Check in attendees
Scan tickets or find guests by name on the Check-in screen, read the verdict, undo a mistake, and keep checking in when the venue Wi-Fi drops.
Where to find it: Onsite › Check-in › At the door › Check-in
The Check-in screen is where you welcome guests at the door. Scan the QR code on their ticket or find them by name, and the screen shows in a large colour verdict whether to let them in. It works on a phone, a tablet or a laptop, and keeps working when the connection drops.
To open it, go to Check-in › At the door › Check-in in Onsite, or click Open check-in on the Overview. The first time on a device, the screen downloads the attendee list (Downloading the attendee list…); after that it opens straight away.
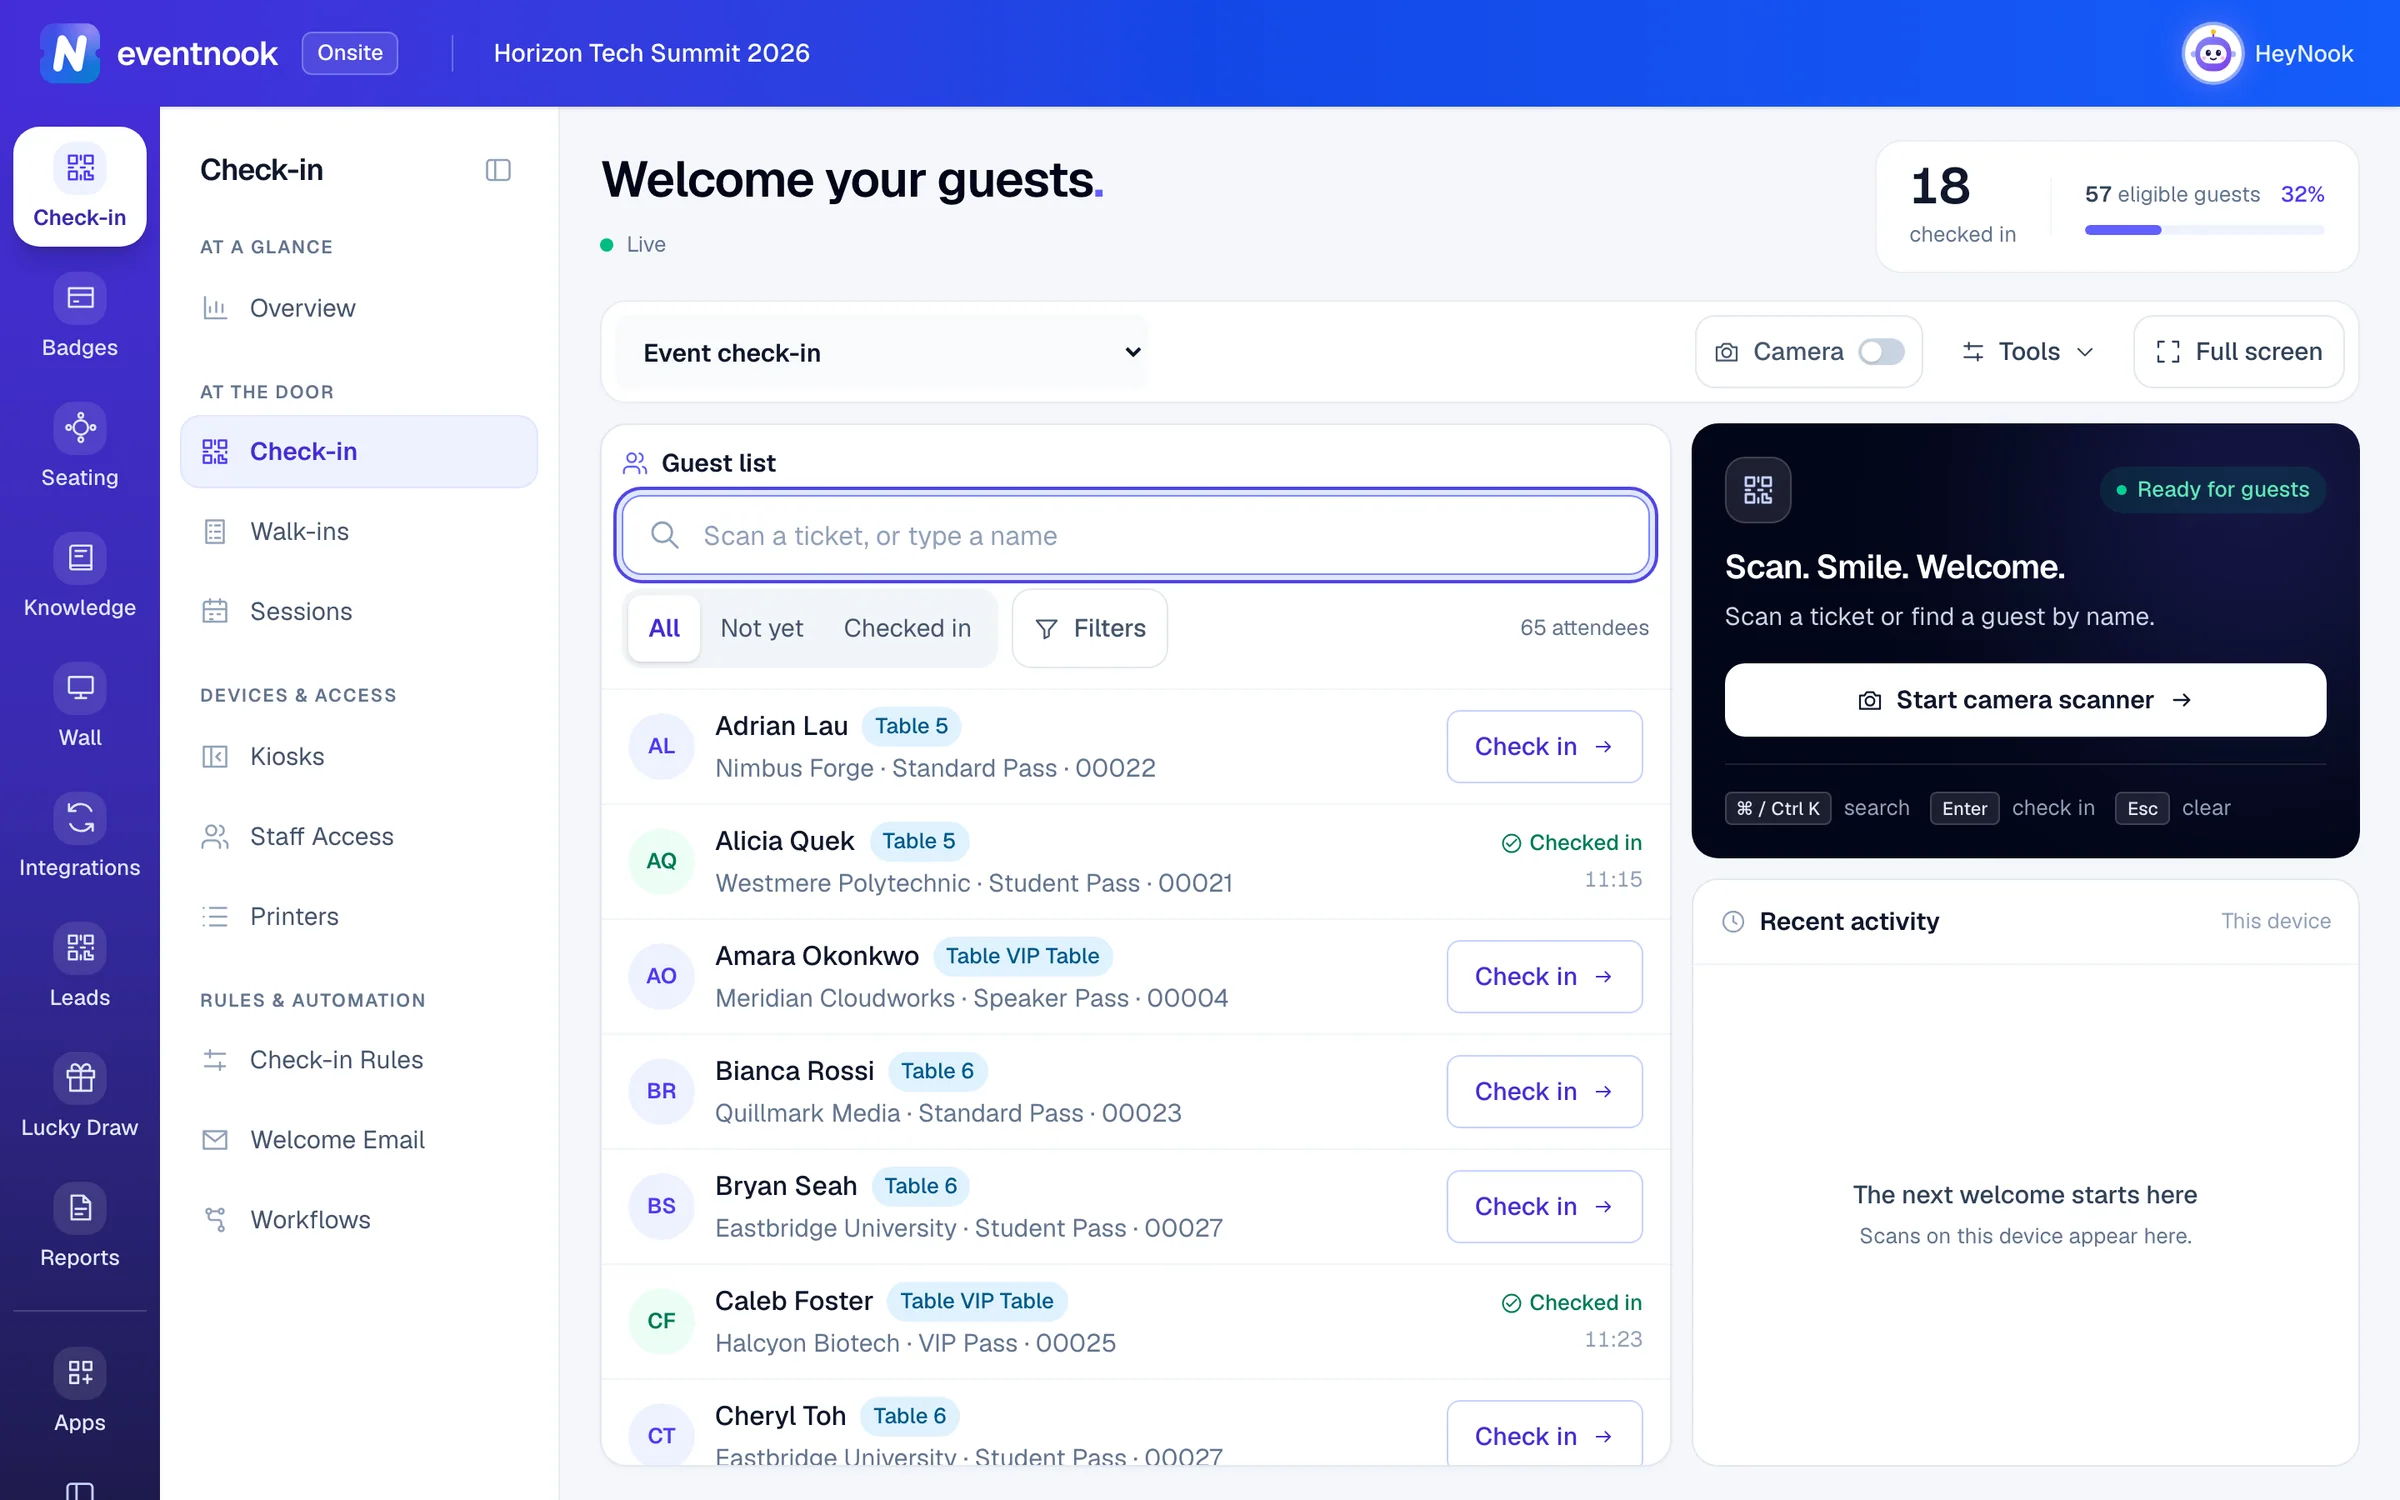
- 1Scan a ticket here, or type a name, company, email or order number
- 2Everyone, those not yet in, or those already checked in
- 3Narrow the list by ticket, category, tag, registration or badge
- 4Scan QR codes with this device's camera
- 5Sound, badge printing and photo options for this device
Check someone in#
Use whichever way suits the device:
- Hand scanner. Scan the ticket's QR code. The scanner types into the search box wherever the cursor is, and the guest is checked in.
- Camera. Turn on Camera (or tap Start camera scanner) and hold the QR code up to it. On a phone or tablet the camera starts by itself. Use Light for a dark room and the switch-camera button to change cameras.
- By name. Type a few letters of their name, company, email or order number in Scan a ticket, or type a name, then click Check in on their row.
Press Enter in the search box to check in a scanned or typed ticket code, or the one guest whose name matches exactly. A close match is never checked in with Enter: click Check in on the right row.
On a laptop, ⌘ K or Ctrl K jumps to the search box and Esc clears it.
Read the verdict#
Every scan shows its answer in the panel on the right, with the guest's name, ticket, company, and their table and category when they have one.
| Verdict | Colour | What to do |
|---|---|---|
| Checked in | Green | Welcome them in. |
| Already checked in | Amber | They are in already. The verdict says when and where they were first scanned. |
| Not admitted | Red | Don't let them in yet. The verdict says why, such as This registration was cancelled. or This ticket type is not admitted at this check-in. |
After 10 seconds the colour calms and the card is marked Last scan, so the next guest isn't waved in on the previous guest's green. A short sound plays with each verdict; turn it off under Tools › Sound.
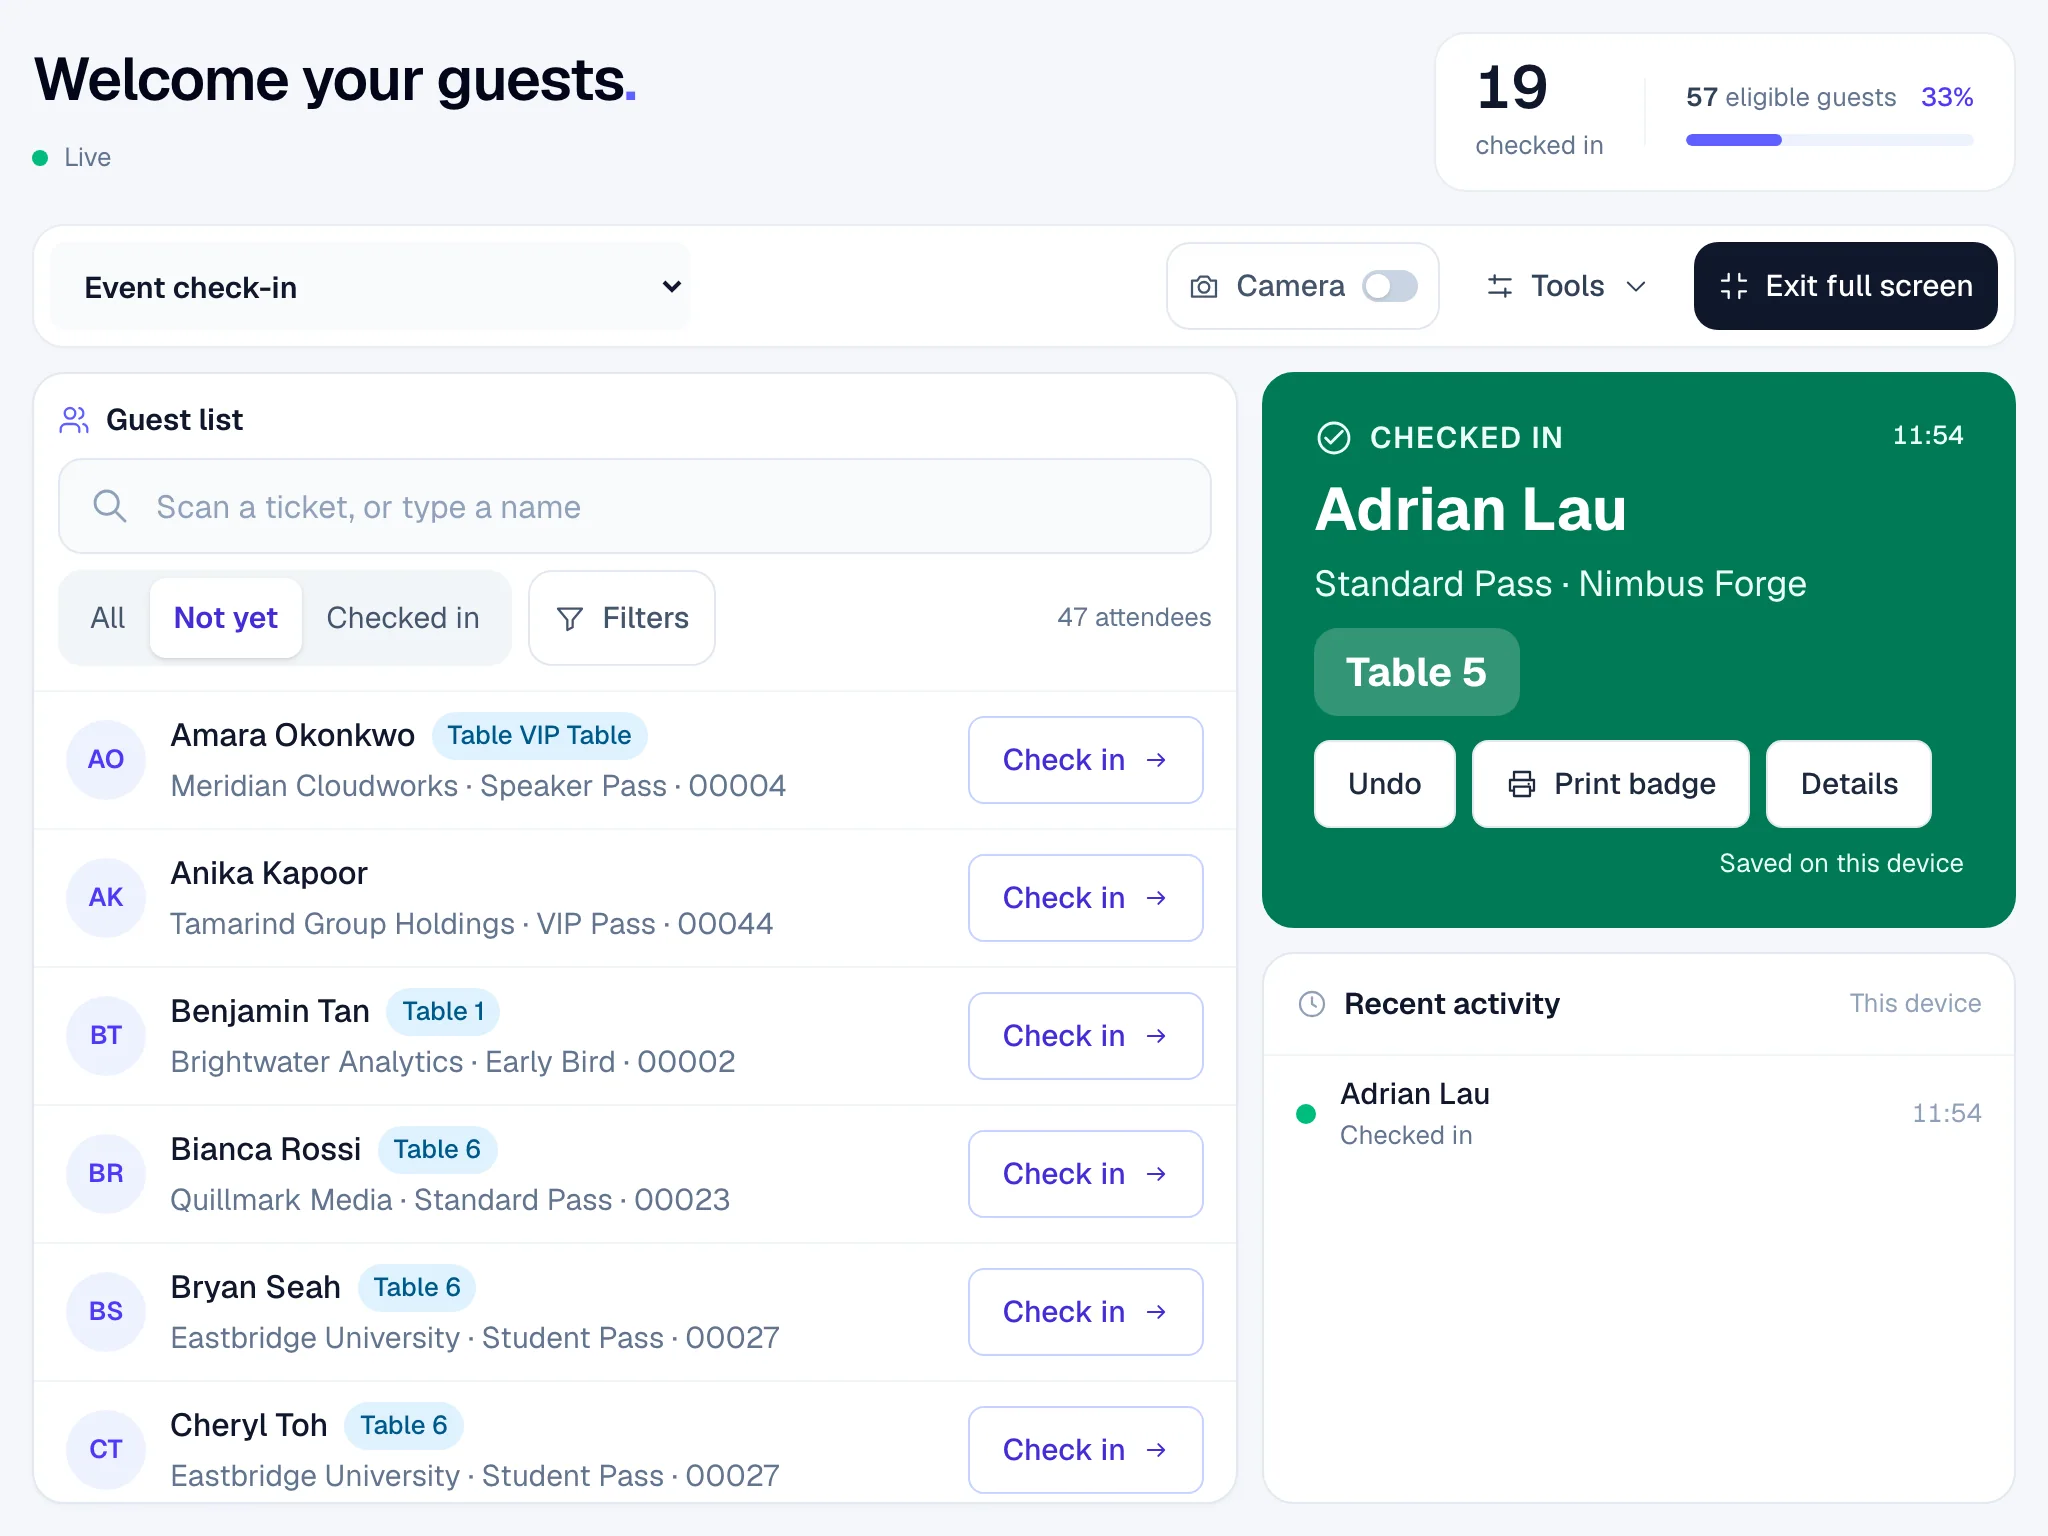
- 1Undo a check-in made by mistake
- 2Print or reprint their badge
- 3Open their details, ticket and activity
- 4Leave full screen
Why a guest is not admitted#
| The verdict says | Why |
|---|---|
| This registration is not approved yet. / This order is not approved yet. | The registration waits for approval or payment. To admit these guests, change Check-in rules. |
| This ticket type is not admitted at this check-in. | The check-in rules admit only some tickets. |
| This ticket code was replaced or cancelled. Ask for the latest ticket. | They scanned an old e-ticket. Their latest email has the current one, or find them by name. |
| This ticket is for a different event. | The QR code belongs to another event. |
| No registration matches this code. | The code isn't one of this event's tickets. Find them by name instead. |
| Not in the downloaded list. Reconnect to check this code. | The device is offline and doesn't know this code yet, for example a ticket issued in the last few seconds. |
| Take their photo first: a photo is needed to check in. | The event requires a photo at check-in. |
Find a group of guests#
The guest list shows All, Not yet or Checked in. To narrow it further:
- Click Filters.
- Tap a Ticket, Category, Tag, Registration status or Badge (Printed or Not printed). Each choice shows how many guests it would list.
- Click Show … guests to close the panel. The filters that are on stay above the list; take one off with its ×, or click Clear all.
Within a group any choice matches; across groups, every group must match. For example, Not yet with the VIP Pass ticket lists the VIPs who haven't arrived. The filters stay in the page's address, so a bookmarked or shared link opens the same list.
Undo a check-in#
- Click Undo on the verdict, or open the guest and click Undo check-in.
- The verdict shows Check-in undone and the guest is listed as not arrived again.
Check-in rules can limit how long staff may undo a check-in. After that time, only someone who can set up Onsite for the event can undo it.
Open a guest's details#
Click a guest's name in the list, or Details on the verdict. The guest opens in three tabs:
| Tab | What it shows |
|---|---|
| Details | Whether they are checked in, their status, category and tags, ticket, company, job title, order, table, how many badges were printed, the sessions they entered, and their photo. |
| Ticket | Their ticket types. Show QR code shows the same QR code as their e-ticket, for a guest without their phone. Opening it is recorded in the check-in log with your name. |
| Activity | Every check-in, refusal, undo, badge print and change for this guest, with who did it and where. |
From here you can also check them in, Print badge, and take a photo when the event uses photos.
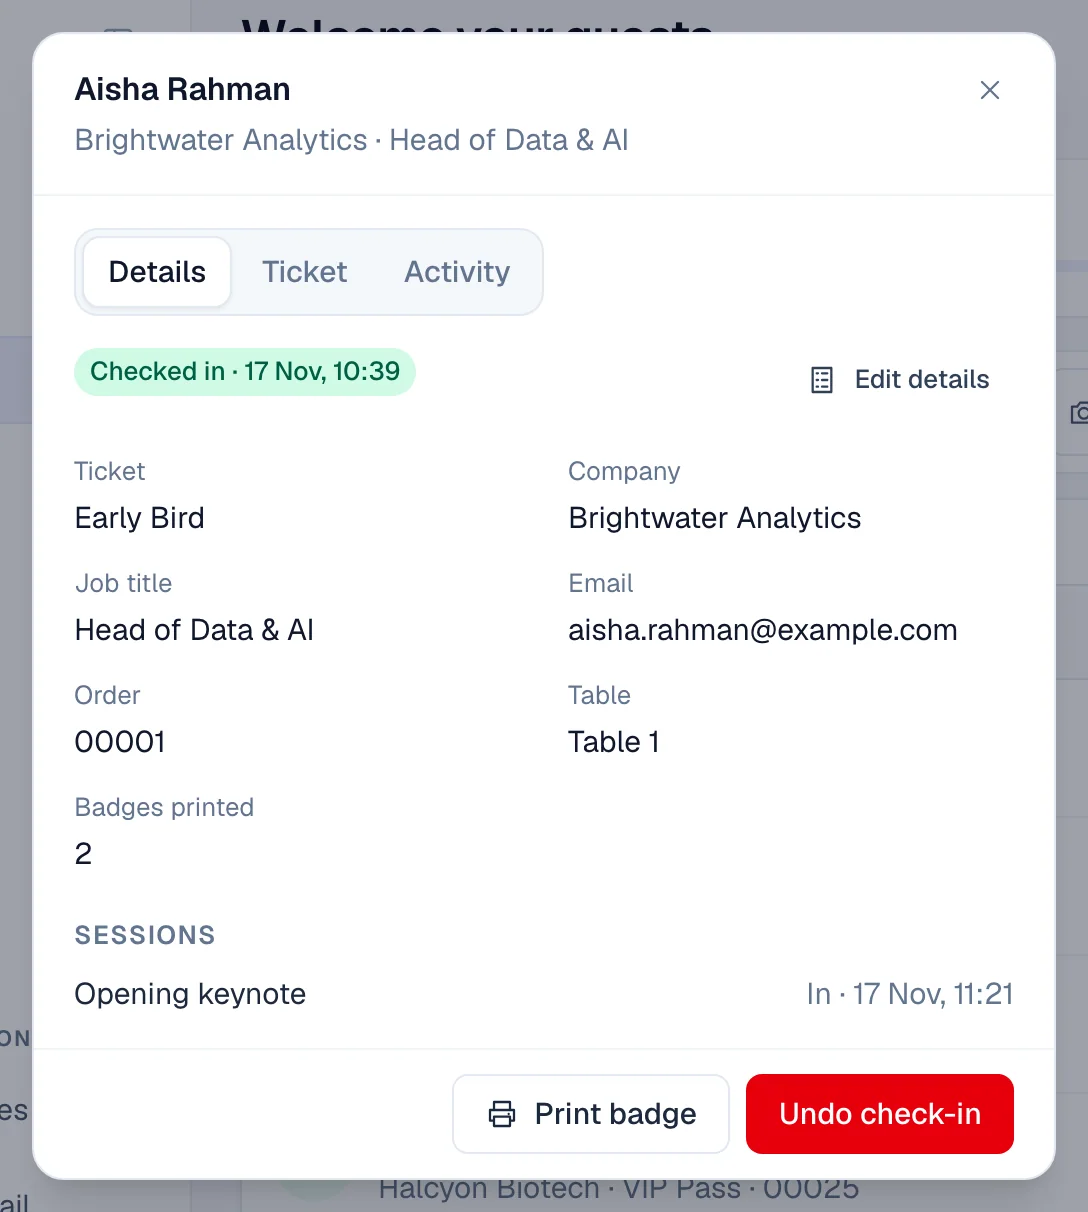
- 1Show their QR ticket to a guest without their phone
- 2Correct their details, or record a substitute
- 3Mark them as not arrived again
Correct details or record a substitute#
If you are signed in with a role that can edit attendees, click Edit details.
- To fix a typo, change the fields and click Save changes. The change is saved to their registration and recorded in the check-in log.
- When a colleague comes in the registered guest's place, tick This is a different person (substitute), type the new guest's details, say Why, and click Save substitute. The check-in log keeps who was registered, and the registered guest's photo is removed so you can take the new guest's.
Print badges#
When the event has a badge template, a guest's badge prints from the verdict or their details with Print badge. A card in the corner shows the badge that was sent, marked First badge or Reprint · copy 2 and so on, with Print again.
Open Tools to choose how this device prints:
| Tool | What it does |
|---|---|
| Auto-print | Prints each guest's badge as they are checked in. It starts on when the check-in rules say to print on check-in. |
| Print to | This device's print dialog, or one of the event's printers. Shown when the event has printers. |
Badges need a connection. Set up badges in Design badges and printers in Printers.
Take photos at check-in#
When Check-in rules ask for a photo, the photo window opens as you check someone in.
- Offer to take one: once they are checked in, take the photo with Take photo and Save photo, or click Skip. Turn the offer off on this device with Tools › Photo.
- Required: the screen shows Photo required. The guest is checked in once you click Save photo and check in, or Check in with this photo when one is already on record. Cancel check-in checks nobody in.
Choose Camera or Upload photo at the top of the window. A photo needs a connection to save.
Check in to a session#
When the event has sessions, choose one in the list at the top left of the toolbar, next to Event check-in. The guest list and counts follow that session, and sessions that track who leaves show Check in and Check out. See Check people in to sessions.
Use full screen at a door#
Click Full screen, or press Ctrl+Shift+F. The screen takes the whole window, without the menu and top bar. Press Esc or click Exit full screen to leave it.
When the connection drops#
The line under the heading shows the connection:
- Live: every scan reaches the server straight away.
- Sending 3 scans…: scans made on this device are on their way.
- Offline — check-in keeps working; 3 scans saved on this device: keep scanning. Verdicts come from the attendee list on the device, marked Saved on this device, and are sent when the connection is back.
If the server disagrees with a verdict made offline, an amber notice says so, for example that a guest turned away is allowed in. Call the guest back, then click Dismiss.
If something looks wrong#
- "You can view onsite, but not check people in". Your role at this event doesn't include check-in. Ask the event's owner for check-in access.
- "Check-in could not start". The device has never downloaded the attendee list and has no connection. Connect once; after that it works offline.
- The camera doesn't start. The browser has blocked it. Allow the camera in the browser's site settings, or use a hand scanner or search by name.
- "There is no badge template for this ticket. Create one under Badge Designer." Add a badge template that covers the ticket.
- Undo is refused. The time staff may undo a check-in has passed. Ask someone who sets up Onsite for the event to undo it.
- A guest was checked in by mistake on another device. Find them on any check-in screen and click Undo check-in. An admin can also undo it on the attendee's record in Event admin, with a reason.
Who can do this#
Owners, Admins, Event Admins and Event Editors can check people in. Members and Event Analysts can open Onsite but not the Check-in screen. A Custom role can if its grid includes check-in. Editing a guest's details needs a role that can edit attendees. Your team can also check people in on their own phones without an EventNook account: see Staff access.
Related guides
- Set the check-in rulesDecide which tickets get in at the event check-in, whether pending registrations are admitted, badges and photos at the door, how long staff may undo, and what staff devices hold.
- Register walk-in guestsRegister guests who arrive without a registration at a walk-in desk, scan their business card to fill in the form, check them in and print their badge, and let your crew run the desk on their own phones.
- Let staff check in on their own devicesGive your team and volunteers an access code so they can check people in on their own phones, tablets or laptops without an EventNook account, and stop any device at any time.
- Design name badgesCreate the badge templates printed at check-in, lay out names, QR codes and pictures, show different things for different people, and check a badge before the doors open.
Still stuck? In EventNook, ask HeyNook. It knows the page you're on and your event, and can take you straight to the right setting.