Design name badges
Create the badge templates printed at check-in, lay out names, QR codes and pictures, show different things for different people, and check a badge before the doors open.
Where to find it: Onsite › Badges › Badge Designer
A badge template is the layout of a printed name badge: the attendee's name, company, ticket and QR code, placed on a page the size of your badge stock. You design it in Onsite, and staff and kiosks print it at check-in.
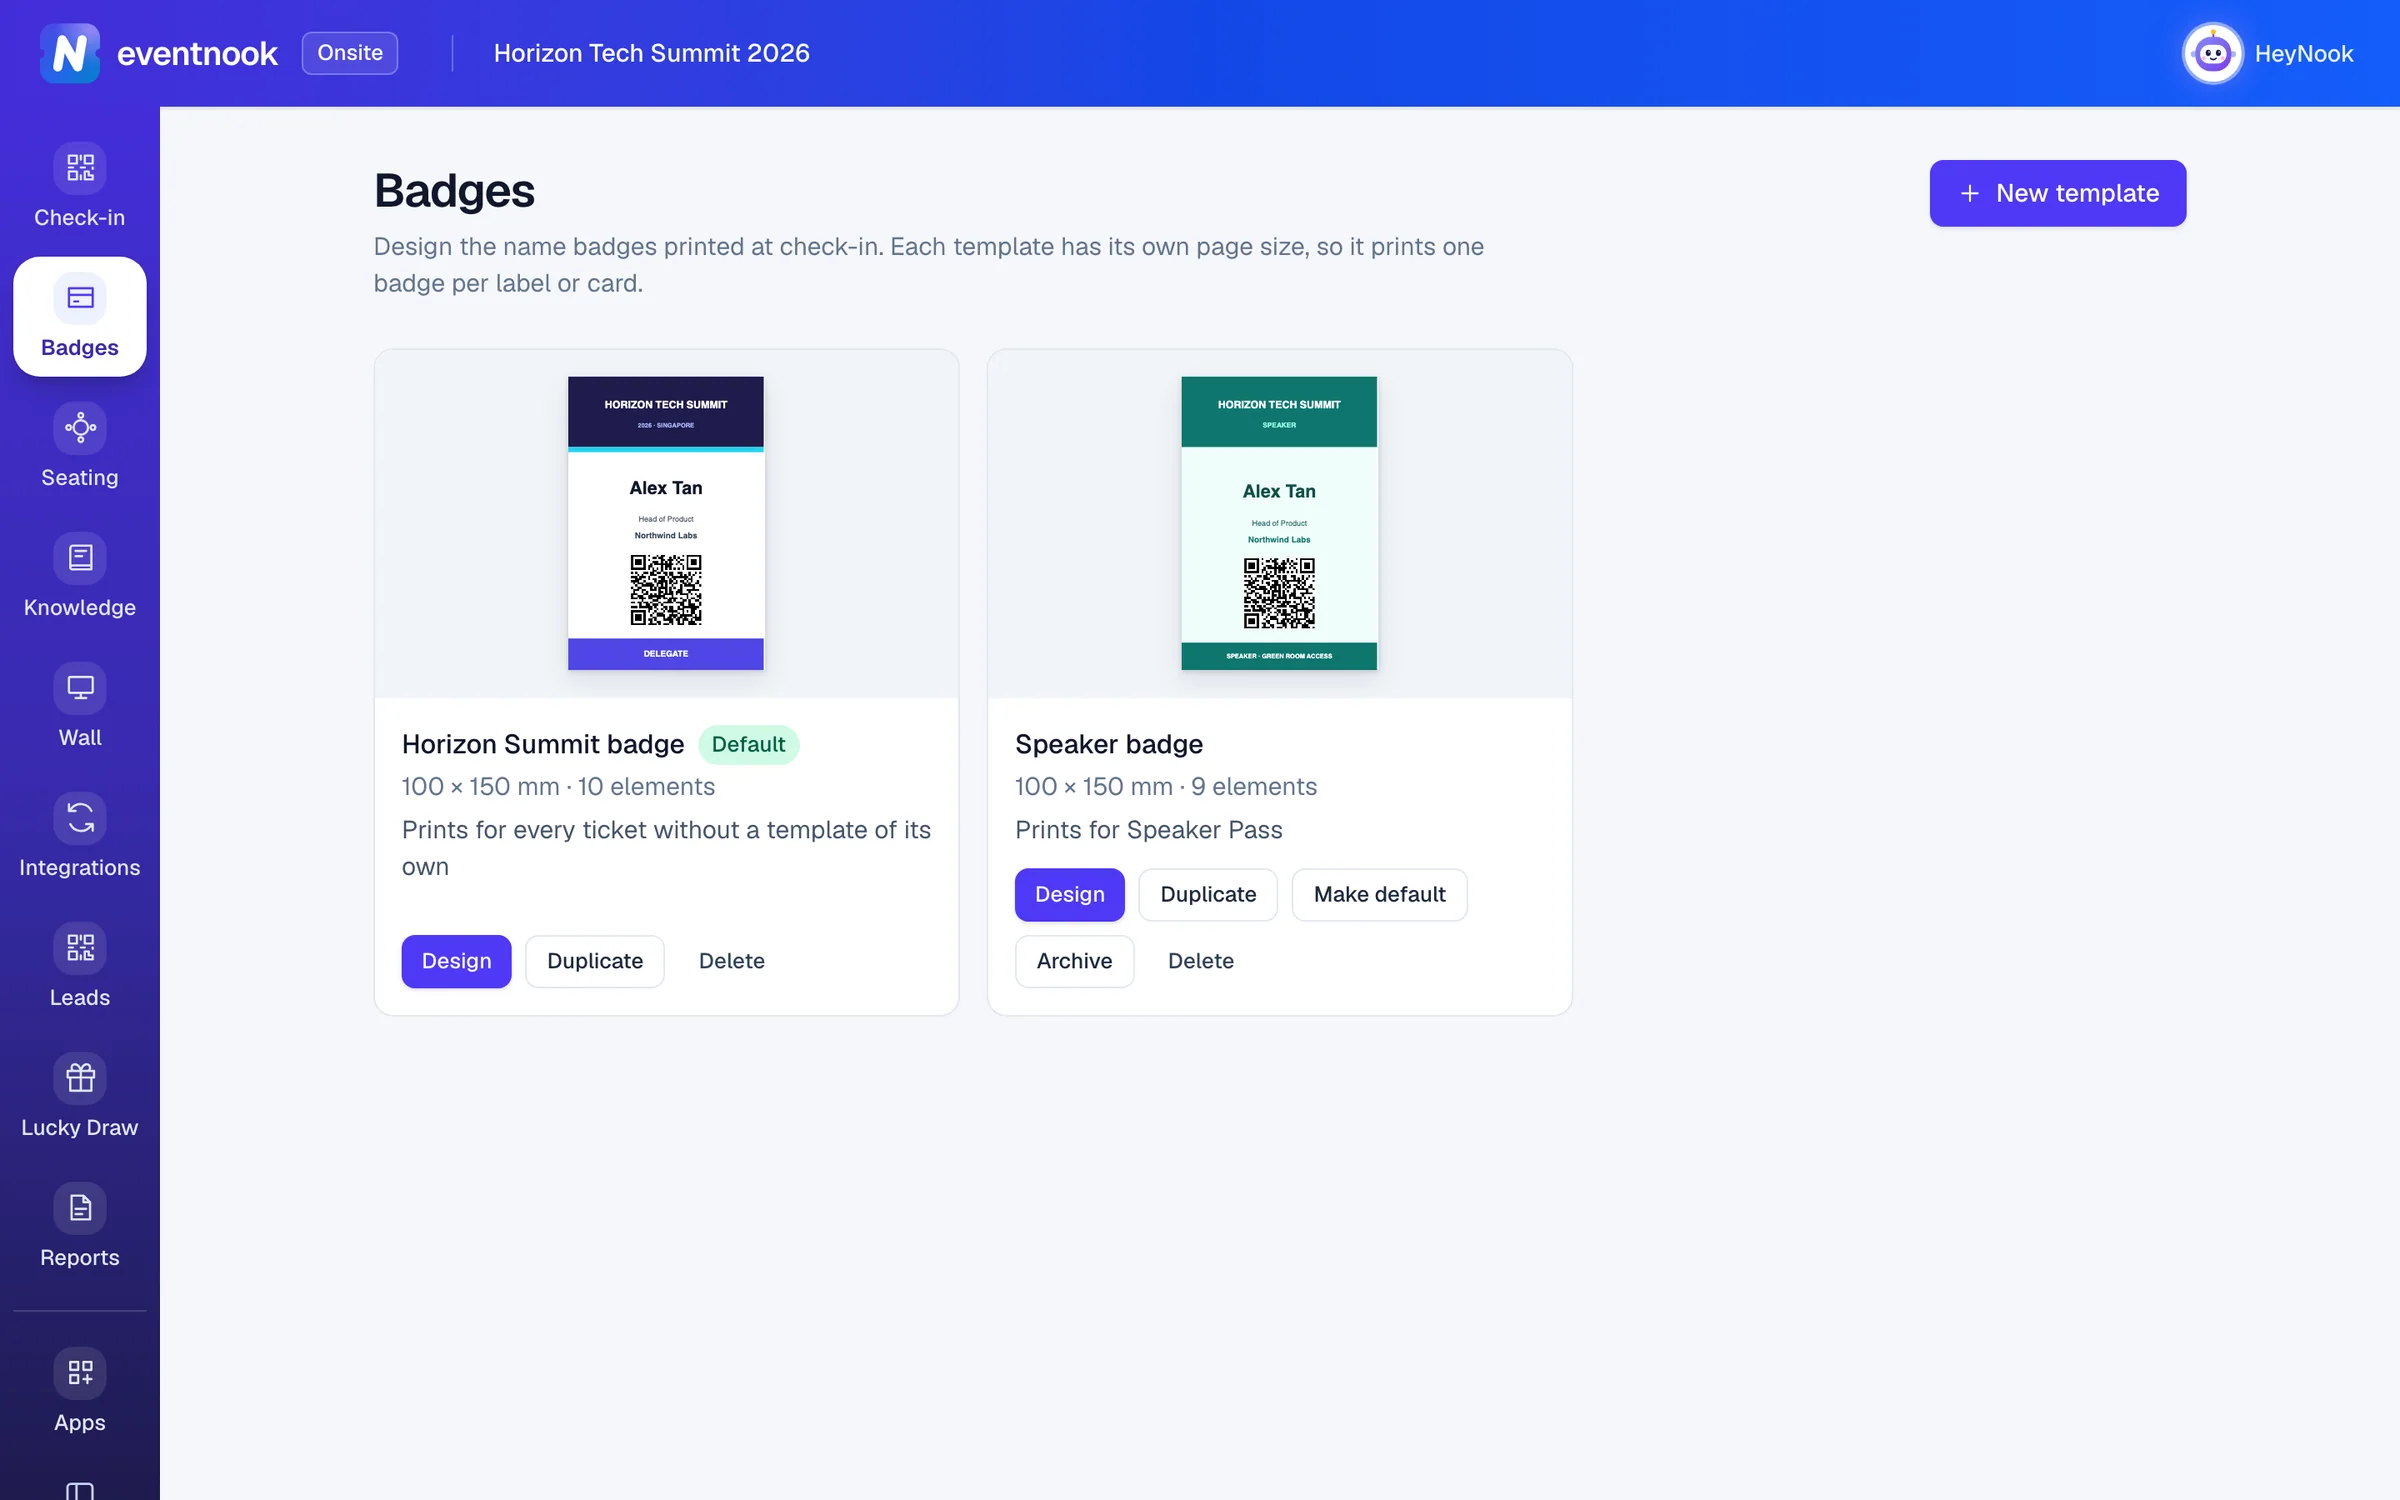
- 1Start a template from a badge size and a layout
- 2Open the template in the designer
- 3Who gets this badge at check-in
- 4Copy a template to make a variant
Create a badge template#
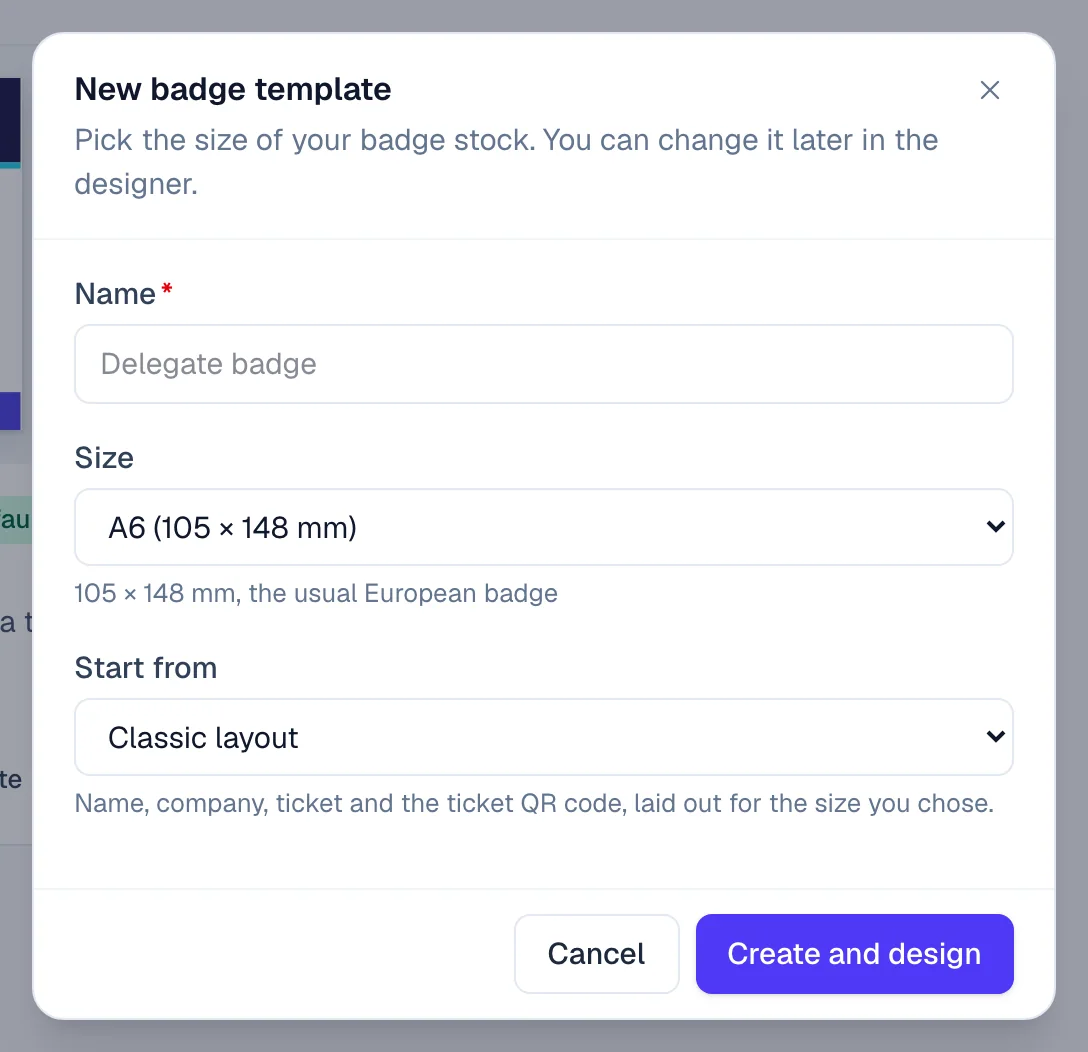
- In Onsite, open Badges and click New template.
- Type a Name, such as
Delegate badge. - Choose the Size of your badge stock. Sizes are grouped as Event badges, Paper sizes, Plastic cards and Label rolls. Choose Custom size for any width and height from 10 to 500 mm.
- Choose what to Start from.
- Click Create and design. The designer opens.
| Start from | What you get |
|---|---|
| Classic layout | Name, company, ticket and the ticket QR code, laid out for the size you chose. |
| Blank | An empty badge. |
| HTML template (write your own) | Your own HTML and CSS, with attendee fields and if/else conditions. See Write the badge as HTML. |
You can change the size later in the designer. The event's first template is its default: it prints for everyone until you add others.
Lay out the badge#
The designer has the tools on the left (Add, Badge and Layers), the badge in the middle with a formatting bar above it, and the selected element's settings on the right.
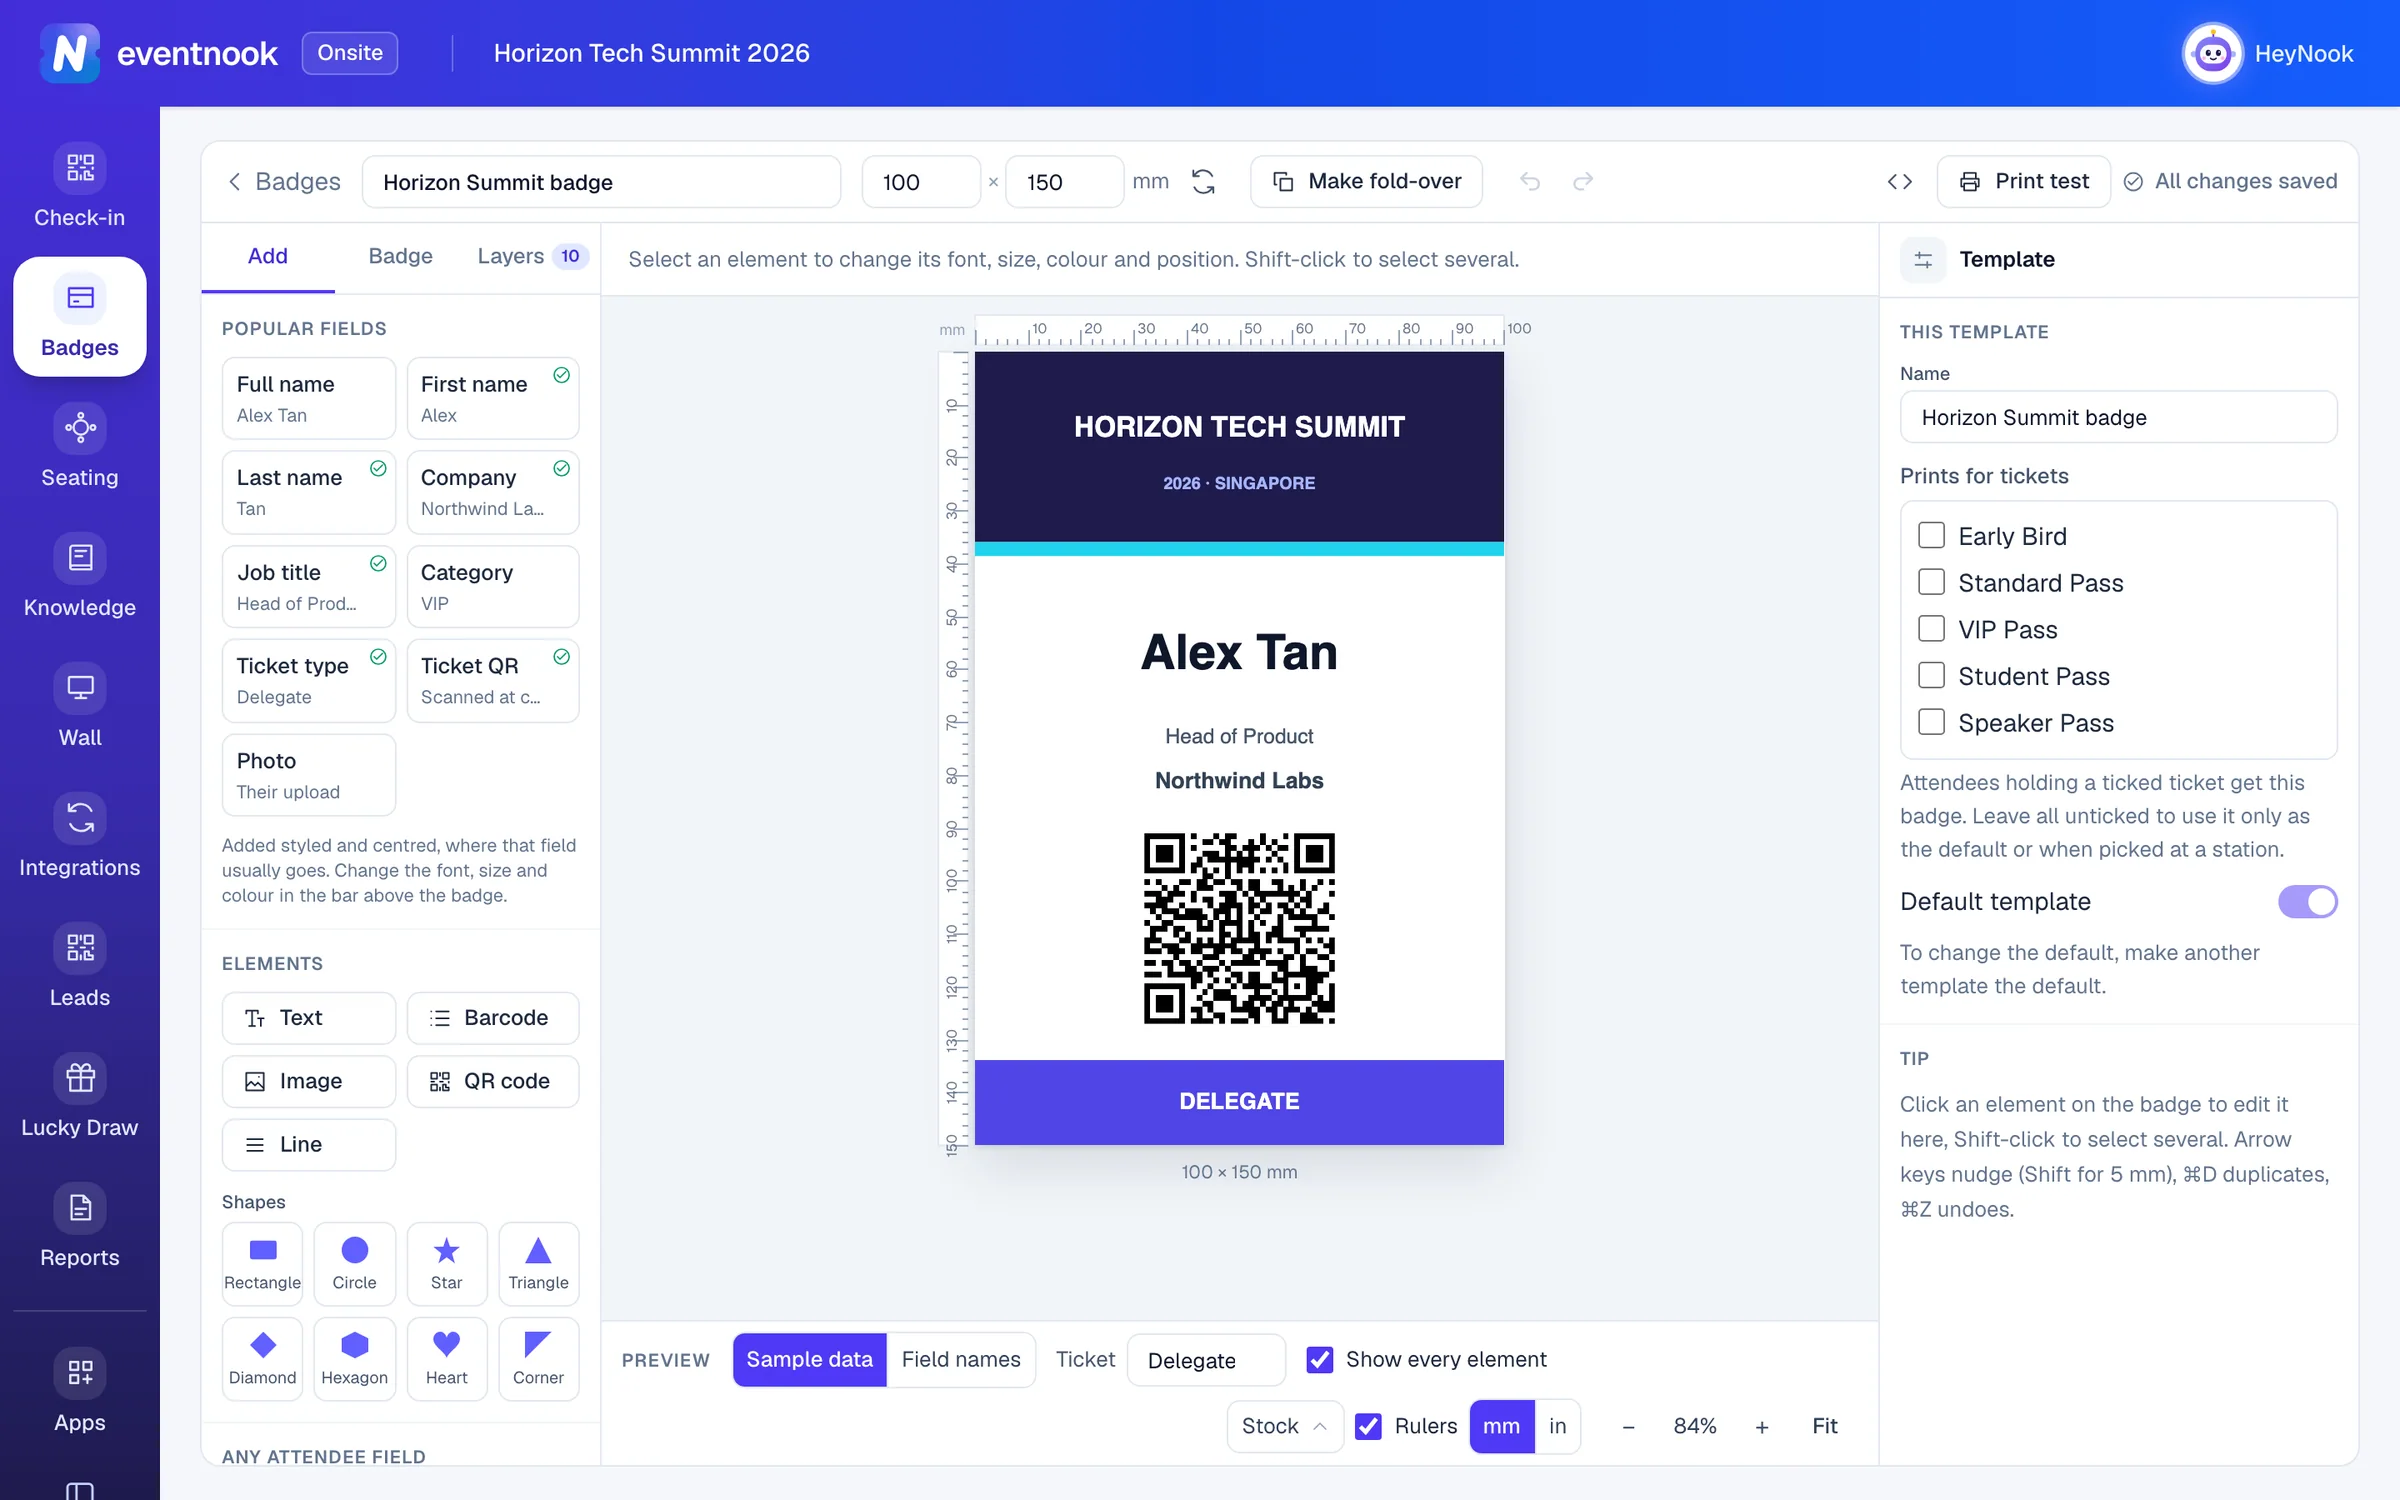
- 1Add a styled field in one click, such as the name or the ticket QR
- 2Size, background, artwork and backgrounds by condition
- 3The tickets this template prints for, and the default
- 4Preview with sample details or with the field names
- 5Print one badge with the preview's details
Add fields and elements#
- In Add, under Popular fields, click a field such as Full name, Company or Ticket QR. It is added styled and centred, where that field usually goes. A tick shows the fields already on the badge.
- Under Elements, add Text, Barcode, Image, QR code or Line, or one of the Shapes.
- Under Any attendee field, click Choose a field… to add any other field: the attendee's details, their registration and your form's own questions.
Photo shows the picture the attendee uploaded, or their initials when they gave none. It needs a photo upload on the registration form, such as the standard Profile Photo field.
Change an element#
Click an element on the badge to select it, or Shift-click to select several. The panel on the right has three tabs:
| Tab | What you set |
|---|---|
| Style | For text: the Content, with fields shown as chips, the font, size, weight and colours, alignment, and Shrink to fit so long names get a smaller size instead of being cut off. For a QR code or barcode: what it Encodes and its colours. For a photo or image: its shape and fit. |
| Position | X, Y, Width, Height and Rotation in millimetres from the top-left corner, and buttons to place it at the badge's edges or centre. |
| Rules | Who the element prints for, and colours that change by condition. See Print some things only for some people. |
A QR code left empty is the attendee's ticket QR code, the one check-in scans. A barcode left empty is the attendee's short code.
The bar above the badge changes the font, size, colour, bold, italic and capitals of the selected text, and lines up several elements. Layers lists every element, top first, to restack, lock, duplicate or delete it.
Arrow keys move the selection by 0.5 mm (Shift for 5 mm), ⌘ D duplicates and ⌘ Z undoes. Click Save changes, or press ⌘ S, to keep your work.
Size, background and artwork#
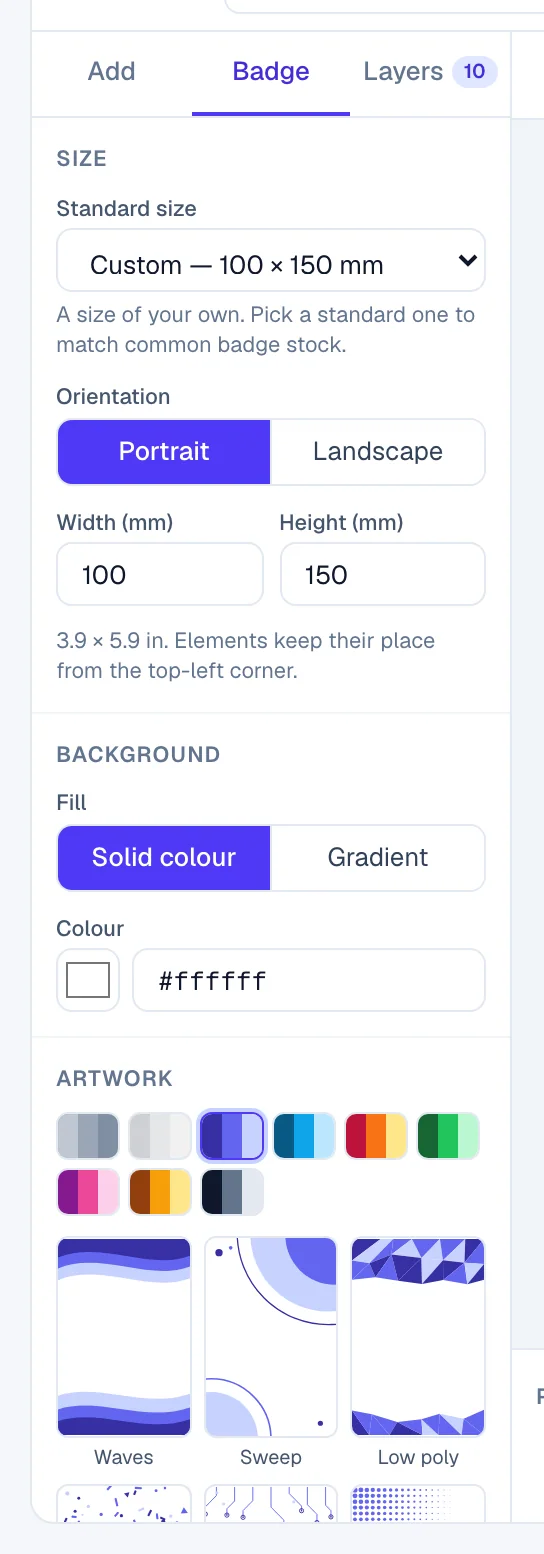
Open Badge in the tools.
| Section | What it does |
|---|---|
| Size | A Standard size or your own Width and Height, and Portrait or Landscape. Elements keep their place from the top-left corner. |
| Background | A Solid colour or a Gradient. |
| Artwork | Ready-made designs in a choice of colours, drawn over the background colour. Choose it again after changing the size. |
| Picture | Upload your own background picture. It fills the badge, over the colour. |
| Background by condition | A different background for some attendees, such as gold for VIPs. |
Pictures can be PNG, JPEG, WebP or GIF. Large pictures are made smaller when you add them.
Stock, under the badge, shows your card's rounded corners and lanyard hole on the canvas, so you can keep names and codes clear of the hole. It is only a preview: it is never saved with the template or printed.
Fold-over badges#
A fold-over badge prints both sides on one sheet that folds in half.
- Click Make fold-over in the top bar.
- Choose Folds across or Folds down the side.
- Leave Copy the design onto the other half ticked to start the other side as a copy, or untick it to start that side blank.
- Click Make fold-over.
The badge keeps its size once folded, and prints on a sheet twice as tall or twice as wide. Set the badge printer's paper to the sheet size the dialog shows. Make one-sided turns it back, and removes the second half.
Print some things only for some people#
One template can print different things for different attendees. Each condition tests a field: is, is not, contains, starts with, is empty and more. Add tests with + Add a test, and choose whether All or Any must hold. Capitals and extra spaces don't matter.
- Select the element and open Rules.
- Under Print it for, tick Only these tickets, or tick Only when… and set a condition, such as Category is
VIP. - Optional: under Colours by condition, click Add a colour rule to change the element's colours for some attendees, such as a gold band with white text for VIPs.
- For the background, open Badge and click Add a background rule under Background by condition.
The first rule that holds wins. Everyone else gets the element's own colours or the main background. In Layers, an element that prints only for some attendees is marked if.
To see a badge as a particular attendee would get it, type values into the Preview bar under the badge, or choose a ticket in Preview as ticket. Untick Show every element to hide what wouldn't print for those values.
Choose which badge each person gets#
At check-in, a badge prints from:
- the template set on the station or kiosk that prints it, if one is chosen there;
- otherwise, the template made for the attendee's ticket;
- otherwise, the event's default template.
To make a template print for some tickets, click on an empty part of the canvas so nothing is selected, then tick the tickets under Prints for tickets and save. To make it the default, turn on Default template, or click Make default on its card. There is always one default: to change it, make another template the default.
Each card on Badges says who it prints for. A template with no tickets that isn't the default prints only when a station is set to print it. To set a station's template, see Kiosks and Staff access.
Copy, archive or delete a template#
- Duplicate makes a copy to change, such as an exhibitor version of the delegate badge.
- Archive keeps a template you don't print now; Restore brings it back. The default can't be archived.
- Delete removes a template. Stations set to print it fall back to the ticket's template or the default.
An event can hold up to 50 badge templates.
Check the badge before the event#
- In the Preview bar, switch between Sample data and Field names to see the badge with sample details or with the fields it reads.
- Click Print test. The device's print dialog opens with one badge, drawn with the preview's values.
- In the print dialog, choose the badge printer, set the paper to the badge's size and turn off any scaling.
To check a real attendee's badge, click Debug, the code button beside Print test. The debug window shows the badge as check-in makes it. Under Render for, find an attendee: it shows their values and which template check-in would print for them and why. Choose a station under Printed at to see what that station would print. Values lists every field the template reads, and calls out the ones that are empty or unknown, which print nothing.
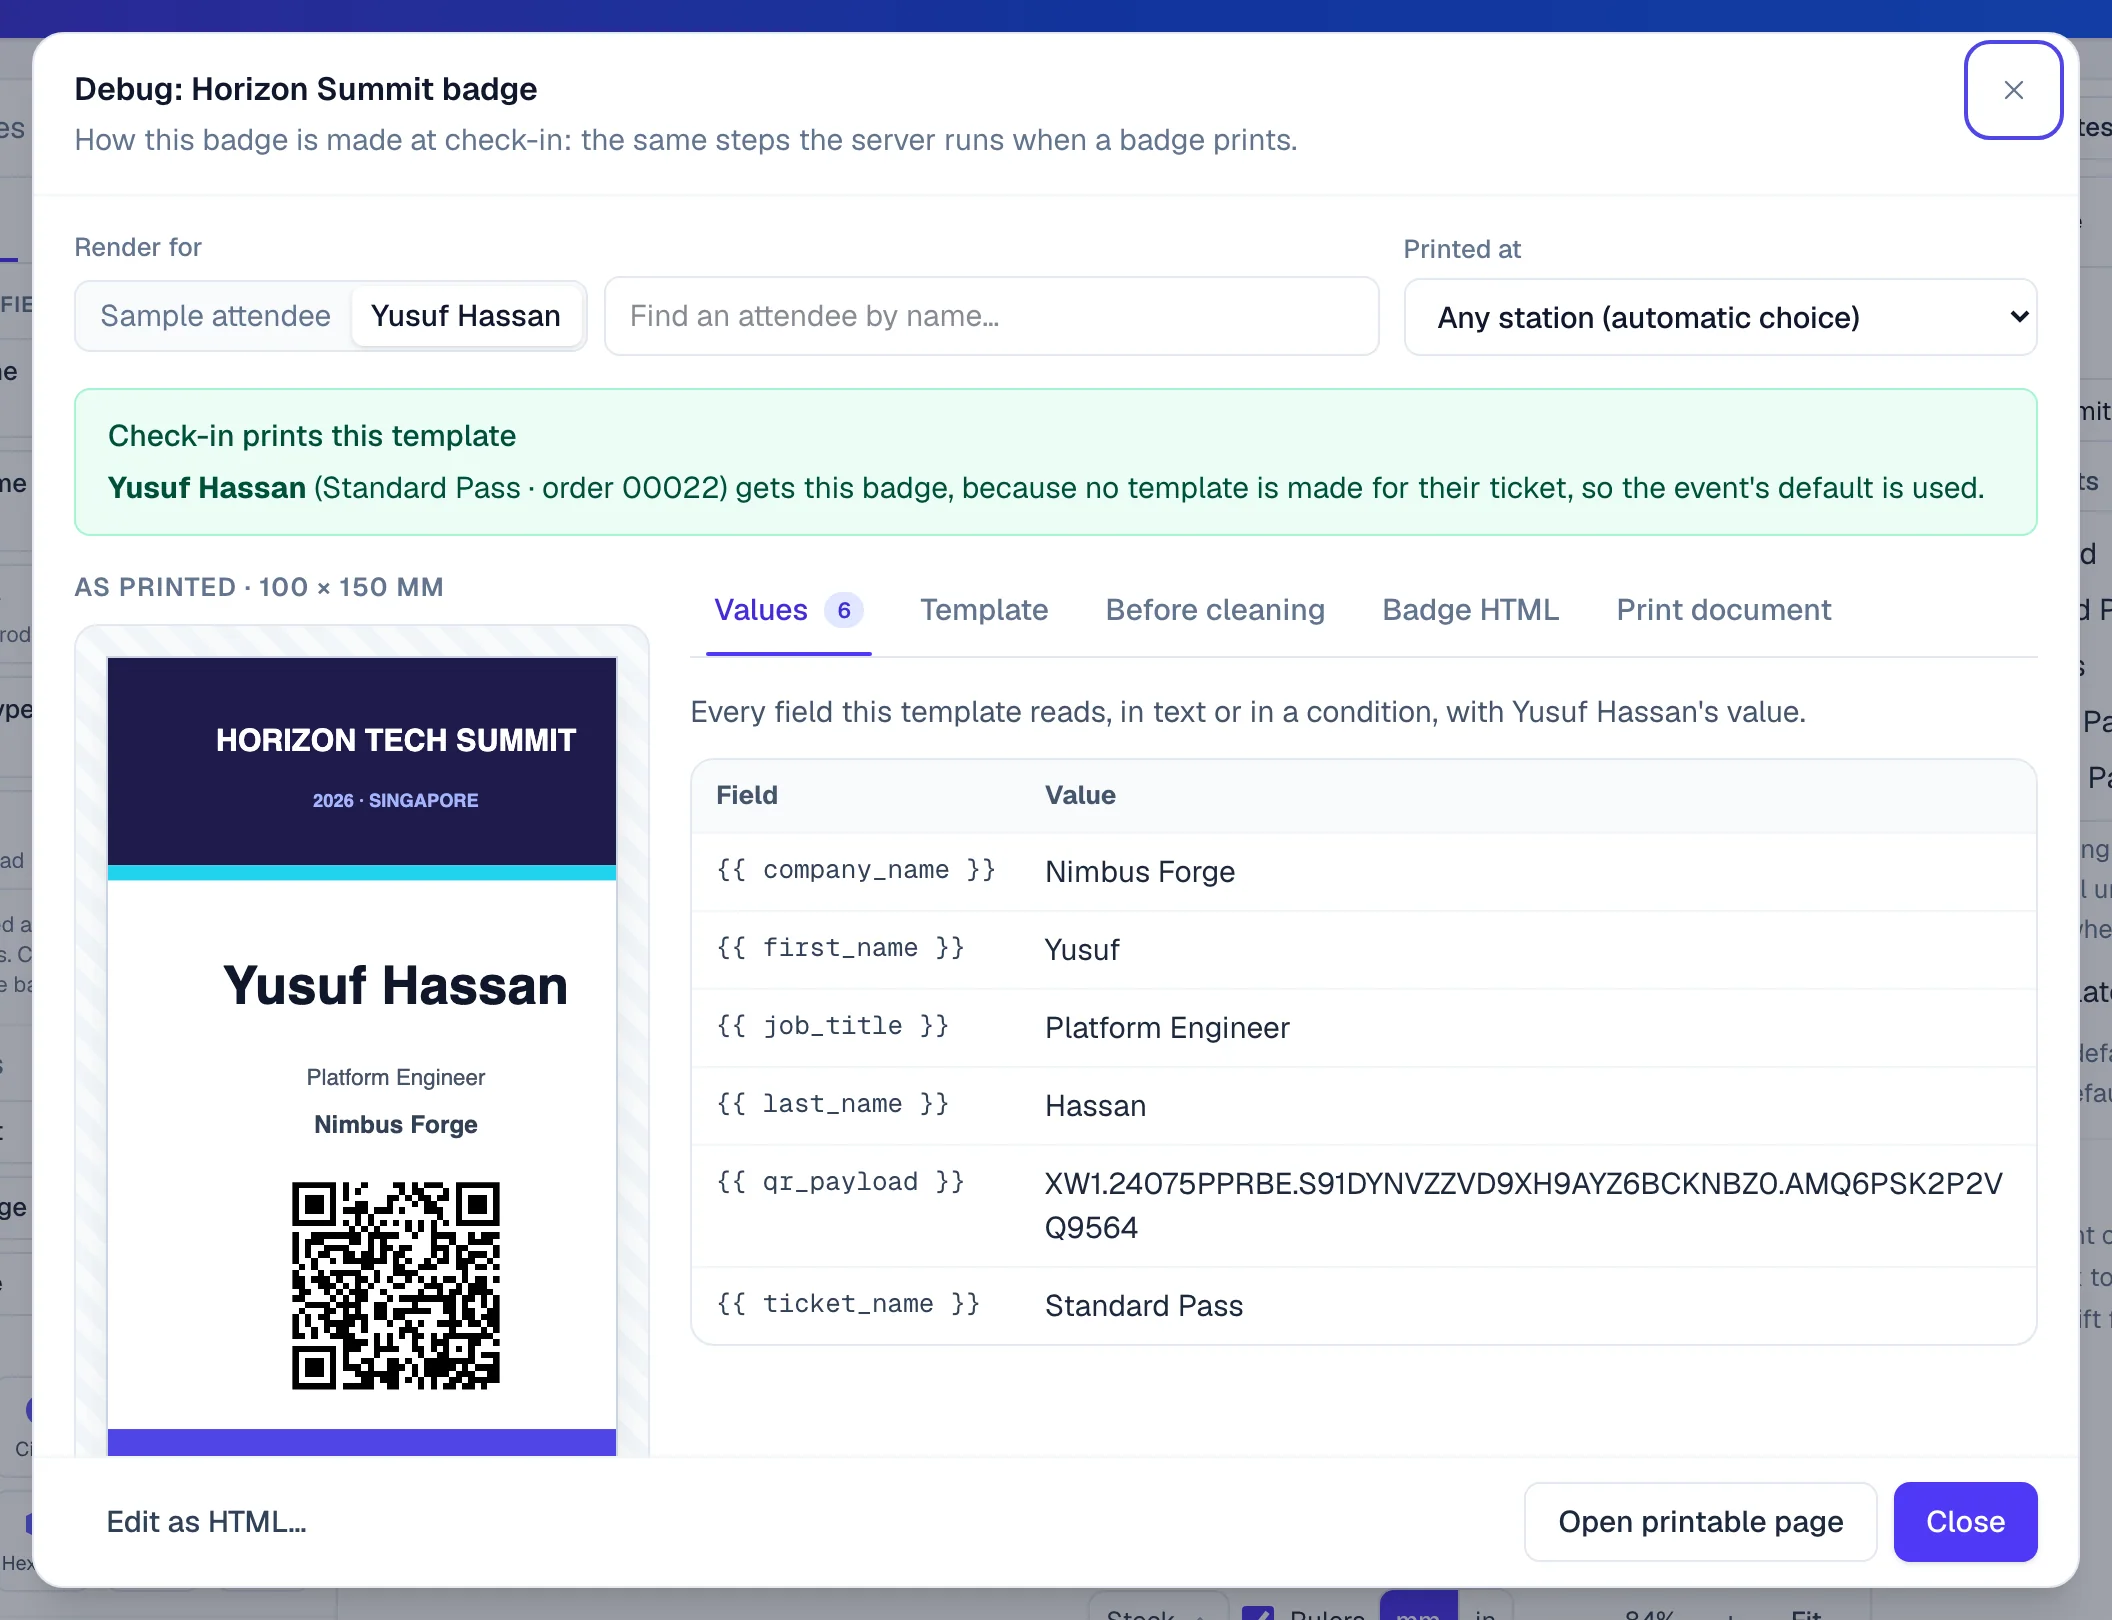
- 1Show the badge with a real attendee's details
- 2Check which badge a station would print for them
Design with @Badge#
@Badge is the badge specialist in HeyNook, at the top of Onsite. Ask it to design a new badge or change one, such as "make the VIP badges gold" or "add the company under the name".
- For a badge open in the designer, its answer has Apply to this badge. The change lands on your draft: Save changes keeps it, and Undo takes it back.
- From anywhere else, its answer has Open in the badge designer, which opens the badge with the change on the draft.
- For a new badge, Review and create the badge shows it as it will print. Click Create and design to create it.
@Badge never saves a badge for you. See HeyNook.
Write the badge as HTML#
For layouts the visual designer can't do, write the badge as HTML and CSS. Choose HTML template (write your own) when you create the template, or click Debug in the designer and then Edit as HTML…. Save the design first.
In the HTML editor, Insert a field at the cursor and Insert a snippet… add fields, conditions, the ticket QR code, barcodes and an attendee photo. Problems are listed with their line as you type, and a template with problems can't be saved. The preview beside it is the badge that prints.
Back to visual designer returns the template to the layout it had in the designer, and discards the HTML.
If something looks wrong#
- A badge prints too small, shifted or on two pages. The printer's paper size or scaling is off, not the design. Set the paper to the badge's size and turn off fit to page. On a cloud printer, adjust its calibration: see Set up badge printers.
- Some text is missing on a printed badge. The attendee's field is empty, or a condition doesn't hold for them. Open the debug window and choose that attendee under Render for.
- An attendee got a different badge from the one you expected. A station's own template wins over the ticket's. The debug window says which template prints for them, and why.
- The photo element says the form has no photo upload. Add the Profile Photo field, or any file upload field, to the registration form.
- Save says the design is too large. It is over 1.5 MB, usually because of pictures. Remove an image or use smaller ones.
- "This template was changed elsewhere". Someone saved the template while you were editing. Discard mine and reload continues from their version; Keep editing lets you note your changes first.
Who can do this#
Everyone with access to the event's Onsite can see the badges and open them with View, read-only. Creating, changing and deleting templates needs a role that can change Onsite set-up: Owner, Admin, Event Admin or Event Editor.
Related guides
- Set up badge printersChoose how badges print at check-in, pair a Mac running the Nook Printing Agent, add its printers to the event and follow every print job.
- Set up self check-in kiosksTurn a tablet or touch screen into a kiosk where attendees check themselves in and print their badge, then choose how it behaves and looks.
- Let staff check in on their own devicesGive your team and volunteers an access code so they can check people in on their own phones, tablets or laptops without an EventNook account, and stop any device at any time.
- Check in attendeesScan tickets or find guests by name on the Check-in screen, read the verdict, undo a mistake, and keep checking in when the venue Wi-Fi drops.
Still stuck? In EventNook, ask HeyNook. It knows the page you're on and your event, and can take you straight to the right setting.