Set up badge printers
Choose how badges print at check-in, pair a Mac running the Nook Printing Agent, add its printers to the event and follow every print job.
Where to find it: Onsite › Check-in › Devices & access › Printers
Badges print from the device that checks someone in, or on a badge printer elsewhere in the venue. With cloud printing, an iPad, a phone or a kiosk sends the badge to a named printer on a Mac running the Nook Printing Agent, which prints it with no print dialog, and you see whether each badge printed.
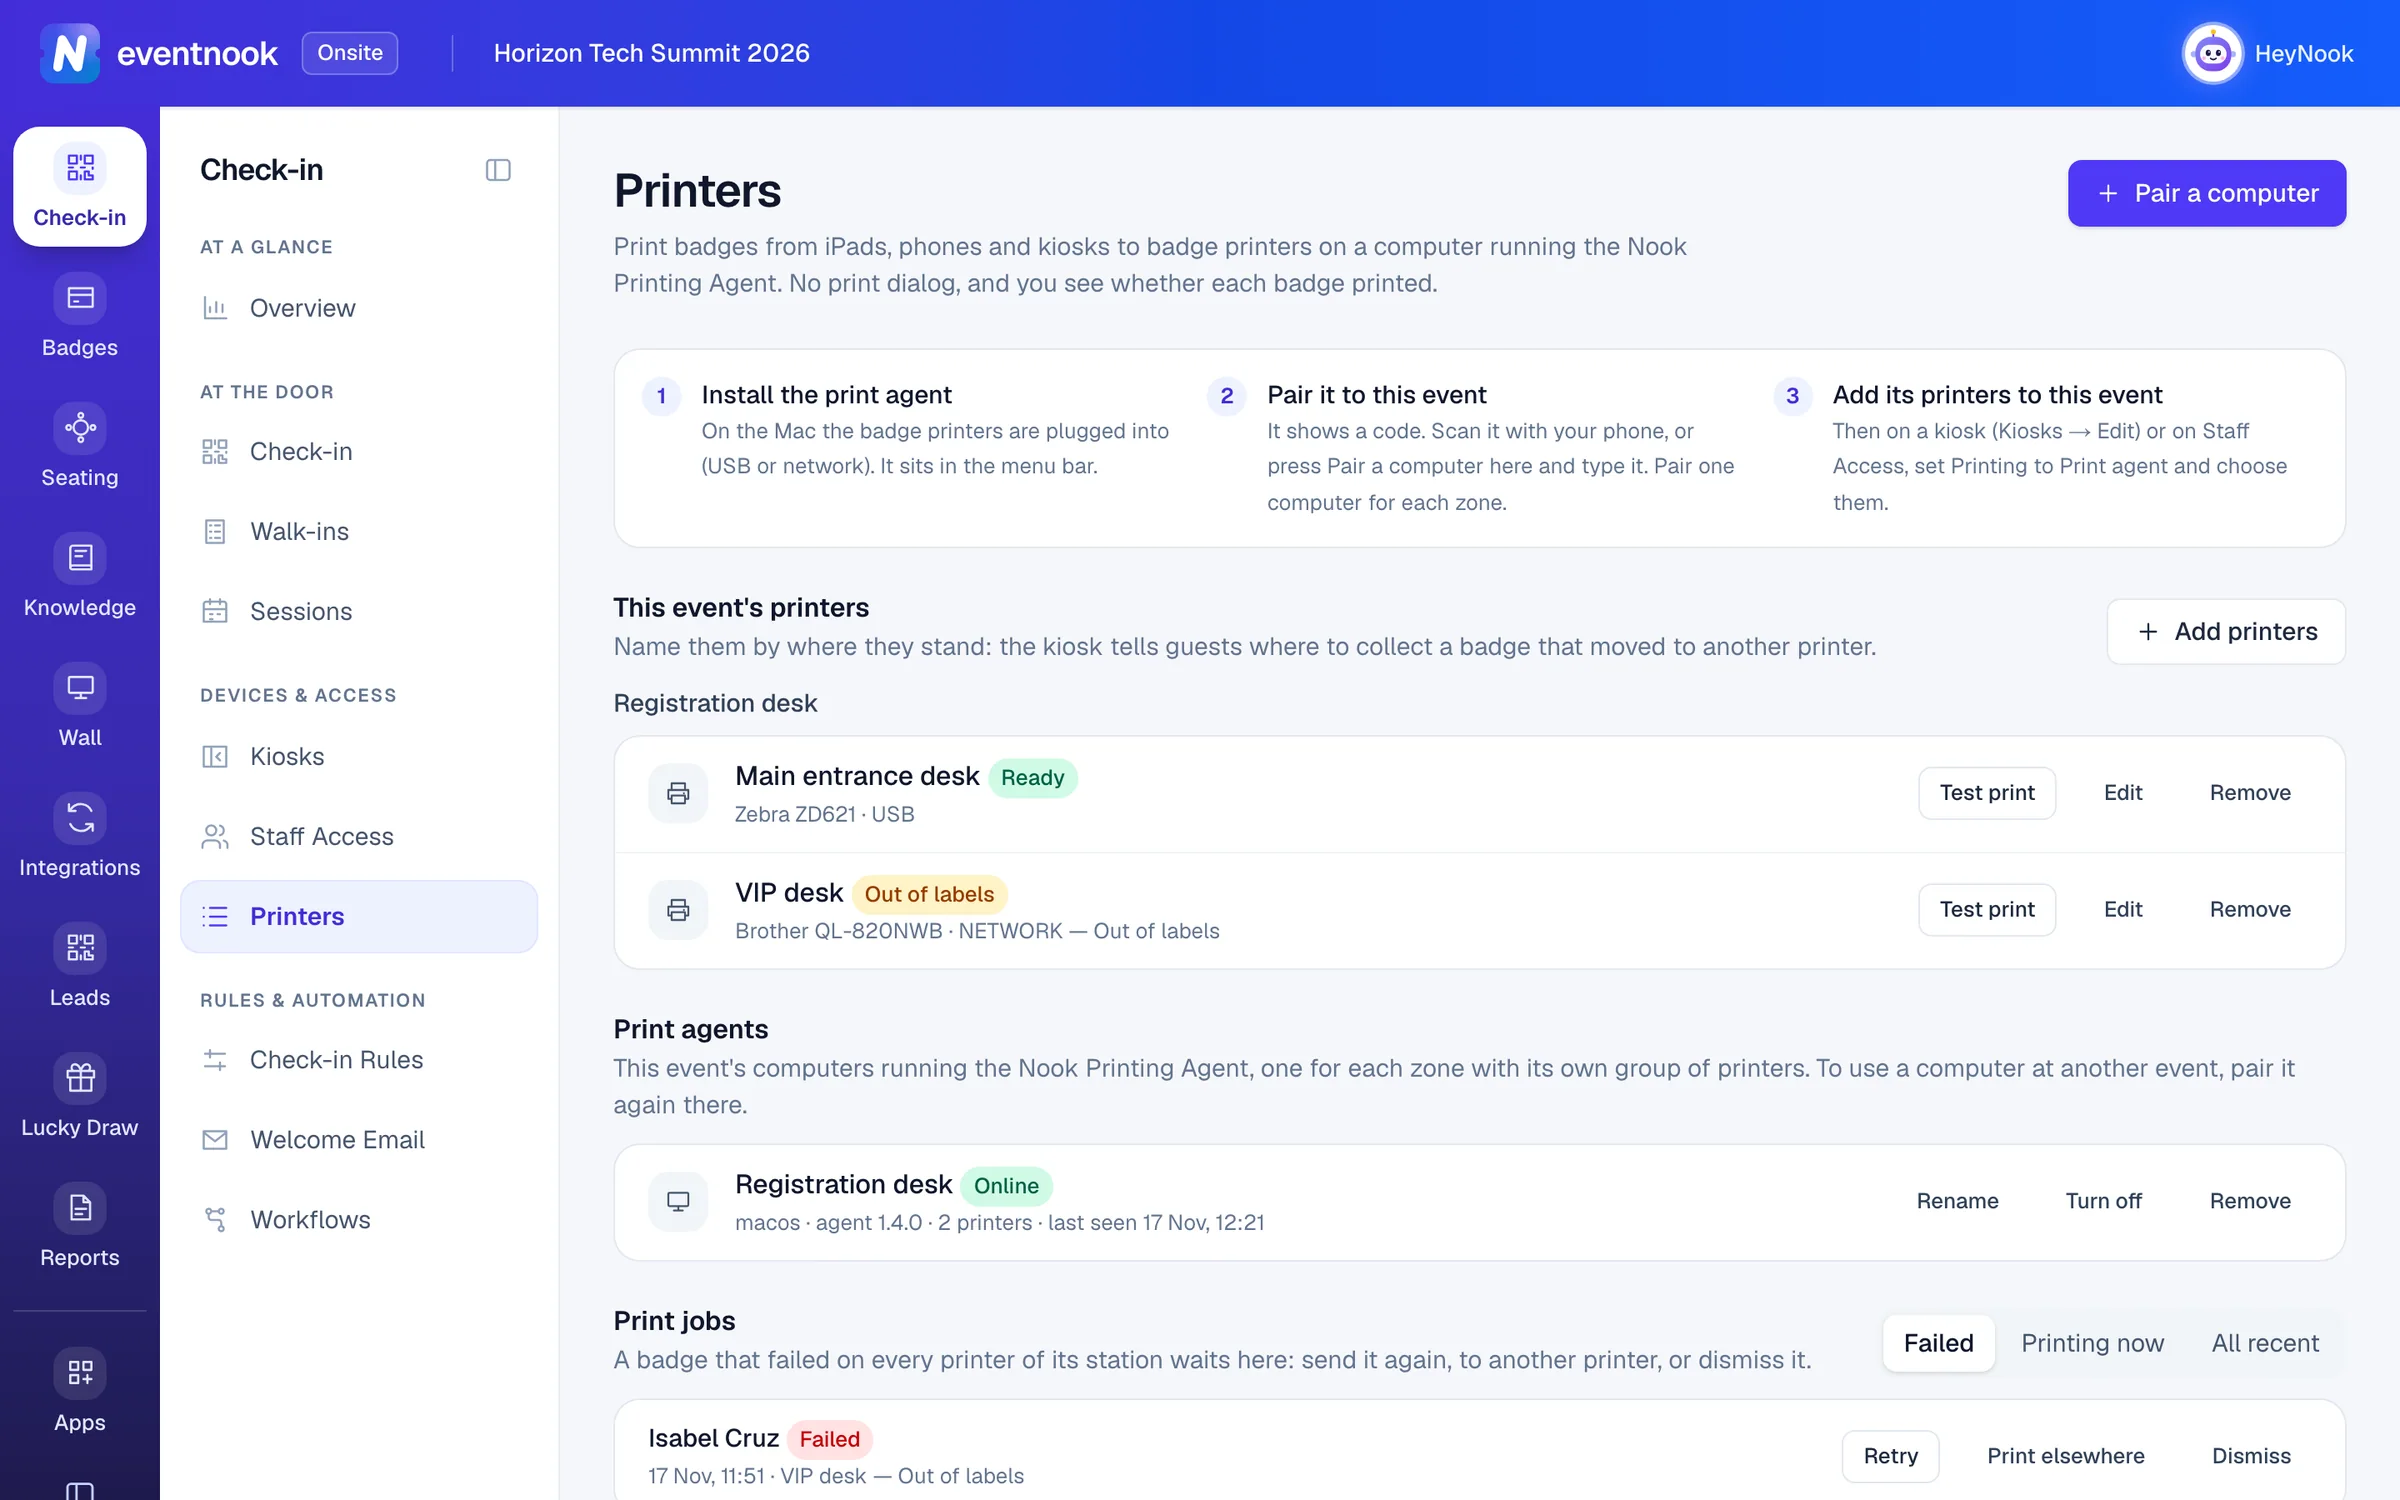
- 1Pair a Mac running the Nook Printing Agent
- 2The printers this event uses, by computer, with their state
- 3The paired computers, one for each zone
- 4Badges sent to the printers, and the ones that failed
Choose how badges print#
Each kiosk and each staff access has its own way to print, set under Badges in its settings on Kiosks or Staff Access.
| Printing | How it works | Use it for |
|---|---|---|
| Browser print dialog | Each badge opens the device's print dialog. | A laptop at a desk with a printer, when someone confirms each print. |
| Silent browser printing (kiosk-printing) | Prints straight to the computer's default printer, with no dialog. The kiosk computer is started with the kiosk launcher. | A kiosk computer with its own printer. |
| Print agent — a named printer, no dialog (cloud printing) | Badges go to the printers you choose, on a Mac running the Nook Printing Agent. | iPads, phones and kiosks with no printer of their own, and several printers in different places. |
Turn off Print badges for a kiosk with no printer beside it: attendees then collect their badge at the desk.
The rest of this guide sets up cloud printing.
Before you start#
- A Mac (macOS 13 or later) with the badge printers connected by USB or on the network, and added in System Settings › Printers & Scanners.
- The Nook Printing Agent app. To get it, ask EventNook.
- A badge template for the event: see Design name badges.
Pair the Mac with your event#
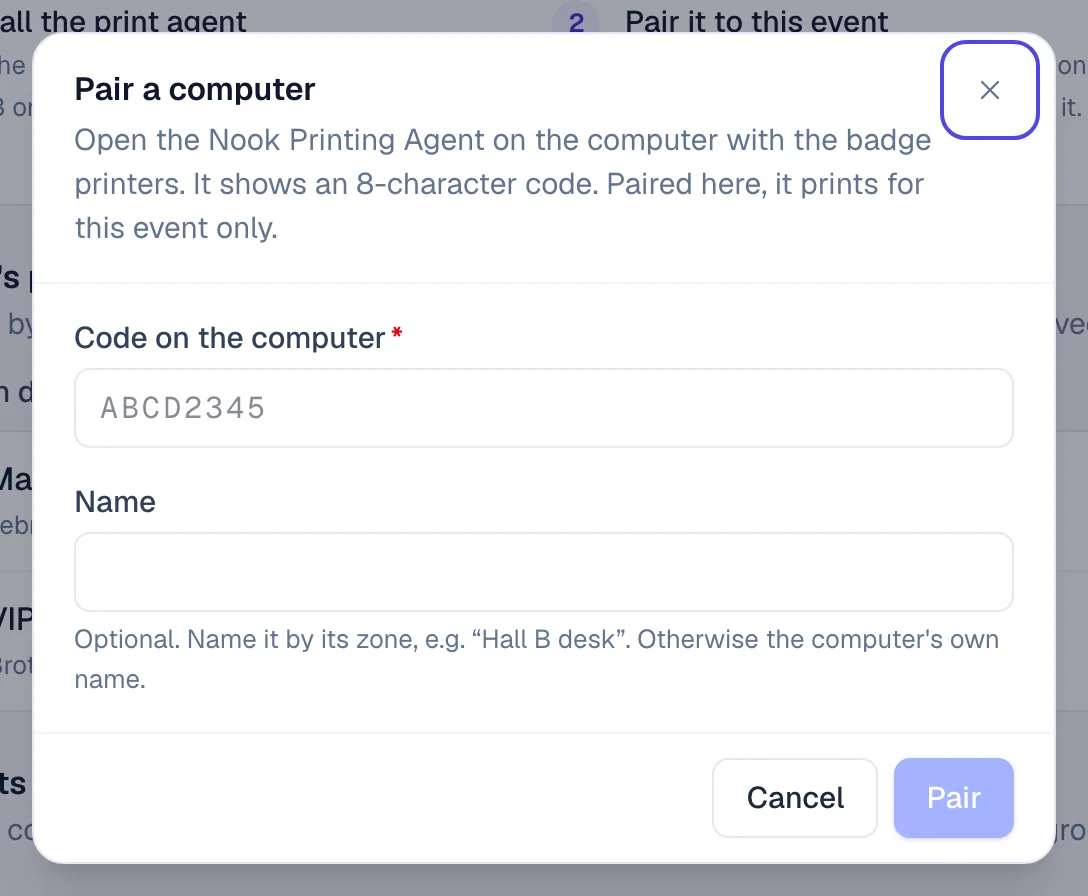
- On the Mac, open Nook Printing Agent. A printer icon appears in the menu bar, and a window shows an 8-character code and a QR code.
- In Onsite, open Printers and click Pair a computer.
- Type the Code on the computer. Optional: give it a Name for its zone, such as
Hall B desk. - Click Pair. The Mac connects within a few seconds and lists its printers.
Or scan the agent's QR code with a phone signed in to Onsite, choose the Event and click Approve.
The agent's window says how long its code works, and shows a new one when it runs out. A paired Mac prints for that event only. Pair one Mac for each zone that has its own printers.
Add the printers to the event#
- On Printers, click Add printers.
- Tick each printer the event uses.
- Give each a Name in this event by where it stands, such as
Badge printer — Lobby. A kiosk tells guests where to collect a badge that moved to another printer, by this name. - Click Add printers. They appear under This event's printers, grouped by computer, with their state.
A printer plugged in after pairing shows in Add printers within 20 seconds.
| State | What it means |
|---|---|
| Ready | Waiting for a badge. |
| Printing | Printing now. |
| Offline | The printer or its computer can't be reached. |
| Out of labels | Load more labels or cards. |
| Jammed | Clear the jam. |
| Cover open | Close the printer's cover. |
| Needs attention | The printer reported another problem. Its message shows beside it. |
Send badges to the printers#
- Open the kiosk or staff access on Kiosks or Staff Access, and go to Badges.
- Set Printing to Print agent — a named printer, no dialog (cloud printing).
- Under Printers, tick the printers it uses, in order. The first one ticked prints; if it fails or goes offline, the badge moves to the next.
- Optional: choose a Badge template, or leave it on Automatic to use each ticket's own template.
- Save.
On the check-in screen, staff can change where their own device prints: open Tools, then choose under Print to: This device's print dialog, This access's printers, or any one printer of the event. The choice is kept on that device. Turn on Auto-print there to print a badge at each check-in. See Check in attendees.
Test and calibrate a printer#
- On Printers, click Test print beside the printer. A test page prints in a few seconds.
- Check that the border sits 1 mm inside the label.
- If it doesn't, click Edit and adjust Calibration: Right (mm) and Down (mm) move the page by up to 10 mm, and Scale (%) sizes it from 90 to 110%. Positive values move right and down.
- Click Save. The calibration applies to every badge that printer prints, and print another test page to check.
Follow print jobs#
Print jobs lists the badges sent to the event's printers. It opens on Failed; Printing now and All recent show the rest. The page updates every few seconds.
A badge that failed on every printer of its station waits under Failed. Click Retry to send it again, Print elsewhere to choose another printer, or Dismiss. A badge still waiting can be cancelled with Cancel.
| Status | What it means |
|---|---|
| Waiting | Sent, waiting for the computer to take it. |
| Printing | The computer took it. |
| Printed | It printed. |
| Failed | It couldn't print, with the reason beside it. |
| Not picked up | No computer took it within two minutes. |
| Dismissed | Someone dismissed or cancelled it. |
Manage the paired computers#
Each computer under Print agents shows whether it is Online, Offline, Not paired or Turned off, with its printers and when it was last seen.
- Rename changes the name people see.
- Turn off stops it taking badges within ten seconds, until you click Turn on. It stays paired.
- Remove stops it printing within ten seconds. It must be paired again to come back.
When a computer is turned off or removed, its waiting badges move to each station's next printer. Remove on a printer takes it out of the event only: it stays on its computer, ready to add again, and jobs already sent finish.
To use a Mac at another event, log it out and pair it again there. On the Mac, choose Log out… from the menu-bar icon. Its printers stop receiving the event's badges, and the event's badge templates are removed from the Mac.
The Nook Printing Agent on the Mac#
The agent keeps printing when its window is closed: the printer icon in the menu bar is the app. Its window has Overview, Print Jobs, Printers, Badge Templates, Connection and Activity.
The menu-bar menu lists each printer and its state, the recent jobs, Test print (a calibration page you can print before pairing), Log out… or Pair this Mac…, Open log and Start at login.
The agent keeps the event's badge templates and draws each badge itself. It never keeps attendees' details: the log and job history show job numbers, printers and results, never a name.
If something looks wrong#
- A badge waits and then shows Not picked up. The Mac is asleep, offline or turned off. Check that the agent shows it is connected, and that the printer is Ready.
- The agent says it is turned off by the organiser. Someone turned it off on Printers. Click Turn on: it starts printing again by itself within a minute.
- A printer is missing from Add printers. Add it in the Mac's System Settings › Printers & Scanners first. It shows within 20 seconds.
- Badges print shifted or the wrong size. Print a test page and set the printer's calibration. The printer's paper should be the badge's size: a fold-over badge prints on a sheet twice its size.
- macOS asks to use your Keychain. Enter your password and choose Always Allow.
- A station's printer list says the event has no printers yet. Pair a Mac and add its printers on Printers first.
Who can do this#
Everyone with access to the event's Onsite can see the printers and print jobs. Pairing computers, adding, editing and removing printers needs a role that can change Onsite set-up: Owner, Admin, Event Admin or Event Editor. Test prints, Retry, Print elsewhere and Dismiss need a role that can check people in.
Related guides
- Design name badgesCreate the badge templates printed at check-in, lay out names, QR codes and pictures, show different things for different people, and check a badge before the doors open.
- Set up self check-in kiosksTurn a tablet or touch screen into a kiosk where attendees check themselves in and print their badge, then choose how it behaves and looks.
- Let staff check in on their own devicesGive your team and volunteers an access code so they can check people in on their own phones, tablets or laptops without an EventNook account, and stop any device at any time.
- Check in with the Nook Check-in desktop appInstall Nook Check-in on a Windows PC or a Mac, get in with an account or an access code, and run a check-in desk with a hand scanner and a badge printer.
Still stuck? In EventNook, ask HeyNook. It knows the page you're on and your event, and can take you straight to the right setting.