Set up self check-in kiosks
Turn a tablet or touch screen into a kiosk where attendees check themselves in and print their badge, then choose how it behaves and looks.
Where to find it: Onsite › Check-in › Devices & access › Kiosks
A kiosk is a screen attendees use on their own: they scan their ticket or find their registration, check in and collect their badge. Any tablet, laptop or touch screen with a browser can be one, and nobody signs in on it.
A kiosk works as soon as you start it, with standard settings and a standard design. Changing them is optional and can be done at any time, even while kiosks are running.
Before you start#
- To print badges at the kiosk, design a badge first in the Badge Designer. Without one, kiosks check people in without printing.
- A kiosk needs a connection. It holds no guest list of its own, so it pauses while it is offline.
Start a kiosk on this device#
- Open Kiosks (in the Check-in menu, under Devices & access).
- Click Use this device as a kiosk. The kiosk opens in a new tab, ready for the first attendee.
If this browser already runs one of the event's kiosks, the button reads Open the kiosk on this device and opens it again.
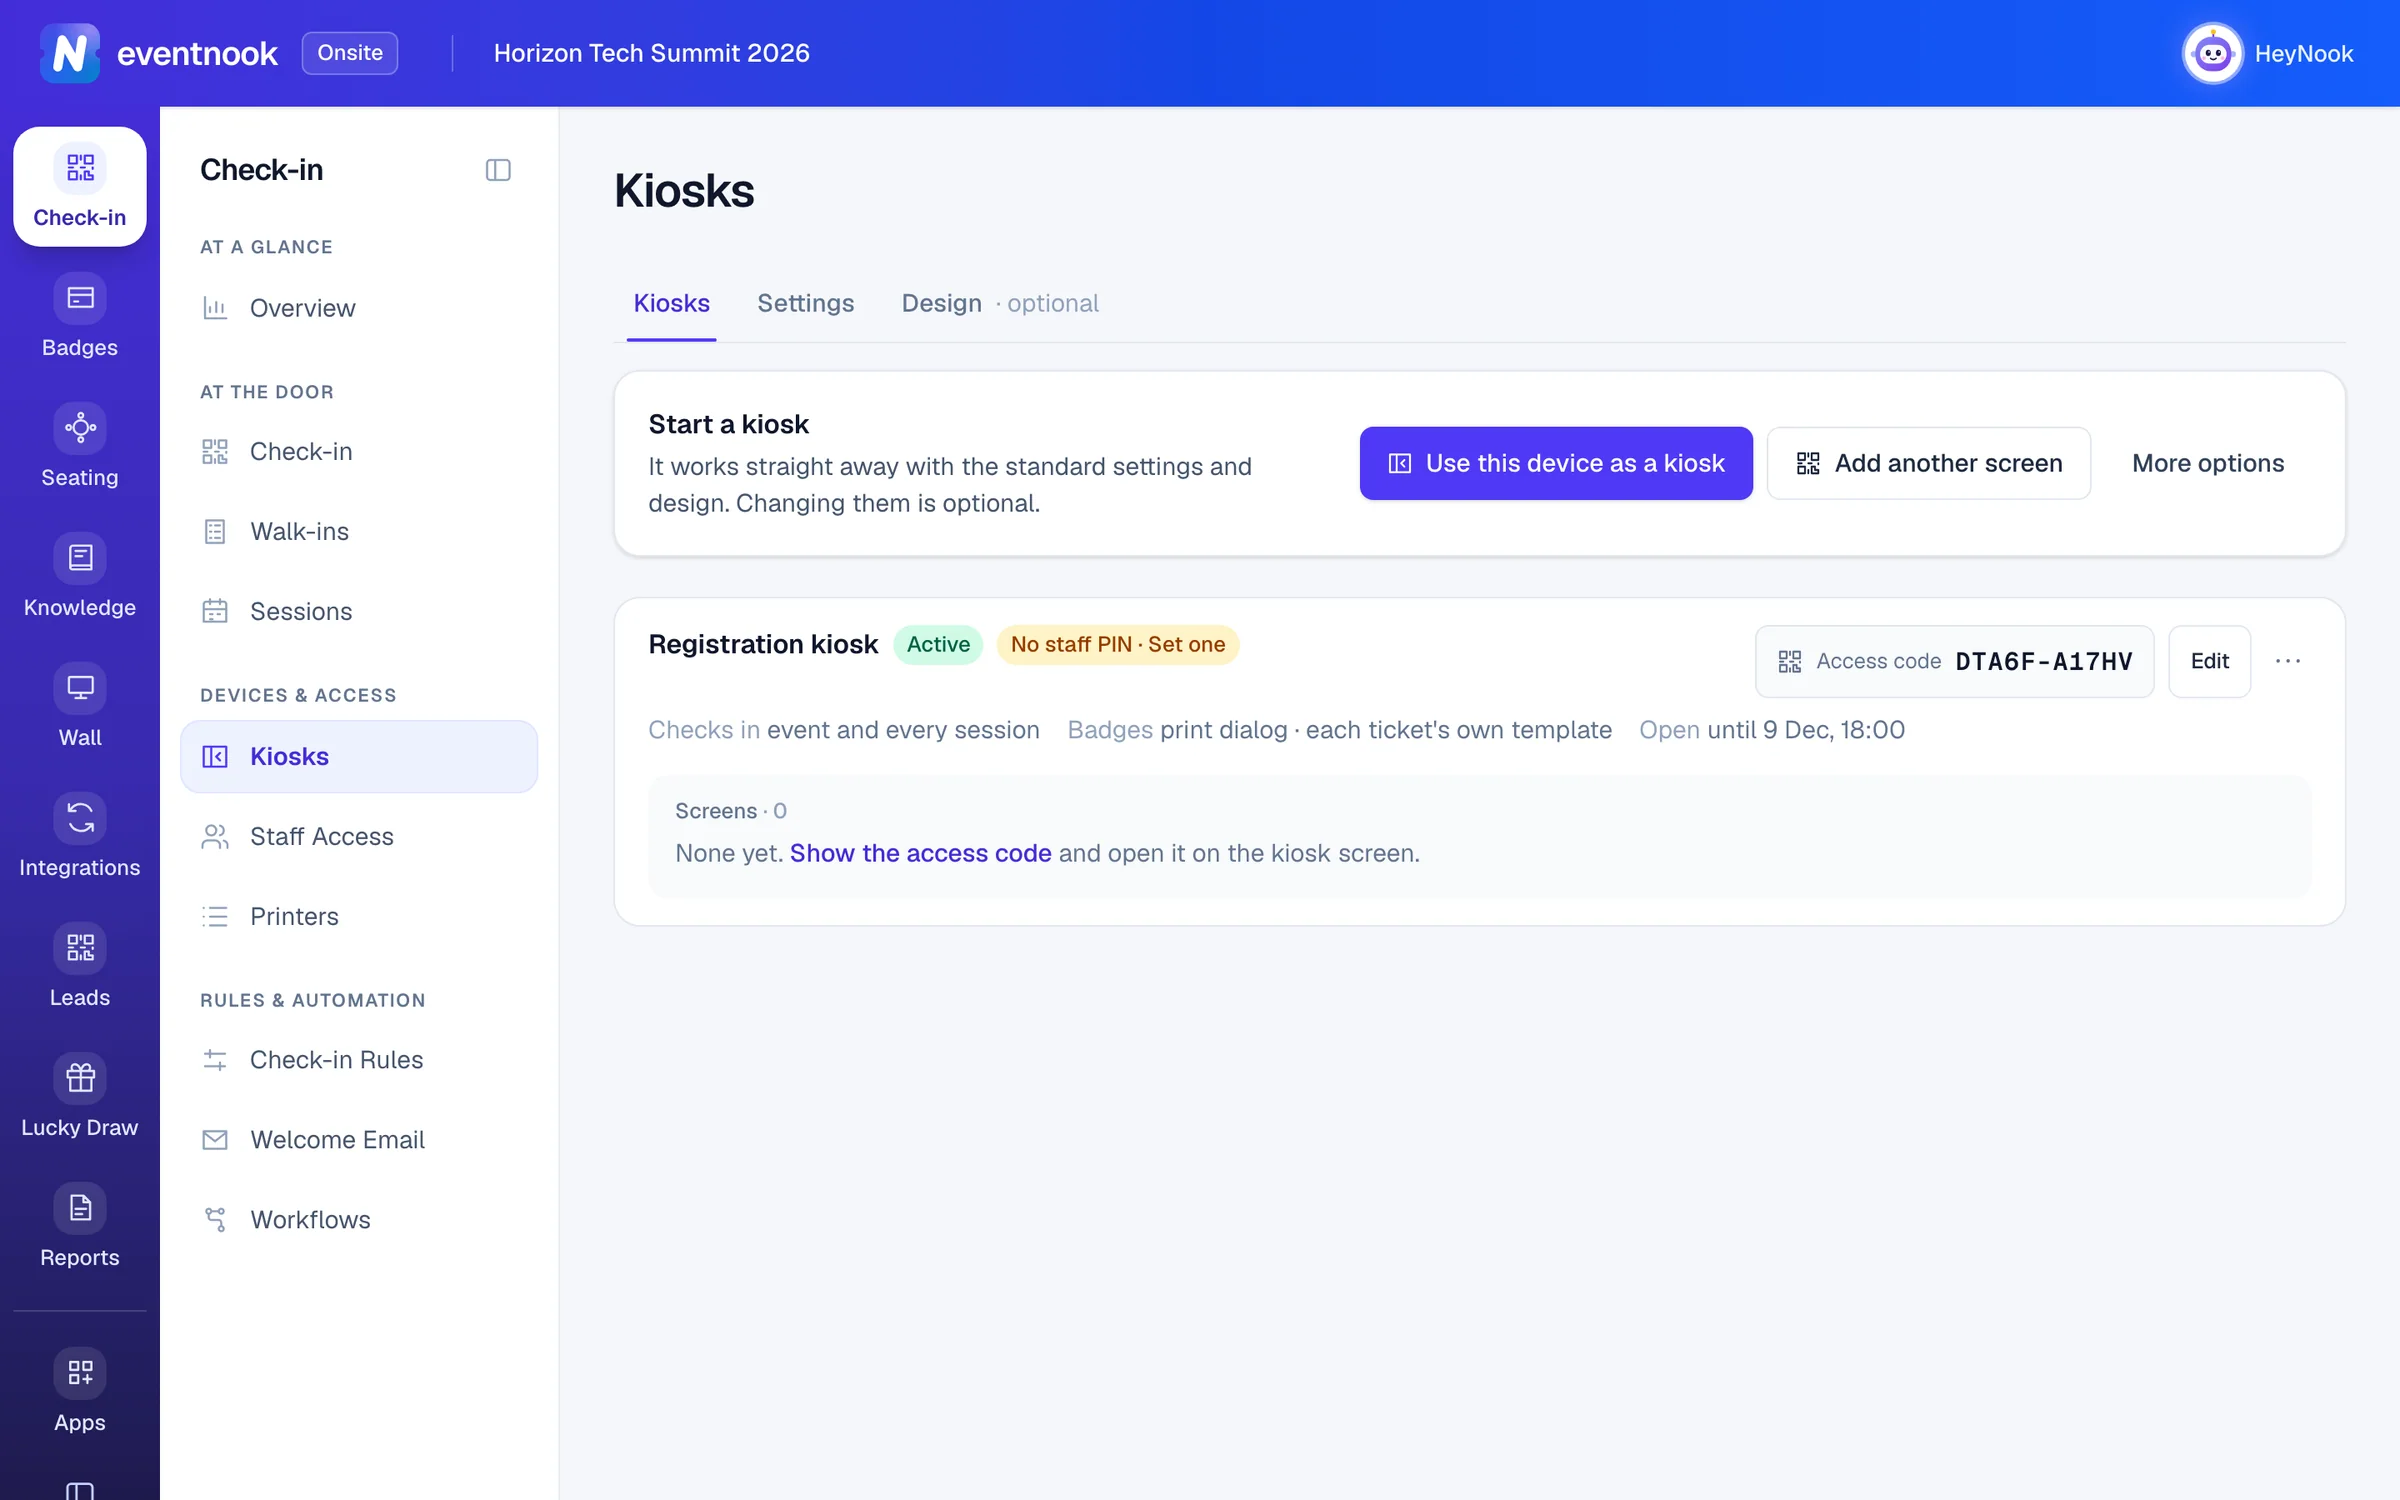
- 1Turn the screen you are on into a kiosk
- 2Get a code and QR code for a different screen
- 3Name it, set a staff PIN or choose how it prints first
Start a kiosk on another screen#
- On Kiosks, click Add another screen. A dialog shows the kiosk's access code, a QR code and a link.
- On the kiosk screen, scan the QR code with its camera, or open the link in its browser. The screen becomes a kiosk straight away.
- Click Done.
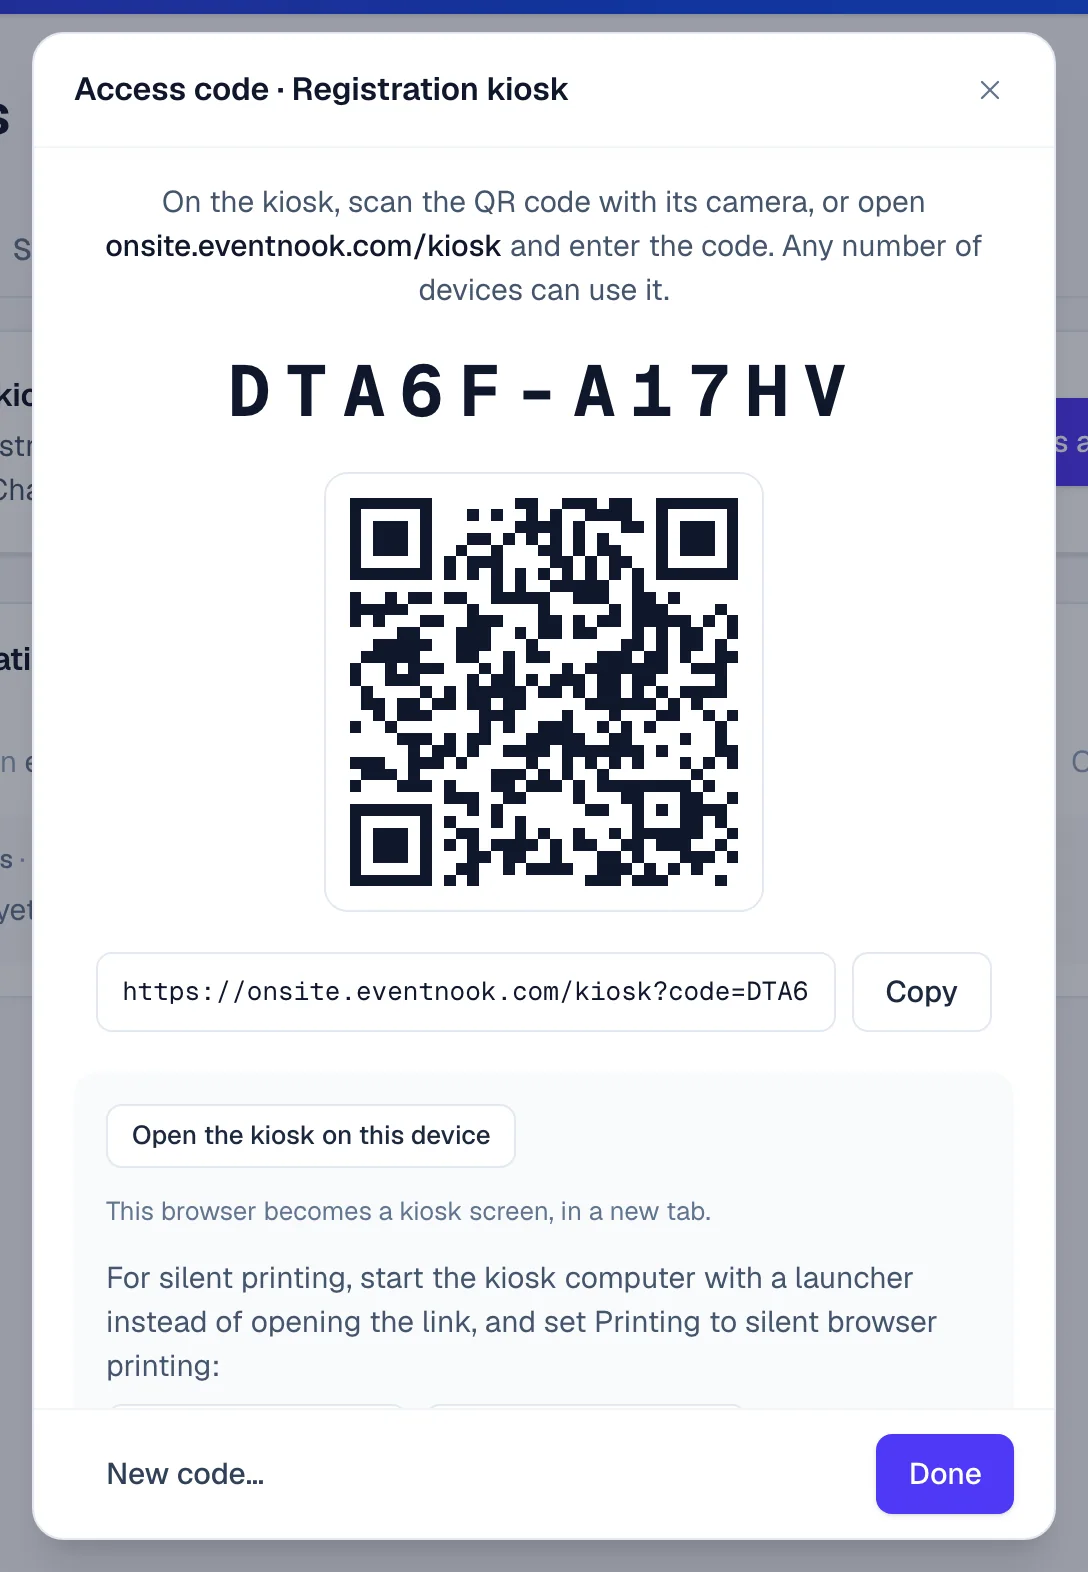
Any number of screens can join the same kiosk with its code. Each one is listed under the kiosk on the Kiosks tab as a screen, which you can rename.
A screen that isn't a kiosk yet shows Start this kiosk when it opens the kiosk page. From there, someone at the screen can also:
- Choose Sign in and start, sign in with their EventNook account, choose the Event, optionally type Where it stands, and tap Start kiosk. They are signed out of the screen again as the kiosk starts.
- Choose Scan a setup code and hold the QR code from Add another screen up to the screen's camera.
- Choose Approve from my phone. The screen shows a code and QR code to approve on a phone. See Approve a screen from your phone.
Change one kiosk#
Each kiosk has its own name, staff PIN, what it checks in and how it prints. Click Edit on the kiosk, or More options to set these before a new kiosk is made.
| Setting | What it does |
|---|---|
| Name | Where or who it is for, such as "Lobby kiosks". New kiosks are named Kiosk 1, Kiosk 2 and so on. |
| How it opens | Access code: any device with the code joins, for screens you set up and leave. Sign-in link: it opens only after someone who manages onsite signs in to EventNook, so the link is no use to anyone else. Default: Access code. |
| Staff PIN | 4–8 digits asked before the kiosk's staff menu opens. Optional, but without one anyone who finds the corner can open the menu. A kiosk without a PIN shows No staff PIN · Set one. |
| Access until | When the kiosk stops working. A new kiosk ends with the event, when the event's end is still to come. Quick choices: when the event ends, End of today, In 24 hours. |
| What it checks in | The event check-in, and which Sessions. None ticked means every session. |
| Badges | Print badges, how (Printing: Browser print dialog, Silent browser printing (kiosk-printing) or Print agent — a named printer, no dialog (cloud printing)) and the Badge template. Automatic uses each ticket's own template. Turn printing off for a kiosk with no printer beside it. |
With Print agent, tick the printers the kiosk uses, in order. If the first fails or goes offline, the badge moves to the next. Printers are added on Printers.
A kiosk that opens with its sign-in link has Sign-in link and Open kiosk on its entry instead of an access code.
Choose how kiosks behave#
Settings applies to every kiosk of the event.
- Open Kiosks and click the Settings tab.
- Change what you need. The tab shows a dot while it has unsaved changes.
- Click Save settings. Running kiosks update within seconds, between attendees.
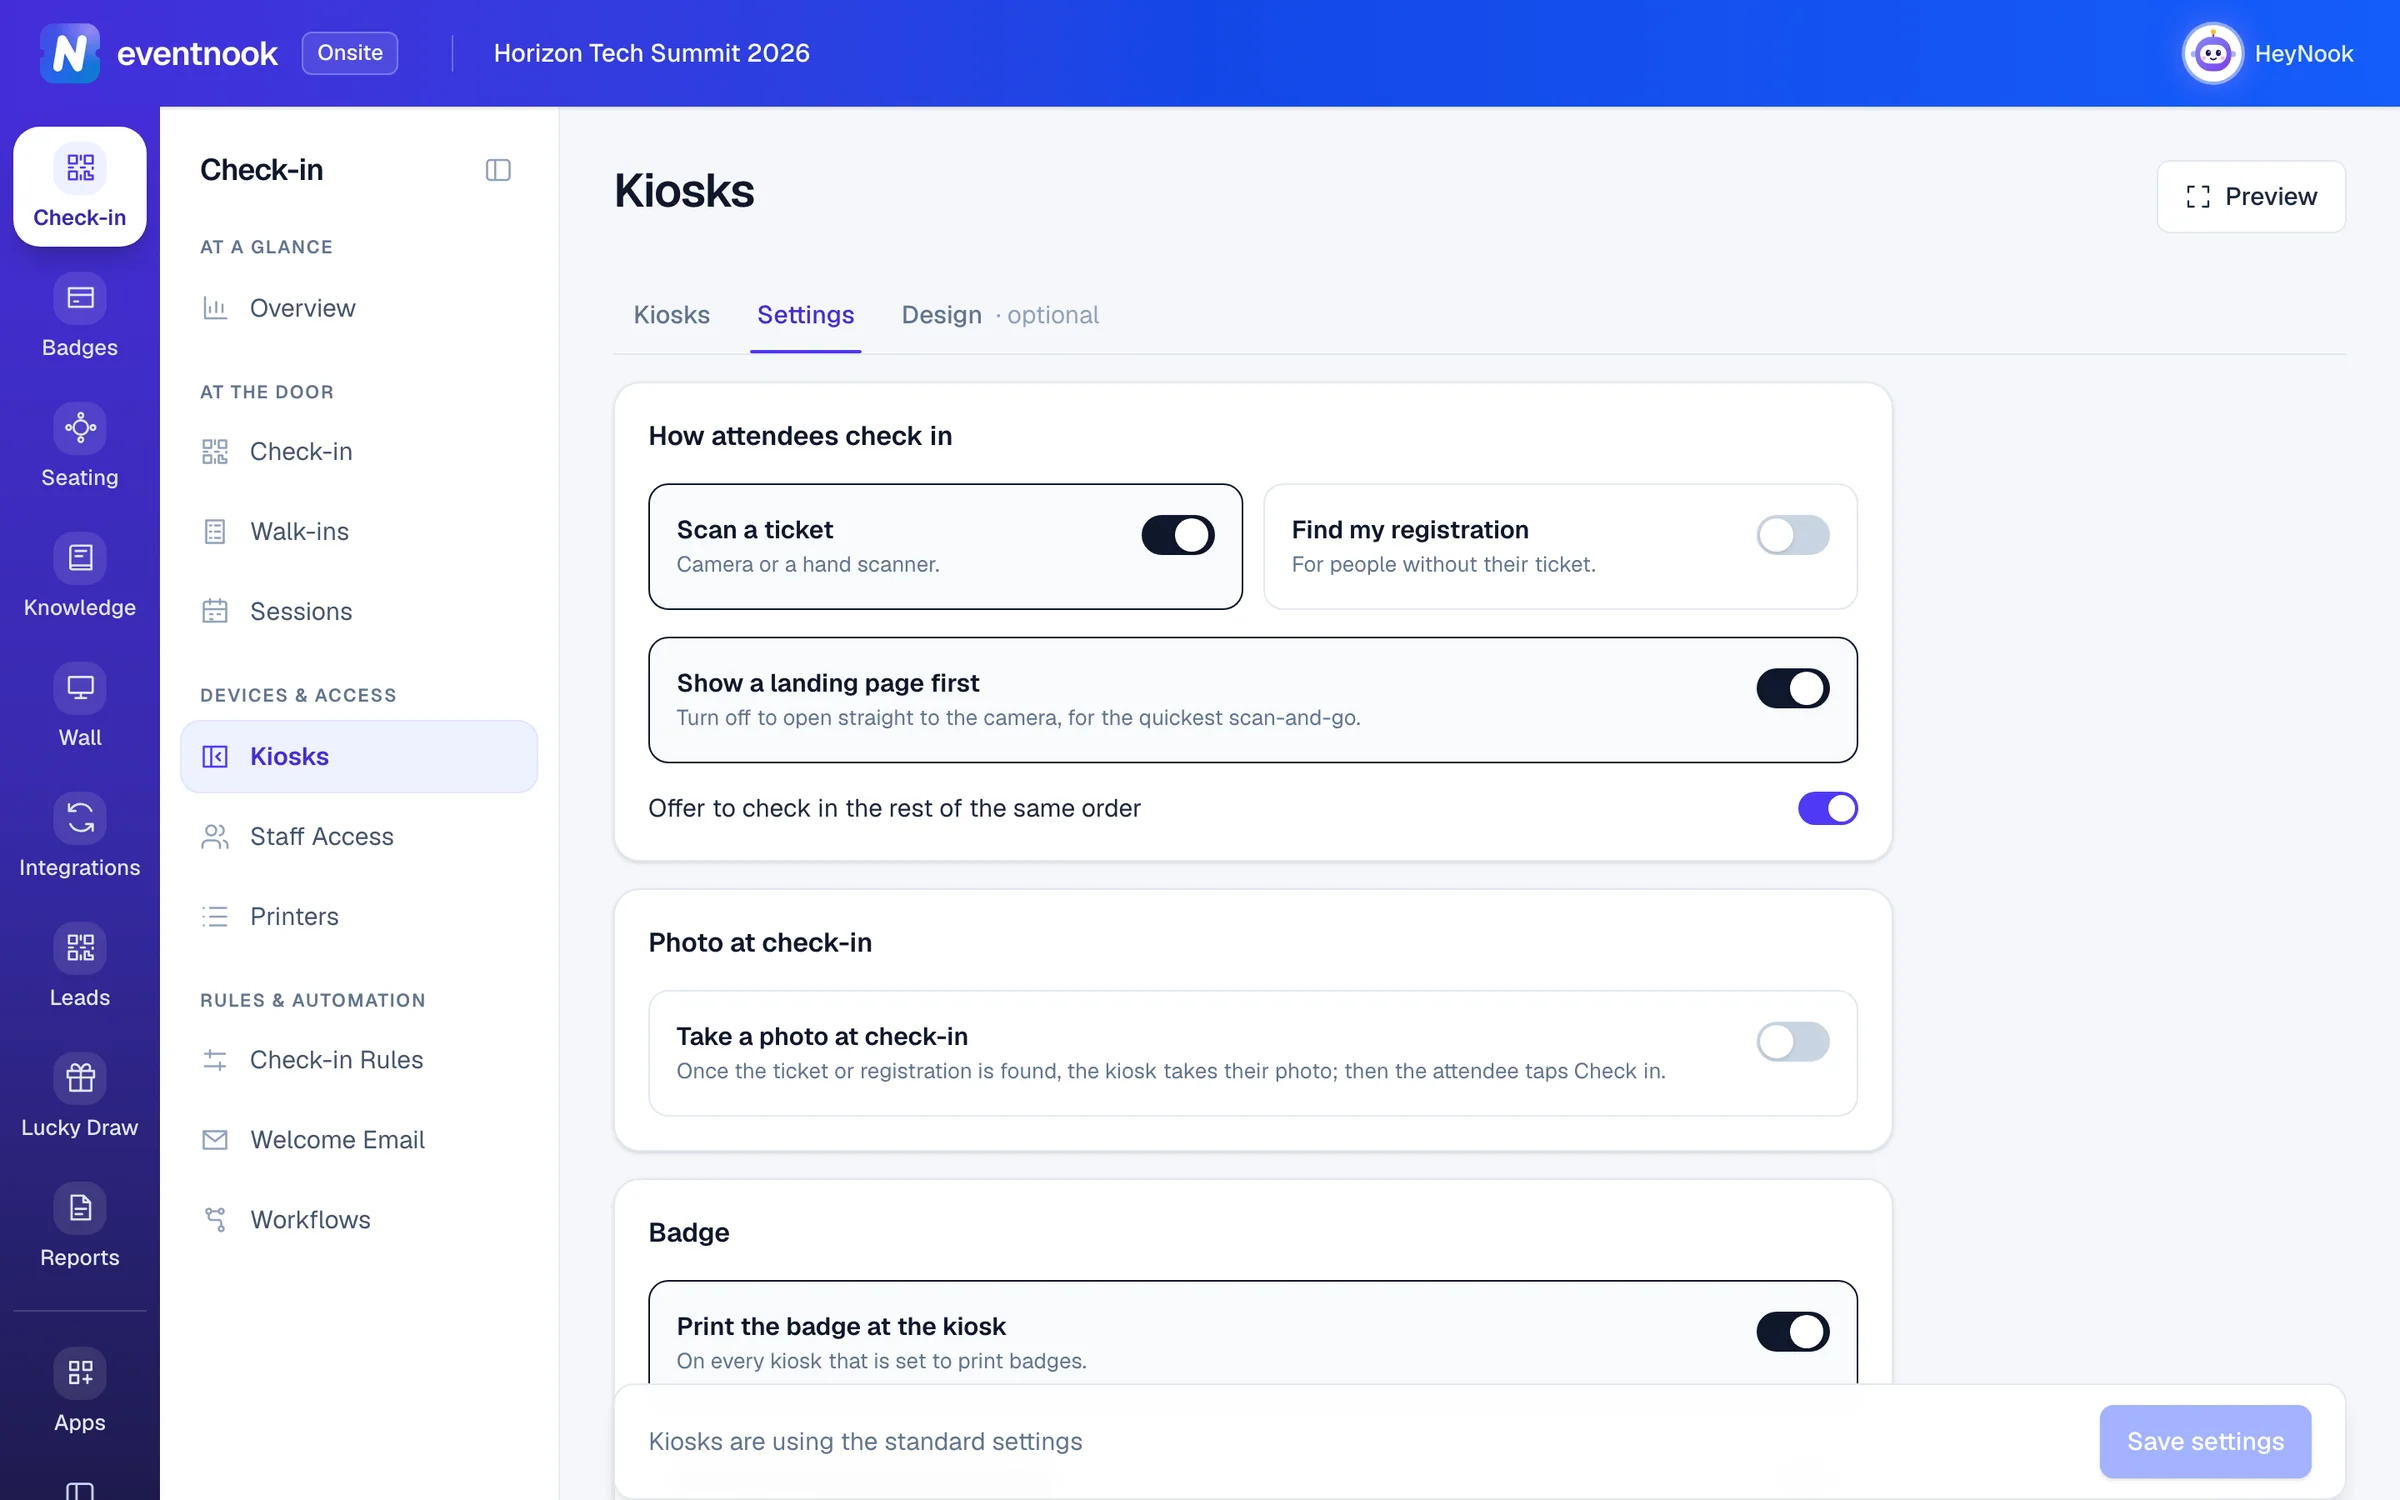
- 1Attendees scan the QR code on their ticket
- 2Attendees without their ticket look themselves up
- 3Try the kiosk's screens full screen
Click Preview to go through the kiosk's screens full screen with what you've set, before you save.
| Section | What you set |
|---|---|
| How attendees check in | Scan a ticket (camera or a hand scanner, on by default) and Find my registration (for people without their ticket, off by default). With Find on, choose What attendees may type (Email, Mobile number, Full name, Ticket code, Order number) and what happens Before checking in: They tap their name, They also answer one question, or Email or ticket code only, and always the question. Matches always show masked details: first name, last initial, company and ticket. |
| Show a landing page first: can be turned off only when scanning is the one way in, so the kiosk opens straight to the camera. Offer to check in the rest of the same order: on by default. | |
| Photo at check-in | Take a photo at check-in, off by default. Then whether Attendees must take one (no Skip button), Terms before the photo they agree to first, the Photo size, the face oval, a Countdown, and AI styles attendees may try on their photo (up to six). |
| Badge | Print the badge at the kiosk, Show the badge before printing (attendees tap Print my badge; off, it prints as soon as they check in), and Reprints from a kiosk per attendee after the first badge. Default: 1. |
| After check-in | Message on the done screen, such as where to collect a lanyard, and A different message per ticket. Done screen stays for (default 8 seconds) and Back to the start when idle for (default 30 seconds). |
Change how kiosks look#
Design is optional. Until you save one, kiosks use the standard design.
- Open Kiosks and click the Design tab.
- On Landing page, choose a Layout: Two cards, Stacked buttons, Image + buttons, Banner on top or Your own design.
- Type the Title and Message under the title. Optional: add a Footer line, such as Wi-Fi details or where the help desk is.
- In Check-in buttons, choose a Button design and, if you like, your own button labels and descriptions. Blank ones use the standard wording.
- Click Background & colours to choose the background, a palette, the Button colour, a Logo, the Text colour and whether to Show a clock.
- Click Save design.
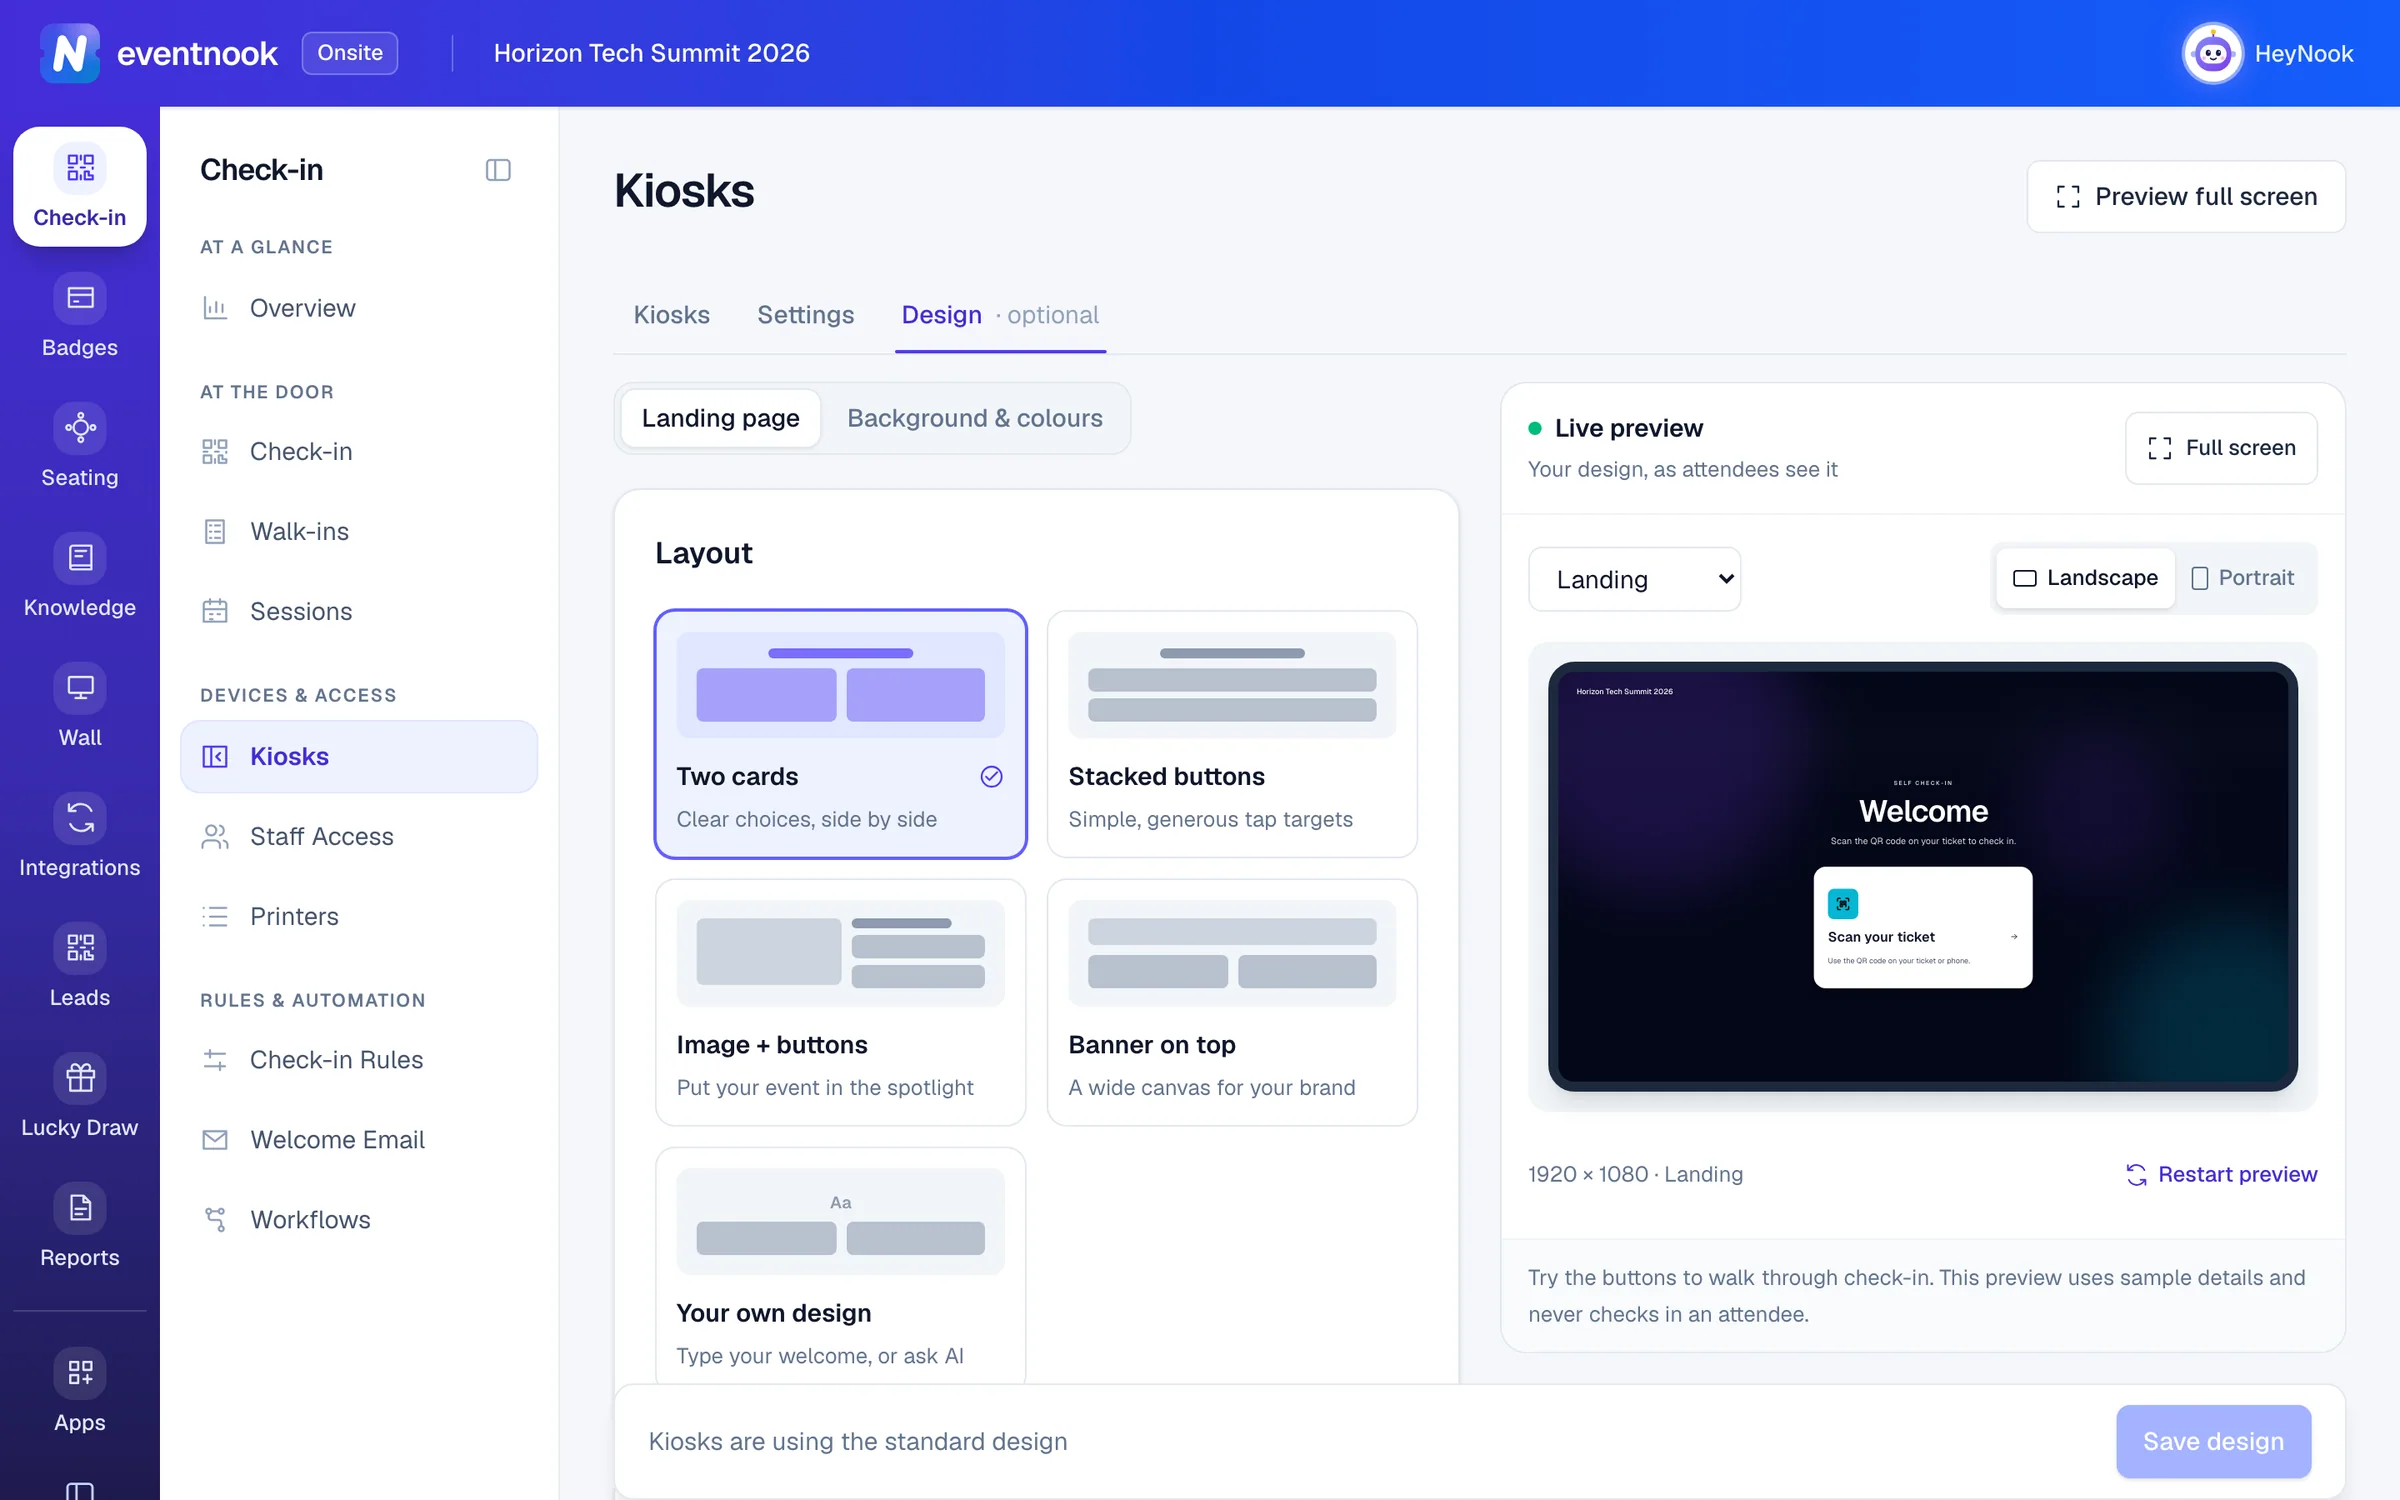
- 1How the welcome screen is laid out
- 2Background, palette, logo and clock
- 3Each kiosk screen, as attendees will see it
The live preview shows each screen of the kiosk. Pick one from its list, switch between Landscape and Portrait, or click Preview full screen.
| Choice | What it does |
|---|---|
| Your own design | Type your own welcome on the page, or type what you want in Ask AI to write it and click Write it. Edit HTML shows the code. |
| Background | Gradient, Soft motion (the standard), Photo or Solid. With a gradient or soft motion, pick a palette, or set your brand colour under Match your brand colour and choose Dark look or Light look. |
| Photo background | Choose a scene from the collection, or Or use your own image. Overlay dims the photo so the words stay readable. |
What attendees see#
- The welcome screen, with Scan your ticket and, if it's on, Find my registration. A ticket held to a hand scanner checks in from here without a tap.
- If they search, they choose their name from the matches and may be asked one question to confirm it's them.
- If others on the same order haven't arrived, the kiosk offers Check in your group too?.
- With photos on, they take their photo and tap Check in.
- Their badge prints, or they see it first and tap Print my badge.
- The done screen shows your message, and their table and seat if they have one. The kiosk returns to the start on its own.
Someone already checked in sees You're already checked in, with Print my badge again while they have reprints left. A kiosk left untouched asks Are you still there? before it goes back to the start, so the next person never sees the last one's name.
Open the staff menu on a kiosk#
- Tap the top-right corner of the kiosk five times quickly.
- Enter the kiosk's staff PIN and tap Open, if it has one.
- Use Test print (a calibration page at the badge size), Full screen again, Reload the kiosk or Unpair this kiosk, then Close.
The menu also shows whether the kiosk is online and how it prints. After five wrong PINs the menu is locked for a few minutes.
Keep an eye on your kiosks#
The Kiosks tab refreshes on its own. Each screen shows when it was last seen and how it is doing.
| Status | What it means |
|---|---|
| Working | The screen is online and reporting in. |
| Heartbeat late | It hasn't reported in for over a minute and a half. |
| Offline | The screen has lost its connection. |
| Camera blocked | The browser isn't allowed to use the camera. |
| Last print failed | Its last badge didn't print. |
| Not seen for … min | Nothing from it for two minutes or more. Check the screen. |
From a screen's ⋯ menu you can Rename, Disable or Remove it. From the kiosk's own menu, Turn off stops every screen on it and Delete removes it. See Remove, disable or turn off for what each does.
If something looks wrong#
- The kiosk says "Check-in is paused". It has lost its connection. It carries on by itself when the connection returns. Meanwhile, send attendees to the desk.
- The kiosk checks people in but prints nothing. The event has no badge design yet, the kiosk's Print badges is off, or Print the badge at the kiosk is off in Settings. With Browser print dialog, someone has to confirm the browser's print dialog.
- An attendee is told to see the registration desk for another badge. They have used the kiosk's reprints. Print it at the desk, or raise Reprints from a kiosk.
- "This screen is already a kiosk". The screen runs a kiosk for another event. Choose Set up for the new event to start again, or keep the current one.
- "Your account can't open this kiosk". A sign-in-link kiosk opens only for people who manage onsite for the event. Tap Sign in as someone else.
- Find my registration doesn't find someone. Check which fields What attendees may type allows. A full name needs two words or more, and a mobile number matches on its last 8 digits.
Who can do this#
Everyone with onsite access to the event can see Kiosks. Starting kiosks, seeing their codes, and changing their settings and design needs a role that manages onsite: Owner, Admin, Event Admin or Event Editor. Event Analysts and Members see the pages but can't change them.
Related guides
Still stuck? In EventNook, ask HeyNook. It knows the page you're on and your event, and can take you straight to the right setting.