Run Lead Retrieval for your exhibitors
Give each exhibitor a team that scans visitors' badges at their booth, choose what they see and record about each lead, and hand them their leads after the event.
Where to find it: Event admin › Apps › Lead Retrieval
Lead Retrieval lets exhibitors' booth staff scan the badges of the people who visit their booth, on their own phones, and keep each person as a lead with a note and a rating. You give each exhibitor a team, decide what they see about the people they scan, and can read every lead yourself.
Before you start#
- Add the Lead Retrieval app to the event. See Add an app to your event. If Apps lists it under Not in your plan, ask EventNook to add it.
- Your exhibitors are the event's sponsors and exhibitors in Website Builder › Special event content, under Sponsors. You can also add one from Lead Retrieval.
- Booth staff need no EventNook account. They sign in with their email address and a code.
Lead Retrieval opens from Apps › Lead Retrieval in Event admin, and from Leads on the rail in Onsite. Both show the same screens, so use whichever is to hand. Open in Onsite and Open in admin portal switch between them.
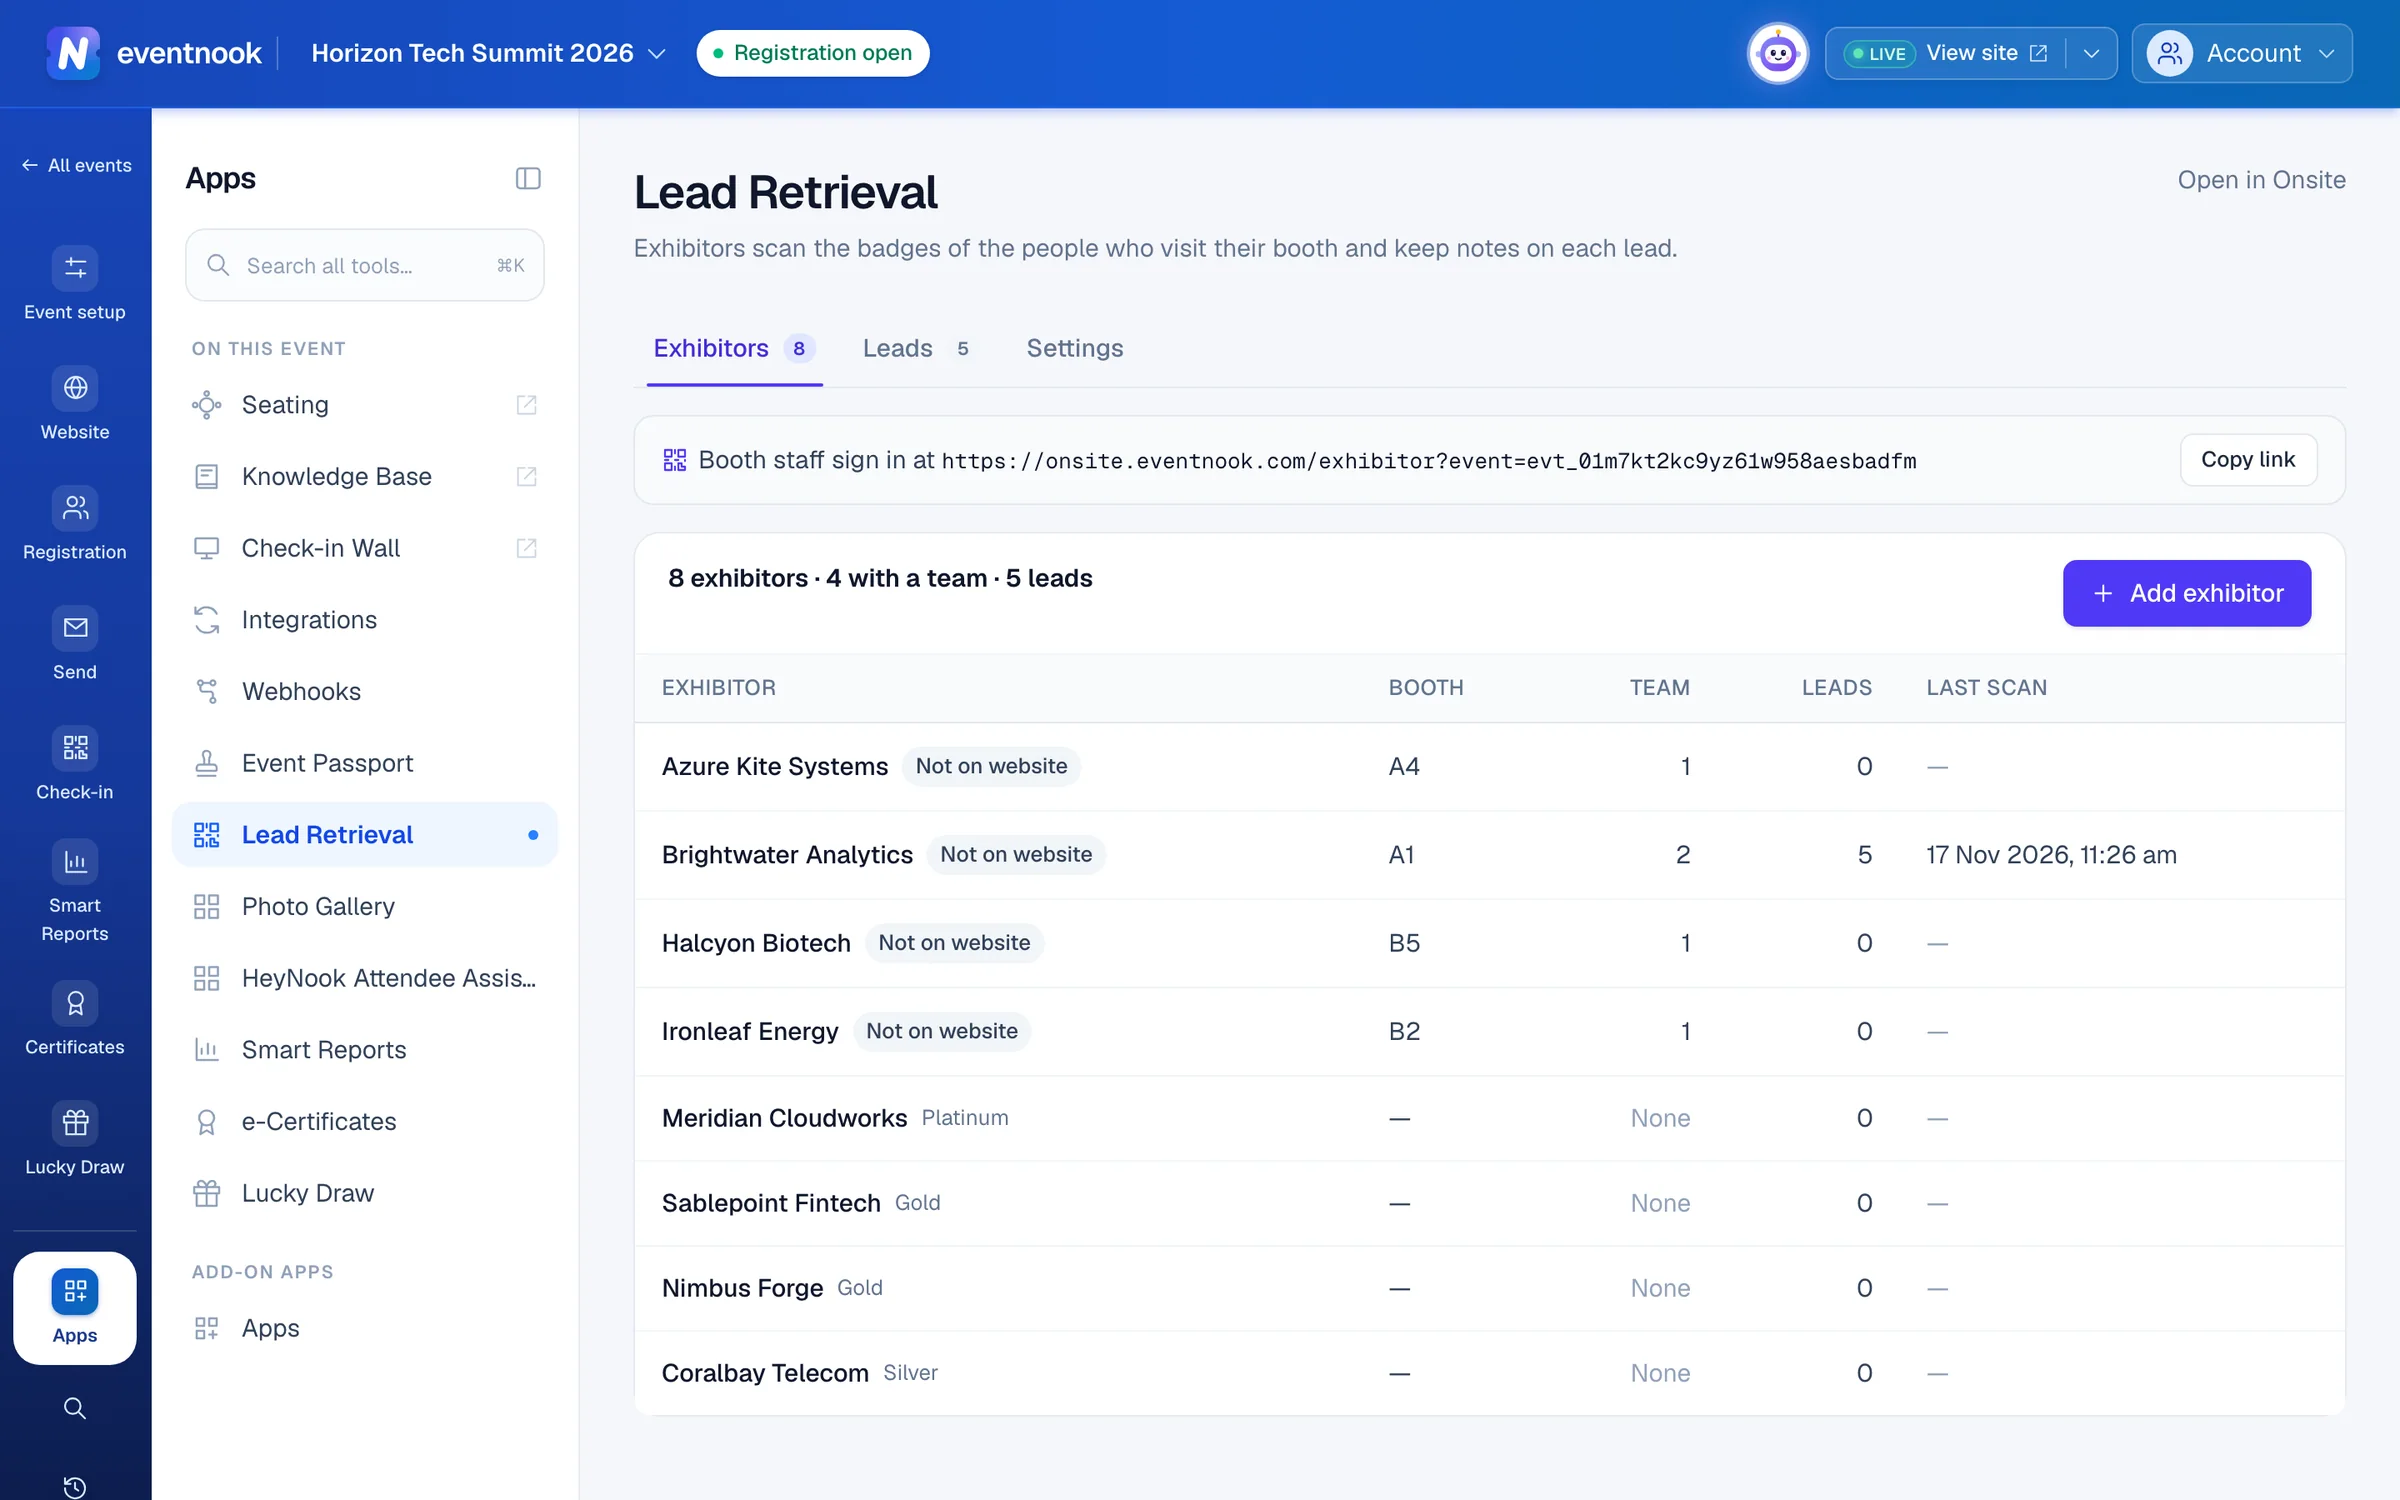
- 1Add an exhibitor that isn't in your sponsors and exhibitors yet
- 2The link booth staff open on their phones
- 3Every lead of the event, with Export CSV
- 4What exhibitors see and record, and for how long
Give an exhibitor a team#
- On the Exhibitors tab, click the exhibitor's row. If it isn't listed, click Add exhibitor, type its Name and Booth, and click Add.
- Under Add someone to the team, type the person's Email and Name.
- Choose their Role: Manager or Staff. Add a manager first.
- Leave Send the invitation email ticked and click Add. They get an email with the link to Lead Retrieval for your event.
- Repeat for the rest of the booth's staff.
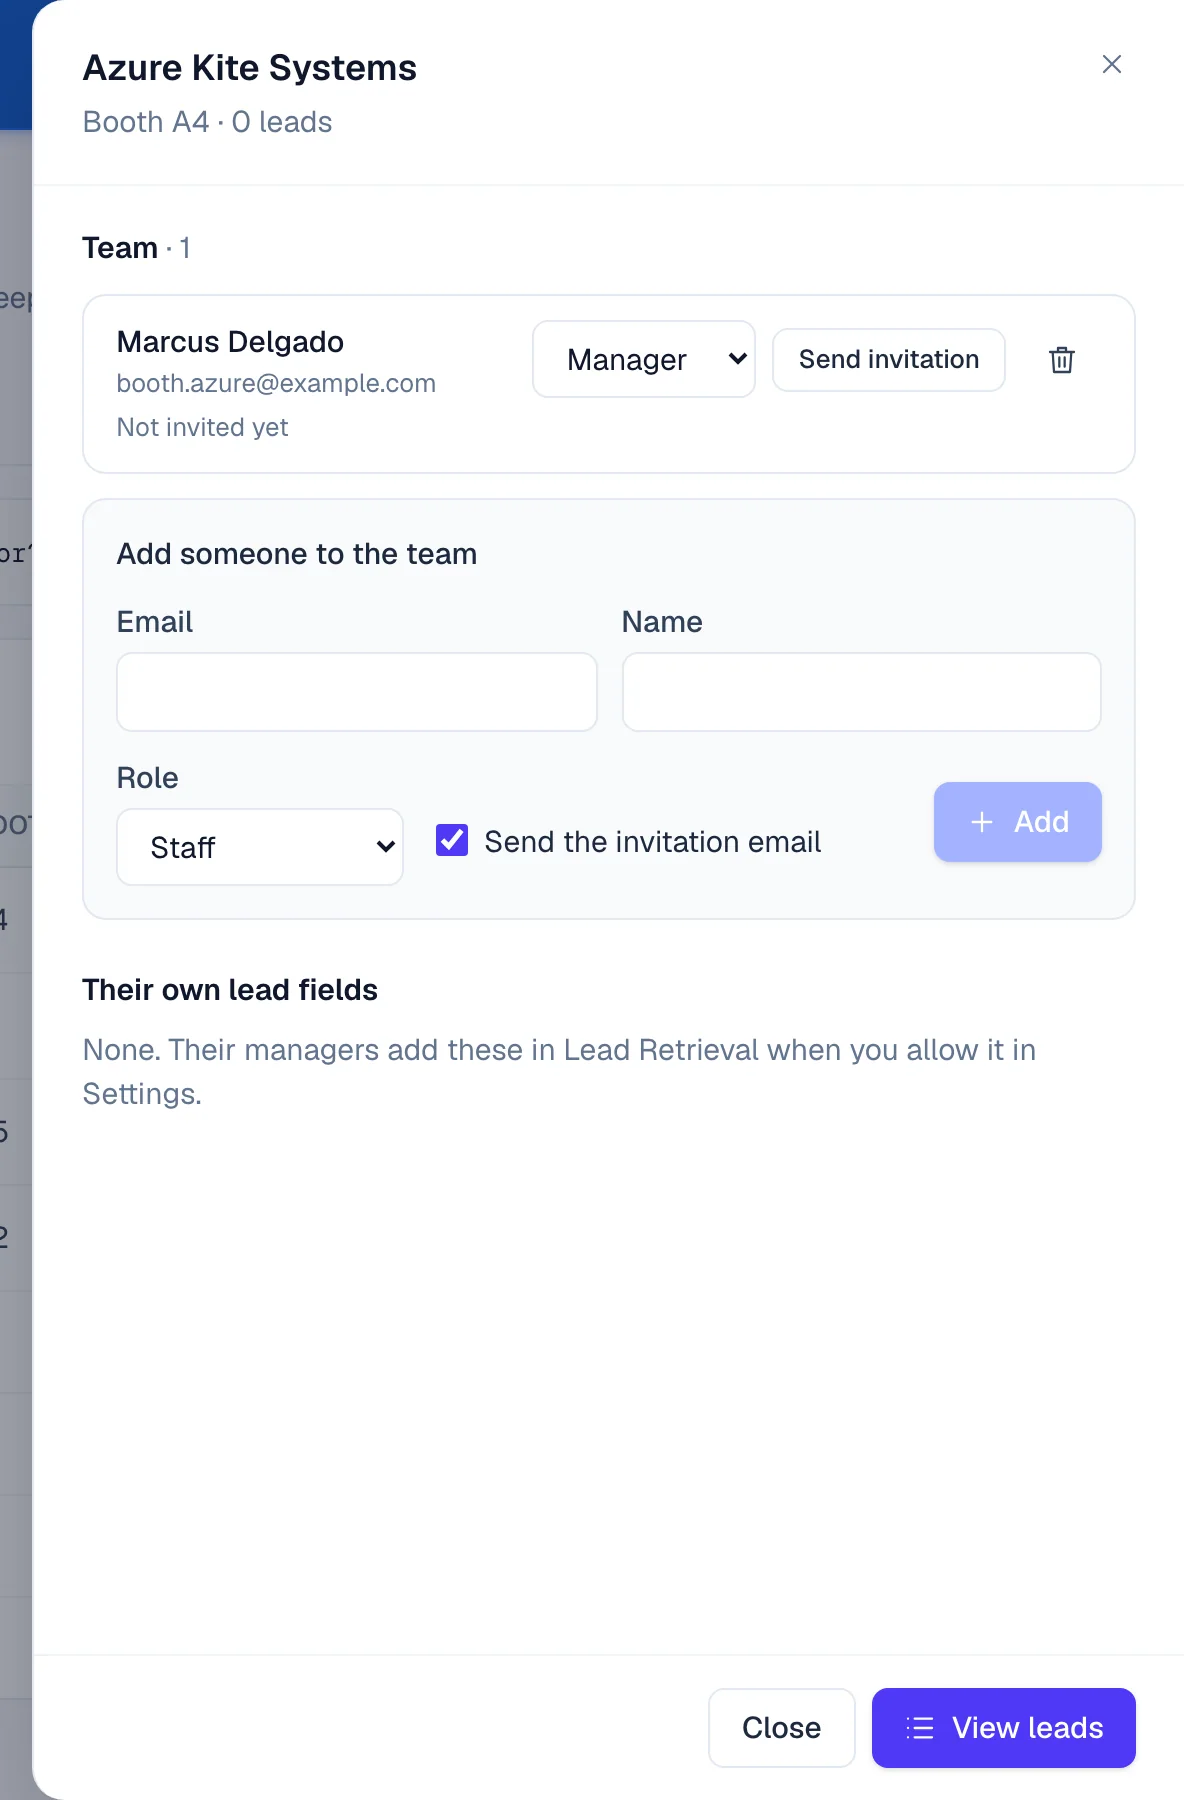
- 1Add booth staff by email, as a manager or staff
- 2This exhibitor's leads
Staff scan badges and qualify leads. A Manager can also add the exhibitor's own lead fields, export its leads and, when you allow it in Settings, add and remove its staff.
An exhibitor you add here stays off the website until you switch it on in Special event content. Its row shows Not on website until then.
| On a team member's row | What it does |
|---|---|
| Role | Changes them between Staff and Manager. It applies straight away. |
| Send invitation / Send again | Emails them the link to Lead Retrieval. |
| Remove (bin) | Signs them out at once. They can't sign in again. The leads they scanned stay with the exhibitor. |
Each row also says when the person was invited or last signed in, so you can see who still has to sign in.
Choose what exhibitors see and record#
Open the Settings tab. It has four parts, and each has its own Save.
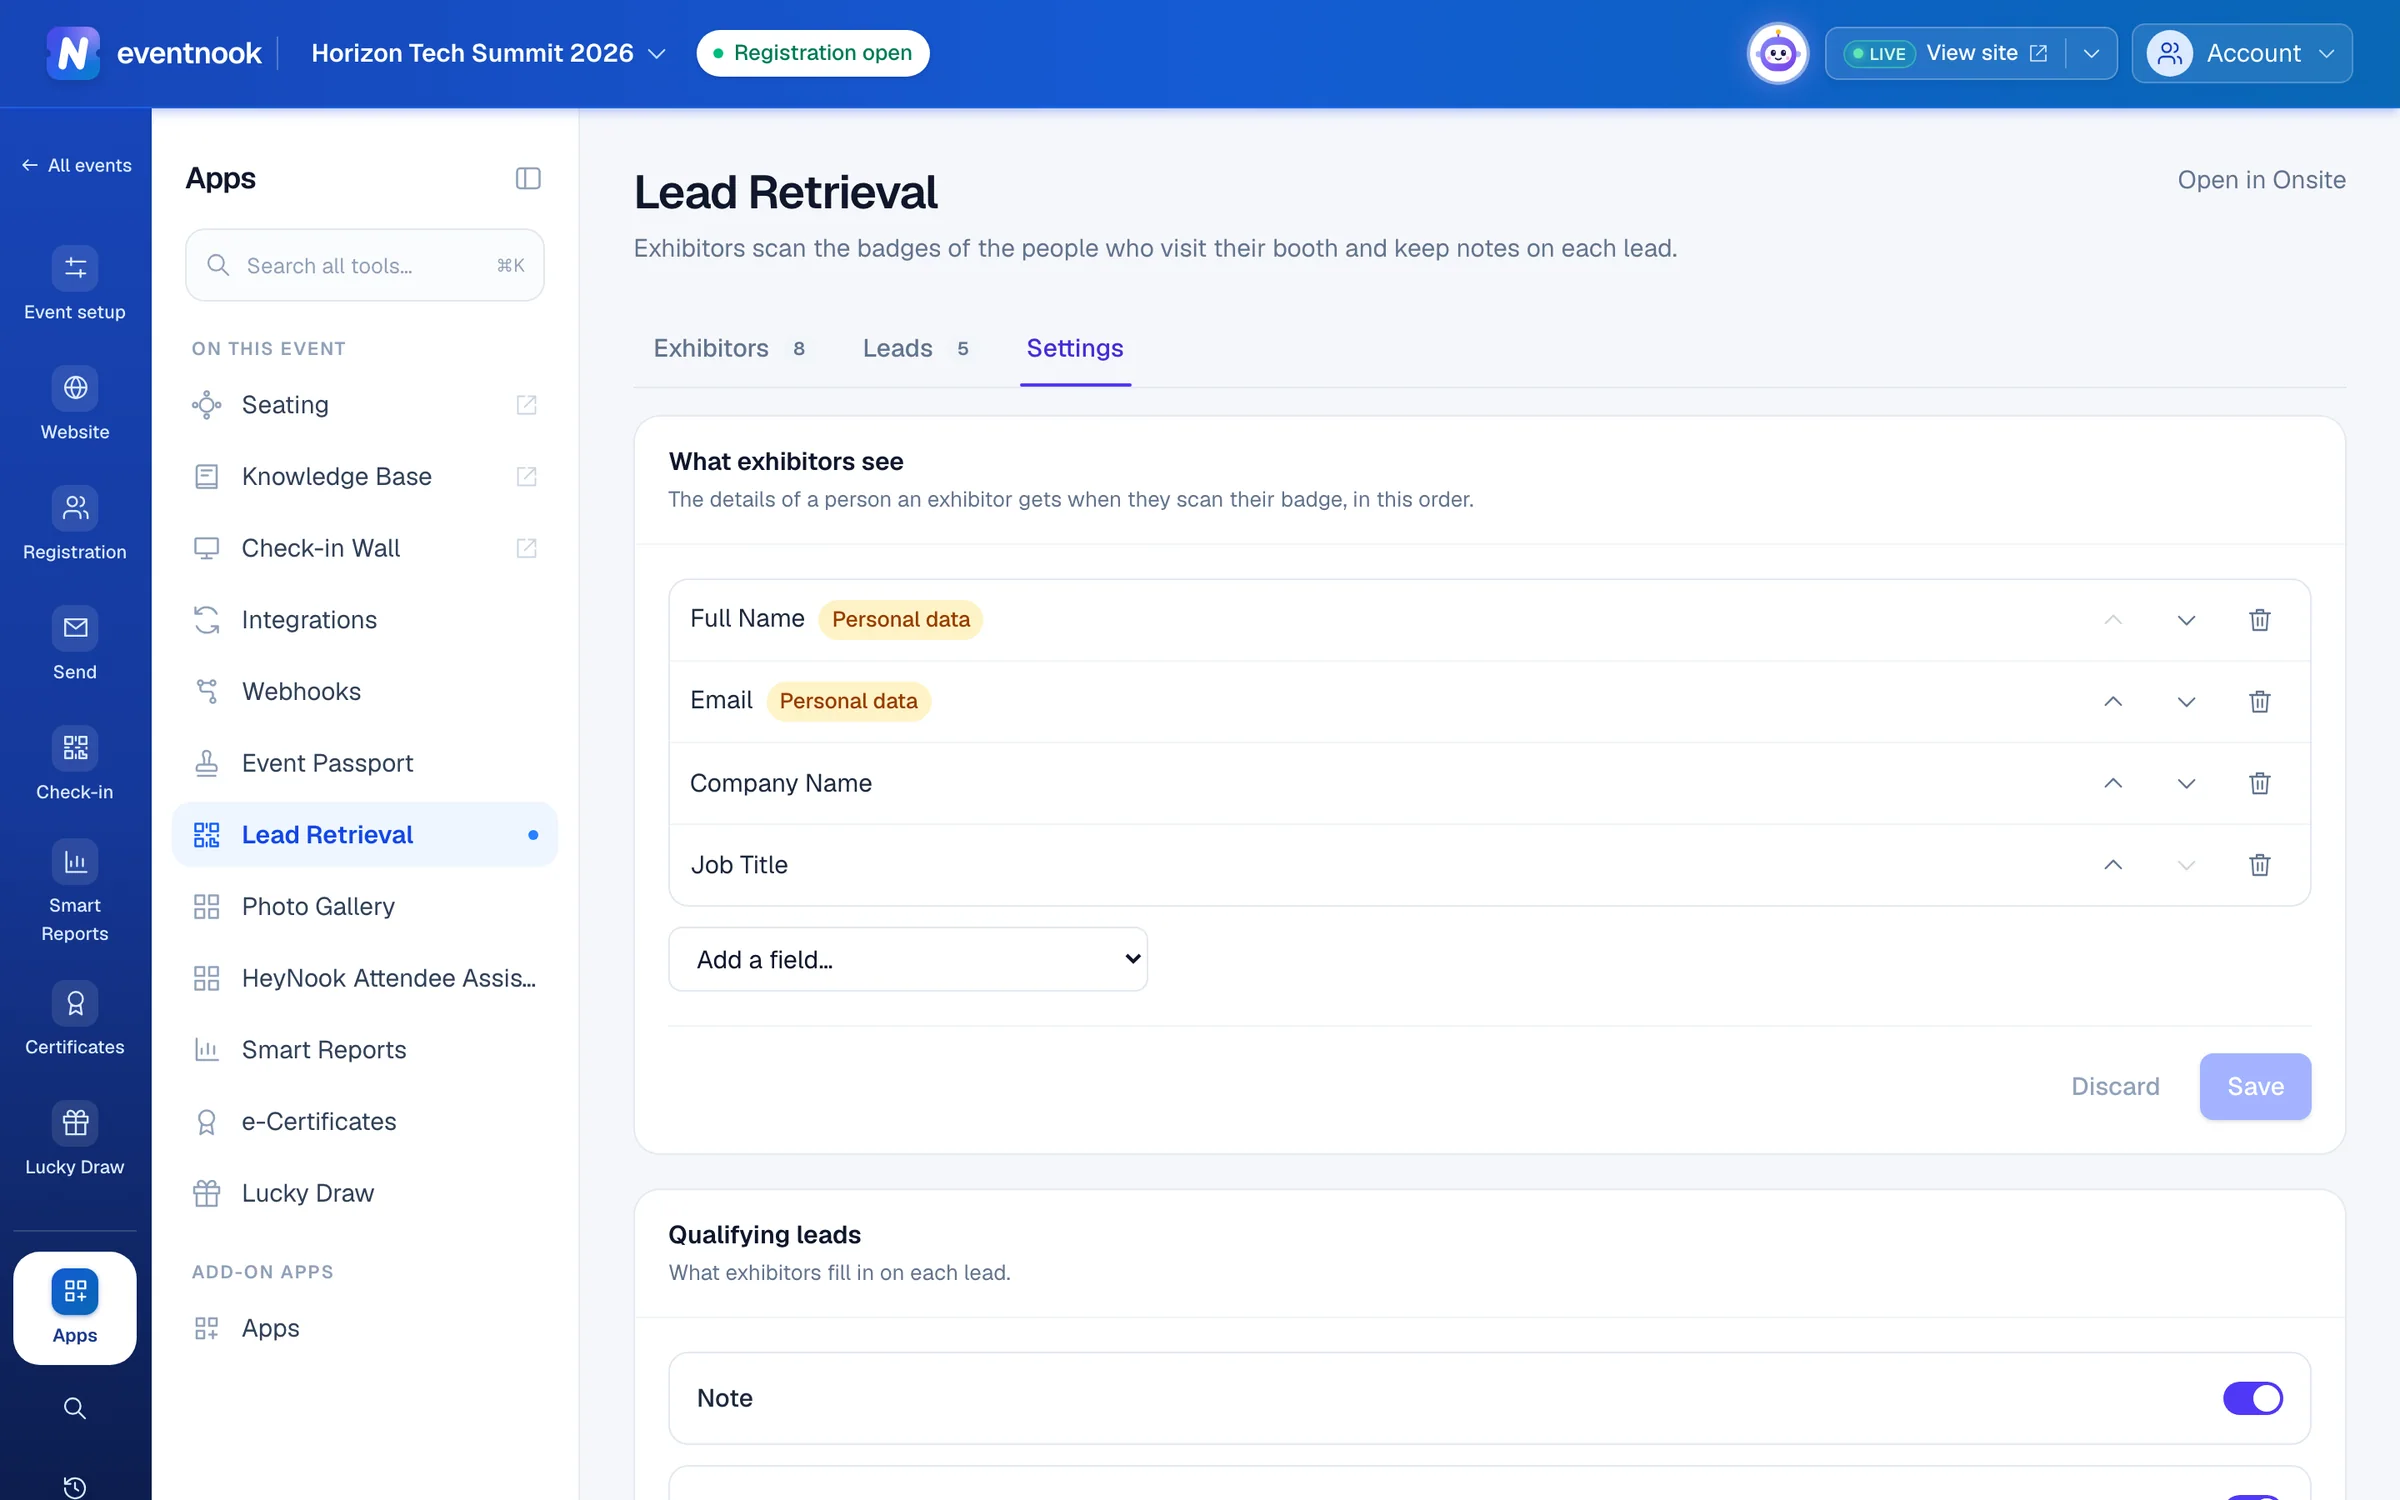
- 1The registration details an exhibitor gets about each person
- 2The note, rating and lead type exhibitors fill in
| Part | What you set |
|---|---|
| What exhibitors see | The registration details an exhibitor gets about a person they scan, in this order. Default: name, email, company and job title. Use Add a field… to add one, the arrows to reorder and the bin to remove. Fields marked Personal data identify someone. |
| Qualifying leads | What exhibitors fill in on each lead. Note is a free-text box. Rating (Hot, Warm, Cold) and Lead type (Decision maker, Influencer, End user, Researcher) are choices: rename them in Shown as, and change, reorder or add options, up to 10 each. Switch off any you don't want. |
| Exhibitors' own fields | Exhibitors may add their own fields: each exhibitor's managers add fields of their own, such as the products a visitor asked about. Up to sets how many, from 1 to 10. Default: on, 5 fields. |
| Exhibitor teams & access | People per exhibitor (1–50, default 5). Exhibitors' managers add and remove their own staff and Exhibitors' managers export their leads (both on by default). Exhibitors keep access for a number of days after the event ends (default 30). |
Exhibitors see a change the next time their screen loads.
See and export the leads#
- Open the Leads tab.
- Choose an exhibitor, or keep All exhibitors.
- Optional: search by name, company or email, or narrow by rating or lead type.
- Click a lead to see the person's details and how the exhibitor qualified them.
- Click Export CSV to download the leads shown.
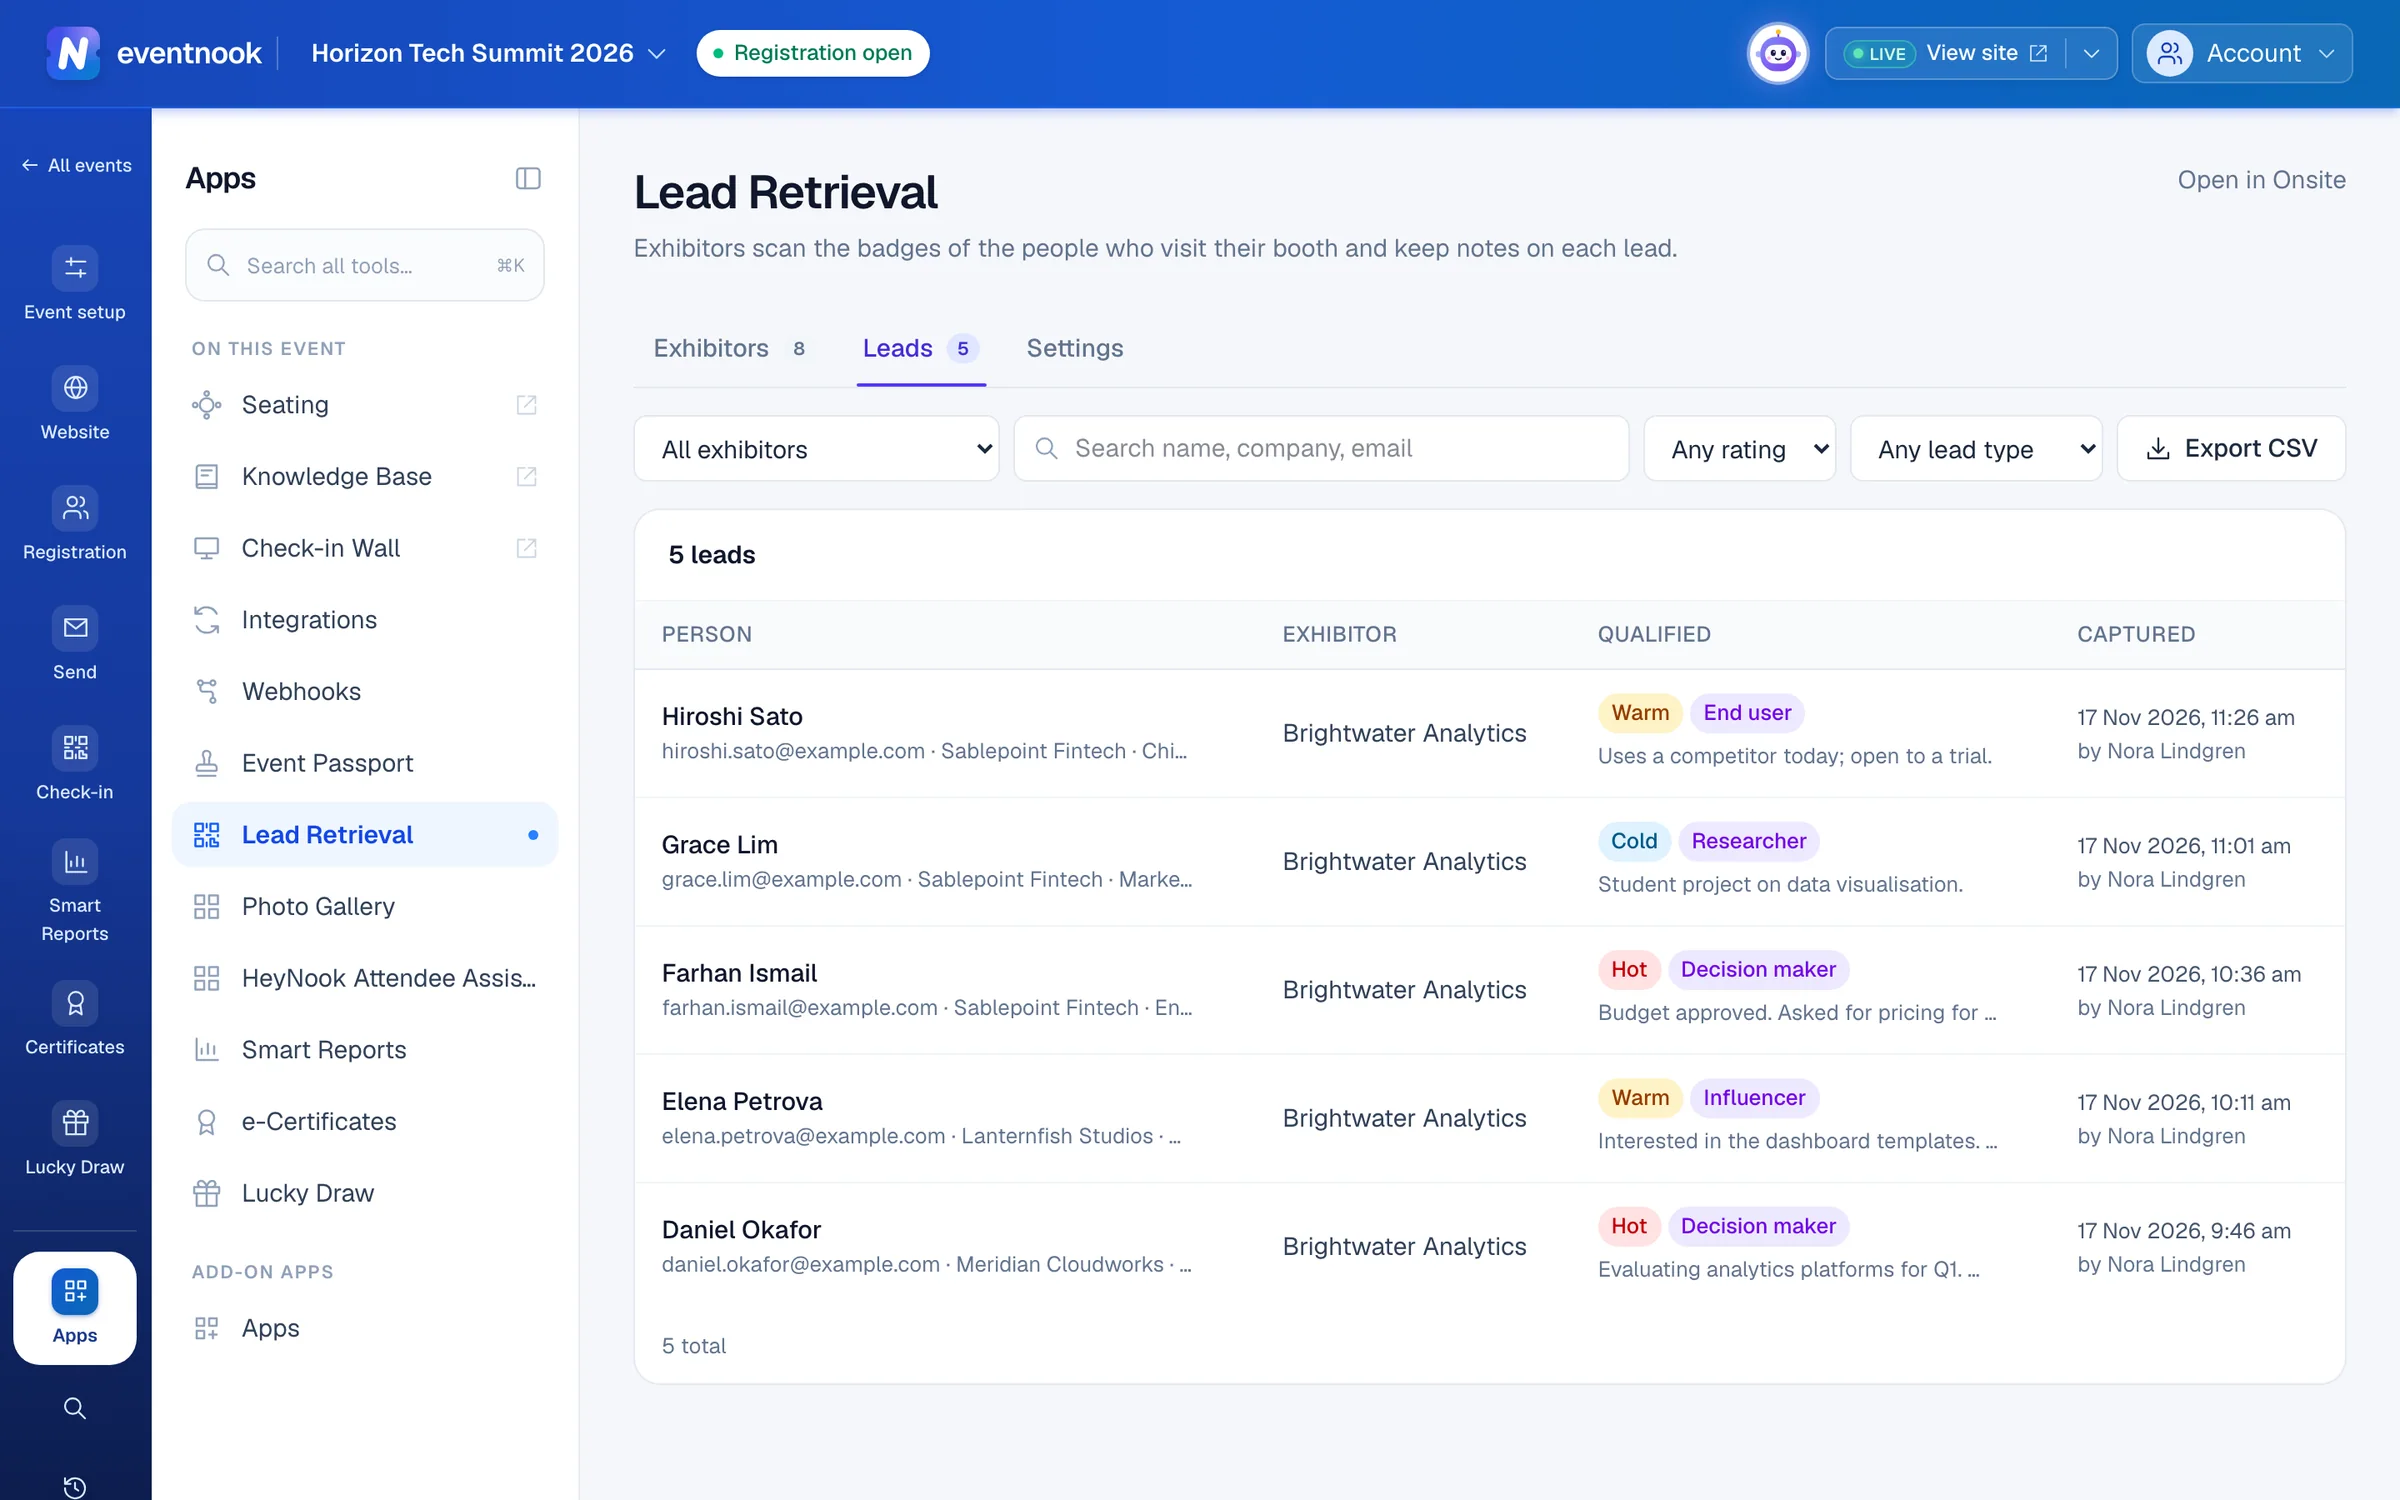
- 1All exhibitors, or one
- 2Download the leads shown as a spreadsheet
A lead shows the same details the exhibitor sees, read from the registration when you look. A person is one lead per exhibitor, however many of its team scan them. Exhibitors never see each other's leads.
To hand an exhibitor its leads after the event, choose it on Leads and click Export CSV. Its managers can also export their own, unless you switched that off.
After the event#
Exhibitors can sign in and see their leads until the days under Exhibitors keep access for have passed since the event ended. Their home screen shows the date. After that, Lead Retrieval tells them it has closed. To give them longer, raise the number of days.
If something looks wrong#
- Booth staff didn't get the invitation. Check the address on the team, then click Send again. Or copy the link from the top of Exhibitors and send it yourself.
- "Too many invitations for this exhibitor. Try again in an hour." The invitation has been sent many times in a short while. Wait, or send the link another way.
- Staff can't sign in. They must type the address that is on the team, and the exhibitor's access must not have ended. Check Exhibitors keep access for in Settings.
- "A team has up to 5 people at this event." The team is full. Raise People per exhibitor in Settings, or remove someone.
- "This address is already on … 's team at this event." An address can be on one exhibitor's team per event. Remove it from the other team first.
- A scan says "That badge isn't a current registration at this event." The registration is cancelled or awaiting approval. Check it in the attendee list.
- A lead shows Registration removed. The person's registration was cancelled or removed after the scan, so their details aren't shown. The exhibitor's notes stay.
- Leads says "Seeing who they are needs access to the event's attendees." Your role can see Onsite but not the attendee list. Ask an event admin for access.
- Emails and phone numbers are partly hidden. Your role can't export personal data. Names, company and job title show in full. Someone who can export sees them whole and can export the leads.
- Someone else changed these settings. Another person saved first. Click Reload, then make your change again.
Who can do this#
Everyone who can see Onsite for the event sees the exhibitors, their teams, the lead counts and the settings. Seeing the leads also needs access to the event's attendees, and exporting them needs permission to export personal data. Organisation owners and admins, Event Admin and Event Editor can change teams and settings. Exhibitors' booth staff never see this page: they use their own screens, described in Scan leads at your booth.
Related guides
- Scan leads at your boothSign in to Lead Retrieval on your phone, scan the badges of the people who visit your booth, add notes and a rating to each lead, and export your leads.
- Add an app to your eventSee which add-on apps your plan includes, add one to an event so it joins the menu for the whole team, and take it off again when you no longer need it.
- Add pages, event content and picturesAdd more pages to your event site, keep your agenda, speakers, sponsors, FAQ and documents in one place for every page, and manage the pictures the site uses.
- Design the Event PassportChoose the sessions and exhibitor booths that earn a stamp, set a goal and a reward, and design the passport attendees fill at the event.
Still stuck? In EventNook, ask HeyNook. It knows the page you're on and your event, and can take you straight to the right setting.