Design the Event Passport
Choose the sessions and exhibitor booths that earn a stamp, set a goal and a reward, and design the passport attendees fill at the event.
Where to find it: Event admin › Apps › Event Passport
The Event Passport gives each attendee a passport that fills with a stamp for every session they attend and every exhibitor booth they visit, on the way to a goal and a reward. You design it here: what earns a stamp, the goal, the reward and how the passport looks.
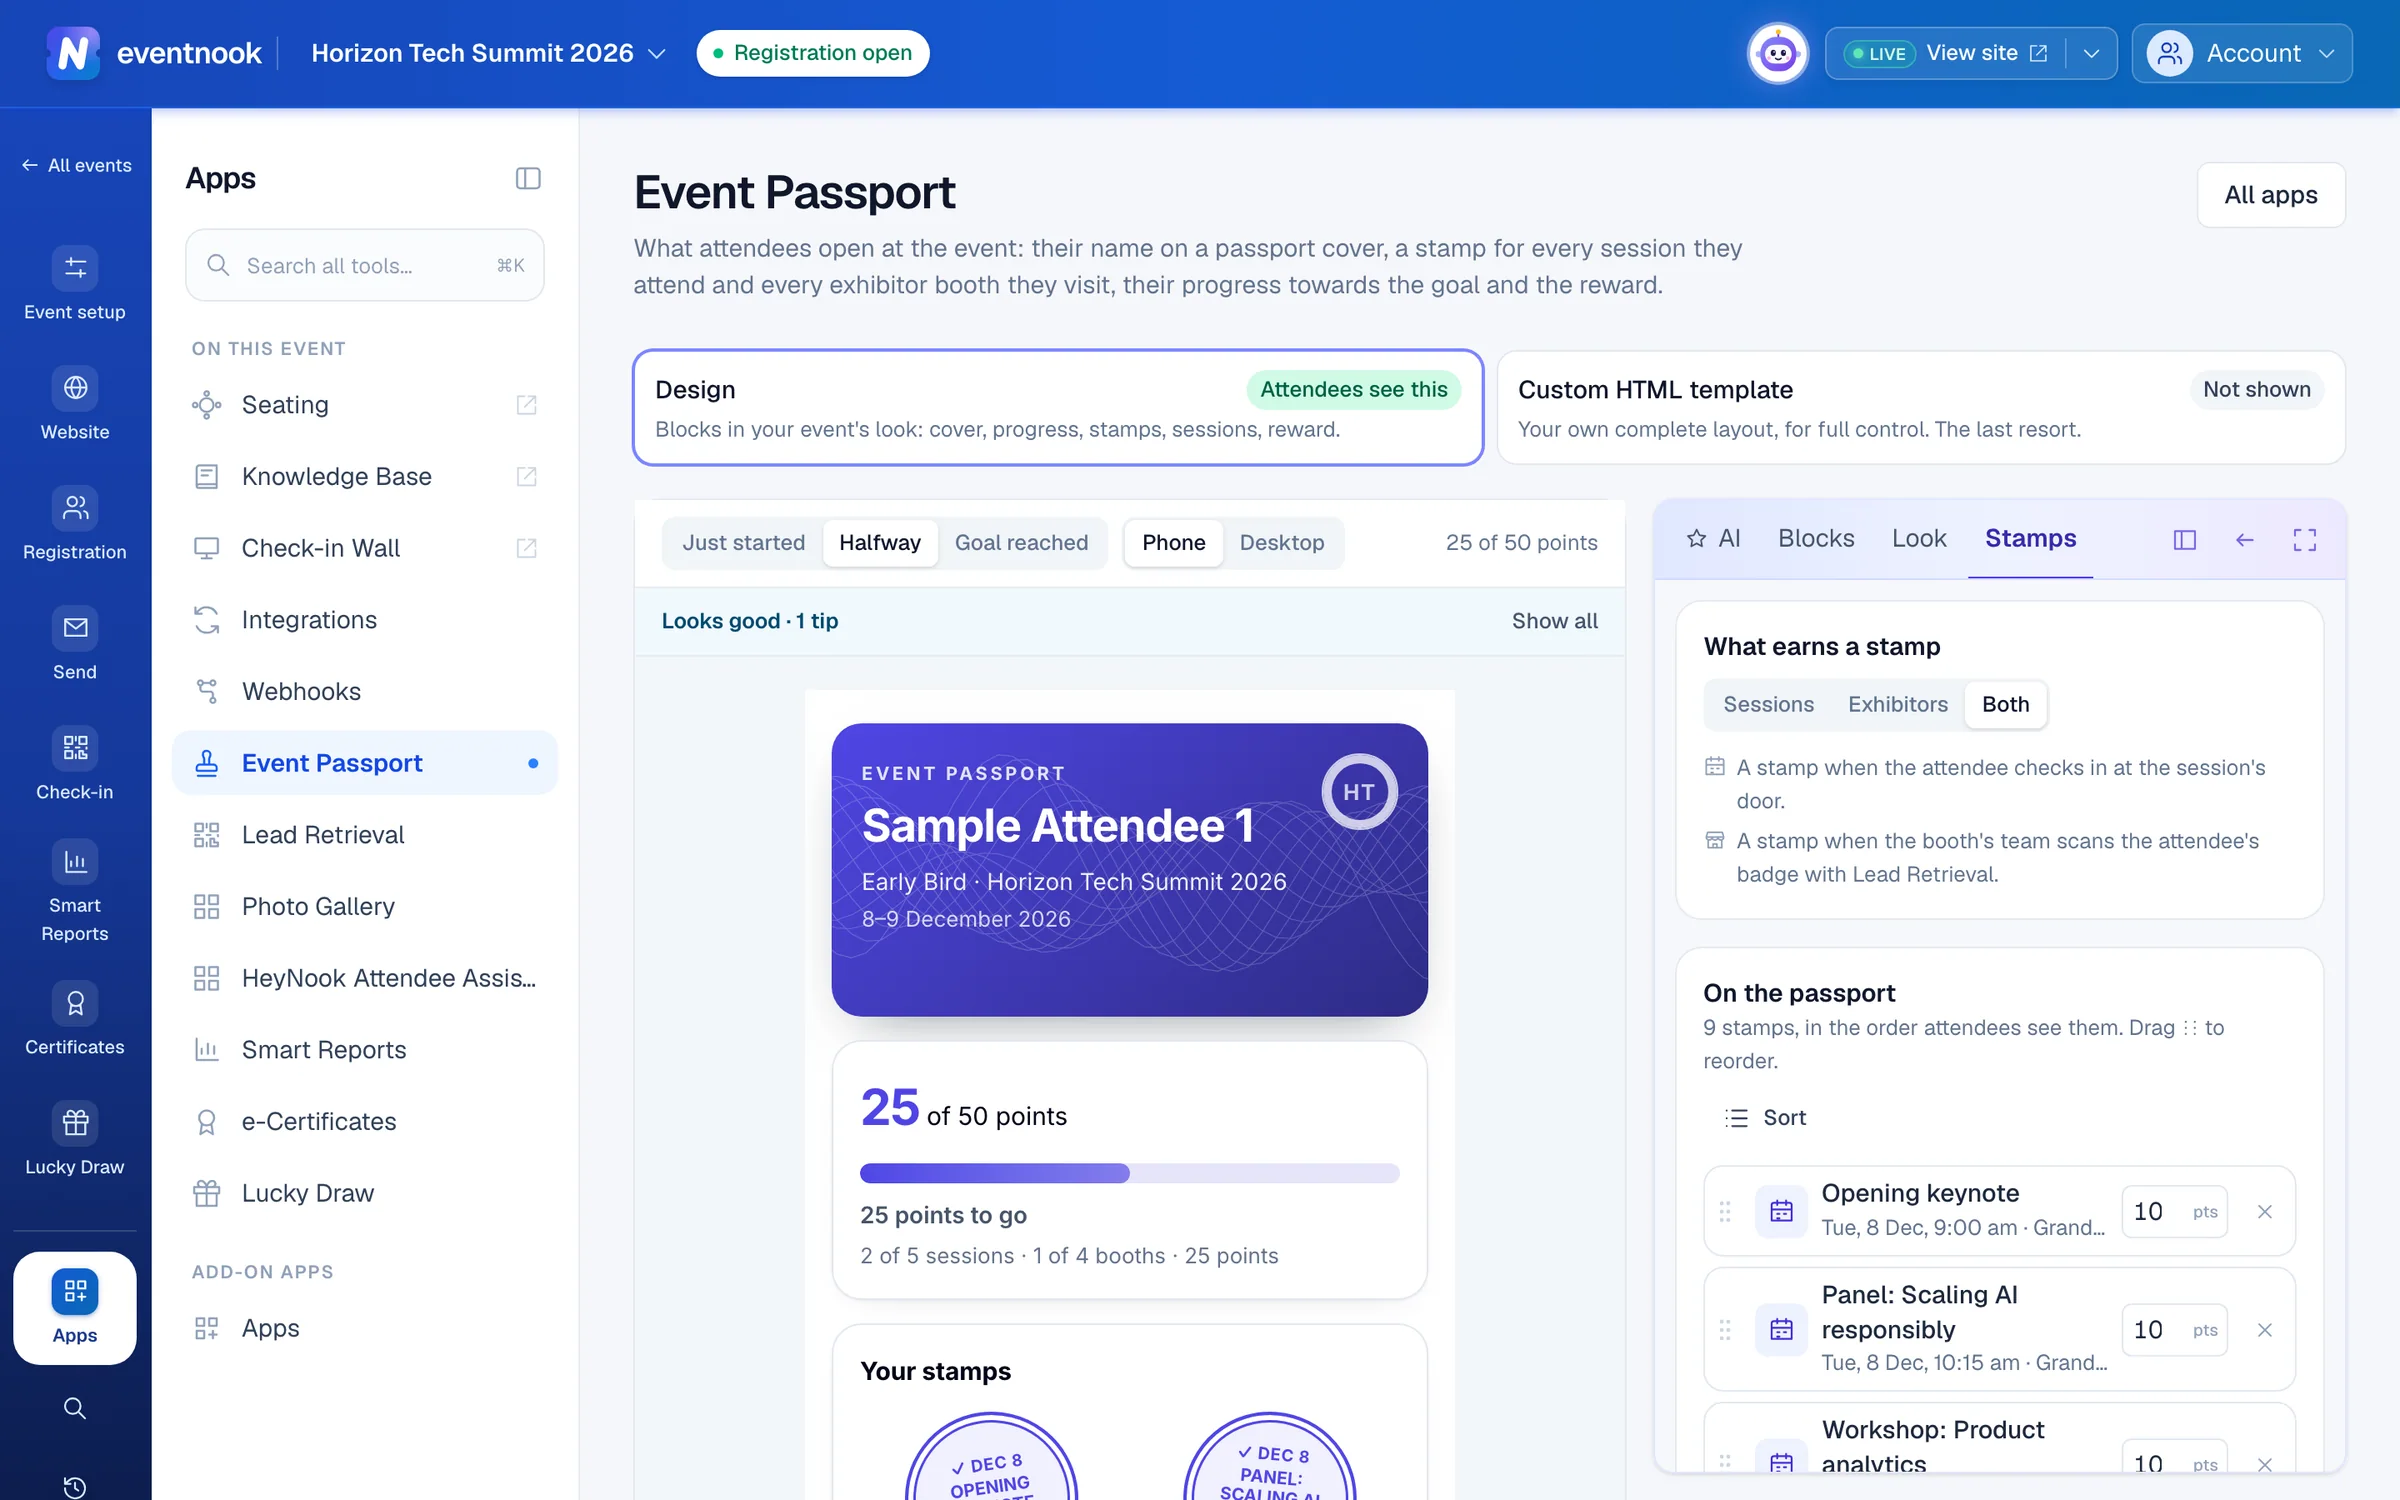
- 1Collect sessions, exhibitor booths or both
- 2The stops that earn a stamp, in the order attendees see them
- 3See the passport at the start, halfway or with the goal reached
- 4Draw it on a phone or a desktop
Add the app to your event#
The Event Passport is an add-on app. Add it to the event from Apps (see Add an app to your event), then open it from Apps › On this event › Event Passport. If Apps says it isn't in your organisation's plan, ask EventNook to add it.
The Session Passport and the Exhibitor Passport are now one Event Passport. An old link to the Exhibitor Passport opens Stamps & reward here.
Choose what earns a stamp#
- Open Event Passport and click Stamps in the panel beside the passport.
- Under What earns a stamp, choose Sessions, Exhibitors or Both.
- Click Add all to put every session or exhibitor on the passport, or click Choose sessions or Choose exhibitors, tick the ones that count and click the Add button under the list.
- Drag ⋮⋮ to put the stops in the order attendees see them. Or click Sort and choose By time, By booth, Sessions first, Booths first or A to Z.
- Click Save stamps & reward.
Once the passport has stops, Add sessions and Add exhibitors under the list add more. A passport holds up to 200 stamps. To take a stop off, click the × on its row.
| Stop | When the attendee gets its stamp |
|---|---|
| Session | When they check in at the session's door. Sessions are the check-in sessions in Onsite: see Check people in to sessions. |
| Exhibitor | When the booth's team scans their badge with Lead Retrieval: see Lead Retrieval. Exhibitors are the sponsors and exhibitors in Special event content › Sponsors, or the ones added in Lead Retrieval. |
Set a goal and a reward#
- In Stamps, under The goal counts, choose Stamps or Points. With Stamps, every stop counts the same. With Points, each stop is worth the points in the box on its row.
- Turn on Set a goal and type the goal. The hint under it says how many stamps or points can be collected.
- Under Reward, type what attendees get, such as a limited-edition tote bag.
- Type How to collect it: where, and until when. It shows under the reward.
- Click Save stamps & reward.
- Above the passport, click Goal reached to see the reward unlocked.
Without a goal, the passport counts what attendees collect and the reward never unlocks.
Change the blocks#
The passport is built from blocks, top to bottom. Click a block on the passport, or in the Blocks tab, to select it and change its settings.
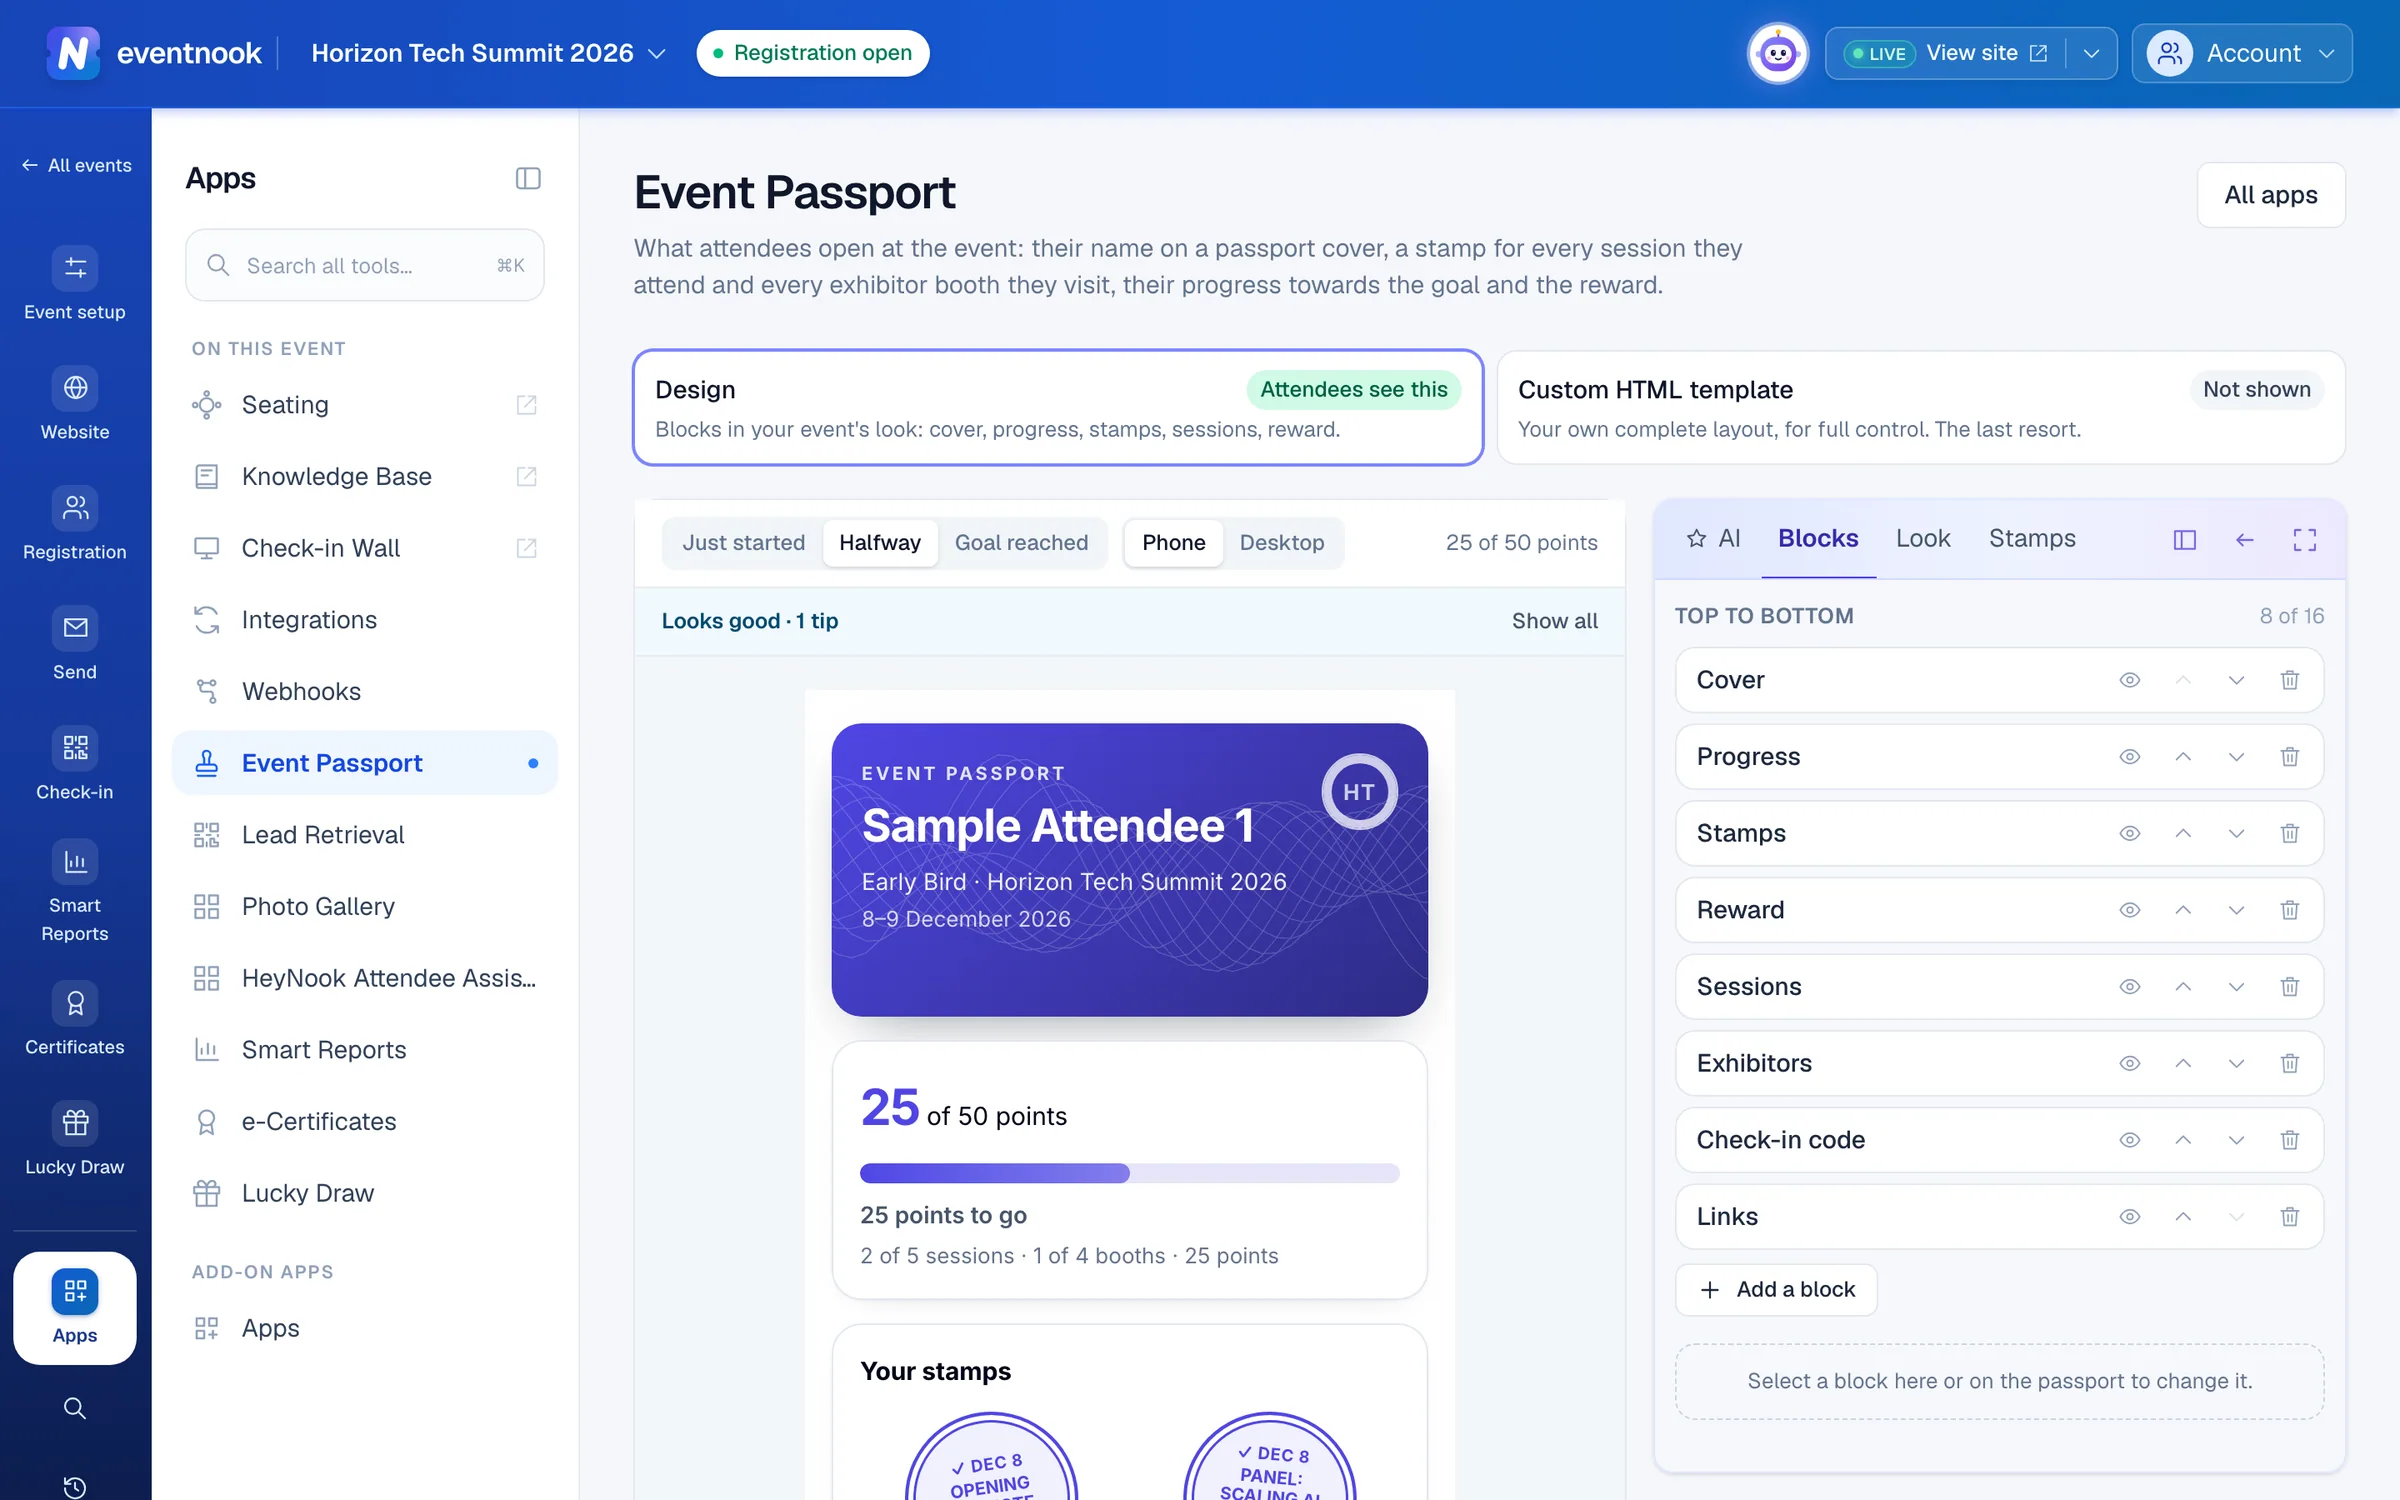
- 1The design, or your own HTML template
- 2AI, Blocks, Look and Stamps
- 3The passport's blocks; select one to change it
- 4Add a block, such as How it works or your own text
- Click Blocks in the panel.
- Select a block and change its settings below the list, such as its Heading.
- Use the buttons on its row to Hide, Move up, Move down or Remove it.
- Optional: click Add a block and choose one.
- Click Save in the bar that appears under the passport.
| Block | What it shows |
|---|---|
| Cover | The attendee's name, with their ticket type, the event's name and dates if you choose. |
| Progress | How far they are towards the goal, as a Bar, a Ring or Steps. |
| Stamps | A stamp for each stop, inked once collected. Stops still to collect can show faintly. |
| Sessions | The sessions, with time, room and points, each marked checked in or not yet. |
| Exhibitors | The booths, with logo, booth number and points, each marked visited or not yet. |
| Reward | The reward and how to collect it, unlocked at the goal. |
| Check-in code | The attendee's QR code, for a session door or a booth when they don't have their badge. |
| How it works | Up to four short numbered steps. |
| Text | Your own words, such as the prize desk's opening hours. Up to four. |
| Links | Back to the event's website, and to the attendee's order. |
A passport has up to 16 blocks. A Sessions block on a passport of exhibitors only, or an Exhibitors block on one of sessions only, is marked Not collected: attendees don't see it.
Change the look#
- Click Look in the panel.
- Under Start from a look, click Event colours, Classic passport, Modern, Festival, Minimal or After dark. Your blocks stay as they are.
- Adjust the Colour, the Page the passport sits on, the Cards, the Cover, the Stamps, and Shape and type.
- Click Save in the bar under the passport.
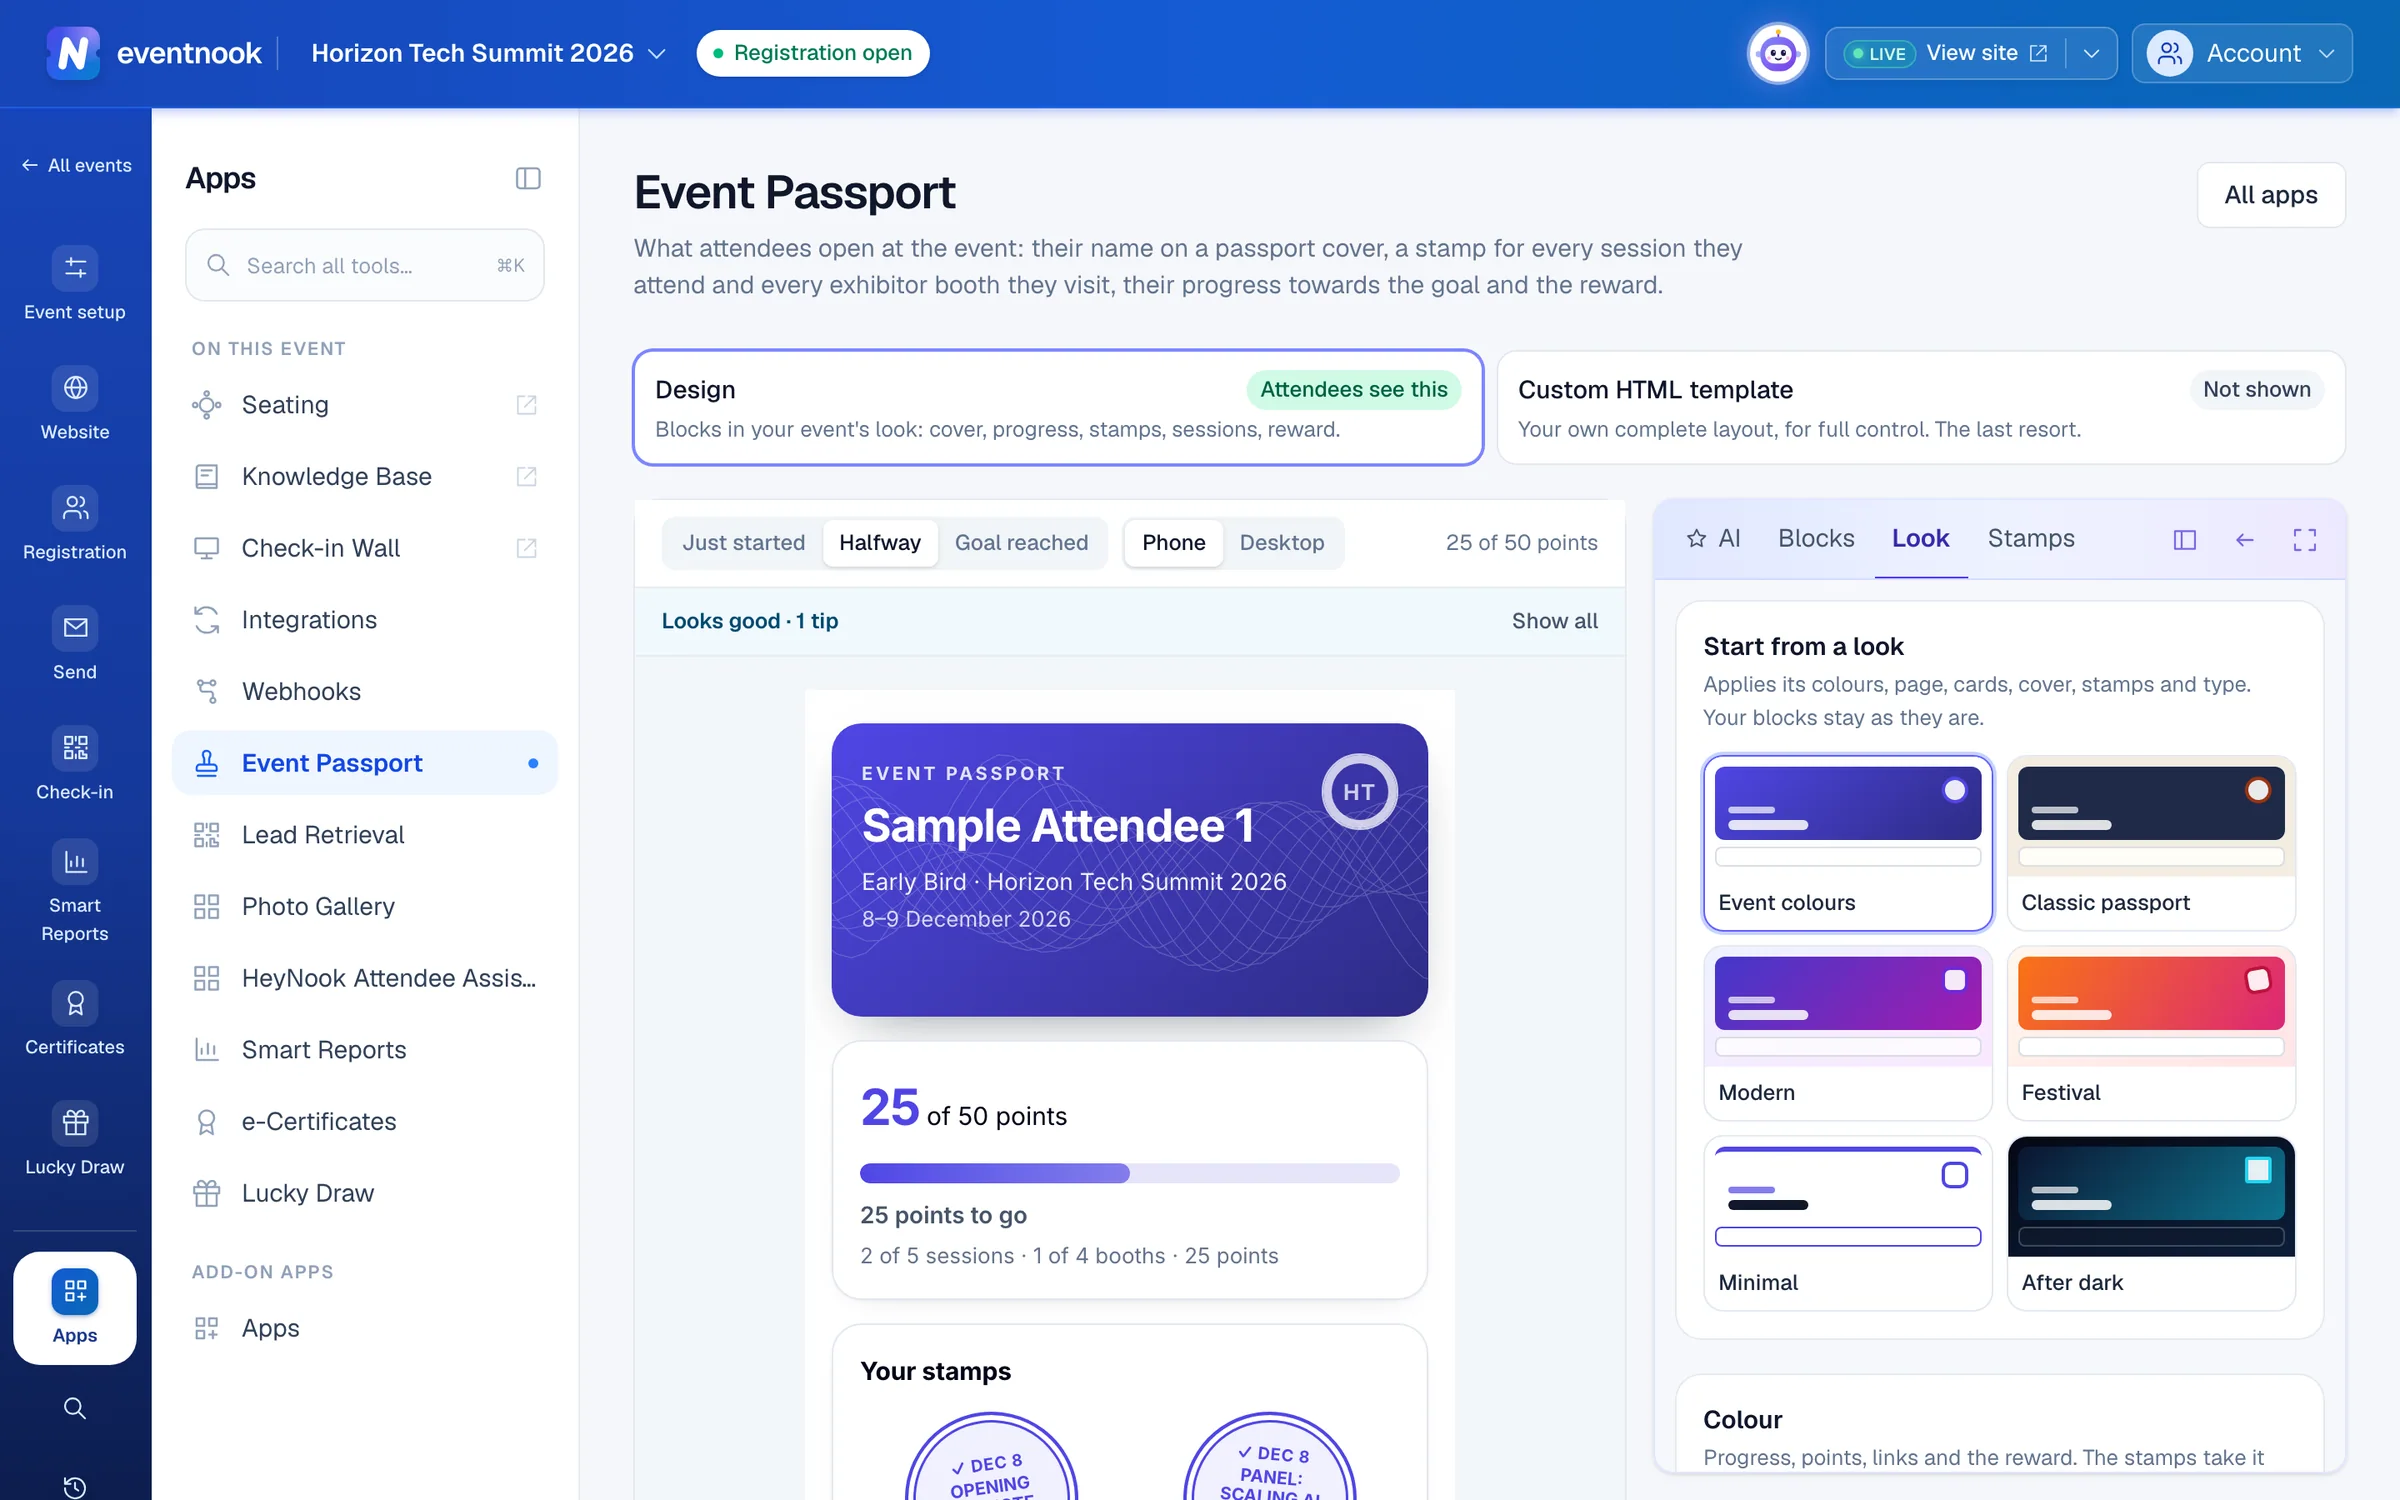
- 1Apply a ready-made look, then adjust it below
Design with AI#
The AI tab is @Passport, HeyNook's passport specialist. Describe what you want, such as "a classic navy and gold passport with tilted stamps", and the passport changes as it works.
- Under the message box, About says what a request is for: Whole passport for an overall change, or A section to point at one part of the passport and click it.
- Undo takes @Passport's last change back.
- Nothing is saved until you click Save.
If the tab says @Passport isn't available here, design the passport by hand in Blocks, Look and Stamps.
Check and save#
Above the passport, a check says what would let it down, such as a goal nobody can reach, with how to fix it. Click one about a block to select that block. When all is well it says Nothing found that would let the passport down.
The passport is drawn for a sample attendee with this event's own sessions and exhibitors. Until something earns a stamp, it shows sample stops. No real attendee is loaded.
Save keeps the design and Stamps & reward, whichever changed. Discard goes back to what was saved.
Use your own HTML template#
Above the editor, choose Design or Custom HTML template. A template is your own complete layout, and the last resort: while one is saved, attendees see it instead of the design. The one attendees see is marked Attendees see this.
To go back to the design, click Use the design instead in the warning above the passport and confirm. Your template is kept.
If something looks wrong#
- An exhibitor isn't in the list to add. The passport doesn't collect exhibitors, or the exhibitor isn't at the event yet. Choose Exhibitors or Both, and add the exhibitor in Special event content › Sponsors or in Lead Retrieval.
- There are no sessions to add. The event has no check-in sessions yet. Add them in Onsite, under Sessions.
- A stop is crossed out. It was removed from the event. Click × on its row and save.
- The goal says "Only … can be collected". The goal is higher than every stop together. Lower it, or add stops.
- Progress shows 0 points. No stop carries points. Give the stops points in Stamps, or count Stamps instead.
- Attendees still see the old passport after saving. A custom HTML template is in use. Click Use the design instead.
- "Someone else saved in the meantime". Another organiser saved the passport. Copy anything you want to keep, click Reload and make your change again.
Who can do this#
Everyone who can see the event's website can open the designer and preview the passport. Saving, and the AI tab, need the Event Editor or Event Admin role, or an organisation owner or admin. Adding the app to the event is covered in Add an app to your event.
Related guides
- Add an app to your eventSee which add-on apps your plan includes, add one to an event so it joins the menu for the whole team, and take it off again when you no longer need it.
- Run Lead Retrieval for your exhibitorsGive each exhibitor a team that scans visitors' badges at their booth, choose what they see and record about each lead, and hand them their leads after the event.
- Check people in to sessionsSet up the talks, workshops, meals and booths you check in separately from the event, decide who may enter and how entries count, and check people in at the room.
- Design the attendee portalDesign Manage My Orders, the page where people who registered see and manage their registrations, and find the other screens attendees use after registering.
Still stuck? In EventNook, ask HeyNook. It knows the page you're on and your event, and can take you straight to the right setting.