Send changes to your own systems with webhooks
Send registrations, attendees, payments and check-ins to your own systems as they happen, check every delivery, and send failed ones again.
Where to find it: Event admin › Event setup › More settings › Webhooks
Webhooks send your event's changes to your own systems the moment they happen: a CRM, a data warehouse, an automation tool or a display at the venue. Each change is posted to an address you choose, signed so your system knows it came from EventNook, and retried until it arrives.
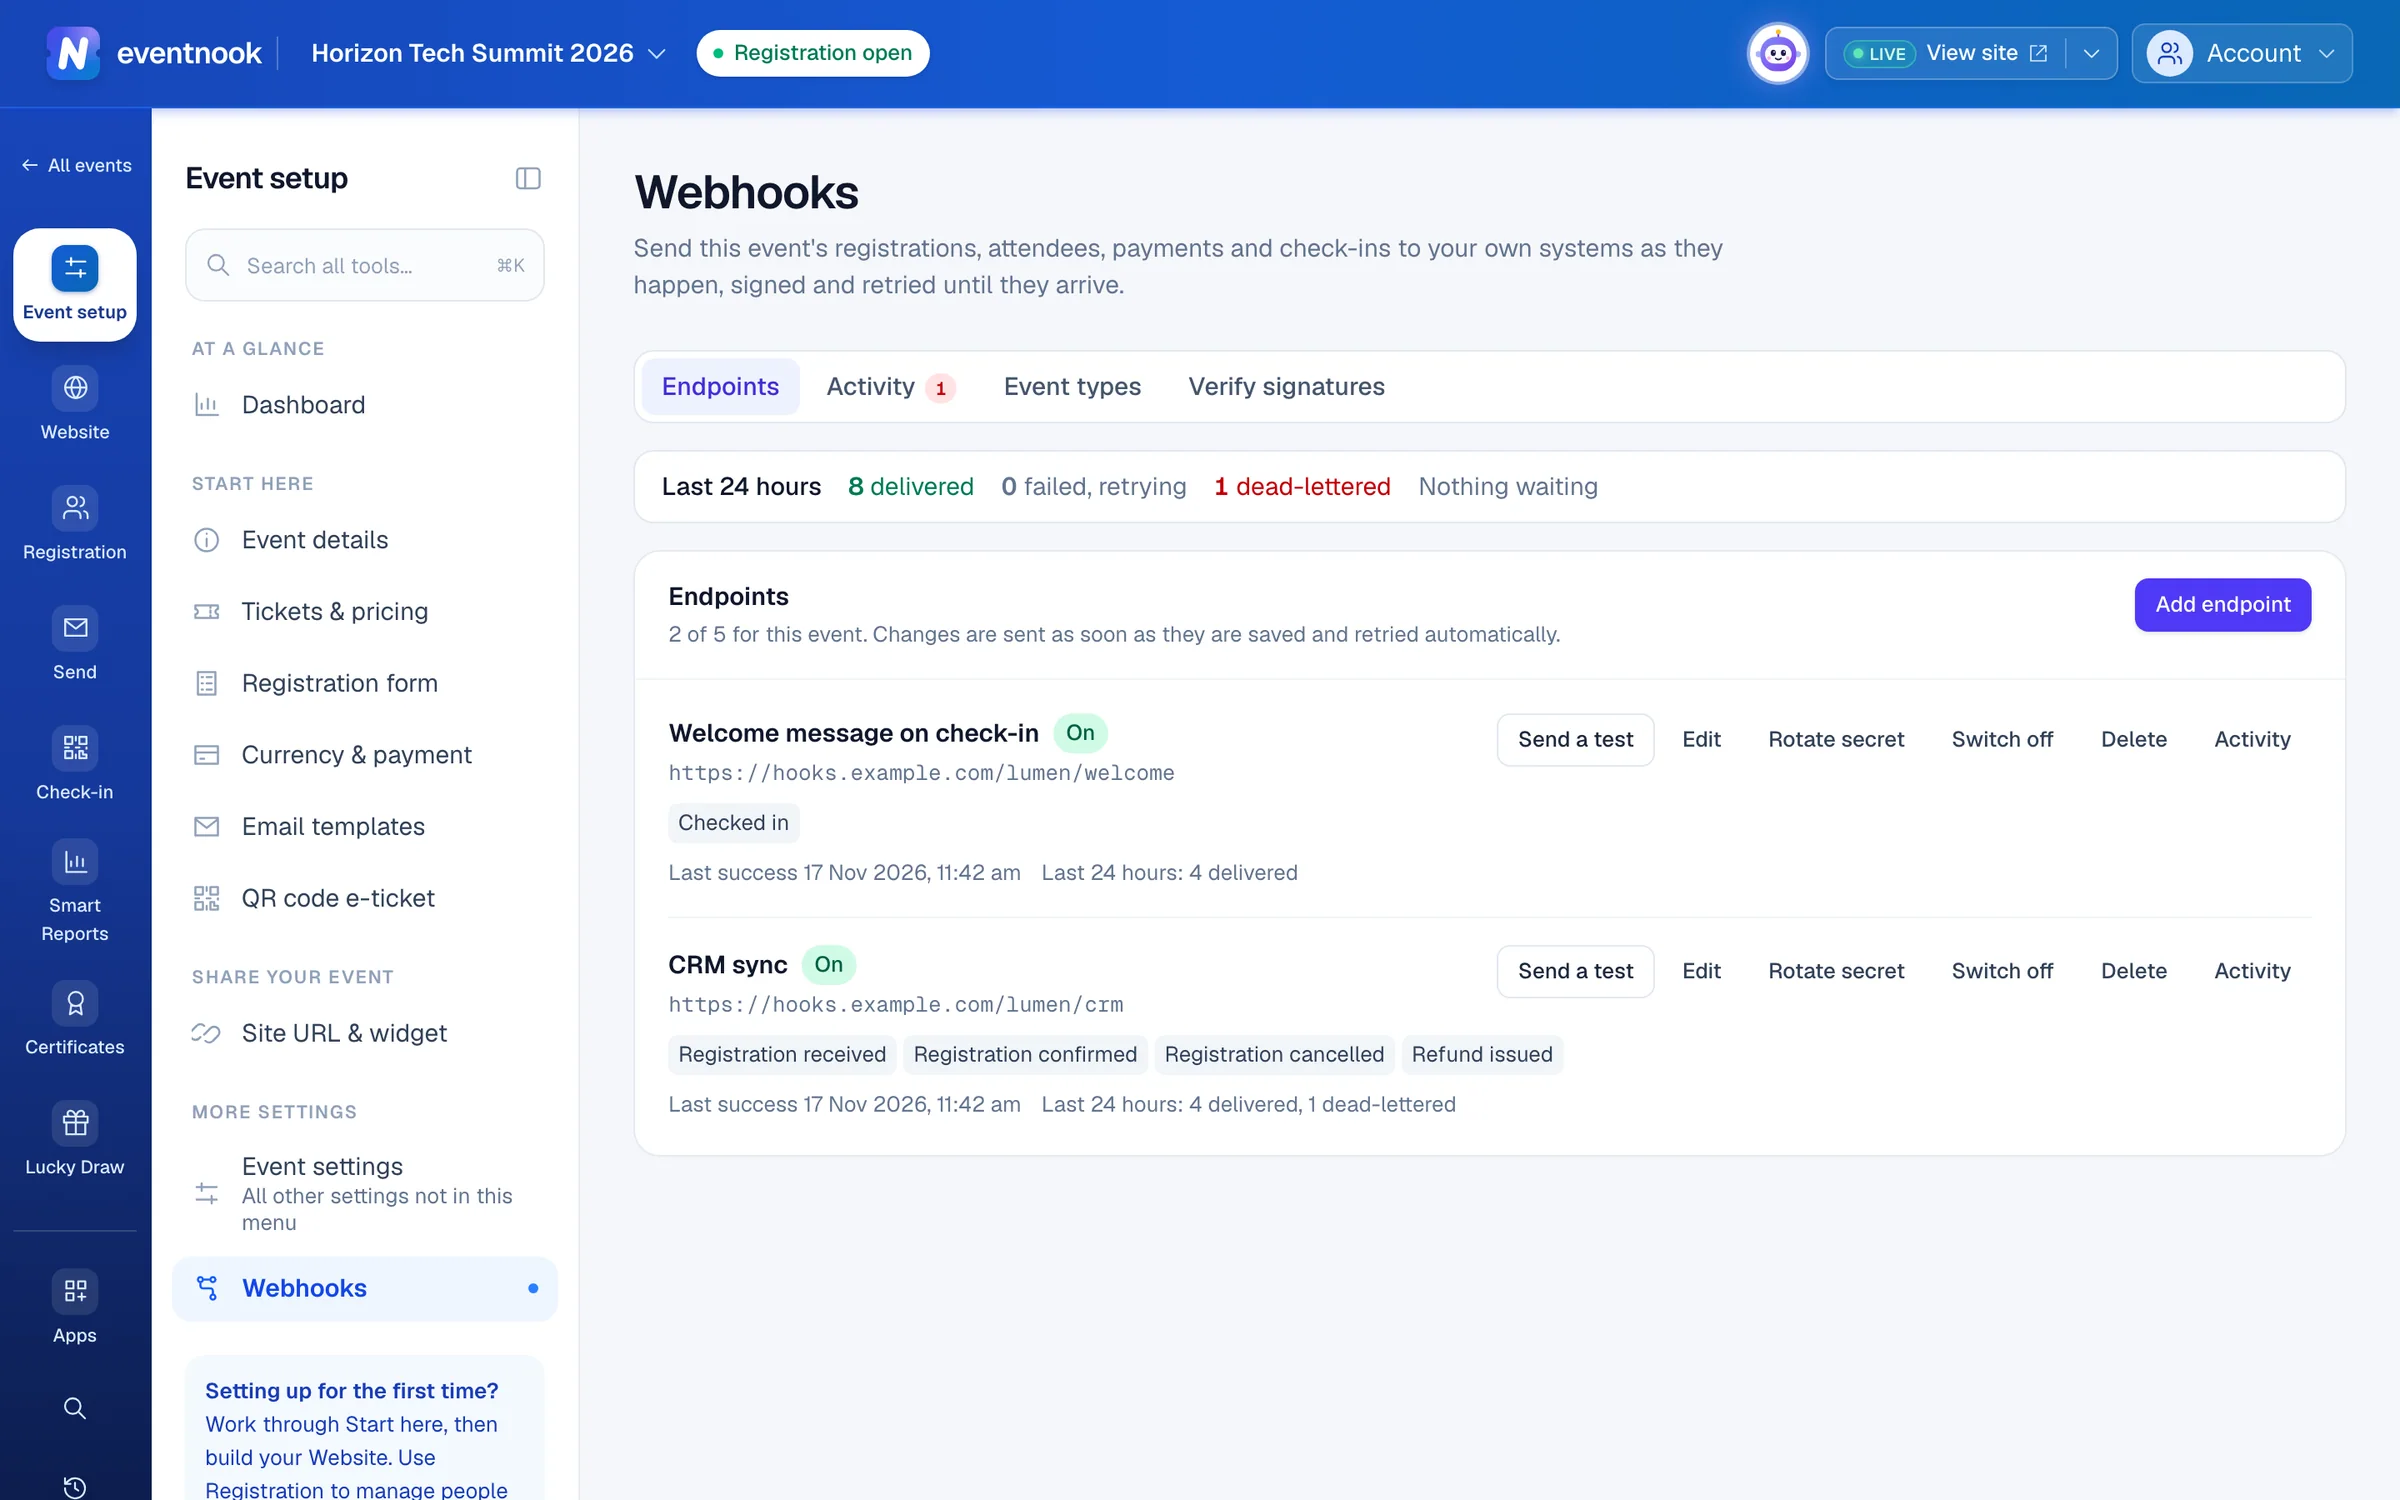
- 1Endpoints, the delivery log, what can be sent, and how to check signatures
- 2Add the address of your system
Before you start#
- Your organisation needs the Webhooks add-on app. On the event's Apps page, Webhooks shows Always on with your plan when you have it. Without it, the Endpoints section explains how to get it: ask EventNook to add it to your subscription.
- You need an https address on your system that answers within 10 seconds. Your developer can read what the endpoint must do.
Add the app to your event#
Webhooks isn't added event by event. Once your organisation has it, every event has Webhooks in its menu, and Open on the Apps page. See Add an app to your event for the Apps page.
Add an endpoint#
An endpoint is the address that receives the changes. An event can have up to 5.
- Open Webhooks and click Add endpoint.
- Type the Endpoint URL. It must start with https and be reachable from the internet.
- Optional: type a Description so the team knows what it is, such as "Salesforce sync".
- Under Events to send, tick the changes it should receive. Select all ticks a whole group.
- Click Add endpoint.
- Copy the signing secret and click I've copied it. It is shown this once; your system uses it to check each delivery.
- Click Send a test on the endpoint's row. The result shows below it, with what your system answered.
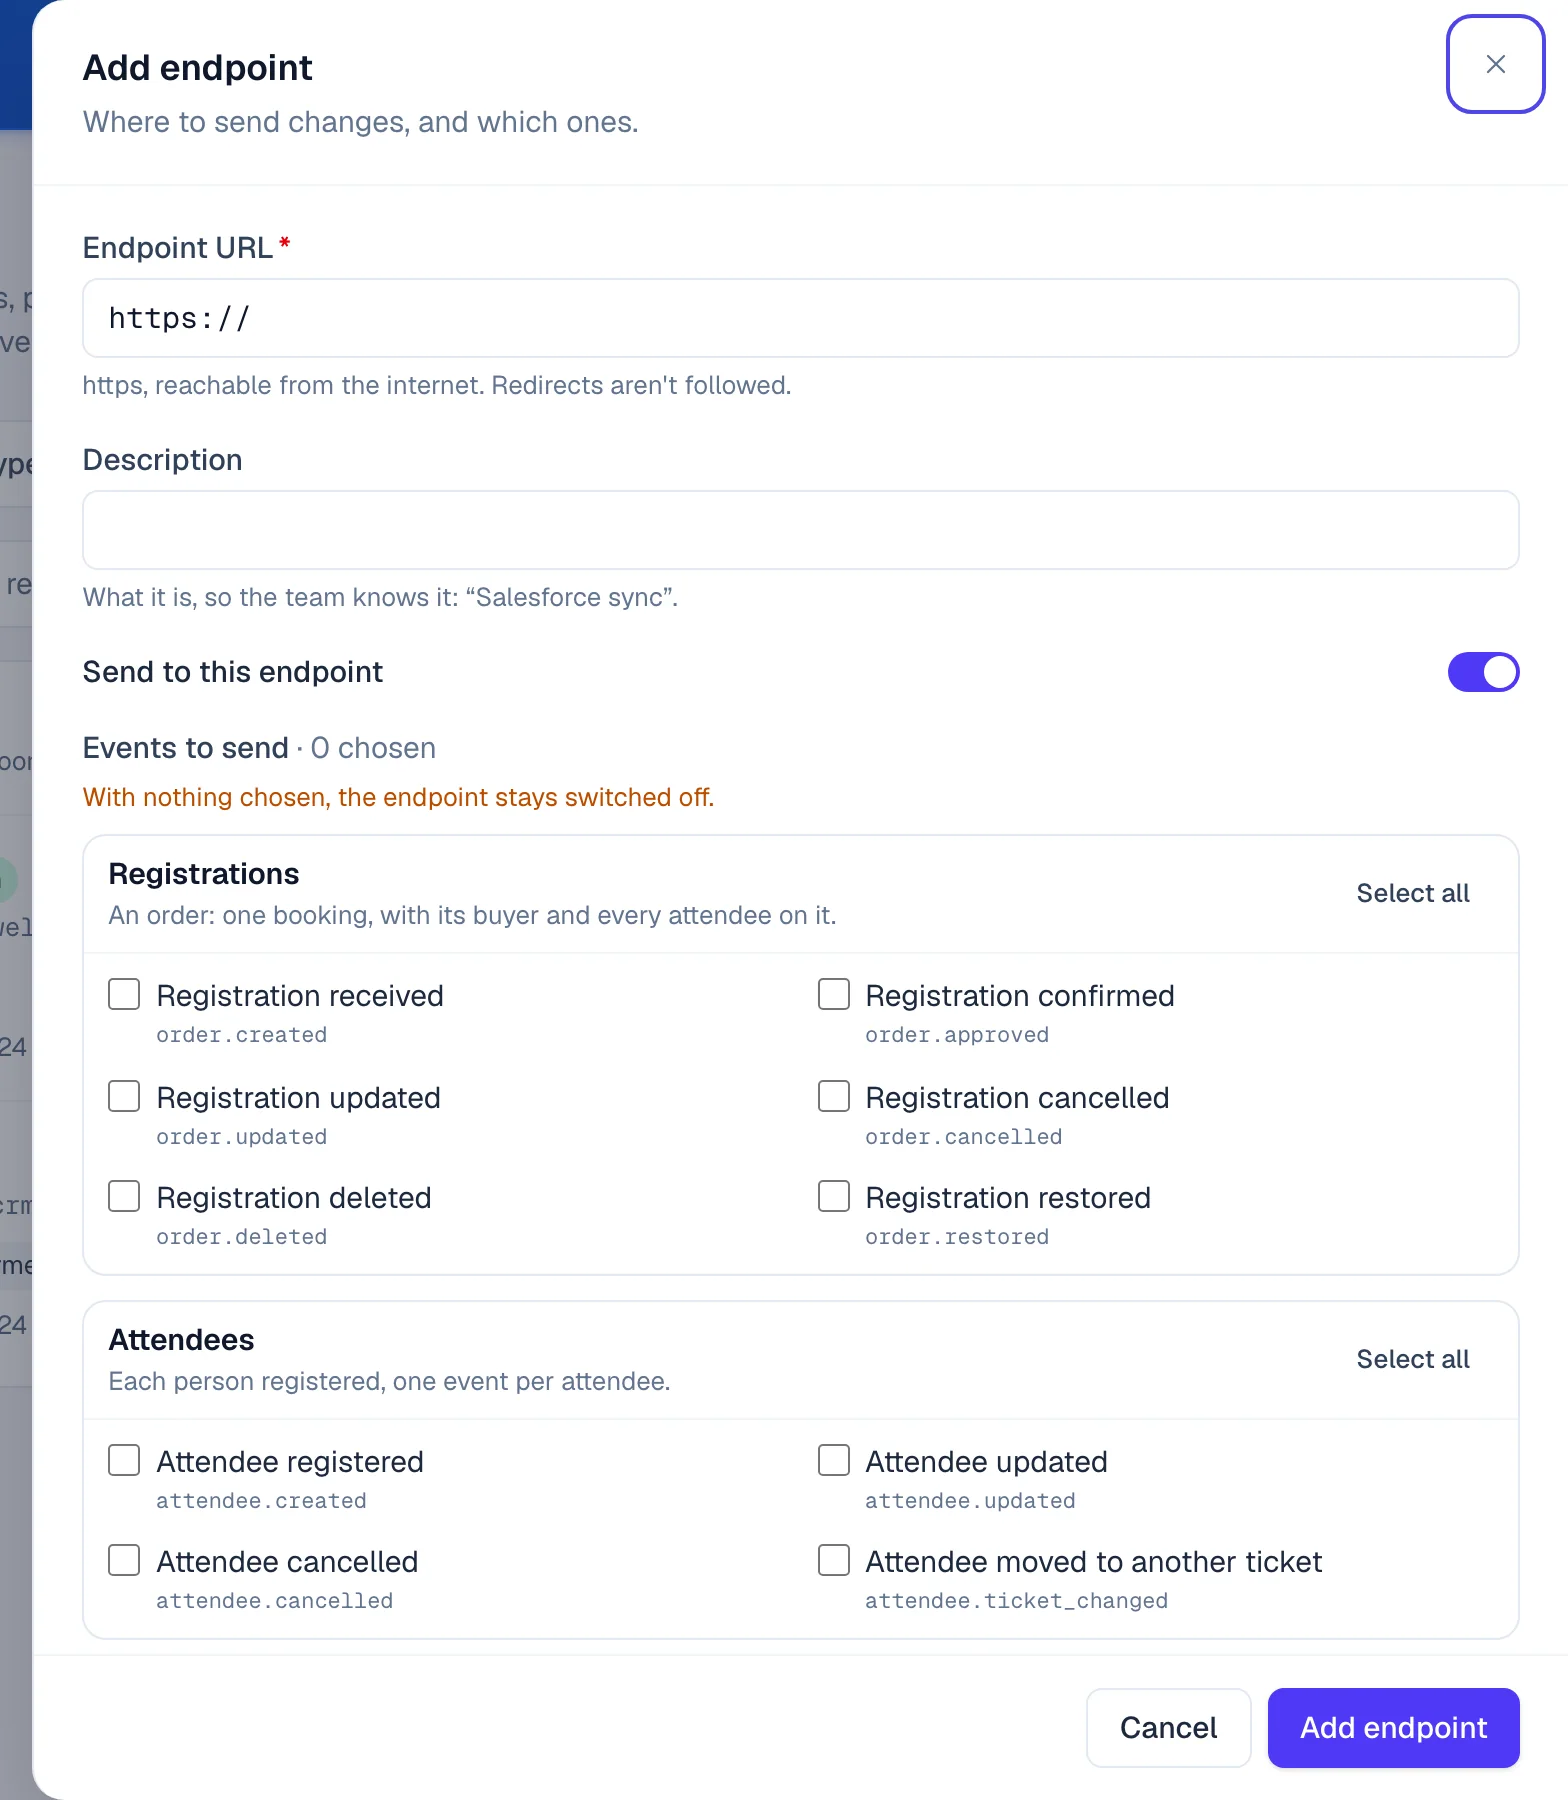
- 1Your system's https address
- 2Tick the changes it should receive
- 3Saves it and shows the signing secret once
Changes are sent as soon as they are saved, so nobody waits for your system, and a slow endpoint never holds up the door. An endpoint with nothing ticked stays switched off.
What an endpoint can receive#
Event types on the Webhooks page lists every change, with what it means. In short:
| Group | Changes |
|---|---|
| Registrations | Registration received, Registration confirmed, Registration updated, Registration cancelled, Registration deleted, Registration restored |
| Attendees | Attendee registered, Attendee updated, Attendee cancelled, Attendee moved to another ticket |
| Payments | Payment received, Refund issued. Payment failed is marked Not sent yet. |
| Check-in & onsite | Checked in, Check-in undone, Checked in to a session, Checked out of a session, Session check-in undone, Badge printed, Seated at a table, Seat removed |
| Event | Event created, Event updated, Event published, Event unpublished, Registration opened, Registration closed, Event archived |
Checked out of a session is sent for sessions that track check-out.
Check deliveries and send them again#
Activity lists every delivery, newest first. A red number on the tab counts what failed in the last 24 hours, and the line above Endpoints shows the same day at a glance.
- Open Activity. Filter by Status, event type or endpoint, or search for an order number.
- Click a delivery. Summary says what it is about, Attempts shows each try and what your endpoint answered, and Payload & headers shows what was sent.
- Fix your endpoint, then click Retry now. A delivery that already arrived has Send again instead.
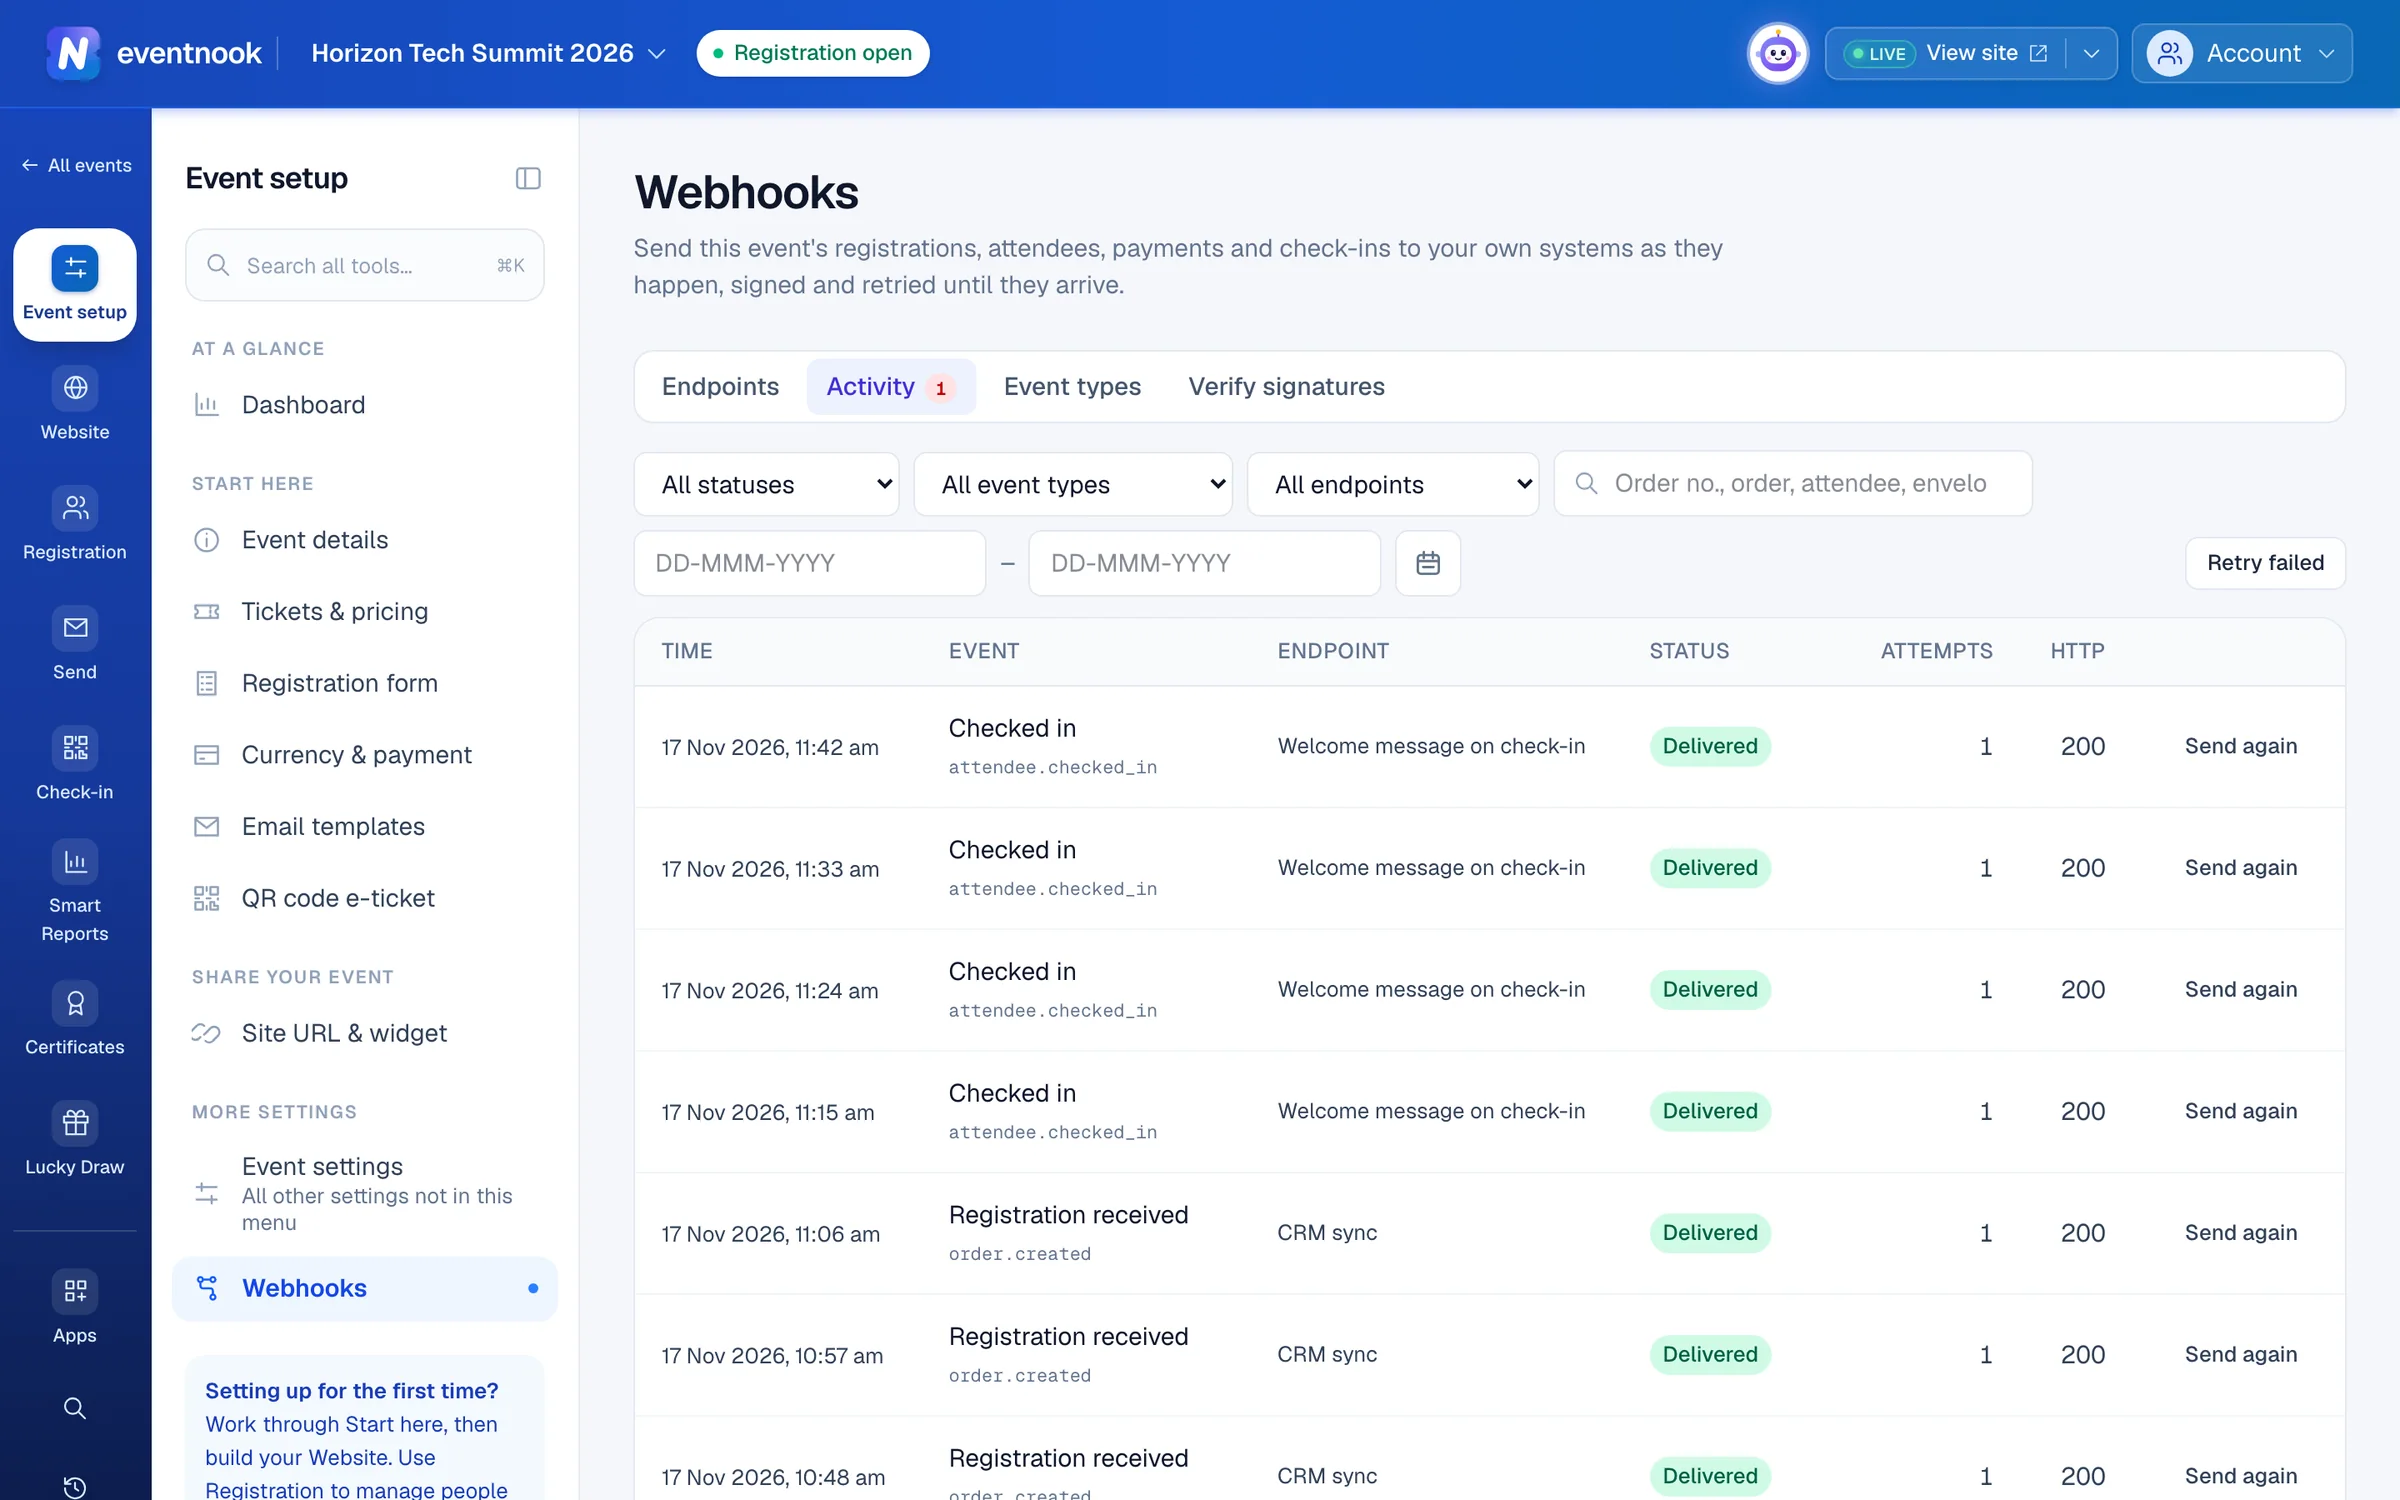
- 1Show only problems, failures or waiting deliveries
- 2Find a delivery by order number
- 3Send failed deliveries again after an outage
| Status | What it means |
|---|---|
| Waiting | Not sent yet. |
| Sending | An attempt is under way. |
| Delivered | Your endpoint answered with a 2xx status. |
| Failed, retrying | It will be tried again automatically. Next try shows when. |
| Dead-lettered | Automatic attempts have ended. Only a person sends it again. |
Send everything again after an outage#
- In Activity, set Sent from and Sent to around the time your system was down. Without dates, the last 24 hours are used.
- Optional: choose a Status, event type or endpoint to narrow it.
- Click Retry failed. The dialog says how many failed or dead-lettered deliveries match.
- Click Retry (the button shows the count). They are sent again at once, with a fresh 72 hours of automatic attempts.
Up to 500 are sent again at once, from at most 31 days. Deliveries to switched-off endpoints are skipped.
Change, switch off or rotate an endpoint#
Each endpoint's row has its actions.
- Edit changes the address, the description or the events it receives.
- Switch off stops sending. Changes made while it is off aren't sent later. Its settings and activity are kept.
- Rotate secret makes a new signing secret, shown once. Under Keep accepting the old secret for (hours), choose 0 to 168 (24 by default): until then, deliveries carry both signatures, so your system can switch over without missing any.
- Delete stops sending for good. Its past deliveries stay in Activity.
An endpoint marked Organisation-wide was set up for your whole organisation. It also receives this event's changes, and can't be changed here.
Call a system when someone checks in#
In Onsite, Workflows sets up the webhooks for check-in: a welcome message, a CRM update, a display that lights up. Each workflow is one of the event's endpoints, so it also shows on the Webhooks page in Event admin and counts towards the 5.
- In Onsite, open Settings › Workflows and click New workflow.
- Type a Name, such as "Welcome WhatsApp", and the Endpoint URL.
- Under Call it when, tick the moments that should call it. An attendee checks in to the event is ticked to start with.
- Click Save, then copy the signing secret. It isn't shown again.
- Click Send a test on the workflow to check your system answers.
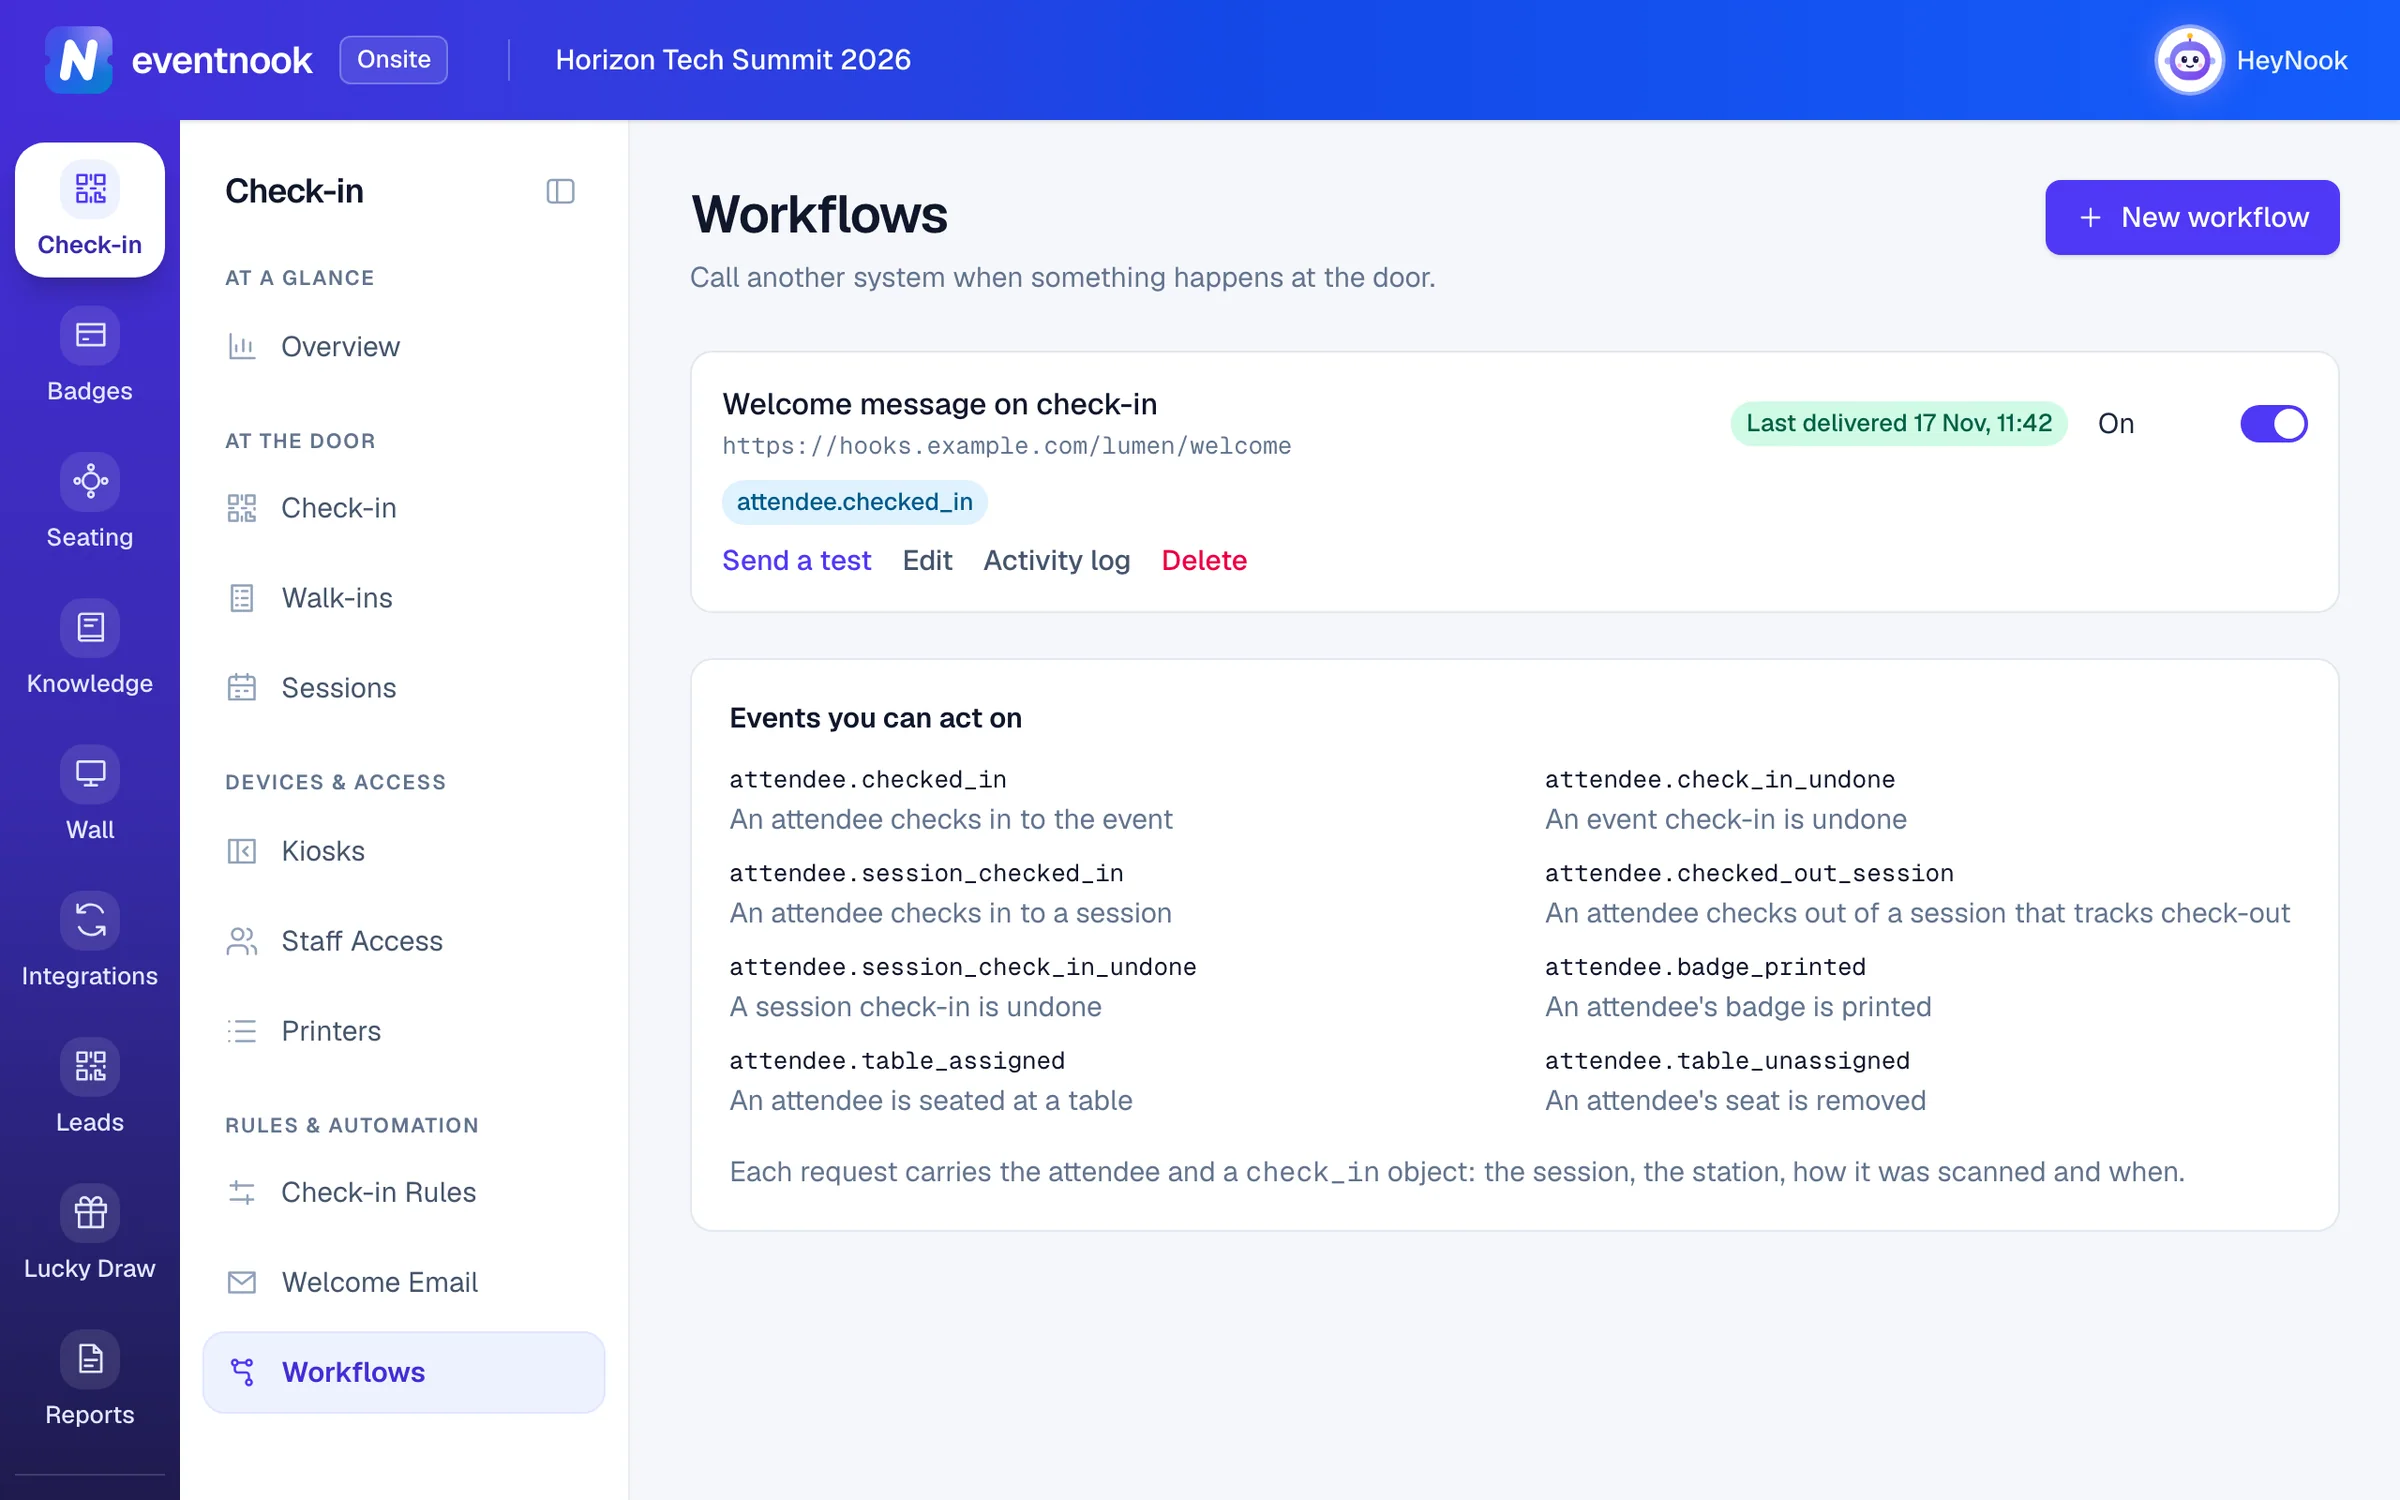
- 1Call your system when someone checks in
- 2What a workflow can be called on
Each request carries the attendee and the check-in: the session, the station, how it was scanned and when. Use the switch on a workflow to turn it on or off, and Activity log to see its deliveries in Event admin.
For your developers#
Verify signatures on the Webhooks page lists the headers on every delivery and has code to check the signature. What the endpoint must do:
- Answer with a 2xx status within 10 seconds. Anything else, or no answer in time, is retried after about 1 minute, 5 minutes, 30 minutes, 2 hours and 6 hours: at most 6 automatic attempts, and never more than 72 hours after the change.
- Do slow work after answering.
- Expect the same change more than once. Ignore an envelope id your system has already handled.
- Use the final address. Redirects are never followed.
- Check the signature over the body exactly as received, before parsing it.
Send a test posts a test delivery that is never retried. Event types shows its type.
If something looks wrong#
- An endpoint shows Switched off after failures. It failed again and again, and the organisation's owners and admins were emailed. Fix it, then click Send a test: a successful test switches it back on. Then use Retry failed for what it missed.
- Attempts say the request timed out. Your endpoint took longer than 10 seconds. Answer at once and do slow work afterwards.
- Attempts say the redirect wasn't followed. Use the final address in Endpoint URL.
- A delivery is dead-lettered. It wasn't delivered within 72 hours. Once your endpoint is ready, click Retry now or Retry failed.
- The signature doesn't match. The body was changed before checking, or the secret was rotated. Check the raw body with the current secret, and the old one during a rotation's overlap.
- Add endpoint is greyed out. The event has 5 endpoints. Delete one to add another.
- Names and emails show masked in a delivery. Seeing them needs permission to export personal data. Your endpoint received them in full.
- Webhooks is missing from the menu. Your organisation doesn't have the add-on, or your role doesn't include Webhooks. Check the Apps page, or ask an owner or admin of the event for access.
Who can do this#
Organisation owners and admins, event admins and event editors see endpoints and the activity log. Adding, changing, testing, rotating, deleting and retrying need edit access to Webhooks: organisation owners and admins, and event admins. An endpoint that receives personal data (registrations, attendees, payments or check-ins) also needs permission to export personal data.
Related guides
- Add an app to your eventSee which add-on apps your plan includes, add one to an event so it joins the menu for the whole team, and take it off again when you no longer need it.
- Bring registrations in from CventConnect your organisation's Cvent account, sync a Cvent event's registrations into an EventNook event, and keep the guest list current on the day.
- Create and manage API tokensCreate API tokens so your own software, workflow tools and AI agents can work with your organisation's events, and rotate or revoke them safely.
- Check in attendeesScan tickets or find guests by name on the Check-in screen, read the verdict, undo a mistake, and keep checking in when the venue Wi-Fi drops.
Still stuck? In EventNook, ask HeyNook. It knows the page you're on and your event, and can take you straight to the right setting.