Give attendees e-certificates
Design a certificate with each attendee's name on it, choose who gets it, publish it and send every attendee their own link.
Where to find it: Event admin › Certificates
e-Certificates gives every attendee a certificate with their own name on it. You design it once and publish it, and each attendee opens theirs online, from a personal link, an email code or their ticket's QR code ID, and saves or prints it.
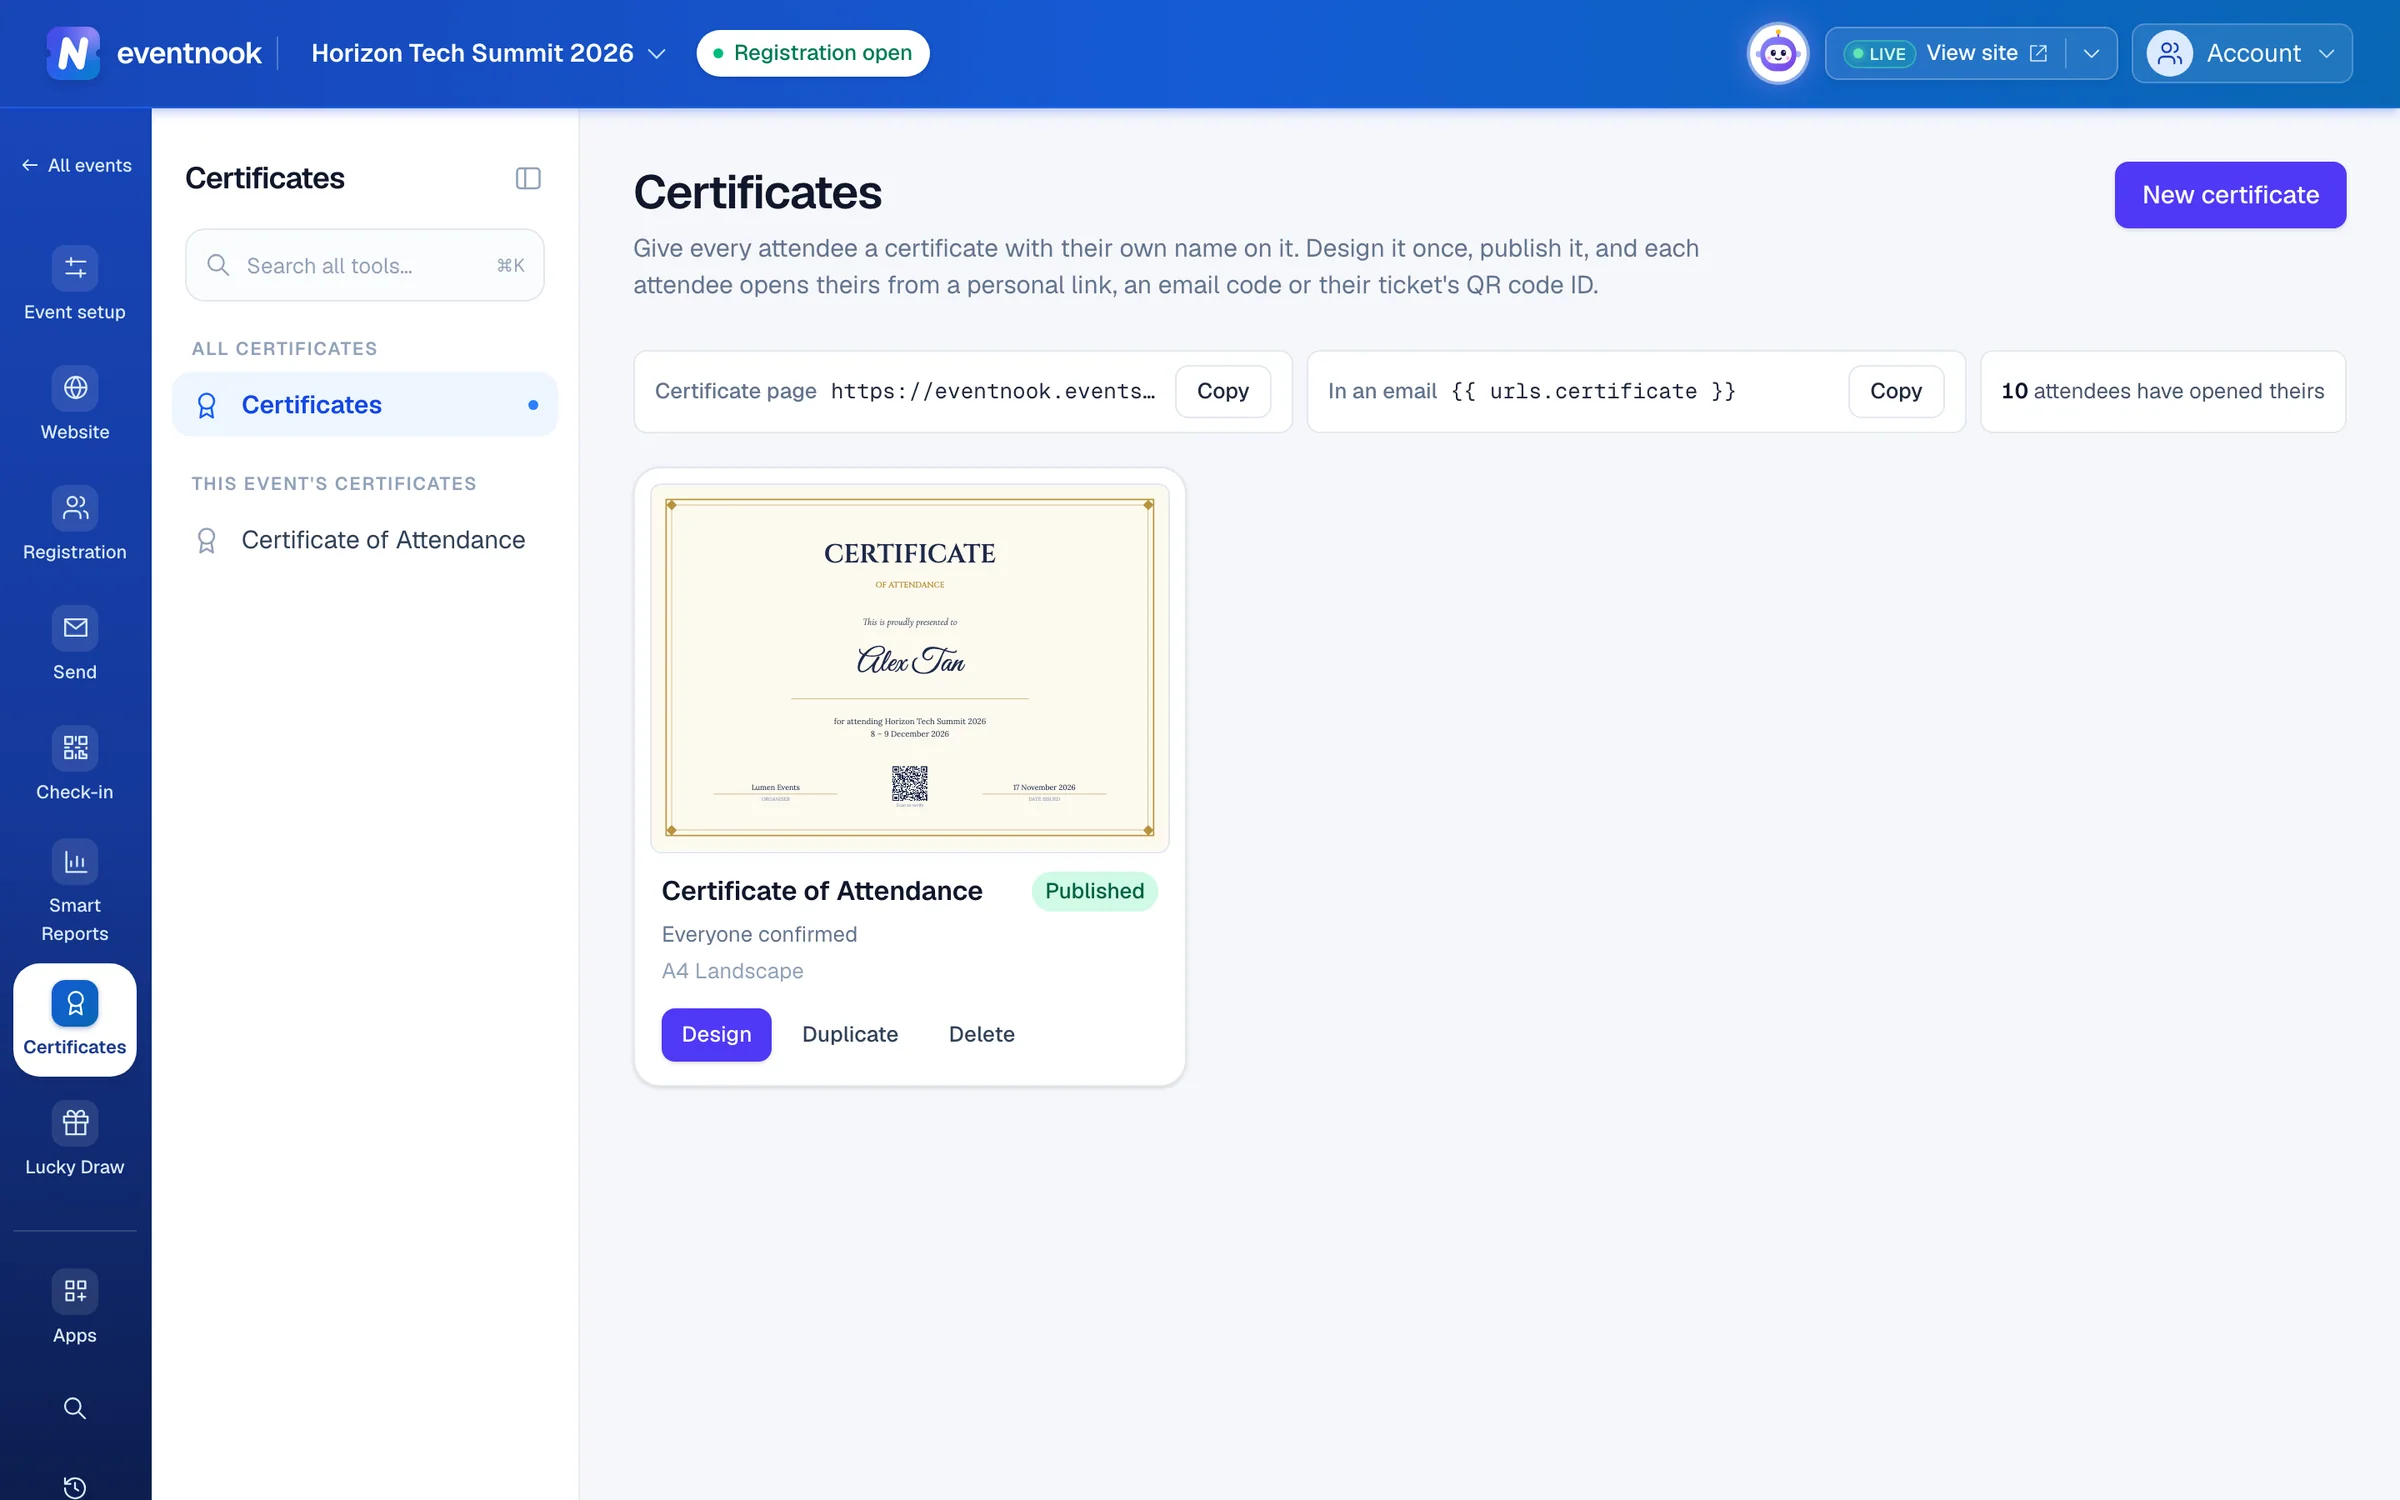
- 1Start from a ready-made certificate or your own artwork
- 2Where attendees sign in to open theirs
- 3The tag that gives each attendee their own link
Add the app to your event#
e-Certificates is an add-on app. Open Apps, find e-Certificates under Attendee engagement and click Add to this event. The event's menu then has a Certificates tab, with All certificates and the event's certificates listed by name.
If Apps shows e-Certificates under Not in your plan, your organisation doesn't have it yet: ask EventNook to add it. See Add an app to your event.
Make a certificate#
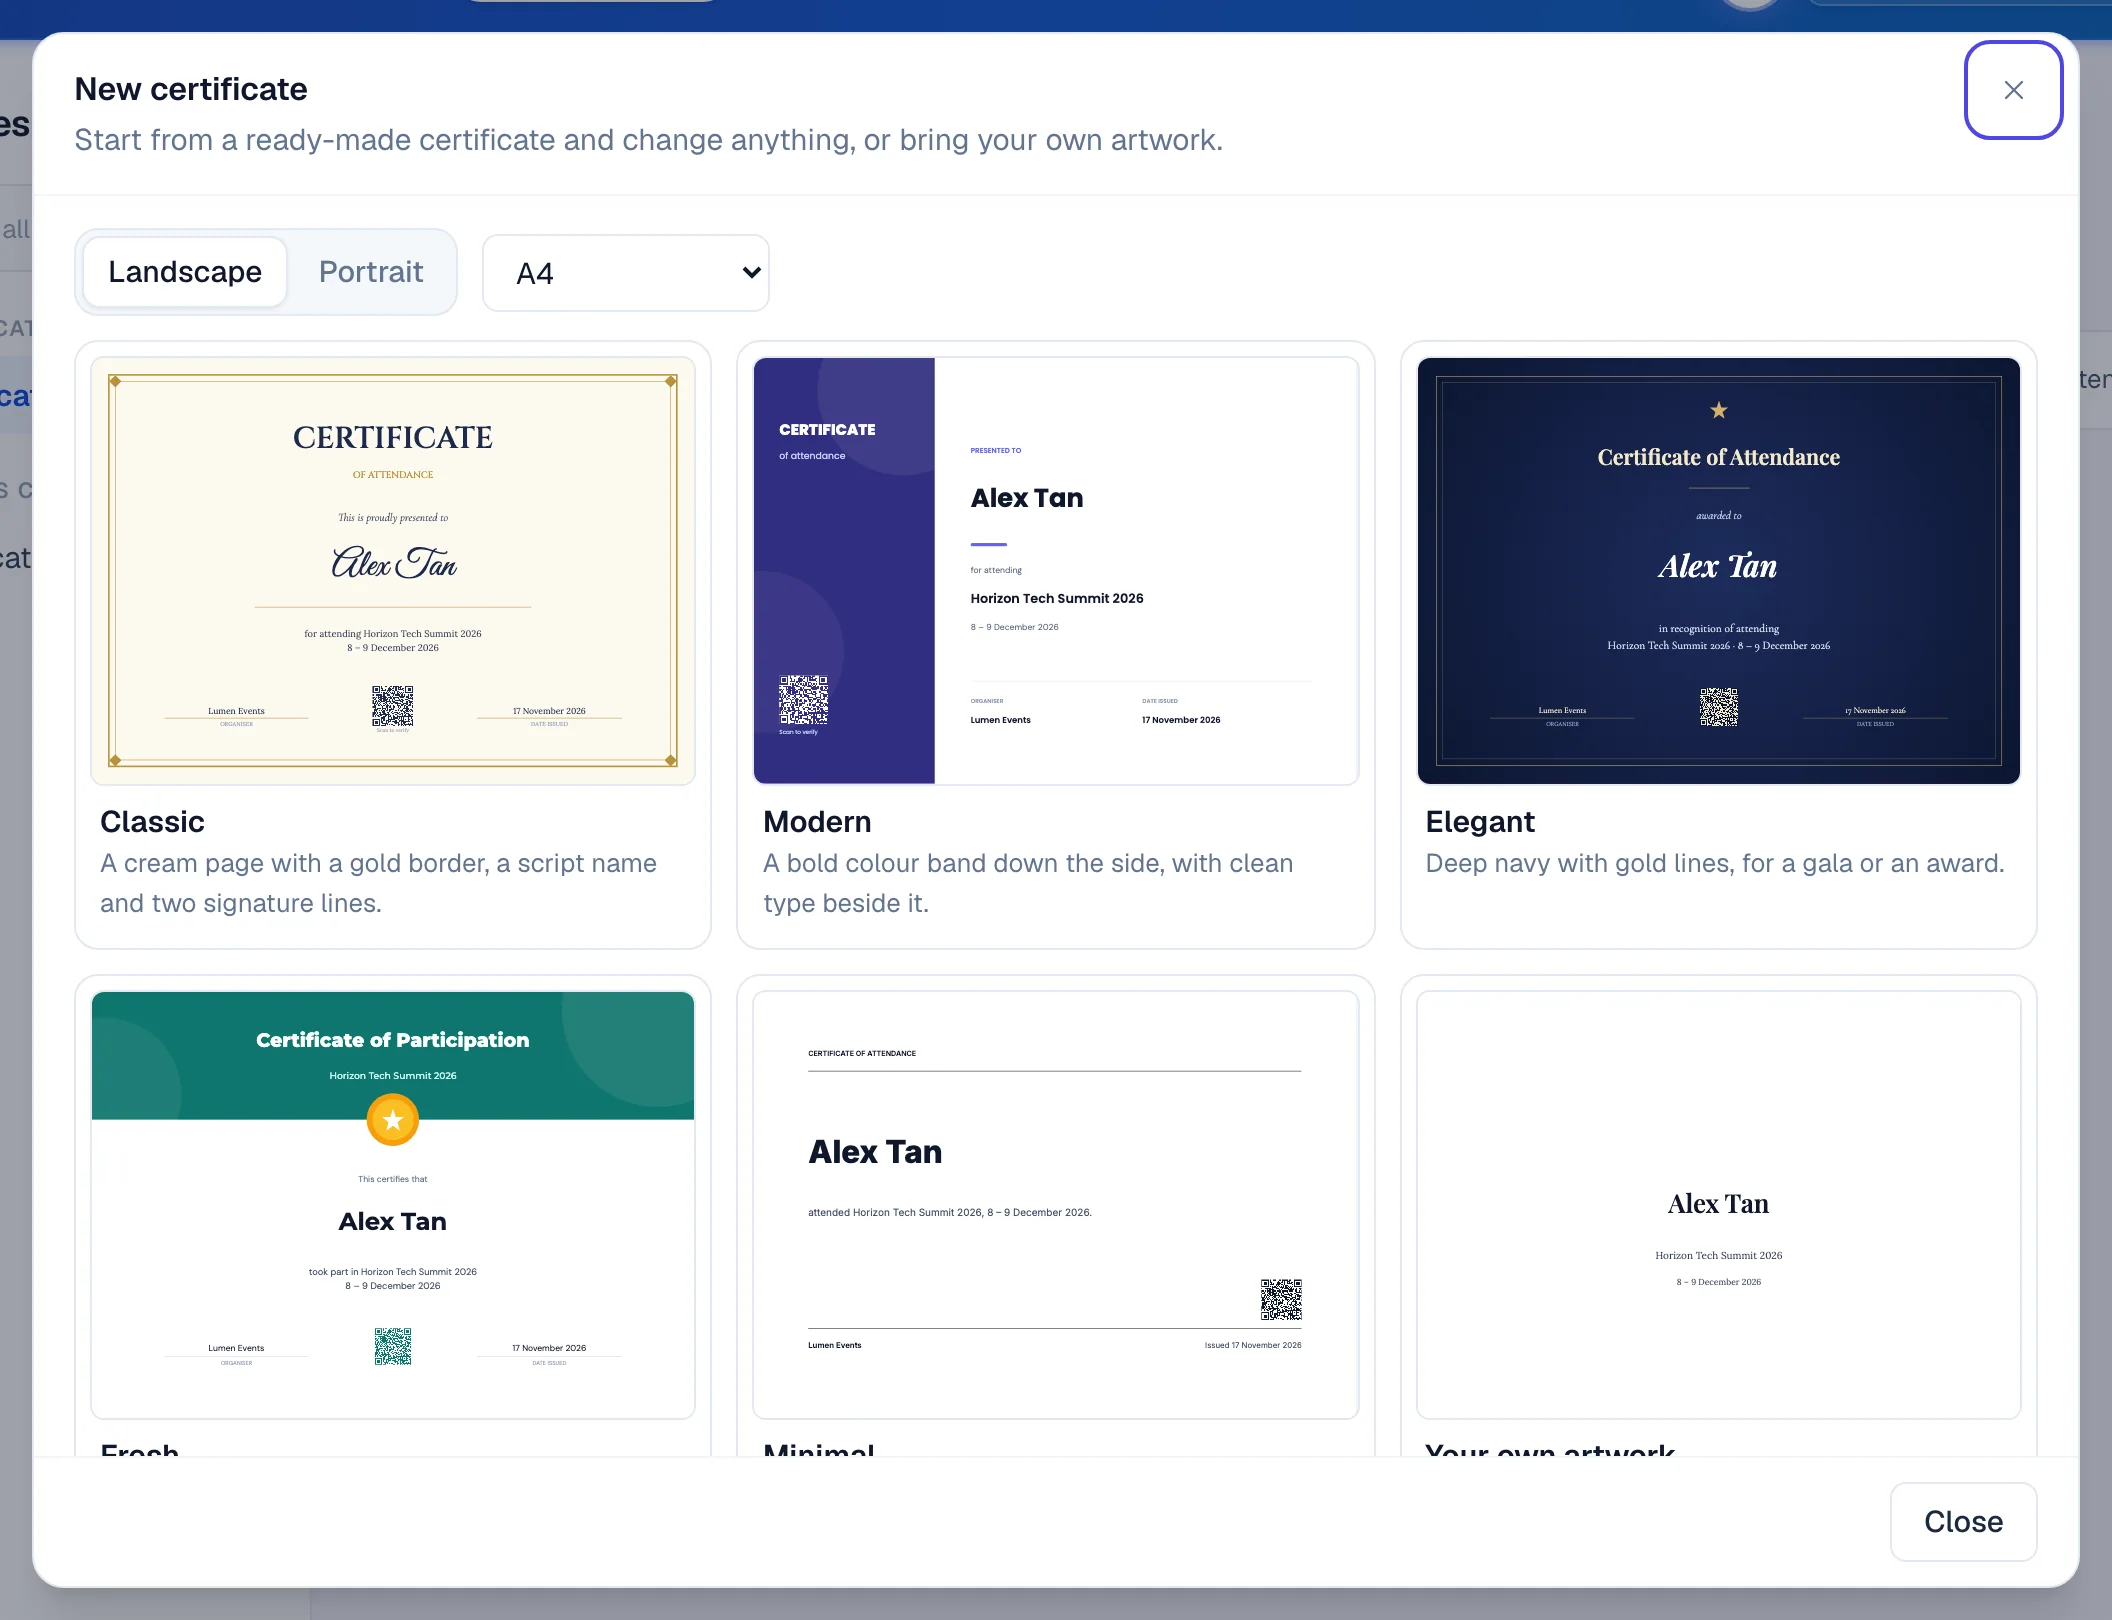
- Open Certificates and click New certificate.
- Choose Landscape or Portrait, and the paper: A4 or US Letter.
- Pick a ready-made certificate: Classic, Modern, Elegant, Fresh, Minimal, Your own artwork or Blank. The designer opens, with the attendee's name, the event and the date already on most of them.
- Click the name at the top to rename the certificate, such as
Certificate of Attendance. - Change the words and the layout (below), then click Save.
The certificate in the middle is drawn as attendees will see it, with a sample attendee. Use + and − to zoom, and the undo and redo arrows (⌘ Z, ⇧ ⌘ Z) to step back.
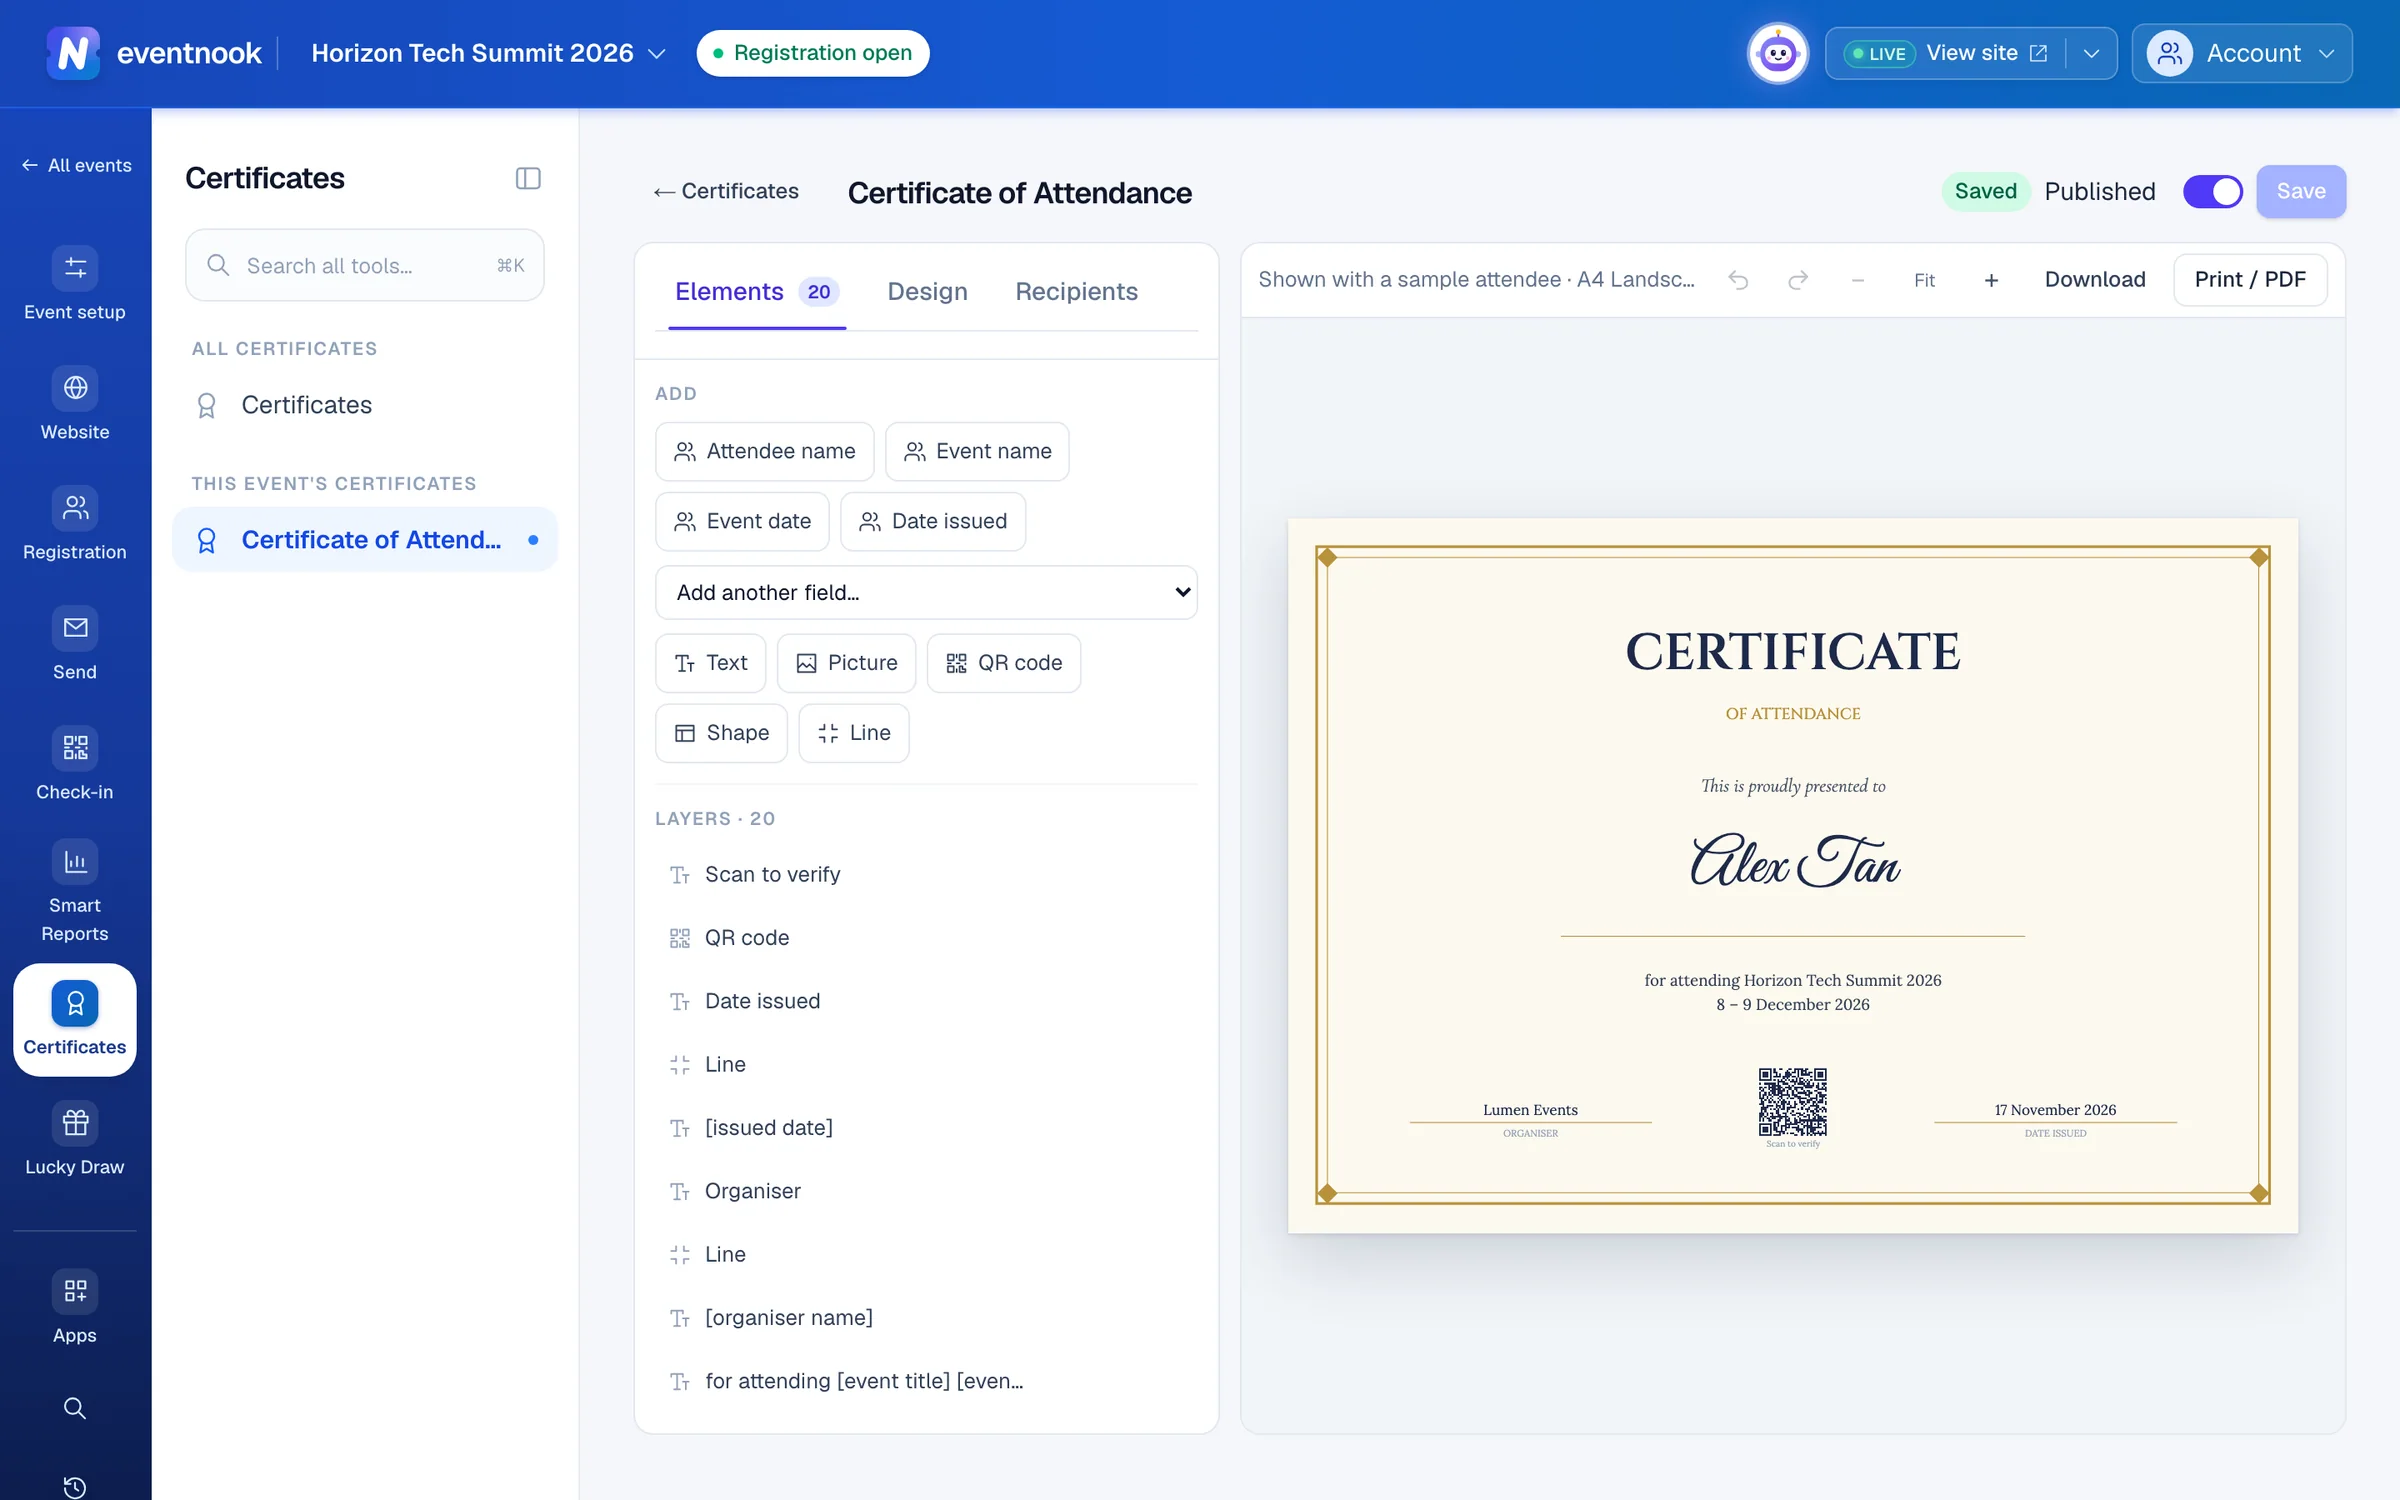
- 1Put the attendee's name on the page
- 2Paper, your own artwork and the page colour
- 3Who gets it and how attendees open it
- 4Attendees can open it only while this is on
- 5Saves the name and the design
An event can have up to 20 certificates, such as one for attendees and one for speakers. Duplicate on a certificate's card makes a copy to change.
Put the attendee's details on it#
Open Elements.
- Under Add, click Attendee name, Event name, Event date or Date issued. Any other detail, such as the company, the ticket or a question from your registration form, is in Add another field.
- Drag it into place on the certificate, and drag its handles to resize it.
- Set its Font, Size, Weight, Colour and Align in the panel.
- For a long value, such as a long name, turn on Shrink to fit and set the smallest size.
To add your own words, click Text and type them in the box. Insert a field puts a detail of the attendee inside the words, such as "This certifies that" followed by the name. Double-click a text on the certificate to edit it.
| Add | What it is |
|---|---|
| Text | Your own words, with fields inside them if you like. |
| Picture | A logo or a signature from the event's media library. |
| QR code | Left empty, it holds the attendee's own certificate link, so anyone can scan a printed certificate to check it. |
| Shape and Line | Borders, bands and signature lines. |
Layers lists everything on the page. Click the lock on a layer so it can't be moved by mistake. With an element selected, the arrow keys nudge it (with Shift, further), ⌘ D duplicates it and Delete removes it. A certificate holds at most 80 elements.
Use your own certificate artwork#
If a designer has made your certificate, use it as the background and place the details on it.
- Make a new certificate from Your own artwork, or open Design on any certificate.
- Under Your own artwork, click Upload your certificate and choose the picture. Use a JPEG or PNG of the finished certificate, without the names.
- Choose how it fits: Fill the page or Show all.
- Open Elements and drag the name, event and date onto the right places.
- Click Save.
For a sharp print, the picture should have the paper's shape and about 3,508 pixels on the long side for A4 (3,300 for US Letter). Design also has the Page colour, a gradient, and Start again from to swap to another ready-made design: your artwork stays as the background, and you can undo it.
Choose who gets it and publish it#
Open Recipients. These settings save at once, on their own.
| Setting | What it does |
|---|---|
| Who gets it | Everyone confirmed (every attendee with a confirmed registration) or Checked in only. With more than one ticket, tick tickets to give it only to those. Pending and cancelled attendees never get one. |
| Personal link | Each attendee's own link, which opens their certificate without signing in. Always on. |
| Email code | On the certificate page, the attendee types the email they registered with and the code sent to it. |
| QR code ID | On the certificate page, the attendee scans or types the QR code of their ticket. |
When the certificate is ready, switch on Published at the top. Attendees can open it only while it is published. If the design has unsaved changes, publishing saves them first.
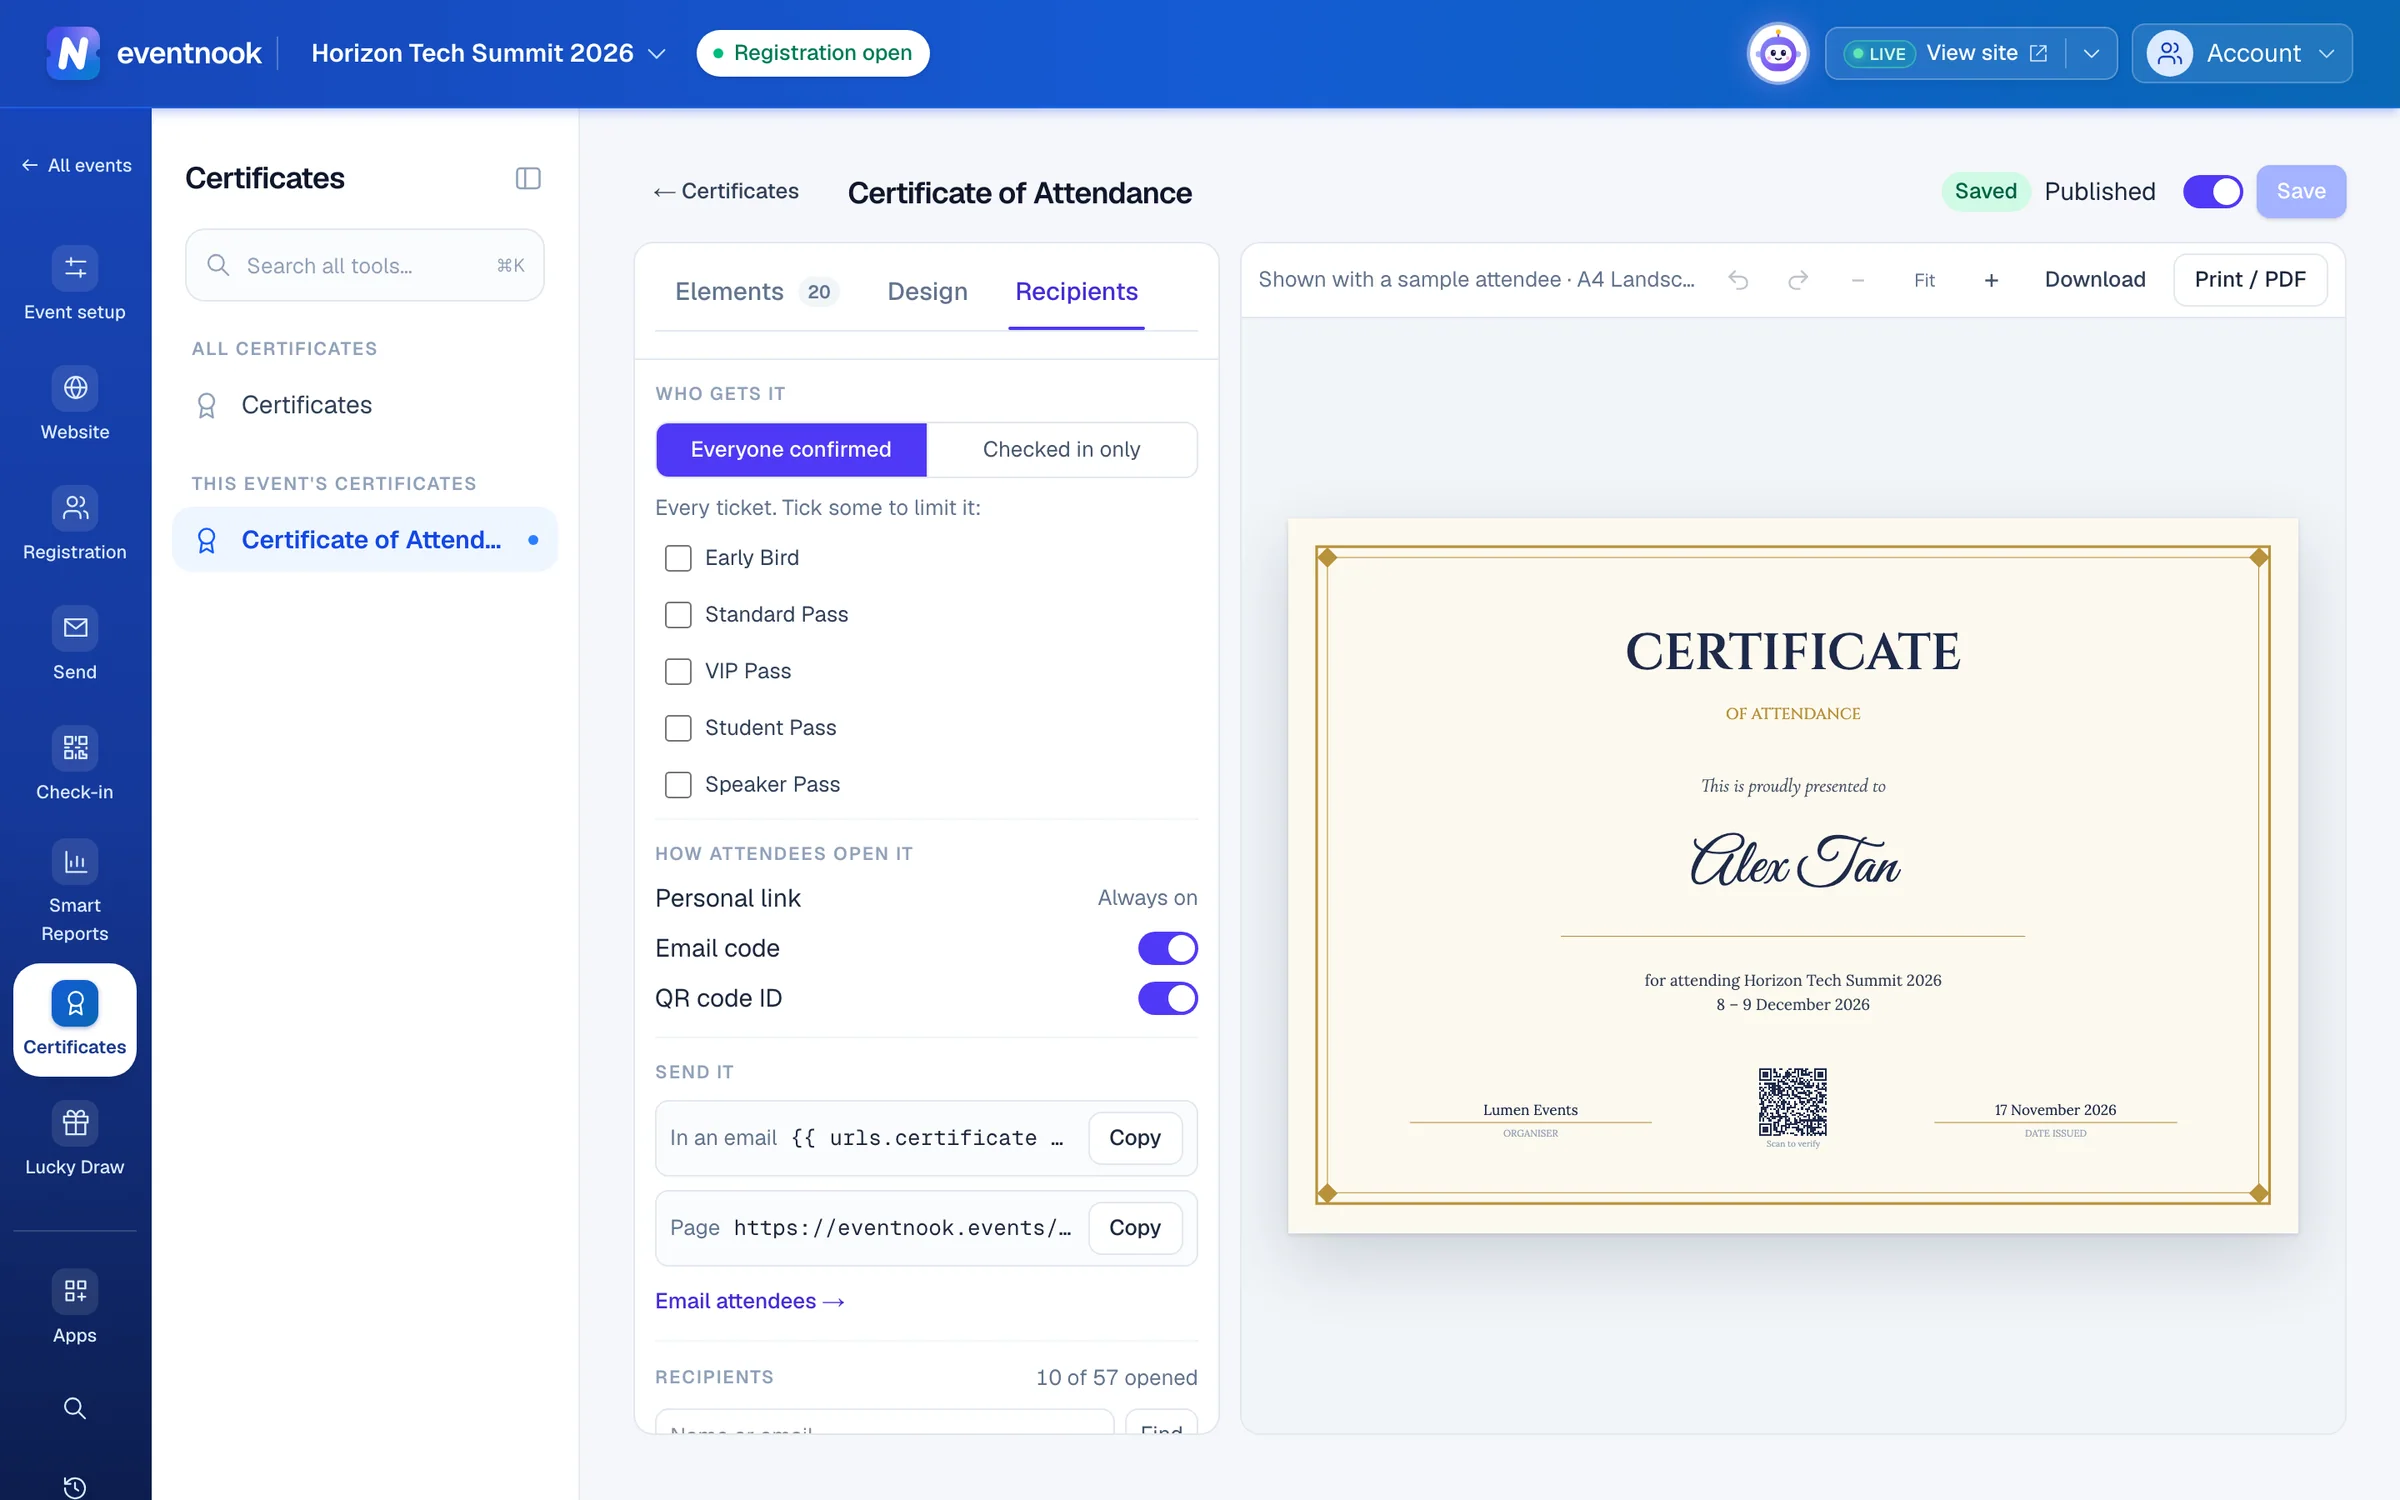
- 1Everyone confirmed, or only those who checked in
- 2Ways in on the certificate page
- 3Send each attendee their own link
Send attendees their certificate#
- Publish the certificate.
- Under Recipients › Send it, copy the tag beside In an email, then click Email attendees →.
- Write the message and put the tag in it, as a link or a button. Each attendee gets their own link.
You can also put the Page address on your website or in a message to everyone: attendees sign in there with an email code or their ticket's QR code ID. What attendees see is in Open your e-certificate.
After the event#
- Recipients shows how many have opened theirs (… of … opened), and Opened or Not opened beside each person. Find searches by name or email.
- Preview on a recipient shows the certificate with their details. Show the sample goes back.
- Copy link copies one attendee's personal link, to send it yourself.
- Download saves the certificate on screen as one file that opens in any browser. Print / PDF prints it; choose Save as PDF in the print dialog for a PDF.
If something looks wrong#
- An attendee says there is no certificate for them. Check Published, and Who gets it under Recipients: they may not have checked in, or hold another ticket. Find them in the recipients list.
- A long name is cut off. Select the text and turn on Shrink to fit, or make its box wider.
- The tag in the email comes out empty. No certificate is published yet. Publish one, then send the email.
- Your artwork looks cropped. Under Design, choose Show all, or change the paper to match the picture's shape.
- The QR code ID isn't accepted. The attendee typed the short code used at the door, or their ticket was reissued. Ask them to scan the QR code of their current ticket or use the link from your email, and check QR code ID is on.
- Save says the certificate was changed somewhere else. Reload the page to get the latest, then make your changes again.
Who can do this#
Everyone with access to the event's website sees the certificates. Changing, publishing and deleting them needs the right to change the website. The recipients and Preview also need access to the attendee list, and Copy link the right to change attendees, since the link opens a certificate without signing in.
Related guides
- Add an app to your eventSee which add-on apps your plan includes, add one to an event so it joins the menu for the whole team, and take it off again when you no longer need it.
- Open your e-certificateOpen the certificate the organiser gives you after the event, save it as a PDF, copy its link or add it to LinkedIn.
- Email your attendees or buyersWrite one email to your attendees or the people who placed orders, choose exactly who gets it, and send it now or at a time you choose.
- Add pages, event content and picturesAdd more pages to your event site, keep your agenda, speakers, sponsors, FAQ and documents in one place for every page, and manage the pictures the site uses.
Still stuck? In EventNook, ask HeyNook. It knows the page you're on and your event, and can take you straight to the right setting.