Seat guests at tables
Set up your tables, seat guests by hand or all at once, draw the hall to scale, and follow every table as people arrive.
Where to find it: Onsite › Seating › Table Assignment
Seating puts each guest at a table for a dinner, gala or banquet, then shows the hall filling up on the day. You plan in Table Assignment and follow the room in Live Tables, both in Onsite.
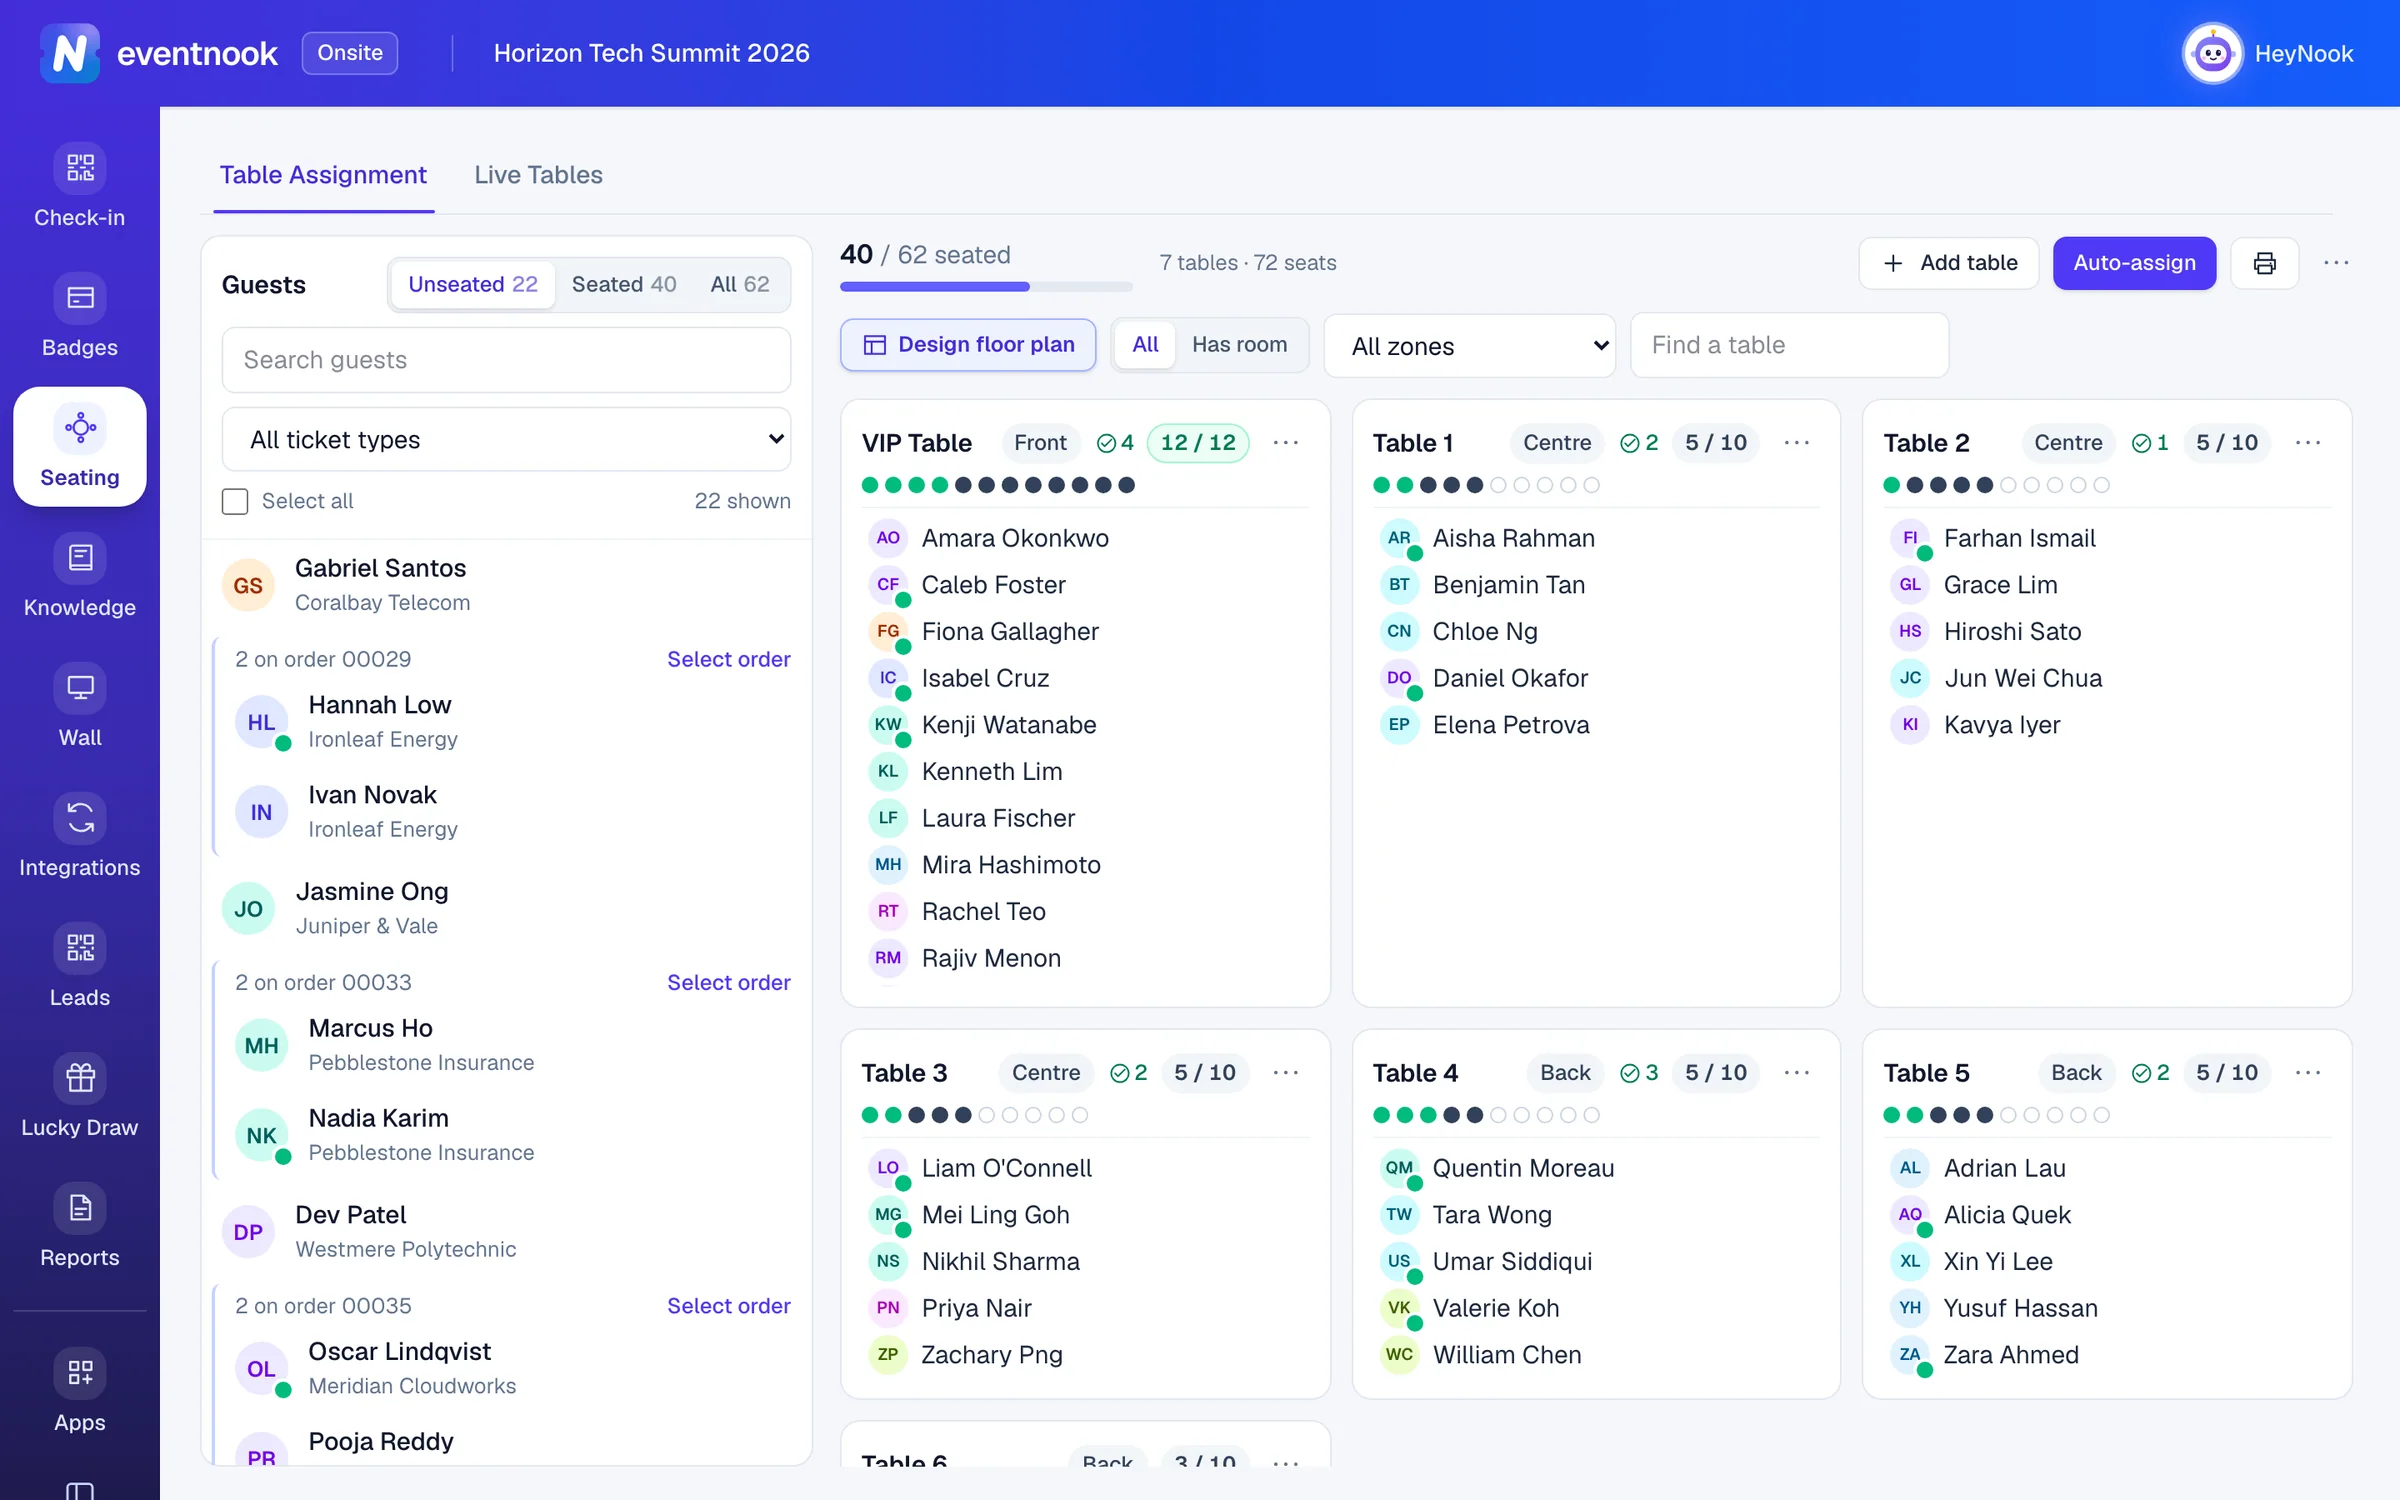
- 1Find guests by name, company, order number or email
- 2Add a table
- 3Seat everyone who has no table yet
- 4Print the list by table or by guest
Add the app to your event#
Seating is an add-on app. Open Apps in Onsite or in Event admin, find Seating and click Add to this event. Seating then appears in Onsite's menu for everyone on the event, with two tabs: Table Assignment and Live Tables.
If Seating shows as not in your plan, ask EventNook to add it. See Add an app to your event.
Set up your tables#
- In Onsite, open Seating. Table Assignment opens.
- Click Add table, give it a Name and click Add table in the dialog. To make a numbered run such as Table 1 to Table 30, click Generate tables instead (once you have tables, it is Generate tables… in the ⋯ menu beside Auto-assign).
- Repeat until every table in the room is on the board.
| Setting | What it does |
|---|---|
| Name | What the table is called on the board, the plan and the printed list. Each name is used once in an event. |
| Capacity | How many seats it has. Empty means no limit. Default: 10. |
| Shape | Round or Rectangular. Decides how it is drawn on the floor plan. |
| Zone | A room or an area, such as Ballroom or Terrace. You can filter the board by zone. |
| Notes | Shown on the table's card, such as "Sponsor table". |
Generate tables asks How many (1 to 500), a Name prefix (Table by default), the number to Start at, Capacity each, Shape and Zone. It shows the first and last names it will make, and skips any name that exists already.
Seat guests#
The Guests list shows Unseated guests first; switch to Seated or All, search, or choose a ticket type. Guests who booked on the same order are bracketed together, with Select order to tick them all.
- Click the guests to seat. Shift-click ticks a range; Select all ticks everyone shown.
- Click Seat here on a table. The button names the guest, or says how many you ticked.
- Or click Find a table… at the foot of the list and pick one. Tables with free seats come first.
You can also drag guests onto a table, and drag a guest from a table back to the list to unseat them.
Each table shows how full it is: a grey count while there is room, green when full, red when over. A dot per seat shows who is seated and, on the day, who has arrived.
- Give a seat number: point at the guest on the table, click + Seat, type the Seat number and click Save.
- Unseat someone: point at the guest and click the cross, or tick guests in the list and click Unseat.
- Not enough seats: the button reads Not enough seats for … — seat anyway, and dropping guests on a full table asks first. Click Seat anyway in the Not enough seats dialog to seat them; the table then shows as over capacity.
Seat everyone at once#
- Click Auto-assign.
- In Keep together by, choose who should sit together: Order (people who booked together), Company, Ticket type, Category, or Nobody (fill tables in turn).
- Optional: under Only these ticket types, tick the tickets to seat. Leave all unticked to seat every ticket type.
- Click Preview. The dialog says how many guests it would seat, across how many tables, and how many would not fit. Nothing has changed yet.
- Click Confirm and seat ….
Auto-assign only fills free seats with guests who have no table. Guests already seated stay where they are. A group no single table can hold is split across tables.
Draw the hall#
Once you have tables, click Design floor plan to place them in a drawing of the room, to scale.
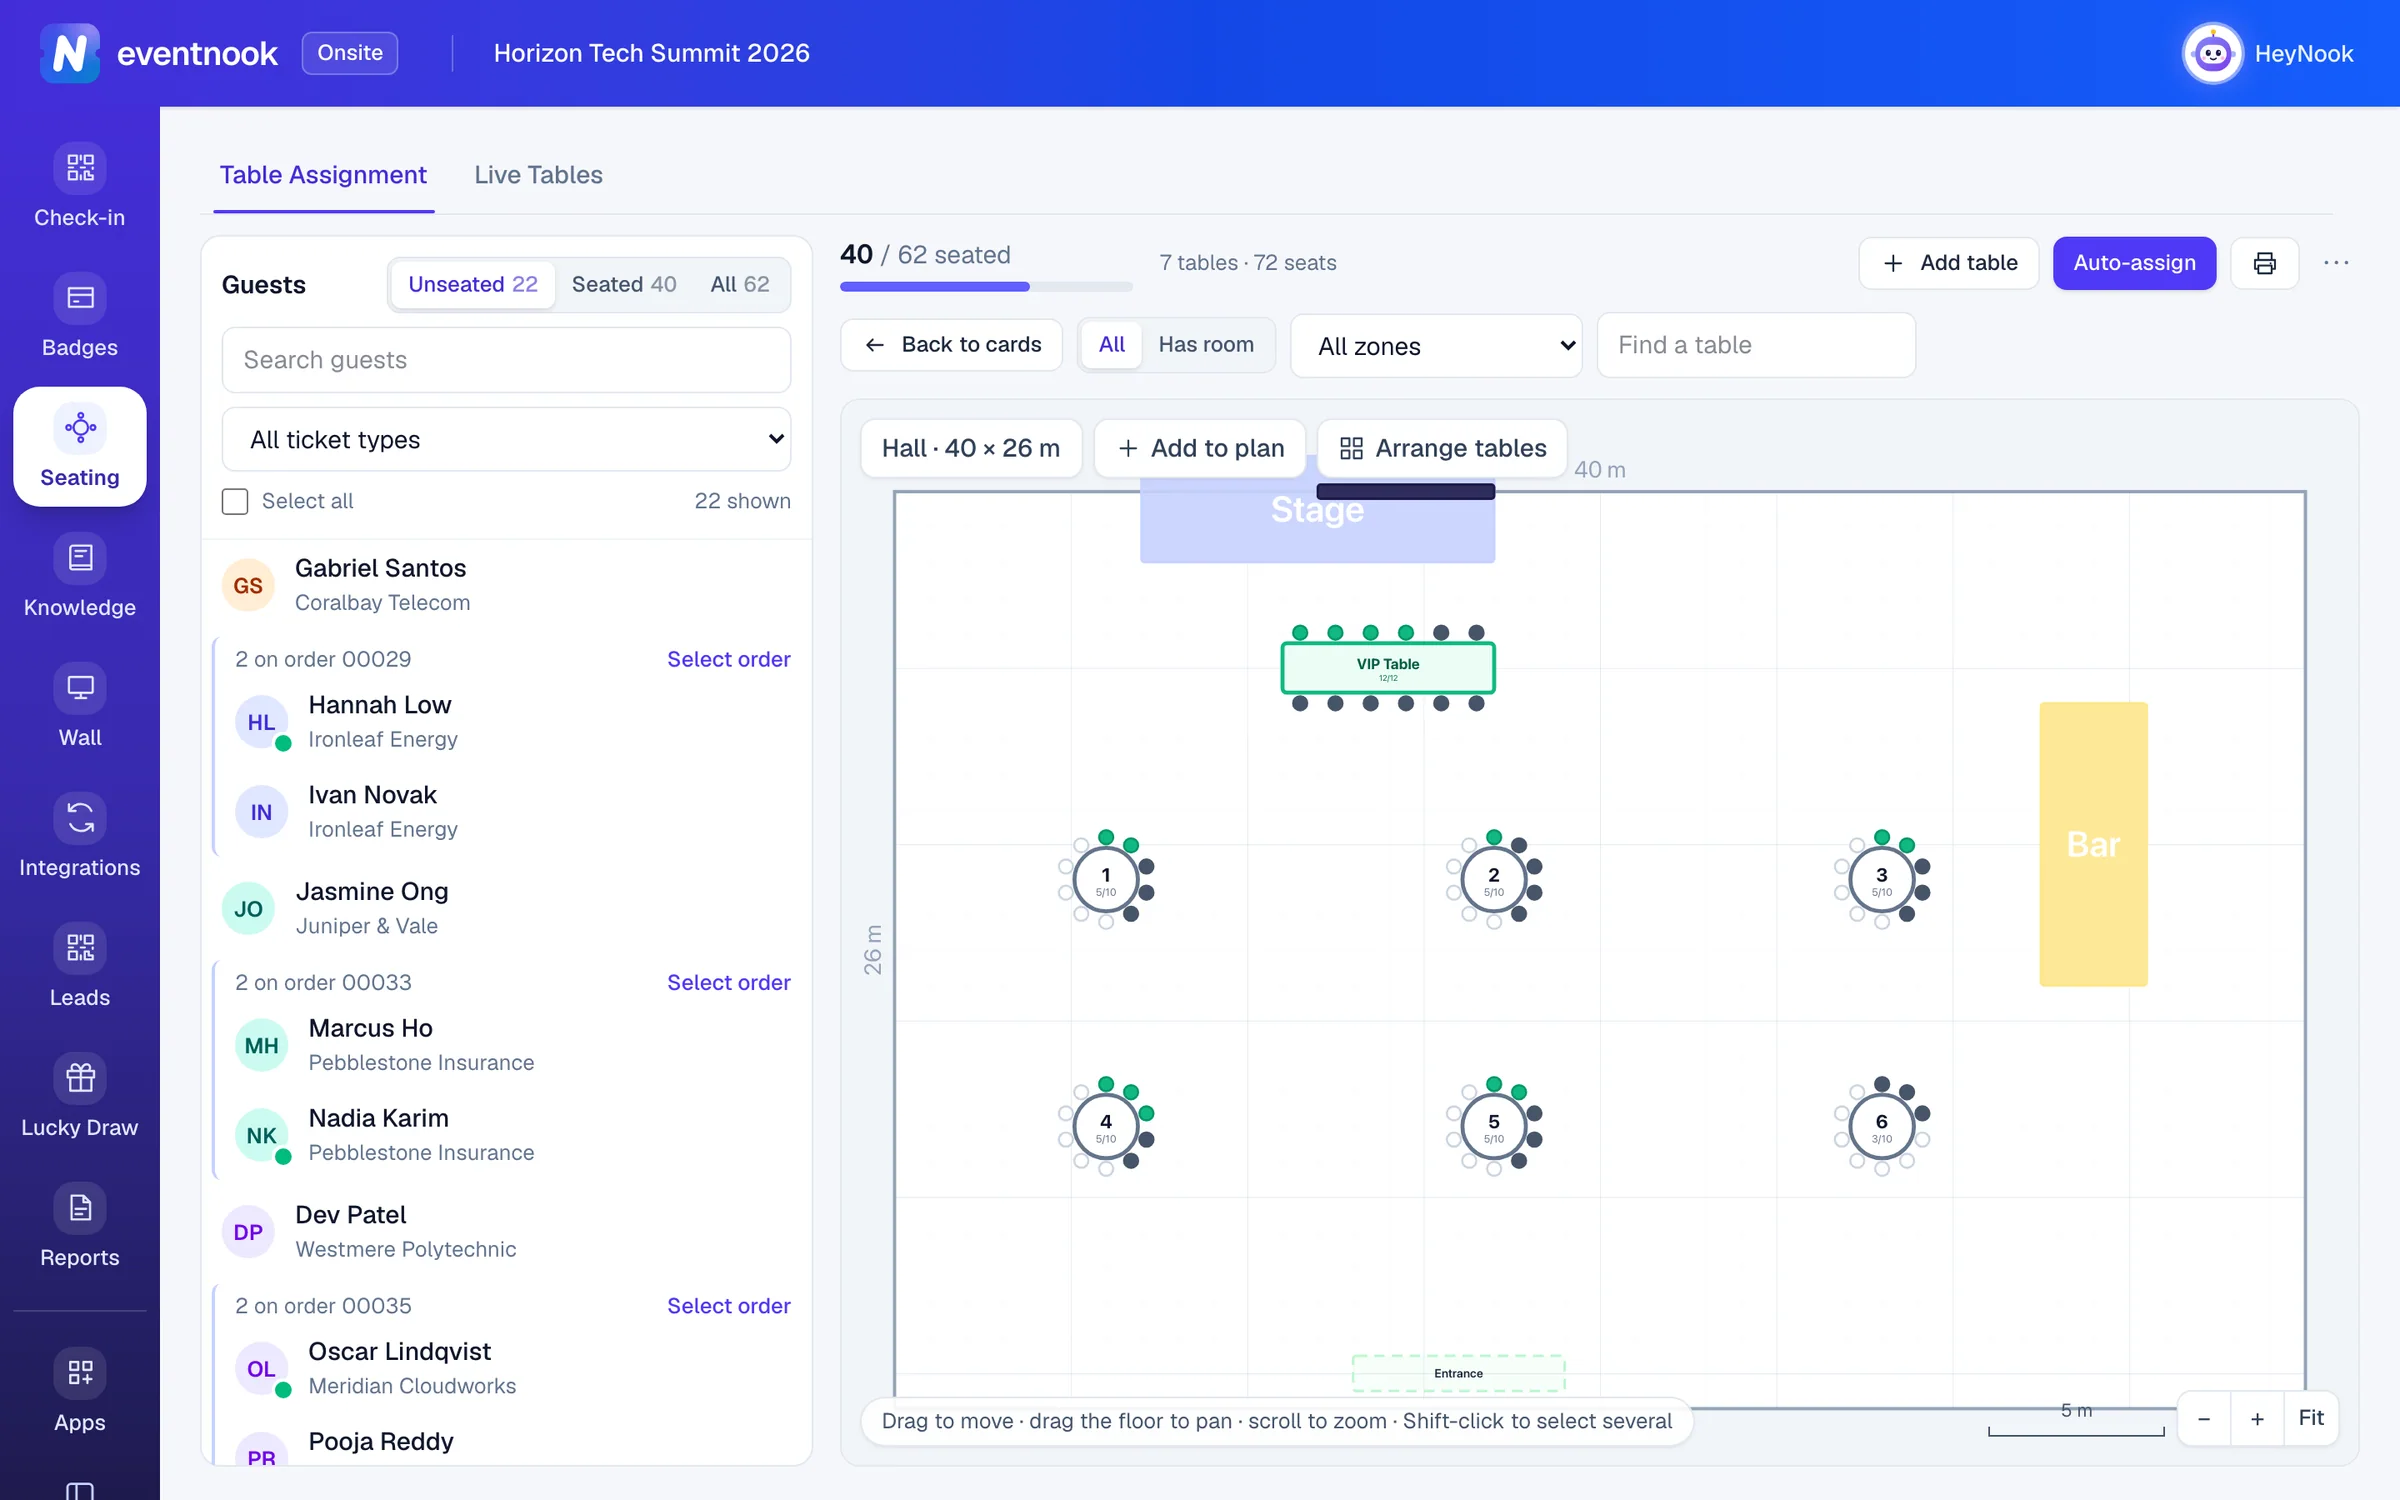
- 1The hall's size in metres, and the venue's own plan behind it
- 2Stage, bar, dance floor, walls and more
- 3Lay the tables out in rows
- 4Back to the table cards
- Click Hall · … and set the Hall size: its Width and Length in metres. Optional: under Venue plan, click Upload image to lay the venue's own floor plan behind the tables. Crop it to the hall's walls first so it lines up.
- Click Add to plan and choose what stands in the room: Stage, Screen, Dance floor, Bar, Buffet, Entrance, Wall, Pillar, Area or Text label. Drag it into place.
- Click Arrange tables, choose the Walkway between tables and Straight or Staggered rows, and click Arrange … tables. Tables are laid out round what is already on the plan, so place the stage and bar first. Guests stay where they are seated.
- Drag a table to move it, its corner handle to resize it and the handle above it to turn it. Shift-click selects several, which move together. Scroll to zoom; drag the floor to move around.
The plan saves itself shortly after each change; the strip at the bottom says Saved. Click a table to see its guests beside the plan, and drop guests on it as you would on a card. Back to cards returns to the board.
Change, merge or delete a table#
Open the ⋯ menu on a table's card:
| Action | What happens |
|---|---|
| Edit table… | Change its name, capacity, shape, zone or notes. Renaming keeps its guests. |
| Merge into… | Its guests move to the table you choose, without their seat numbers, and this table is removed. |
| Delete | The table is removed and its guests go back to the list without a table. |
Print the seating list#
- Click the print button beside Auto-assign.
- Choose By table (each table with its guests and seats, for the floor team) or By guest A–Z (every guest with their table, for the welcome desk).
- Click Print.
Follow the tables on the day#
Open Live Tables. Every table on the floor plan is coloured by how many of its guests have checked in: Everyone here, Arriving, Nobody yet or No guests seated. The page refreshes every few seconds, and a table ripples when one of its guests checks in.
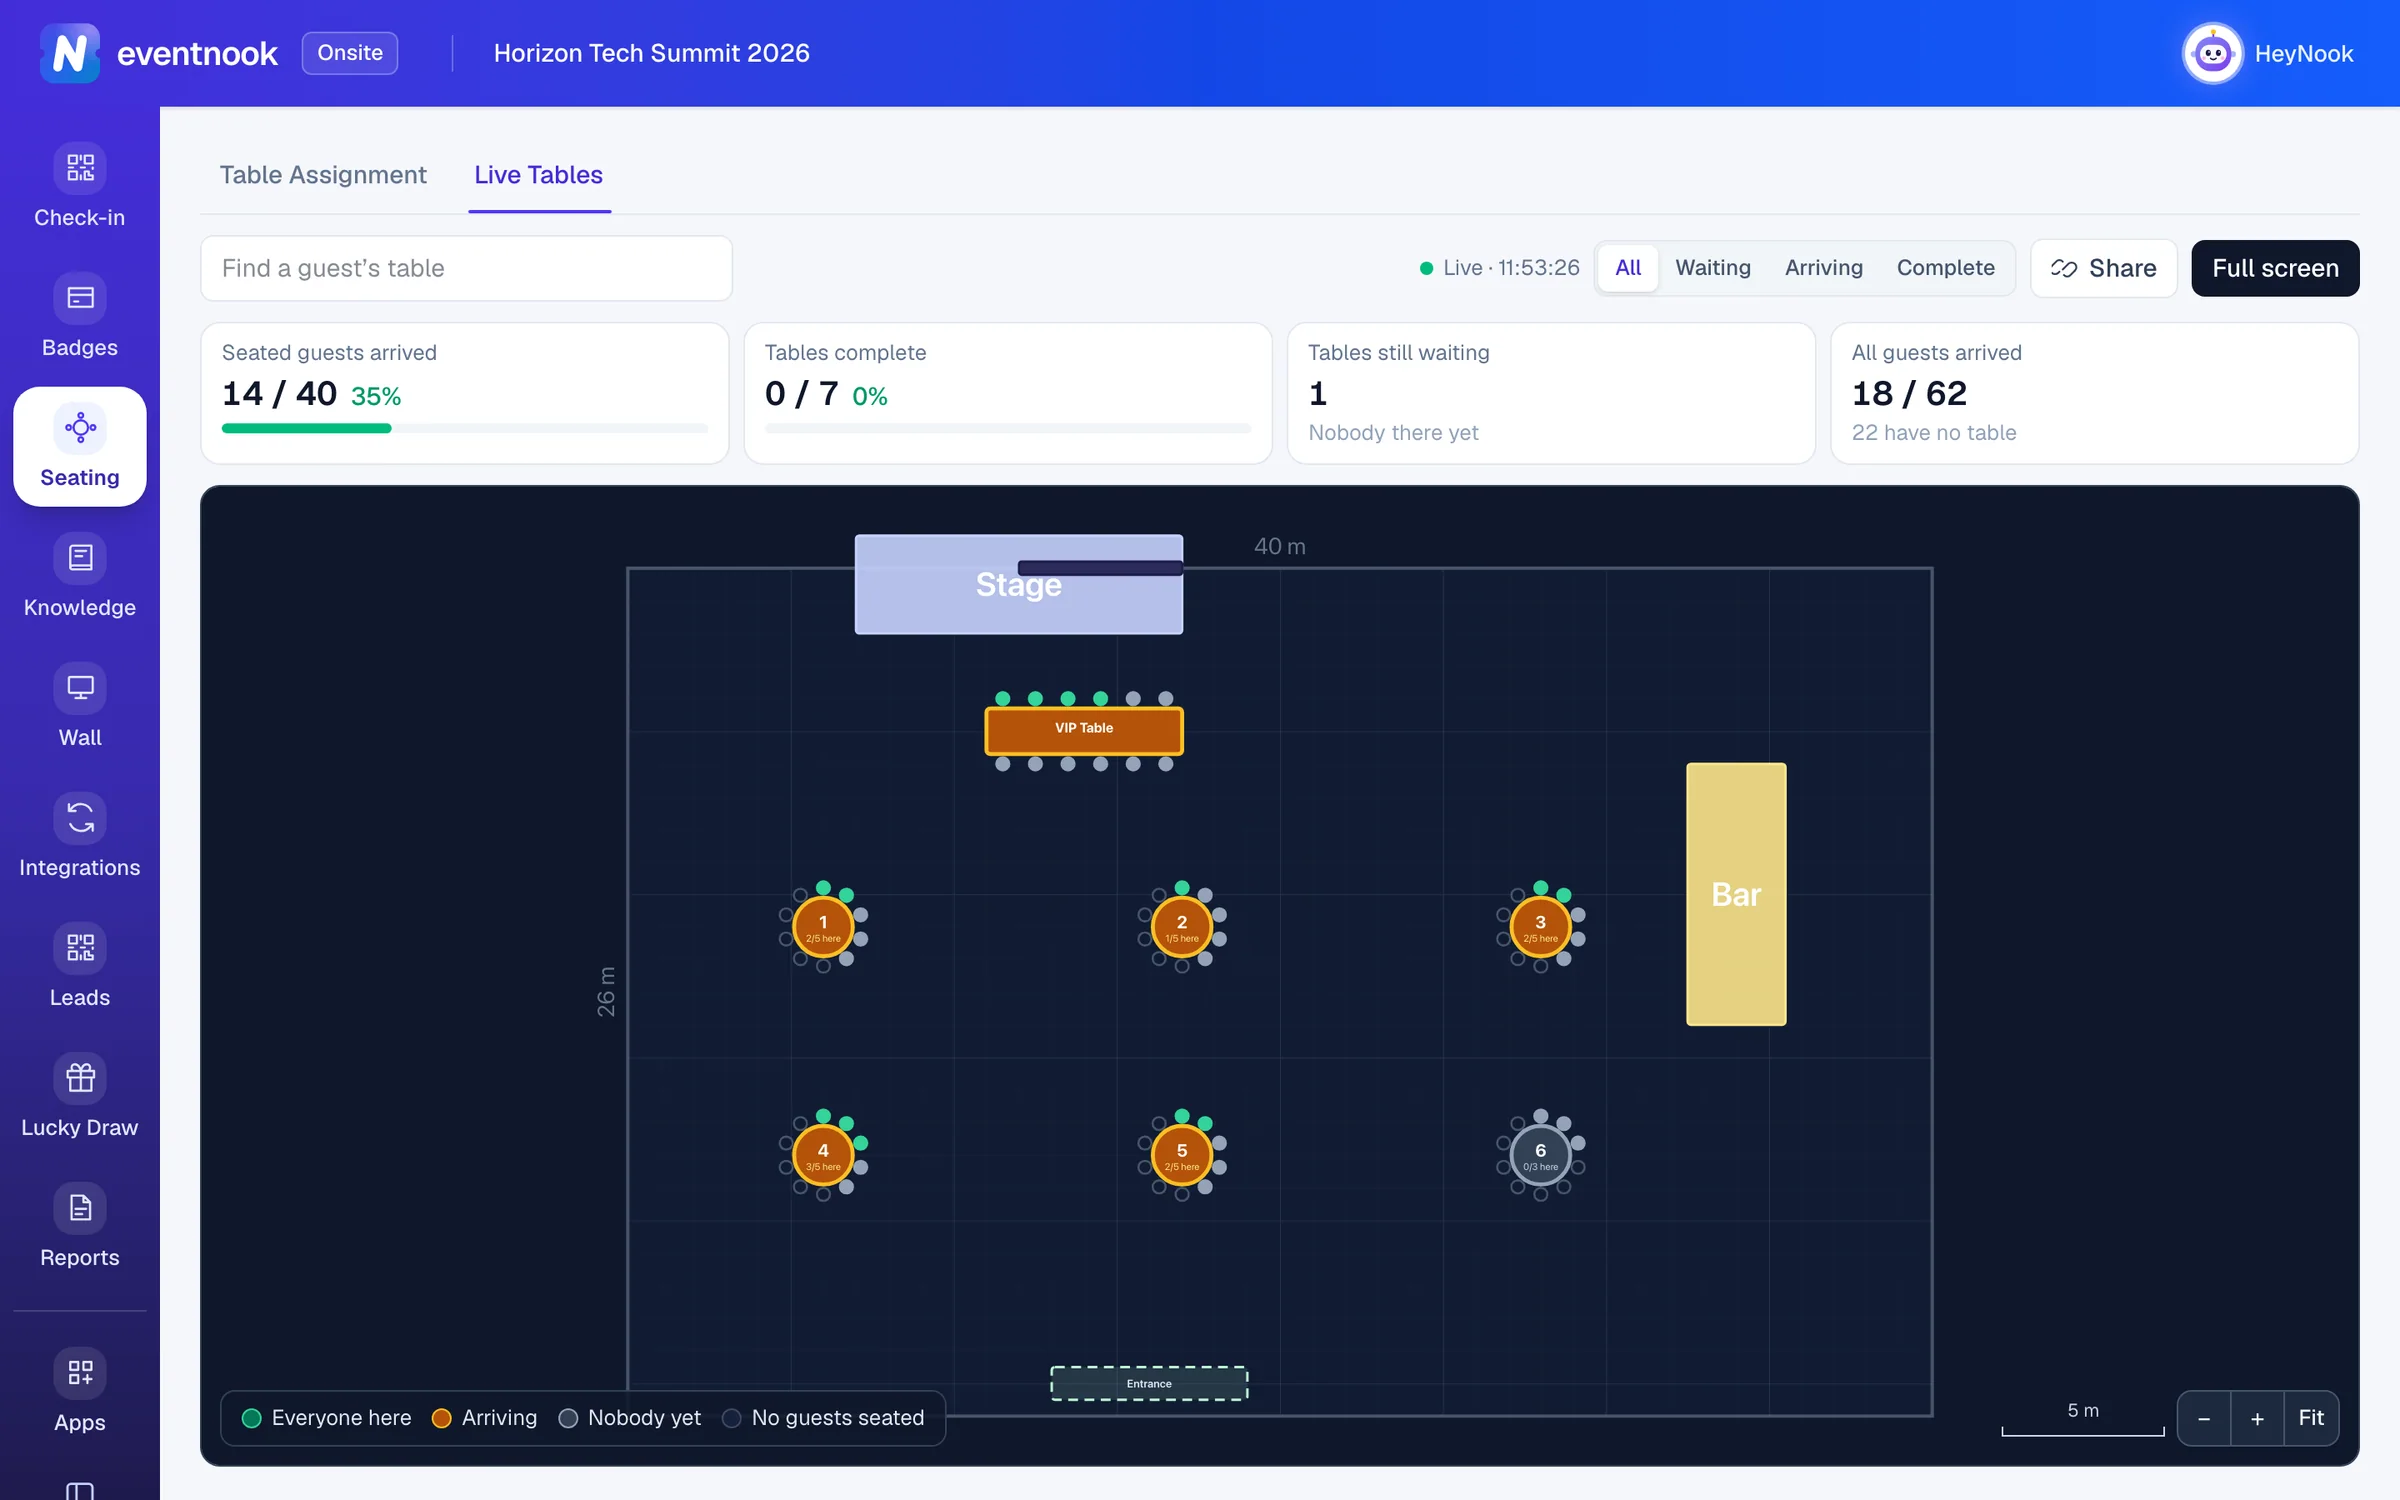
- 1Look a guest up and light their table
- 2Show only the tables waiting, arriving or complete
- 3Share the hall with people who have no account
- 4Fill a screen by the door
- The four figures at the top are Seated guests arrived, Tables complete, Tables still waiting and All guests arrived, with how many guests have no table.
- To find someone, type at least two letters of their name, company or order number in Find a guest’s table and pick them. Their table lights up with their name above it, and its guest list opens with them marked.
- Click a table to see its guests, their seat numbers and who has Arrived or is Not yet here.
- Click Full screen to leave it on a screen by the door.
Nothing on Live Tables changes the seating. Check guests in as usual, in Check-in.
Share live tables with people who have no account#
A banquet captain, the venue's floor manager or a screen backstage can watch the hall fill through a link, without an EventNook account. They can't change anything.
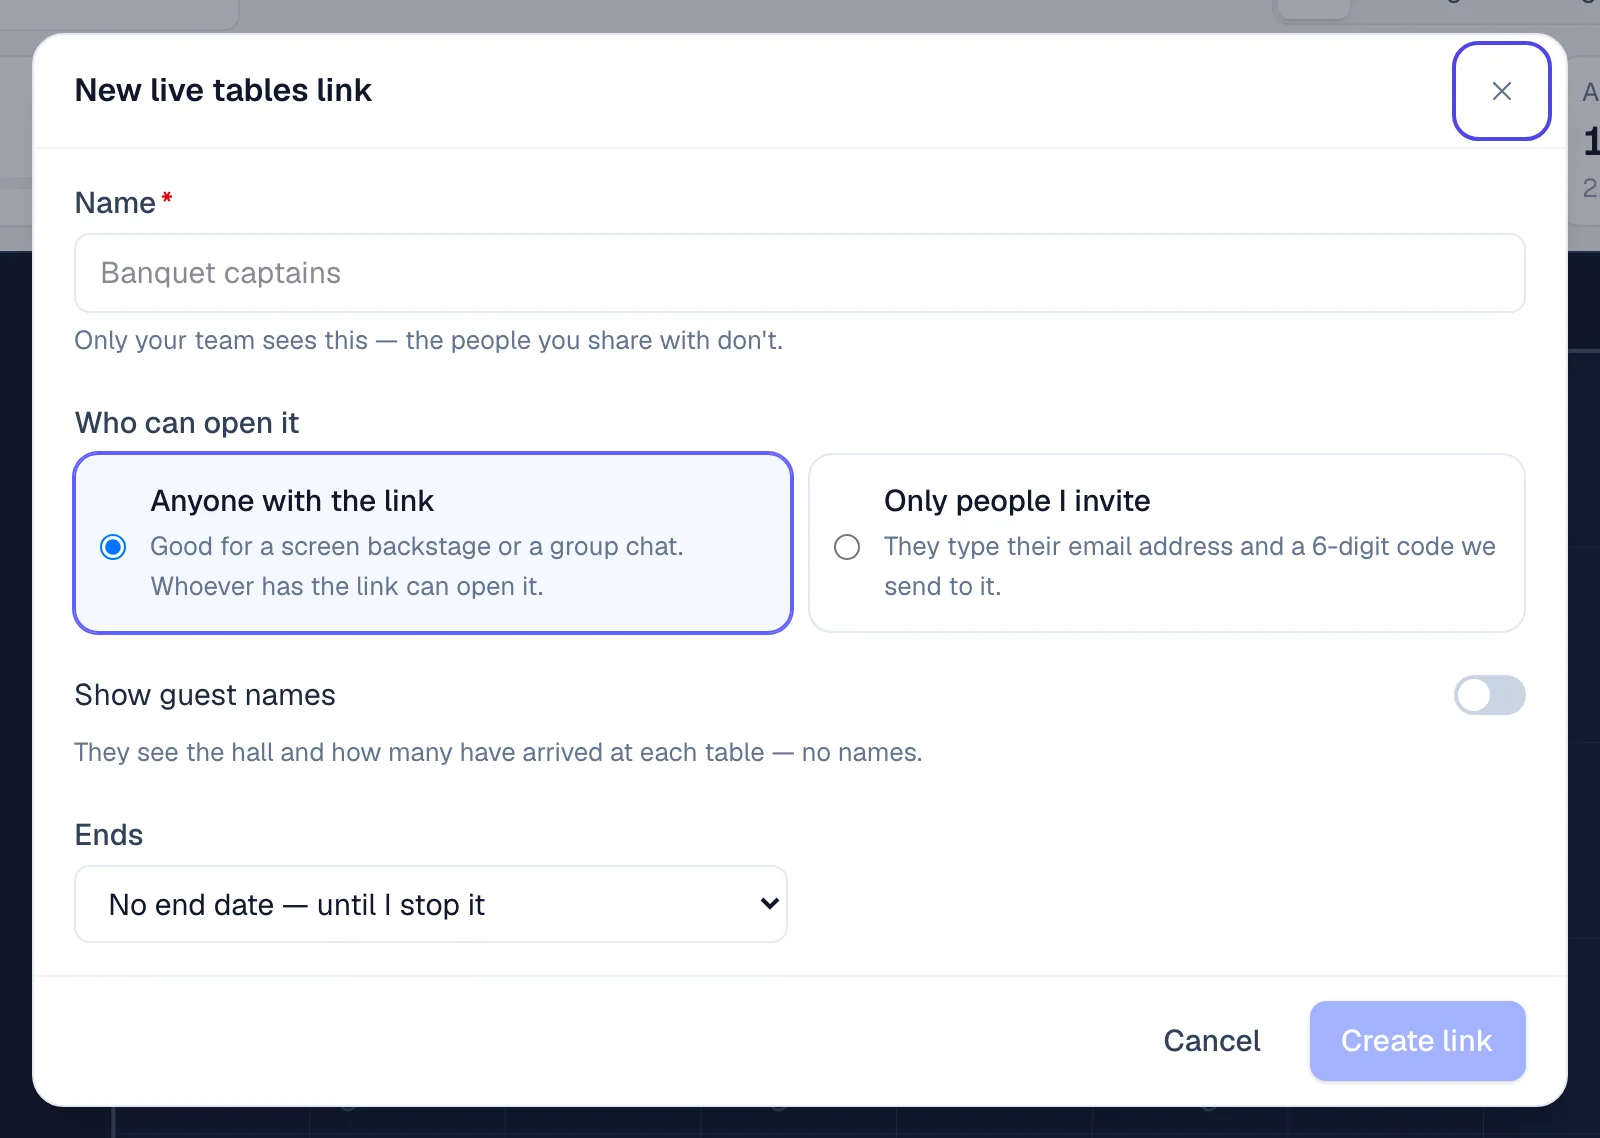
- On Live Tables, click Share, then New link.
- Type a Name for the link. Only your team sees it.
- Under Who can open it, choose Anyone with the link, or Only people I invite and list their Invited email addresses. Invited people type their address and a 6-digit code EventNook emails them.
- Optional: turn on Show guest names and set when it Ends.
- Click Create link, then Copy link or QR to show its QR code.
| Setting | What it does |
|---|---|
| Show guest names | Off: they see the hall and how many have arrived at each table, no names. On: they can look a guest up by name or company and open a table's guest list, with names, companies, seats and who has arrived. Never emails or order details. Default: off. |
| Ends | No end date — until I stop it (the default), in 12 hours, 24 hours, 3 days or 7 days, or On a date and time…. |
Each link in Share live tables has Edit, New link and Stop. New link replaces the address and its QR code, and signs out anyone who signed in with a code. Stop ends the link for good.
If something looks wrong#
- A table shows over capacity. Guests were seated with Seat anyway, its capacity was lowered below the guests already there, or table numbers came in with an import. Raise its Capacity, or move guests to a table with room.
- Auto-assign is greyed out. There are no tables yet, or everyone already has a table.
- A guest isn't in the list. Guests whose registration is cancelled can't be seated and aren't listed.
- A seat number is refused. Another guest at that table already has it. Choose another number.
- The print button is greyed out. Nobody is seated yet.
- A shared link says "This link isn't available". It was stopped or replaced. Send the current link from Share.
- A shared link says "This link has ended". Its end date has passed. Click Edit on the link and choose a later end, or make a new link.
- Live Tables says Reconnecting…. The connection dropped. The page catches up by itself once it is back.
Who can do this#
Everyone with access to the event in Onsite can open Table Assignment and Live Tables. Changing tables, seats and the floor plan, and making share links, needs permission to manage Onsite, which Event Admin and Event Editor have. Others see "You can view seating but not change it."
Related guides
- Add an app to your eventSee which add-on apps your plan includes, add one to an event so it joins the menu for the whole team, and take it off again when you no longer need it.
- Check in attendeesScan tickets or find guests by name on the Check-in screen, read the verdict, undo a mistake, and keep checking in when the venue Wi-Fi drops.
- Import attendees from a spreadsheetAdd many attendees at once from a CSV or Excel file or pasted rows, check every row before anything is created, and choose whether they are emailed.
- Show live check-ins on the venue's screensDesign a live check-in counter in your event's look, and put it on a TV, a projector or a signage player with a link or a code.
Still stuck? In EventNook, ask HeyNook. It knows the page you're on and your event, and can take you straight to the right setting.