Show your event's photos in albums
Make photo albums, upload a whole shoot at once, put the photos in order and show the albums on your event website.
Where to find it: Event admin › Website › Website pages › Special event content
The Photo Gallery puts albums of your event's photos on your website. Upload a whole shoot at once, put the photos in order, and show the albums on any page as covers, a grid, masonry or a carousel.
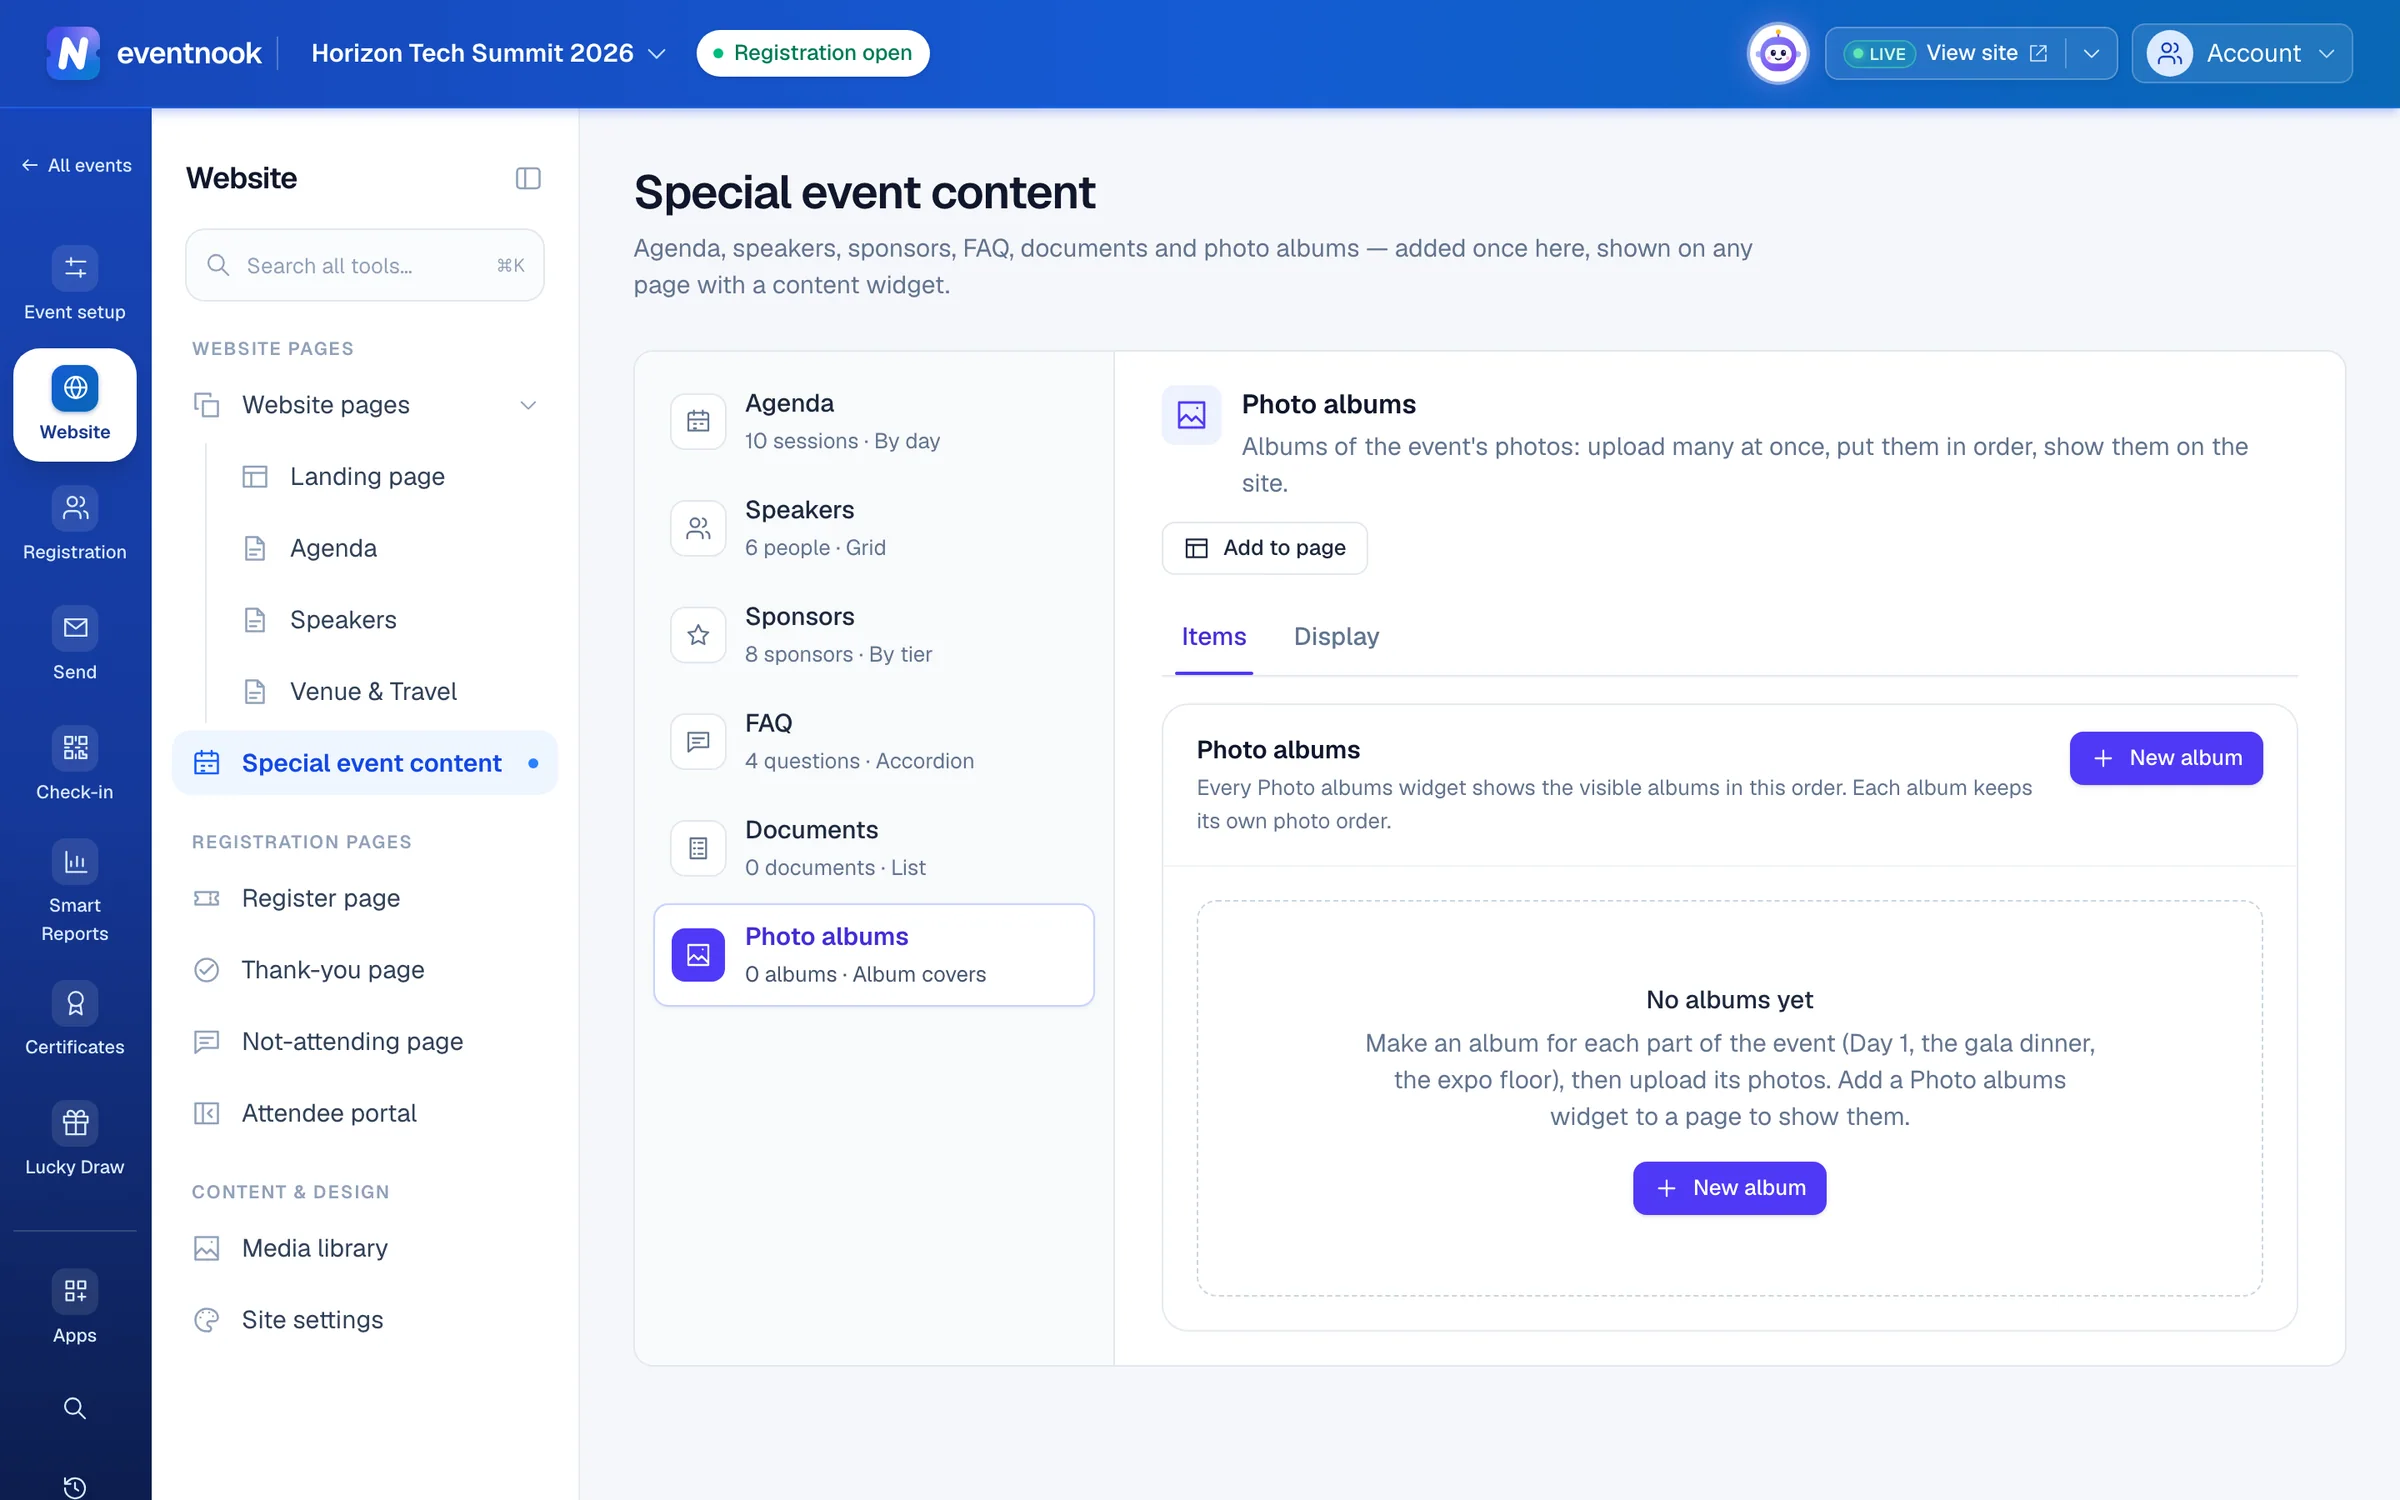
- 1Make an album for each part of the event
- 2Choose how the albums show on your website
- 3Put the albums on a page of your website
Add the app to your event#
Photo albums come with the Photo Gallery add-on app. Add it from Apps (see Add an app to your event), or open Website Builder › Special event content, choose Photo albums and click Add Photo Gallery to this event.
Once added, Photo albums joins the list in Special event content, and the app is under Apps › On this event › Photo Gallery. If Apps says the Photo Gallery isn't in your organisation's plan, ask EventNook to add it.
Albums live beside the event's agenda, speakers and other content: see Add pages and event content for how Special event content works.
Make an album#
- Open Special event content and choose Photo albums.
- Click New album.
- Type the Title visitors see, such as
Day 1orGala dinner. Optional: add a Description. - Click Create album. The album opens, ready for its photos.
An event can have up to 100 albums. To change the order the albums show in, hover over an album and use its up and down arrows.
Upload photos#
- In the album, click Upload photos and choose the pictures: as many as you like at once. Or drag them from your computer and drop them onto the album.
- Keep the page open while the bar shows Uploading … of …. Each photo is sized for the web on your computer before it goes up, and added after the album's last photo, in the order you chose them.
- When the bar says how many photos were added, click Done.
If some photos failed, open Which ones, and why to see each one's reason, and click Try again to send them again. Stop ends the upload; photos already added stay.
| Pictures it takes | JPEG, PNG, WebP, GIF or HEIC. HEIC opens only in browsers that can read it, such as Safari. |
| Photos per album | Up to 2,000. The album's header says how many it has. |
| Camera details | Camera and location details are removed when a photo is uploaded. Visitors never see them. |
Put the photos in order#
Choose the album's Order:
| Order | What it does |
|---|---|
| Your own order | Drag a photo to its place, or open it and click Move earlier or Move later. |
| When taken, oldest first / When taken, newest first | By the date the camera recorded, or the file's date when the camera's isn't in the picture. |
| File name | By the photos' file names. |
| Newest uploads first | The latest photos you uploaded come first. |
New photos fall into the order you chose. To start your own order from when the photos were taken, choose Your own order, then under Arrange by choose an order and click Arrange. Then move photos by hand.
Captions, the cover and several photos at once#
- A caption. Click a photo to open it, type its Caption and click Save caption. Visitors see it under the photo when the display shows captions.
- The album's cover. Open the photo and click Set as cover.
- Move or delete several photos. Tick them (Shift-click ticks a run, Select all ticks every photo shown), then choose an album under Move to album…, or click Delete.
- Rename or hide an album. Click Album details. Untick Visible on the site to hide it: a hidden album stays here, but no widget shows it.
Show the albums on your website#
- On Photo albums, click Add to page.
- Click Add beside the page that should show the albums, or click New page with Photo albums, give the page a title and click Create page.
- Click Open with the page's name. The albums are at the end of the page's draft: move them where you want them, then publish the page.
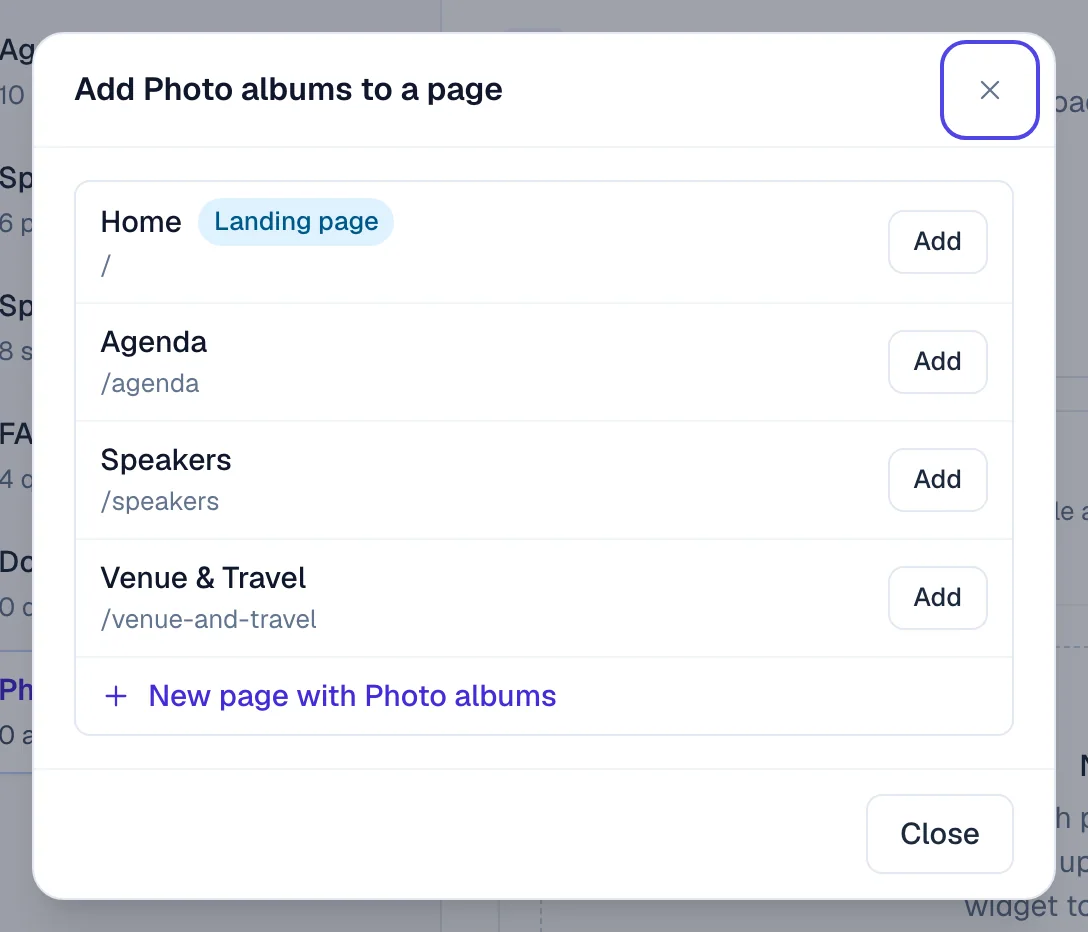
You can also add the Photo albums section in the page editor: see Build your event website. In the section's settings, What to show picks the albums (all of them when you pick none), Show at most limits how many, and the section can use the default display or Its own layout.
Only visible albums that have photos show on the site.
Choose how the albums look#
The Display tab sets how every Photo albums widget shows the albums, unless a widget has its own layout.
- Click Display.
- Check that Show Photo albums on this event's website is on.
- Under Default display, choose a layout and tick what visitors see.
- Click Save Photo albums display.
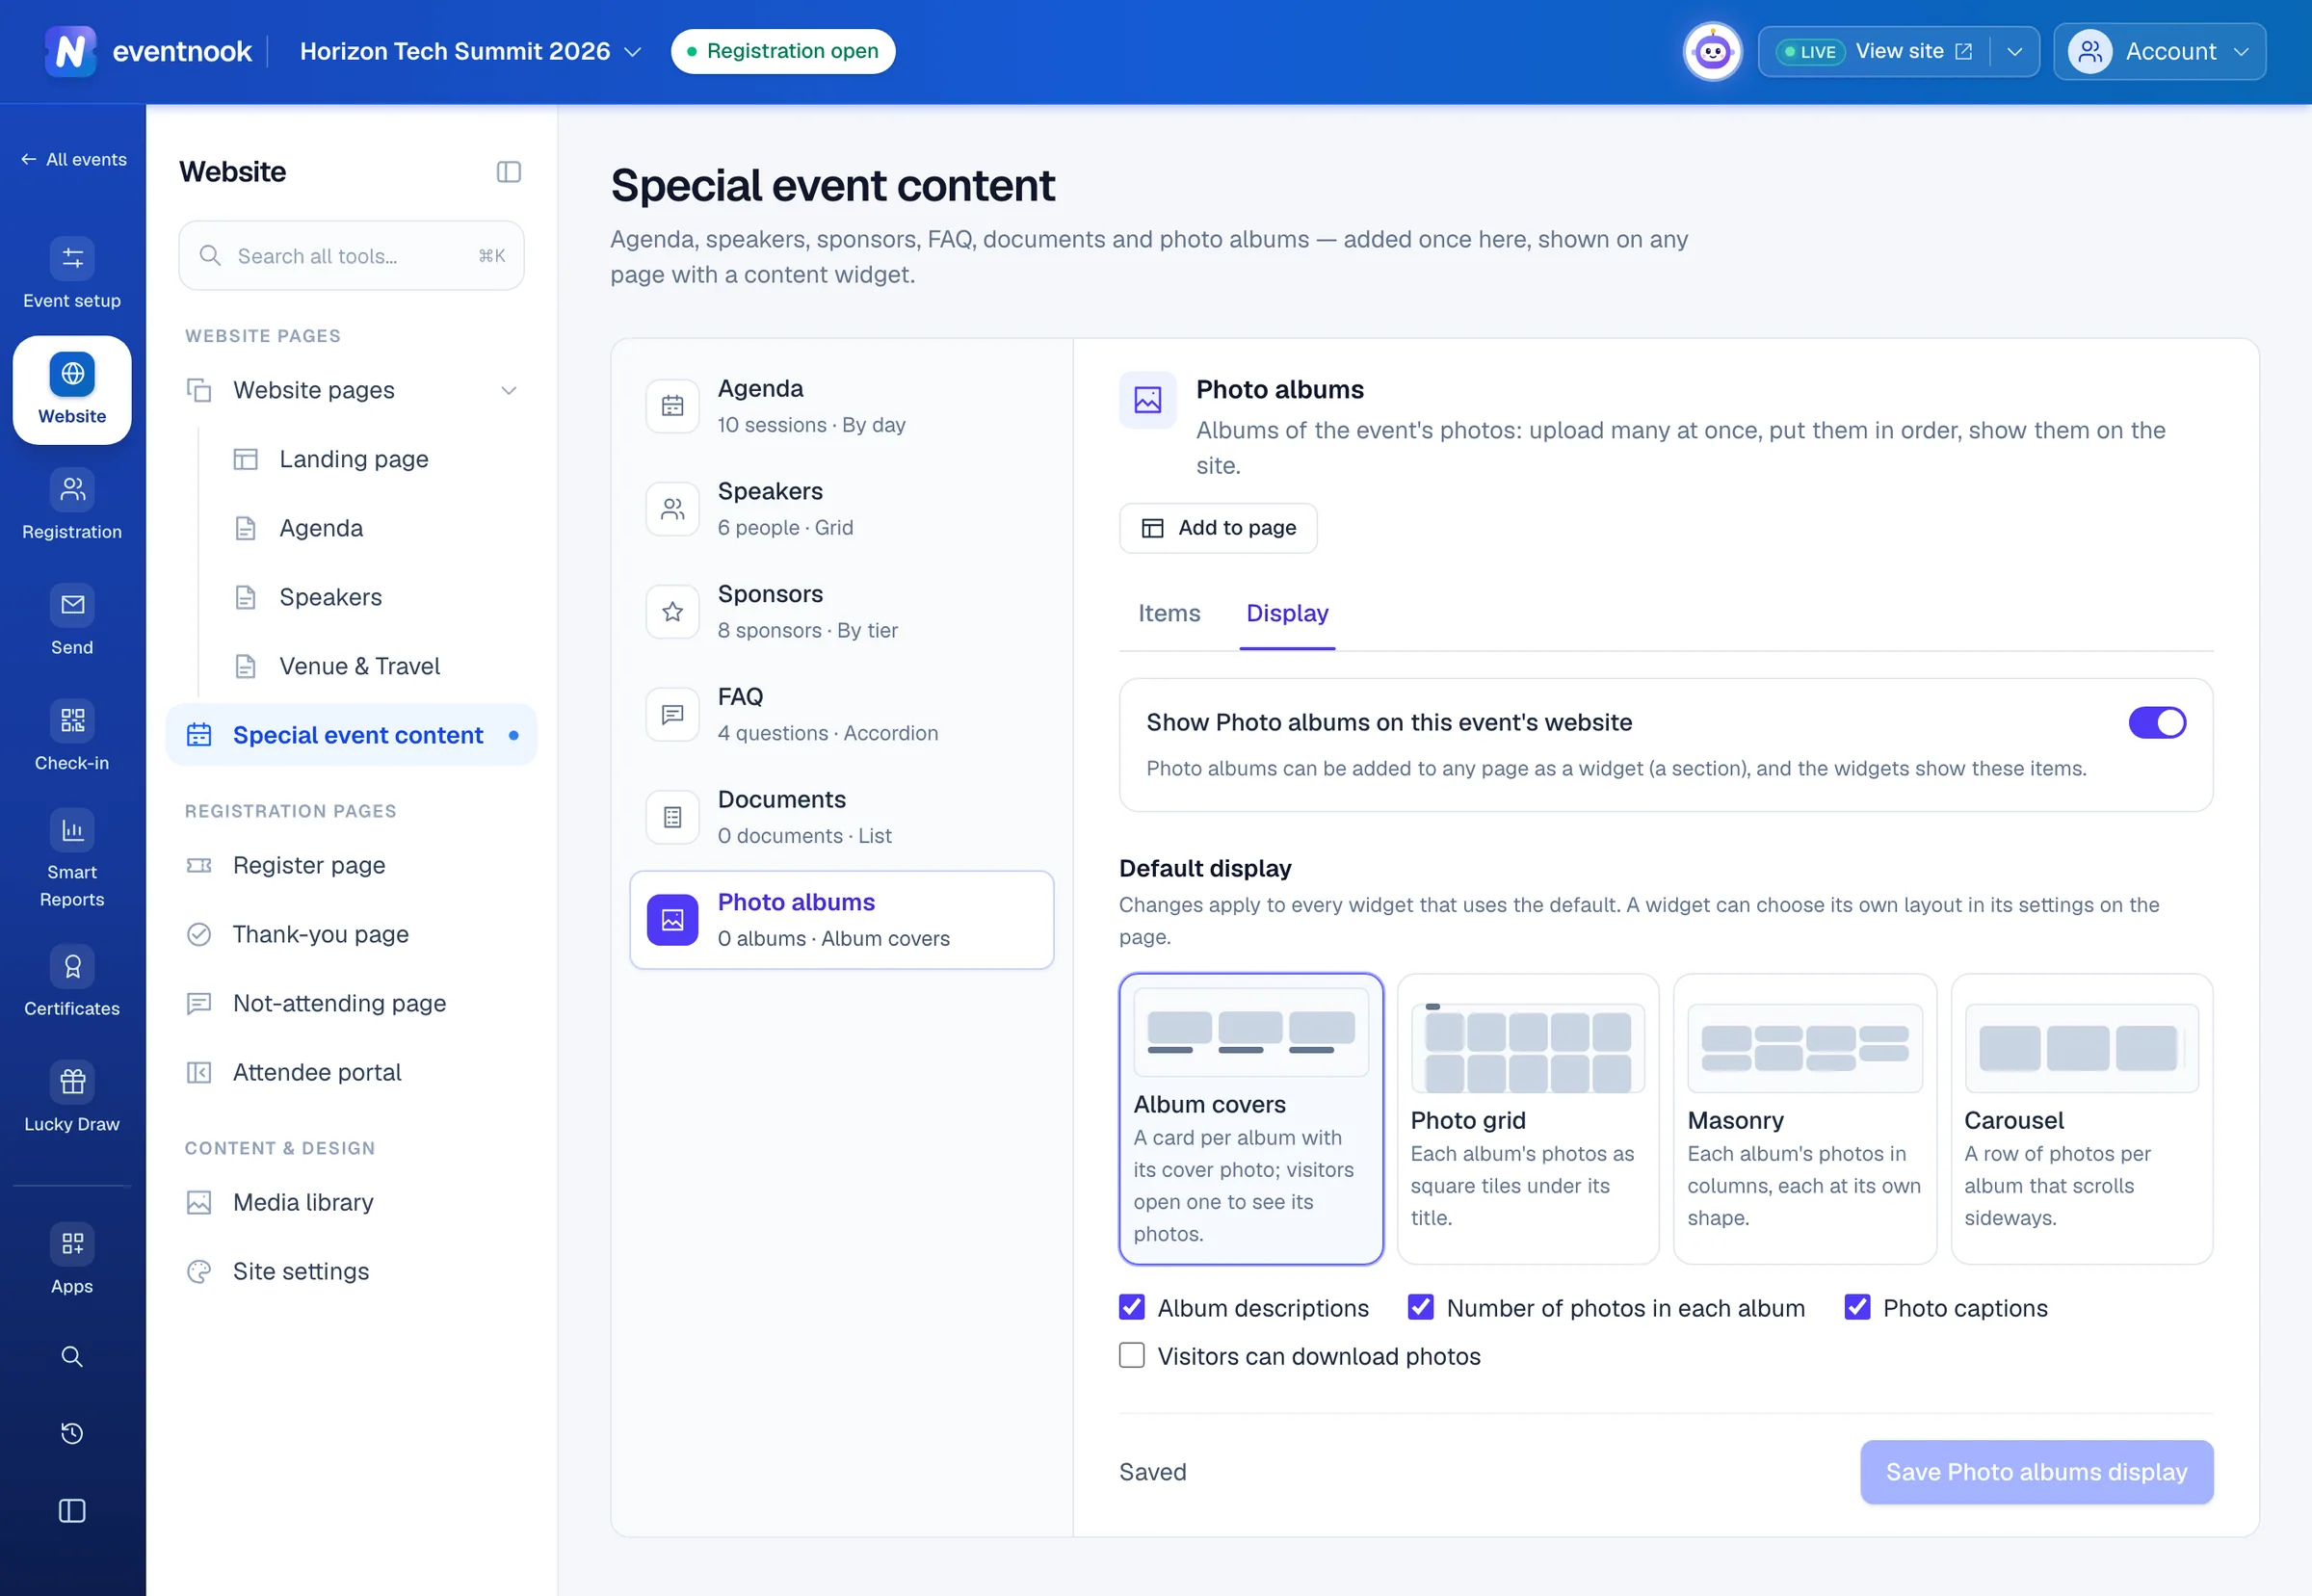
- 1Photo albums on or off for the whole site
- 2Album covers, a photo grid, masonry or a carousel
- 3Let visitors download the photos
- 4Save the display for every Photo albums widget
| Layout | What visitors see |
|---|---|
| Album covers | A card per album with its cover photo; visitors open one to see its photos. The default. |
| Photo grid | Each album's photos as square tiles under its title. |
| Masonry | Each album's photos in columns, each at its own shape. |
| Carousel | A row of photos per album that scrolls sideways. |
The options are Album descriptions, Number of photos in each album and Photo captions (all on by default), and Visitors can download photos (off by default). Visitors can open any photo full screen and move through the album with the arrow keys or by swiping.
If something looks wrong#
- The albums don't show on the site. Check that Show Photo albums on this event's website is on under Display, that the album is visible and has photos, and that the page with the albums is published.
- There is no Photo albums in Special event content. The Photo Gallery isn't added to this event yet. Add it from Apps.
- "This browser can't open HEIC photos." Use Safari, or export the photos as JPEG first.
- "Not a picture: JPEG, PNG, WebP, GIF or HEIC only." The file isn't a picture EventNook takes. Save it as JPEG and upload it again.
- "The album was changing while this was saved. Try again." Another upload or move in the same album got there first. Try again.
- Upload photos is greyed out. The album holds 2,000 photos. Make another album for the rest.
Who can do this#
Everyone with access to the event can see the albums. Making albums, uploading, ordering and deleting photos, and saving the display need the Event Editor or Event Admin role, or an organisation owner or admin. Adding the app to the event is covered in Add an app to your event.
Related guides
- Add an app to your eventSee which add-on apps your plan includes, add one to an event so it joins the menu for the whole team, and take it off again when you no longer need it.
- Add pages, event content and picturesAdd more pages to your event site, keep your agenda, speakers, sponsors, FAQ and documents in one place for every page, and manage the pictures the site uses.
- Build your event's landing pageDesign the home page of your event site by typing on the page or describing it to AI, add sections such as the agenda and speakers, and publish it.
Still stuck? In EventNook, ask HeyNook. It knows the page you're on and your event, and can take you straight to the right setting.