Register for an event
Choose your tickets on the event's site, fill in your details and finish registering, on a phone or a computer.
You register on the event's own site: choose your tickets, give your details and, for a paid ticket, pay. All you need is an email address you can open, because your confirmation and ticket are sent there.
The organiser designs the site and can change most of its wording, so the buttons and headings may read differently from the ones here.
Start registering#
- Open the link the organiser shared, such as one in an invitation or on their website.
- Click Register now. Registration opens over the page or on a page of its own. On some events the button opens the registration form straight away, with no ticket to choose.

- 1Start registering
Choose your tickets#
- Under Choose your tickets, add the tickets you want. Use + and −, or pick a number from the list beside them. Some events let you tick one or several tickets instead.
- Optional: enter a code. See Use an invitation or discount code.
- Click Register. The button shows how many tickets you chose and the total so far.
Your tickets are now held for you while you finish. Some events show a countdown: Your tickets are reserved with the time left.
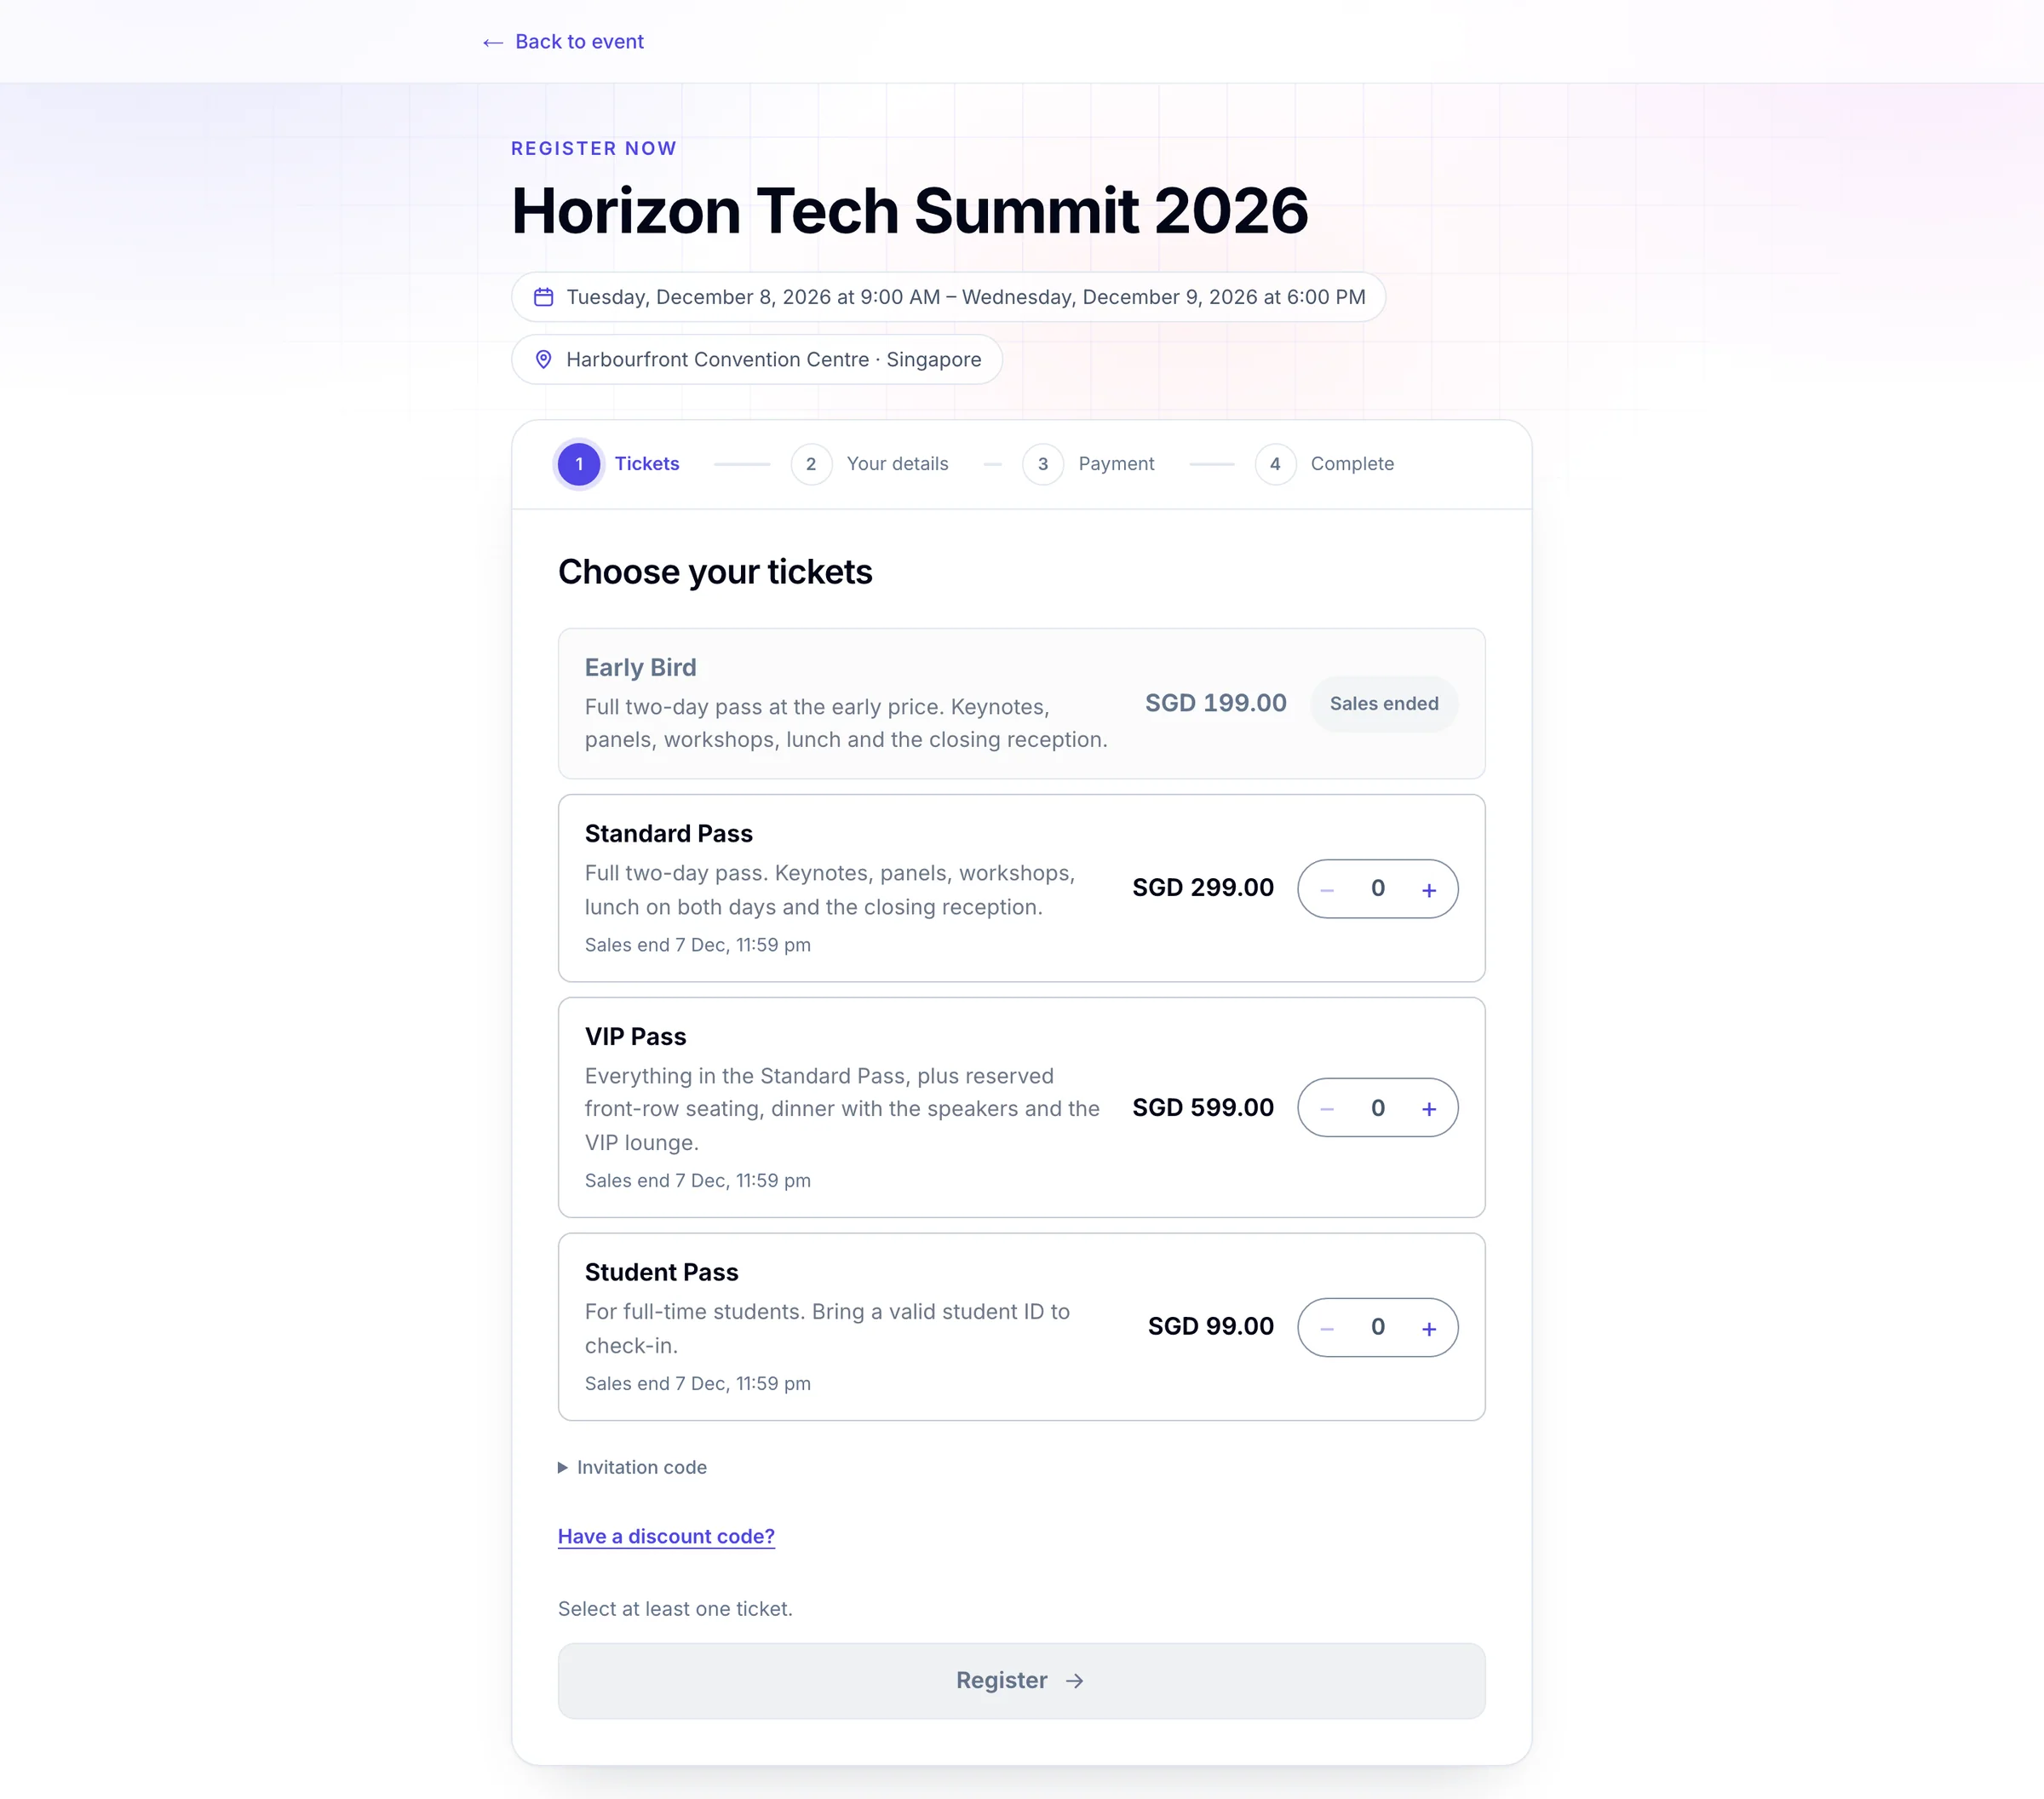
- 1Add a ticket, or pick a number from the list beside it
- 2Have an invitation code? It shows the tickets it unlocks
- 3Take money off with a discount code
- 4Hold your tickets and go on to your details
| On a ticket | What it means |
|---|---|
| 5 left | Only a few of this ticket remain. The number shows from 10 down. |
| Sales start … or Coming soon | The ticket isn't on sale yet. |
| Sales end … | The last moment you can buy it, in the event's time zone. |
| Sold out, Sales ended, Not on sale | You can't choose it now. The organiser may word this differently. |
| Includes 10 attendees | One ticket admits a group, such as a table of ten. |
| Add-on · with … | An extra, such as a workshop, bought together with the main ticket it names. |
| … price until … | An early price, and the date it ends. |
| Your contribution | A donation. Click a suggested amount or type your own. |
| Show details | Opens the ticket's description. |
Some events ask you to choose a Ticket category first, such as Member or Student, and click Show tickets. Some ask you to pick a visit: click Show available dates, then choose a date and a session.
Fill in your details#
- Fill in the form. Fields marked * are required; the others say (optional).
- If you chose several tickets, fill in a section for each attendee: Attendee 1, Attendee 2 and so on. The buttons at the top take you to each one.
- If there's a Booking contact section, choose who gets the confirmation email and updates about the booking: one of the attendees, or Someone else with their own details.
- If the form asks you to confirm your email, click Verify email address, type the code you're sent and click Verify.
- If there are registration terms, read them and tick I agree to the registration terms.
- Click Continue to payment. For free tickets the button is Complete registration, and you're done.
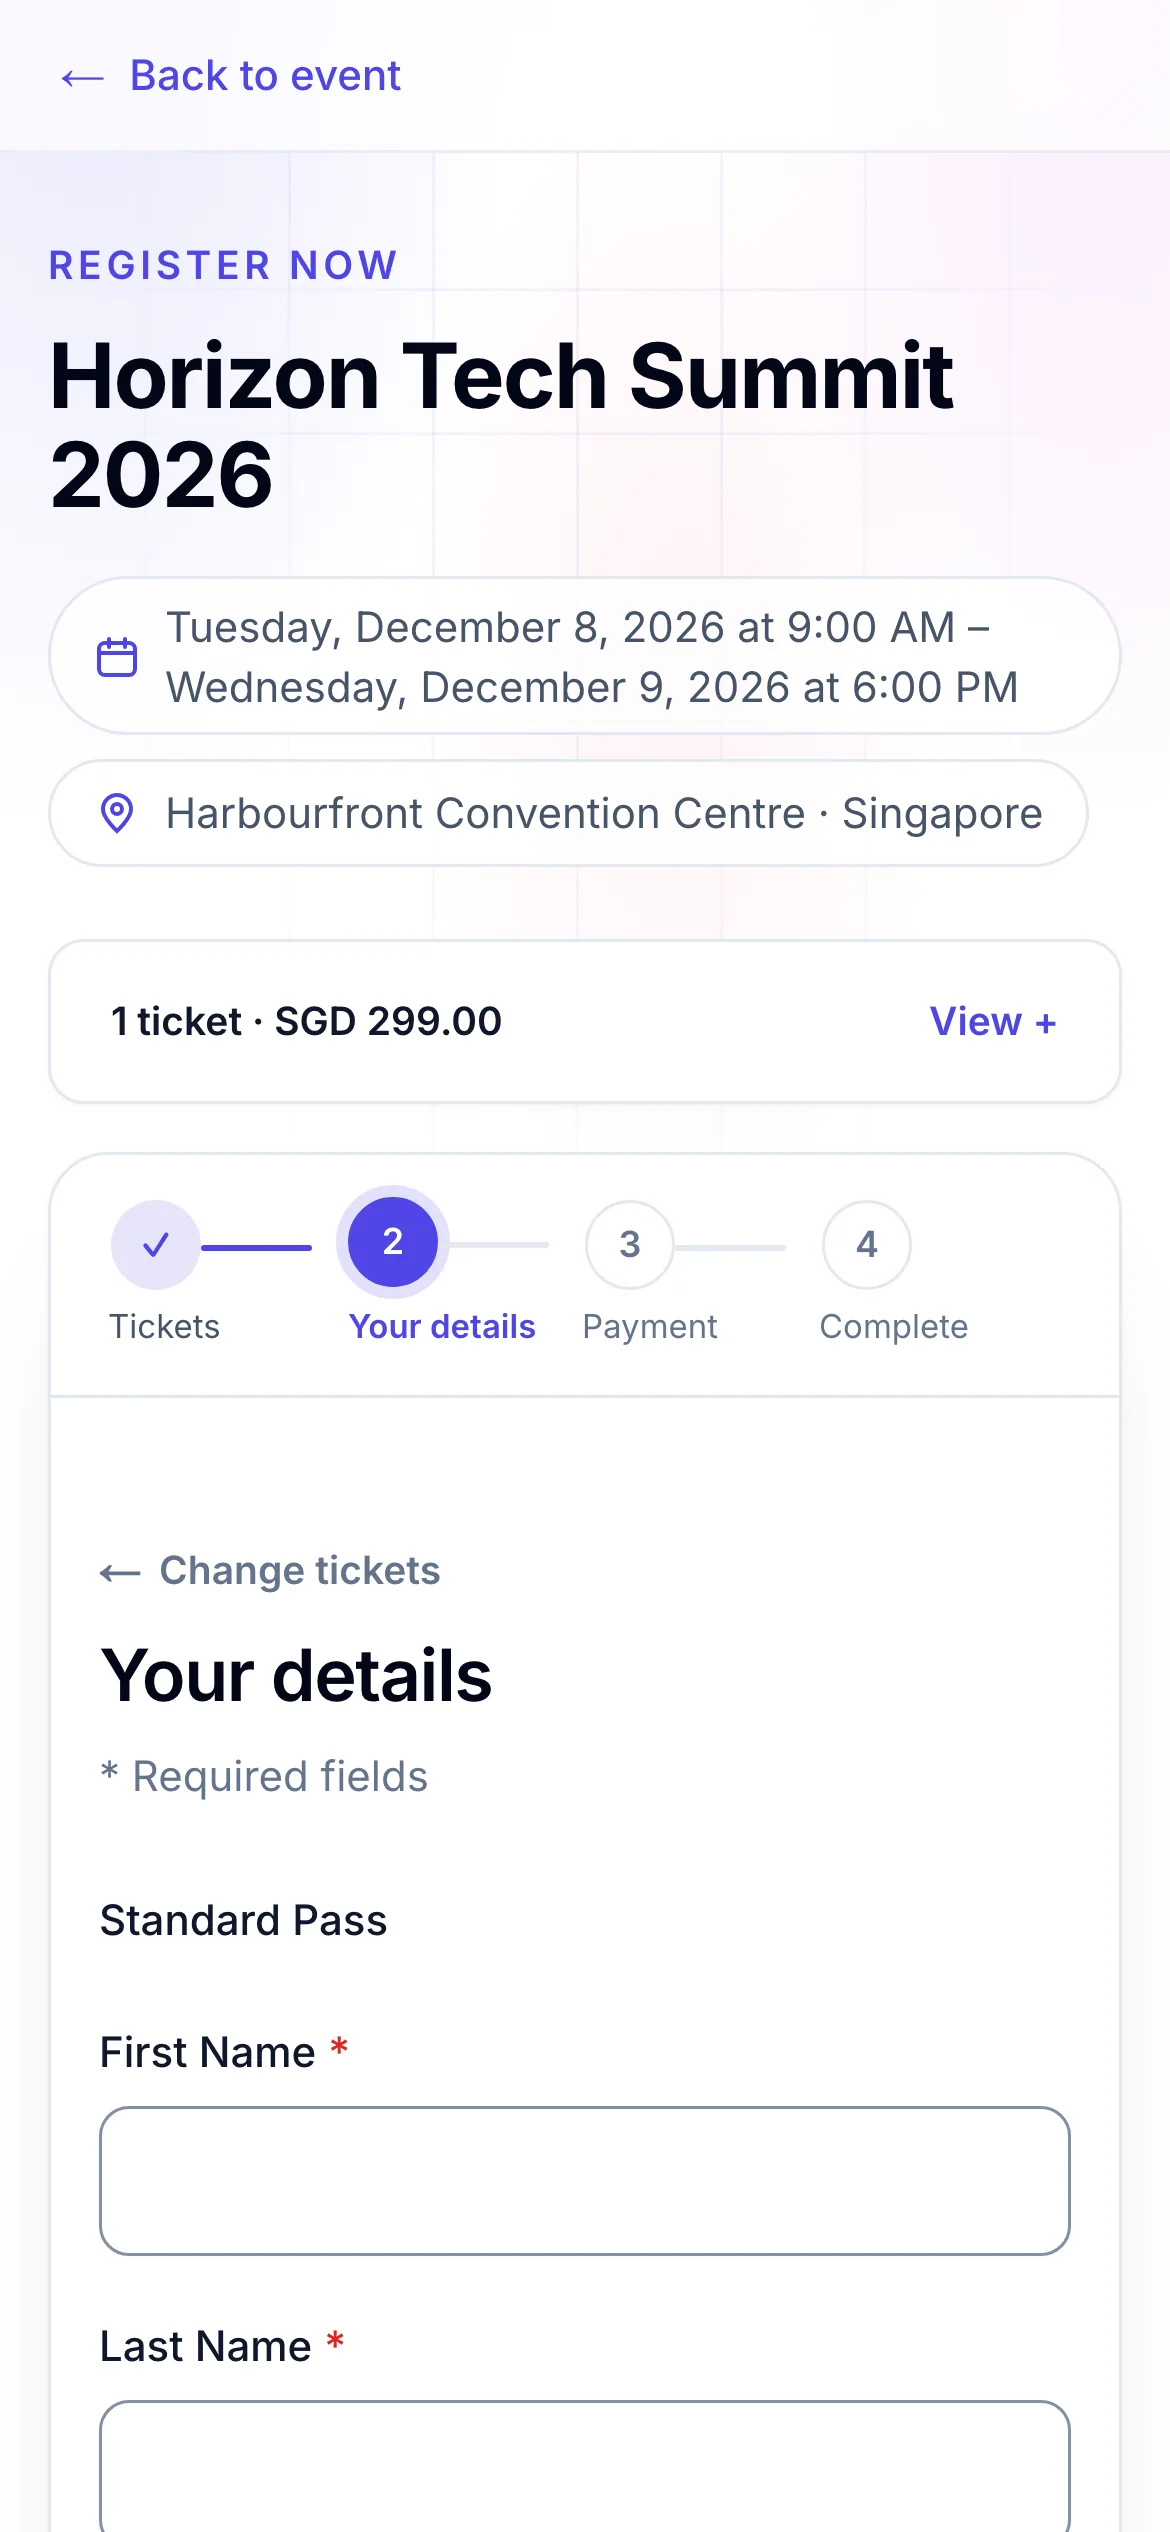
- 1What you're registering for, and the total
- 2Go back to the tickets
- 3Fields marked * must be filled in
If something is missing or wrong, a box at the top says Check 2 fields (or however many) and lists them. Click one to go straight to it.
To pay, see Pay and get your confirmation.
Change your tickets#
On the details step, click Change tickets at the top. The page warns that this gives up your reservation and clears the details you entered; click Change tickets again to go back, or Keep my tickets to stay.
On a phone, click View + on the order summary to see what you chose; Hide − folds it again.
If you were sent a special link#
- A link with a ticket or code in it. The ticket starts chosen and the code filled in. You can still change them.
- A link to one ticket's form. The registration form opens straight away, with no ticket to choose.
- A personal registration link. It opens your own form, sometimes already filled in.
- A private link. It shows only the tickets the organiser chose for it, which may not be on the public page.
If something looks wrong#
- Your reservation has expired. Tickets are held for a limited time. Click Choose tickets again (or Start again) to check what's available now.
- Registration is closed, or Registration has not opened yet. Registration isn't open now. Check the event's page for when it opens, or ask the organiser.
- The Register button stays grey. Choose at least one ticket. An add-on needs its main ticket too: the page says which. If you're asked to choose a category, a date or a session, do that first.
- The ticket in your link isn't available right now. It may be sold out or no longer on sale. Choose from the tickets shown.
- You're in the queue… Please keep this page open. Many people are registering at once. The page carries on by itself. If it then says lots of people are registering, wait a moment and click the button again; nothing was lost.
- The page asks for an access code. The event site is private. Enter the code the organiser gave you and click Continue.
- This link has expired, has already been used, or is not valid. Check that you opened the whole link from your email. If you have already registered with it, your confirmation email is on its way or in your inbox. Otherwise ask the organiser for a new link.
- The page suggests a different email address. It spotted a likely typo, such as a misspelt domain. Click Use this address if it's right.
For organisers#
What people see here is set in Event admin:
- The tickets, their prices, limits and sales dates: Create tickets and set prices.
- The questions on the form: Build the registration form.
- The register page around the tickets, and the thank-you page: Design the register and thank-you pages.
- When registration opens and closes, the countdown and how long tickets are held: Set when and how people register.
- Any wording on these pages: Change the wording people see.
Related guides
- Use an invitation or discount codeEnter a discount code to take money off your tickets, or an invitation code to see tickets that are kept for invited guests.
- Pay and get your confirmationPay for your tickets, see your confirmation, and find the confirmation email, invoice and receipt that follow.
- Manage your registrationSign in to My Order with a code sent to your email, see your registration and tickets, change your details and cancel if the organiser allows it.
- Your e-ticket and QR codeFind your e-ticket in your email or in My Order, print or save it, and show its QR code at check-in.
Still stuck? In EventNook, ask HeyNook. It knows the page you're on and your event, and can take you straight to the right setting.