Design the register and thank-you pages
Write what stands around your tickets on the register page, and what people see right after they register, by typing on the page, picking a ready-made design or asking AI.
Where to find it: Event admin › Website › Registration pages › Register page
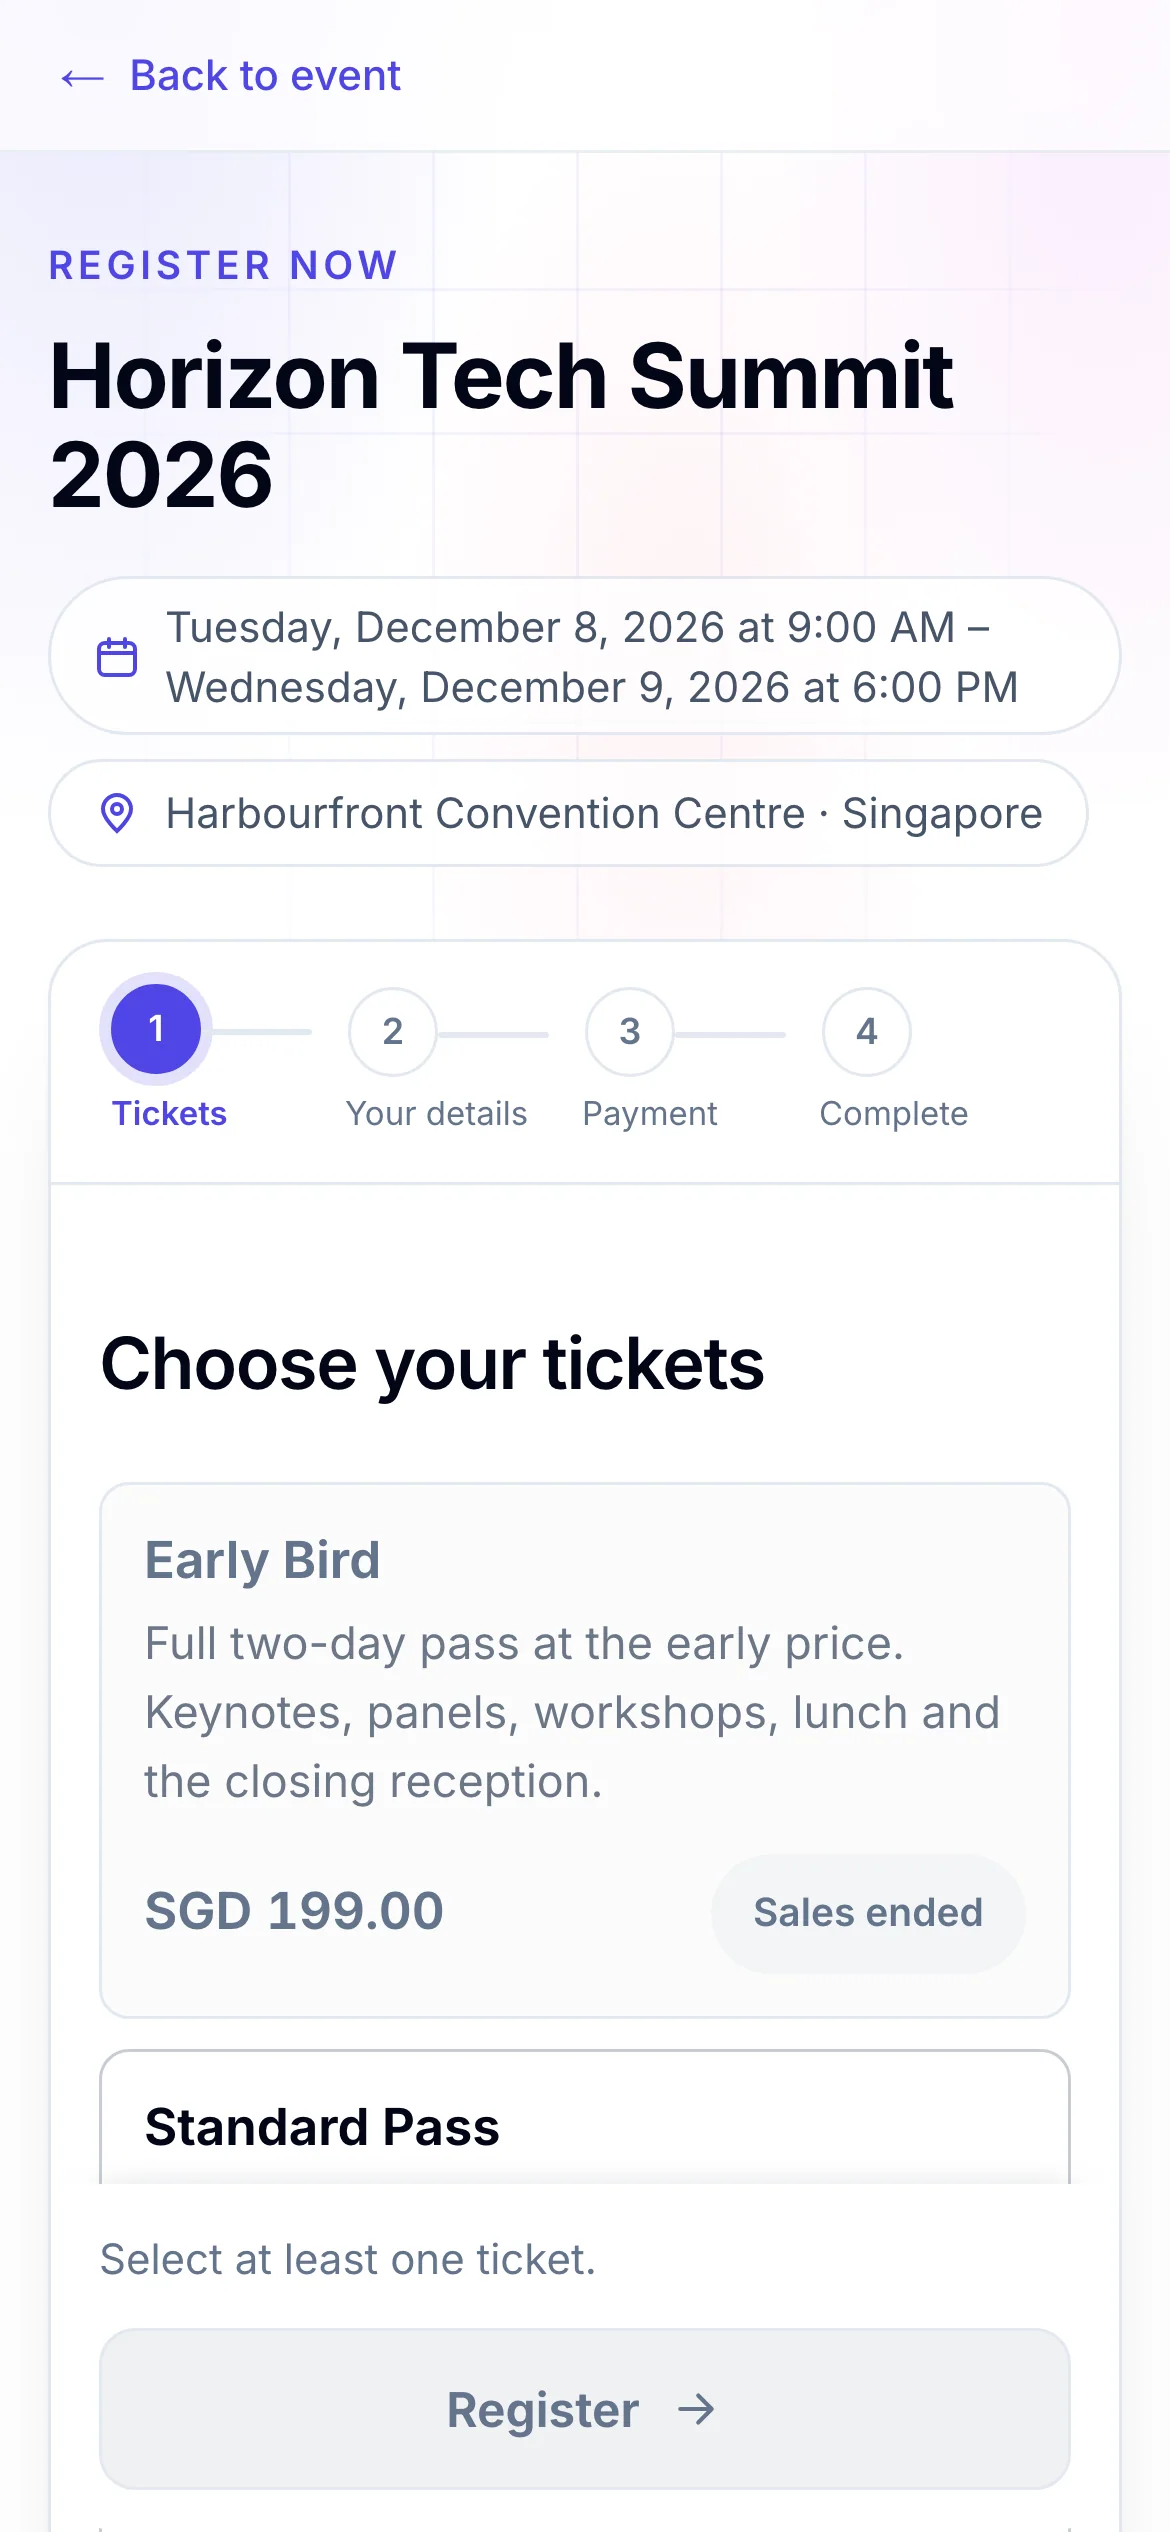
The register page is where people land when they click Register: your tickets in the middle, with your own words around them. The thank-you page is what they see right after they register. Both are drawn in your event's design, and saving makes them live straight away: there is nothing to publish.
Design the register page#
Open Website Builder › Register page. The page has four parts:
| Part | What it shows |
|---|---|
| Top bar | What's at the very top: A link back, The event site's menu, or No bar. |
| Above the tickets | Your own content. It starts with the event's name, date and place. |
| Ticket widget | Your tickets. What's on sale is set in Tickets & pricing, and how the widget behaves in Site URL & widget. |
| After the tickets | Anything people should know, such as a refund policy or how to get there. |
- In the Content tab, choose a part under Your page, or click it on the page.
- Type right on the page. The toolbar has headings, lists, links and images.
- Click Save changes. The page is live at once.
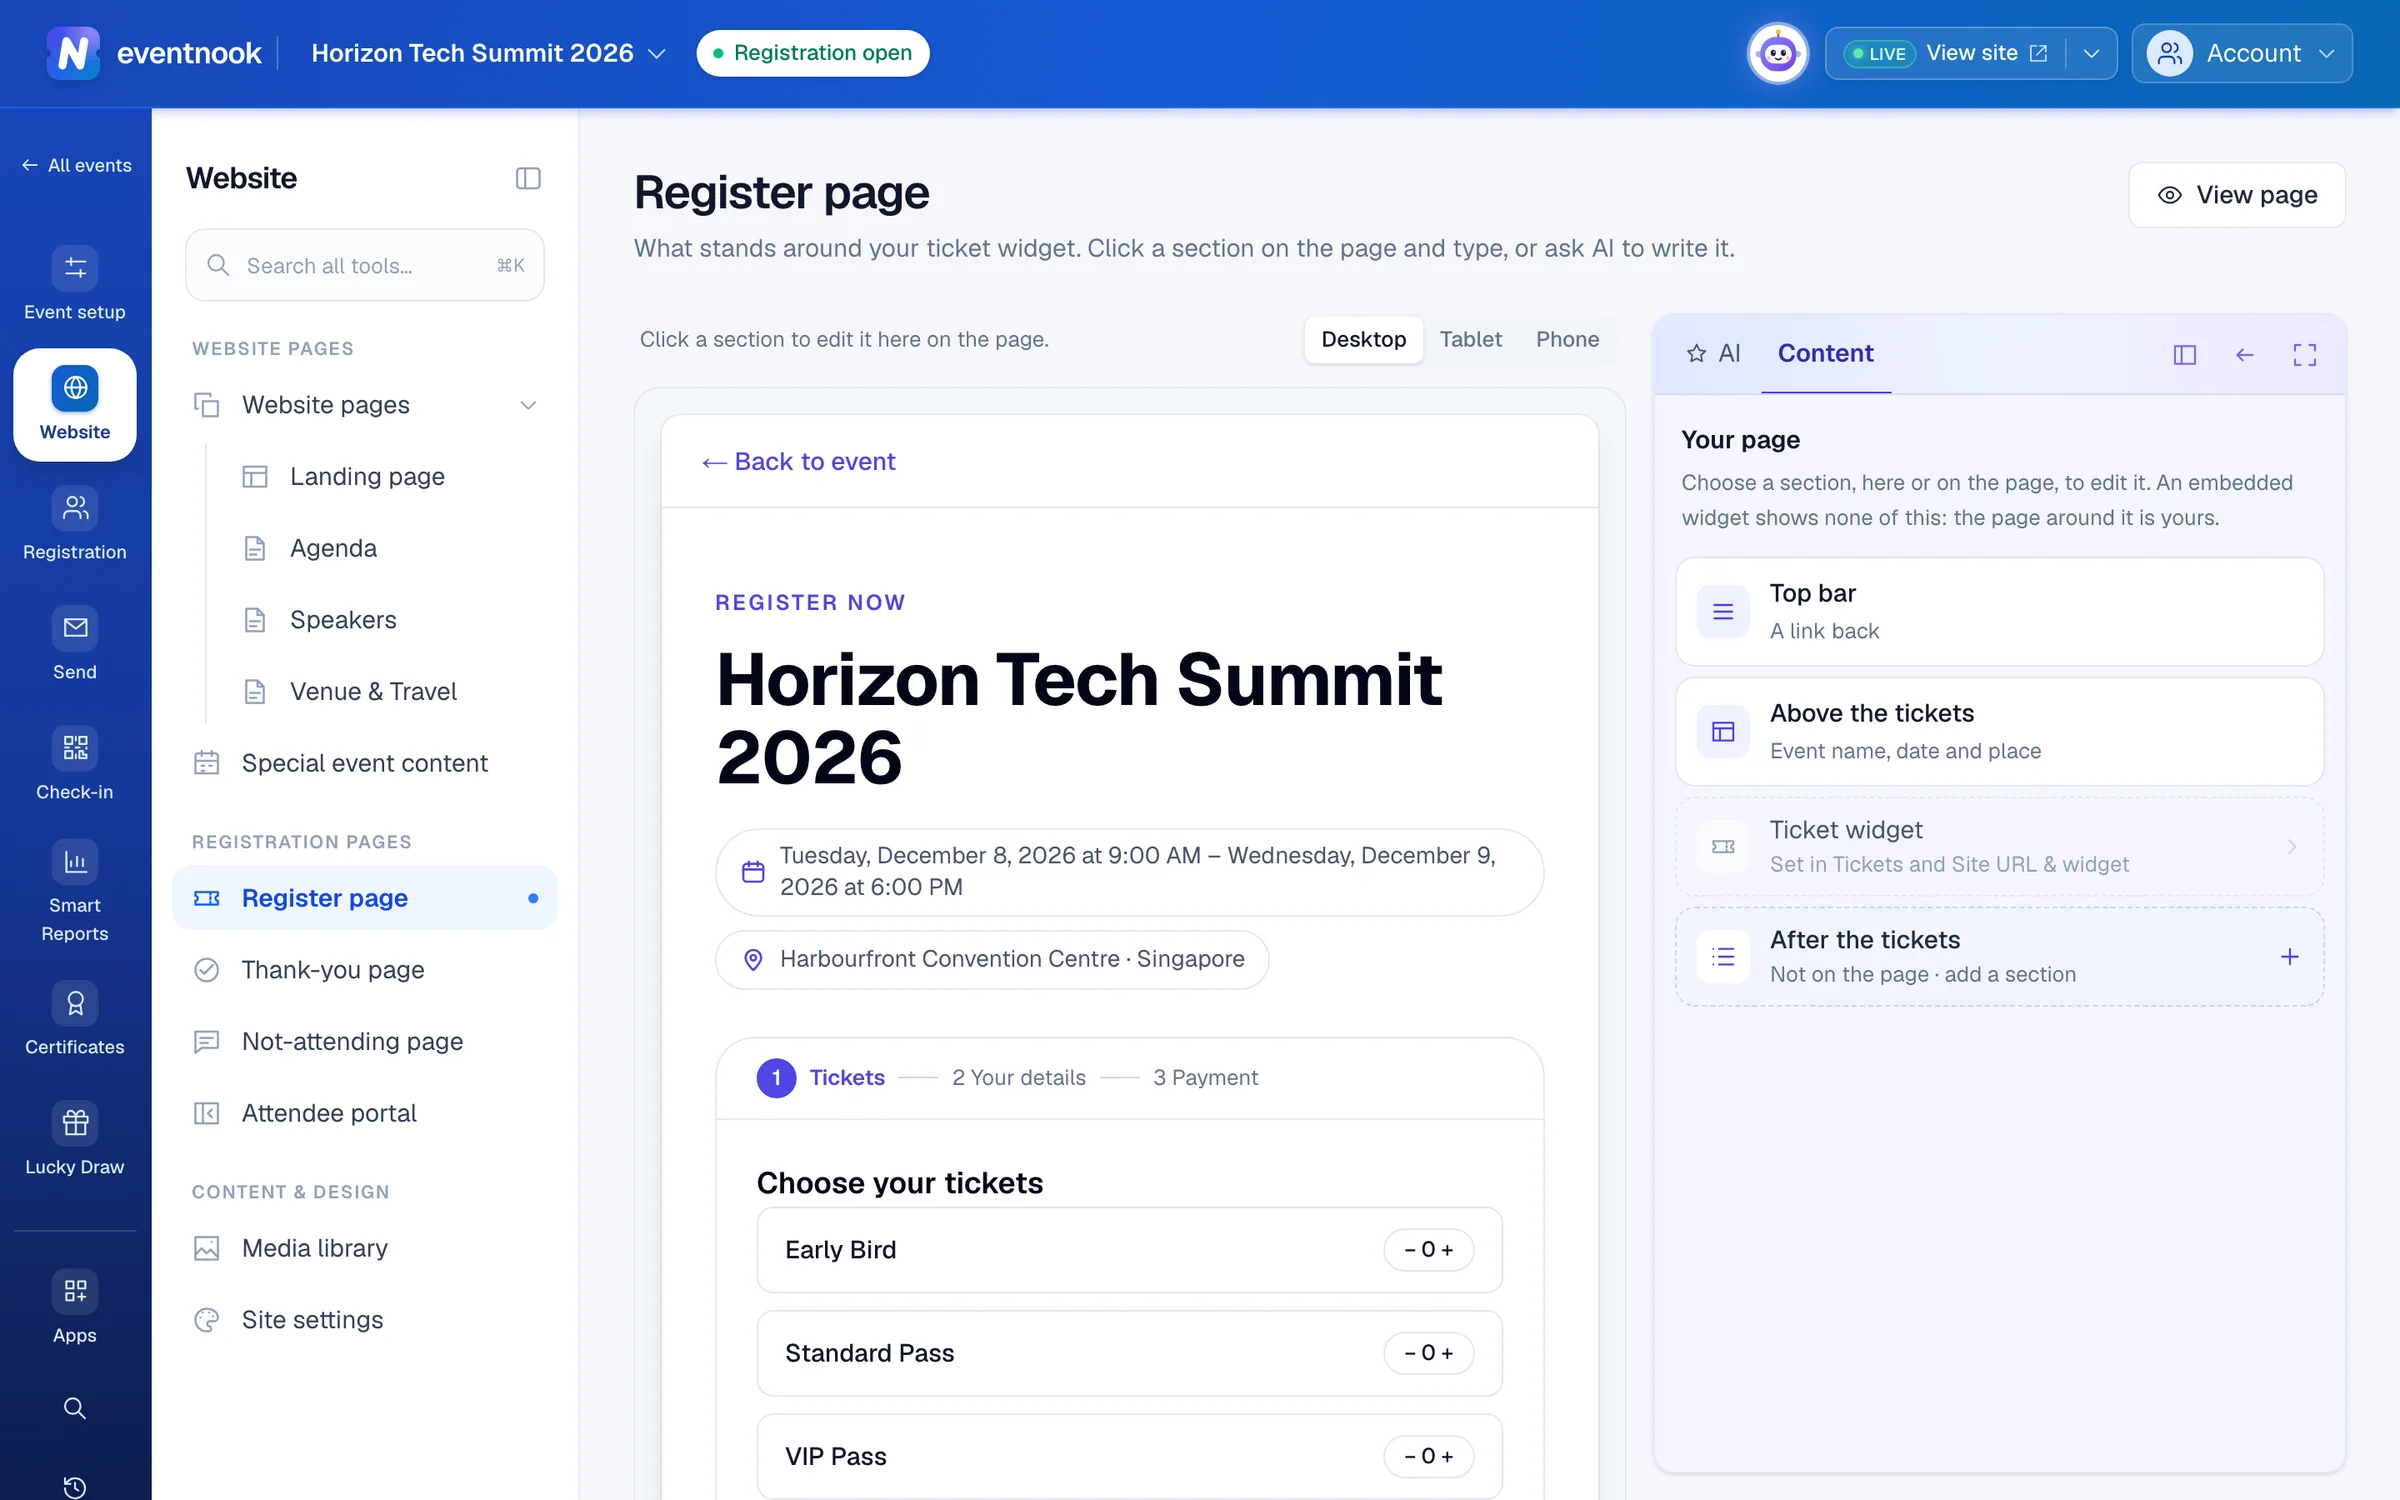
- 1The sections around your tickets
- 2Open the live register page
Tinted words, such as your event's name, fill themselves in and stay right if the event changes. Type around them, or delete one to leave it out. Go back to the default header restores the starting content.
Above the tickets shows on every step but the last, and After the tickets on the ticket, details and payment steps. The last step is the thank-you page. When your ticket widget is embedded on your own website, none of this shows: the page around it is yours.
Start from a ready-made design#
- Open Above the tickets or After the tickets.
- Under Ready-made designs, pick one, such as Spotlight banner or Good-to-know cards.
- Change the words on the page. Words in [square brackets] are for you to fill in.
- Click Save changes.
To add a section after the tickets when there is none, click + Add a section after the tickets on the page.
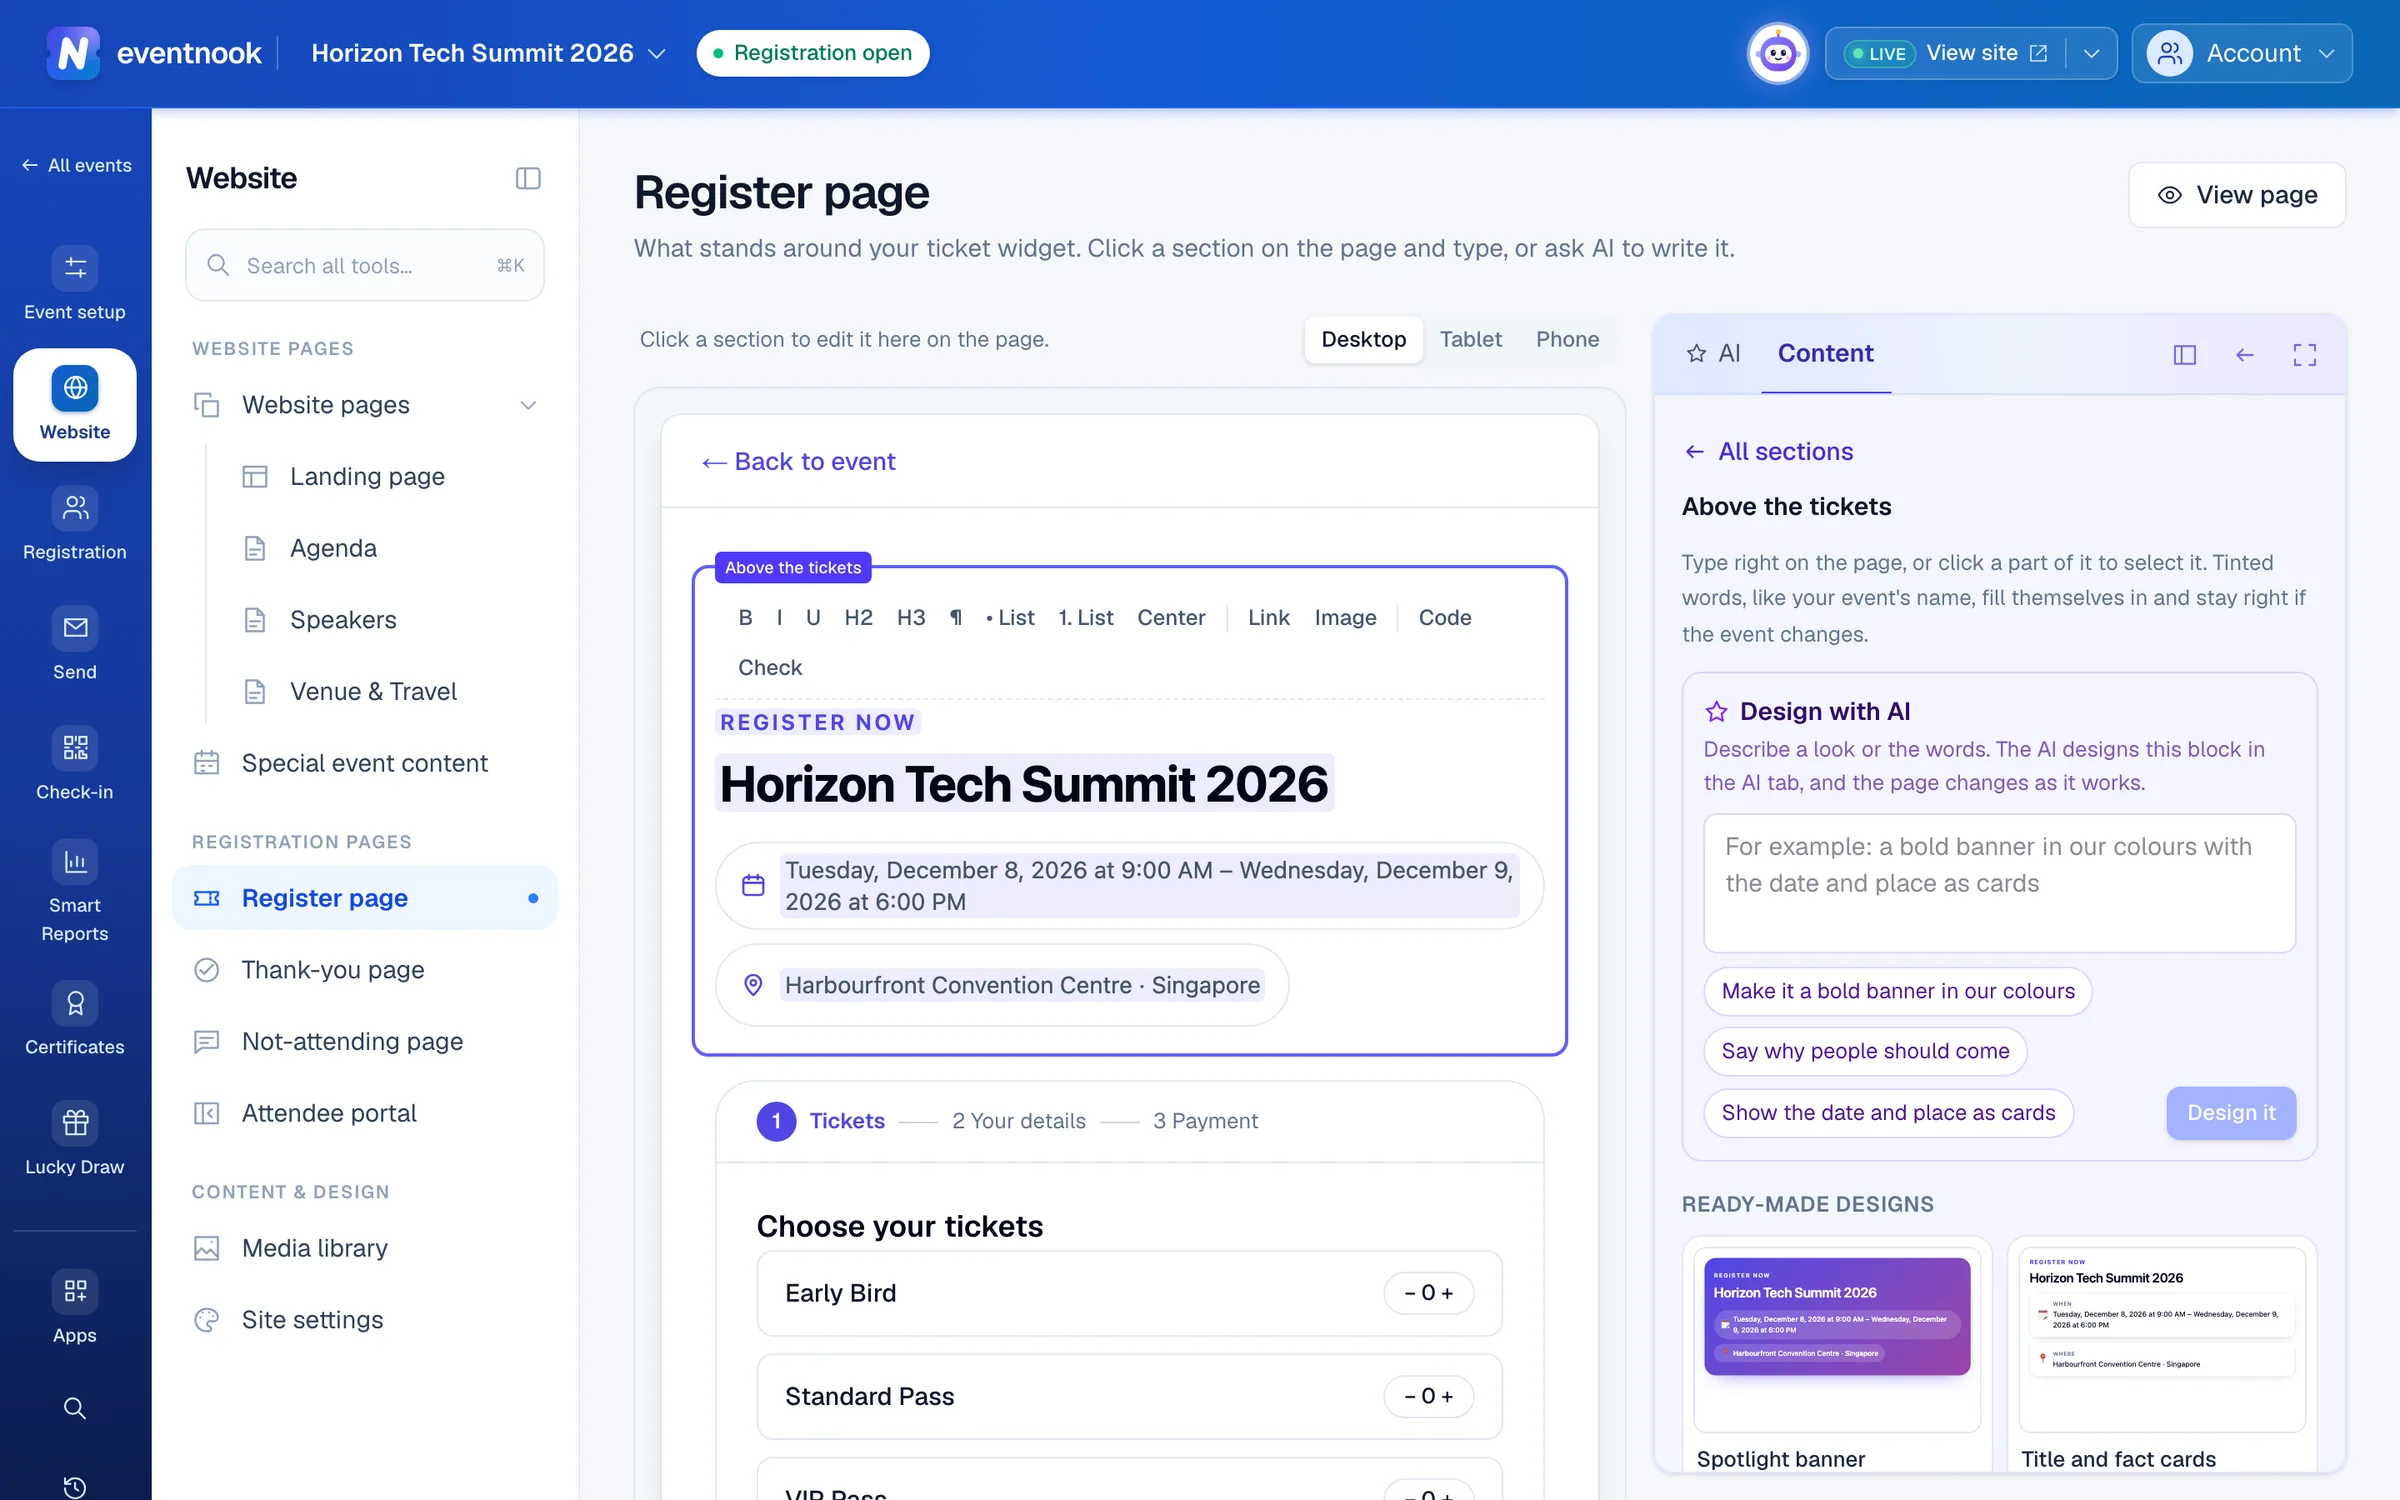
- 1Start from a design in your theme
- 2Describe a look and AI designs this section
Design with AI#
Describe the look or the words under Design with AI in a section and click Design it, or open the AI tab and say what you want for the whole page. The page changes as the AI works, in your theme. Check page asks it to review the page and say what to fix. Undo and Restore go back. Nothing is saved until you click Save changes.
To change one part, click it on the page. In the bar above it, Ask AI about it aims the AI at that part, Show in code opens its HTML, Select parent selects the box around it, and Remove takes it out.
Show your site's menu or a link back#
Choose Top bar, then under Show at the top of the page:
- The event site's menu shows your logo and links from Site settings.
- A link back shows a link to your event's home page. Give your own website's address in Link goes to to send people there instead, and change Link wording if you like. The address must start with
https://. - No bar leaves the top empty.
Remove a section or add it back#
Click Remove beside it in Your page, or Remove this section when it's open, then Save changes. Until you save, Discard brings it back. To add it back later, choose it in Your page. The ticket widget always stays.
Design the thank-you page#
Open Website Builder › Thank-you page. Your page is built of blocks, top to bottom, and you type straight into them. The ready-made page starts with a clear confirmation and the order reference. Confirmed registrations get a Download ticket button when a ticket is available, the event's details, Add to calendar and a summary of the registration.
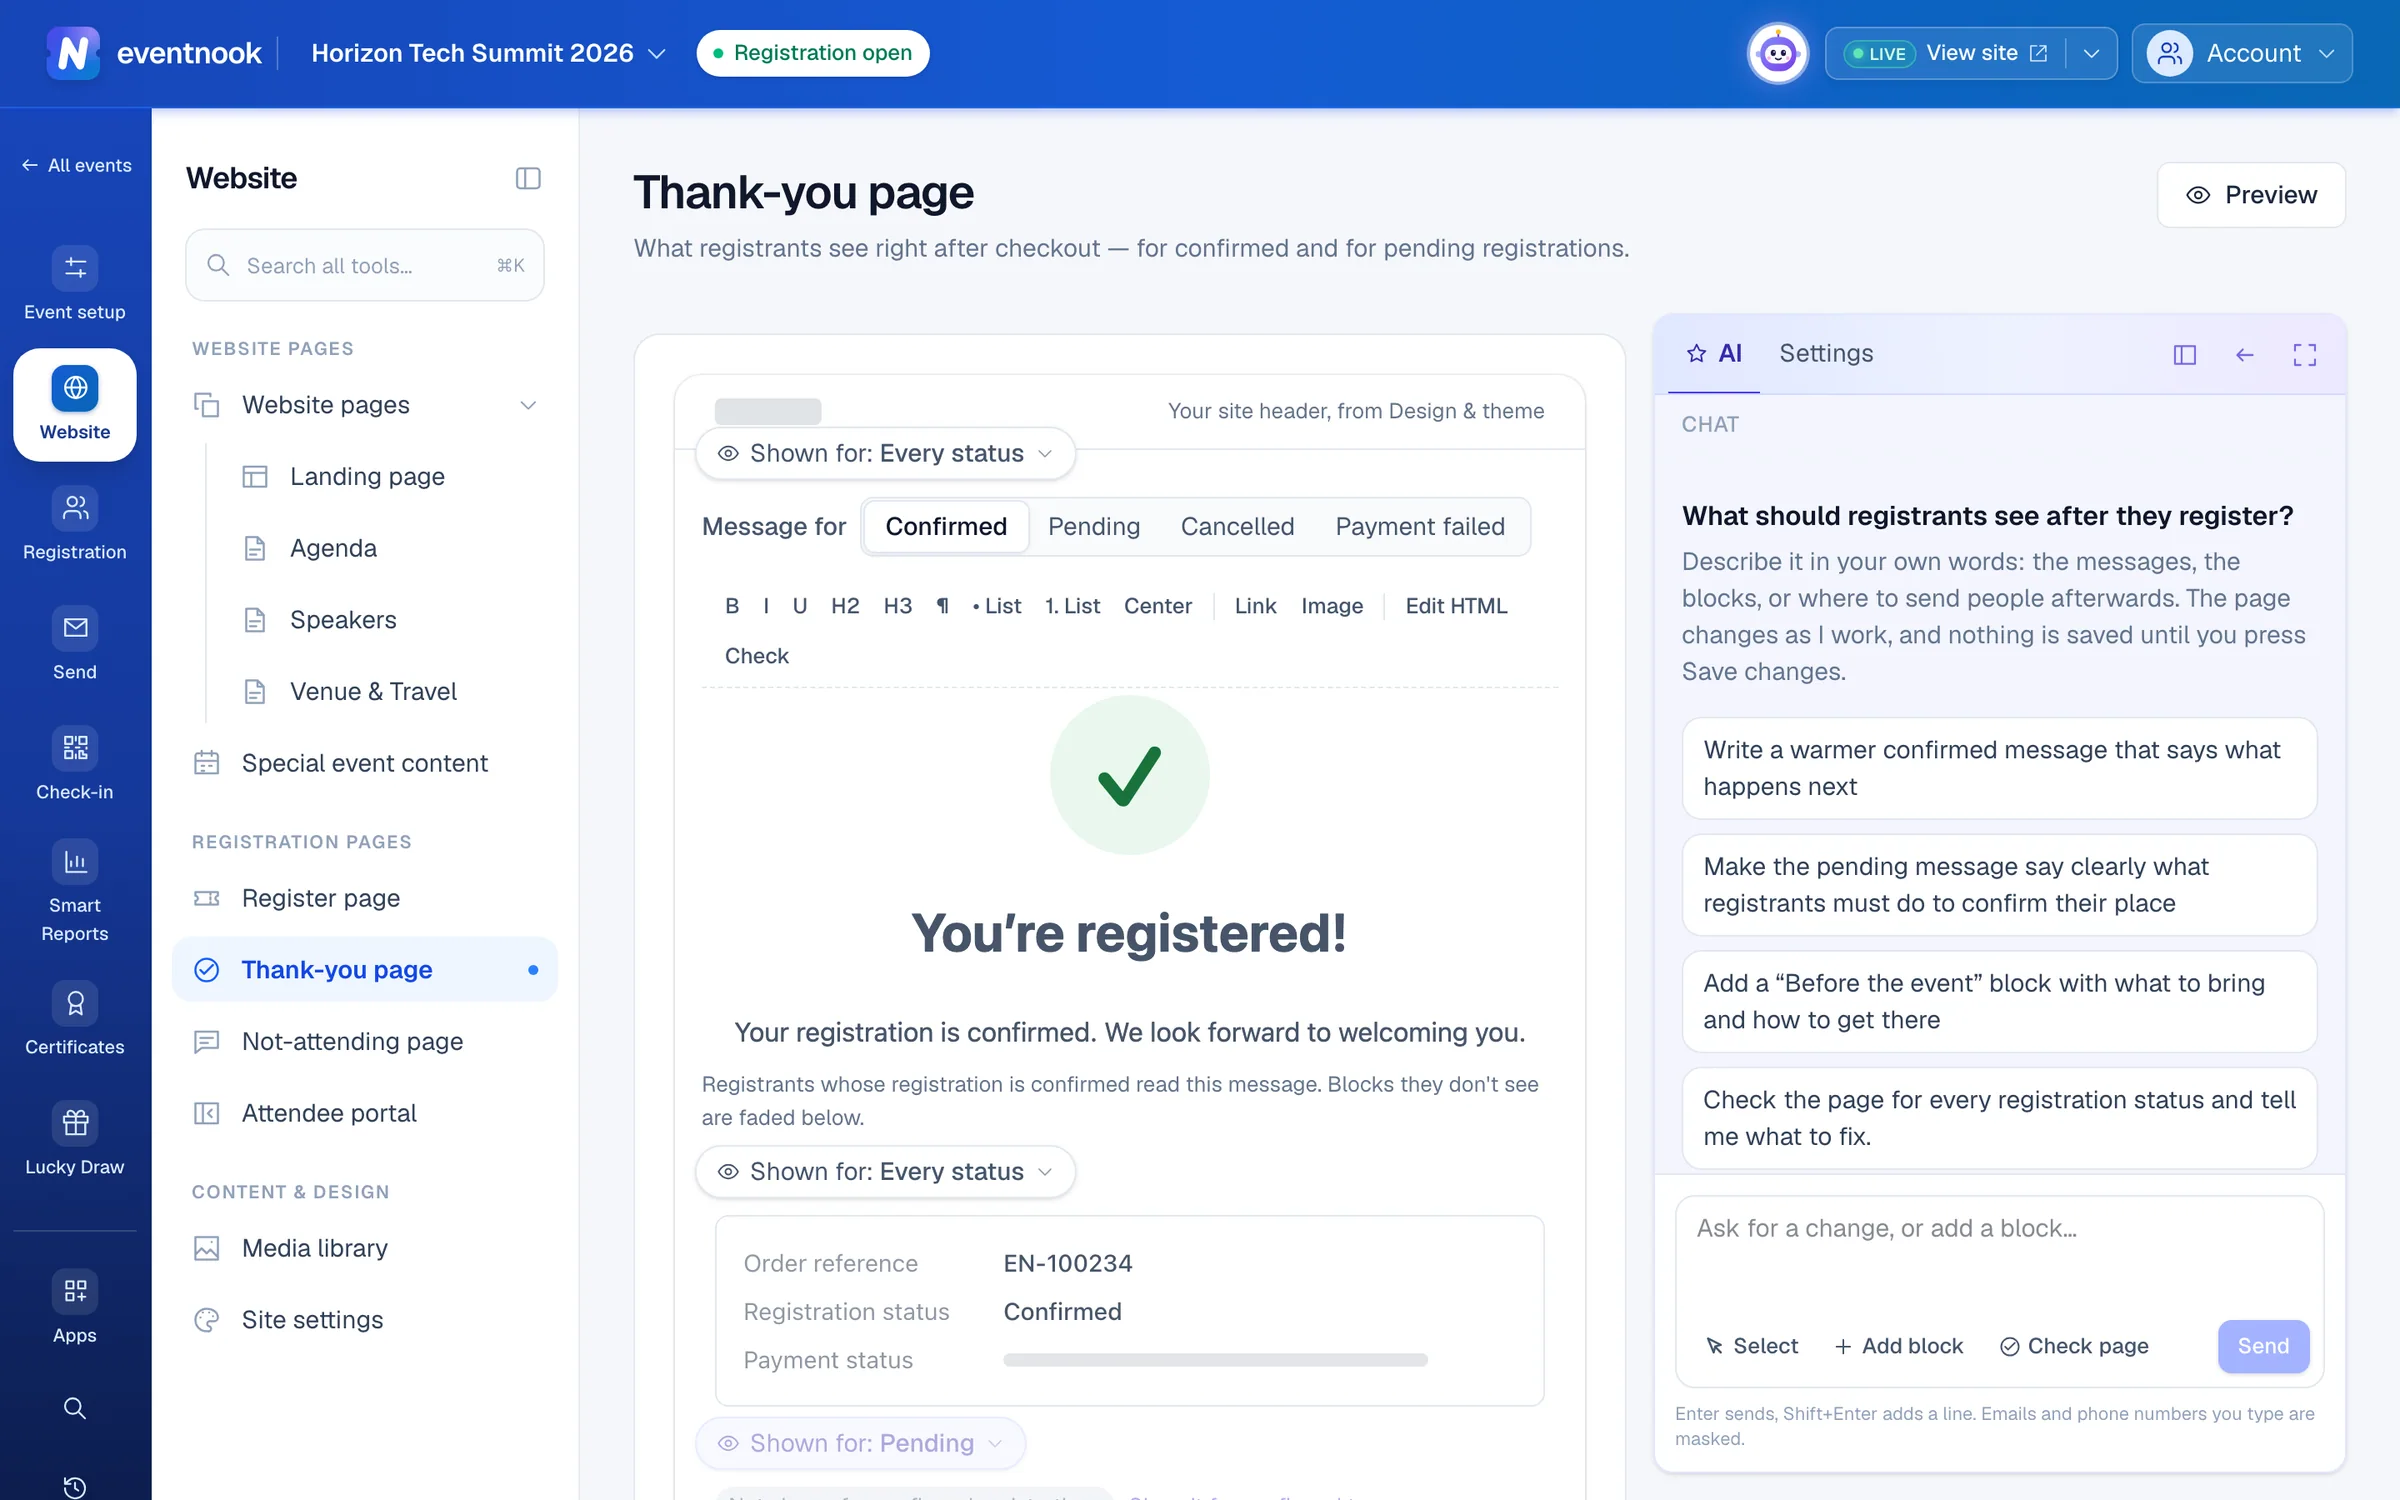
- 1A message for each registration status
- 2What the page shows, the redirect and messages
- 3See the finished page for any status
Change the message#
- Click into the thank-you message block and type. Use the small toolbar for headings, bold, lists, links and images.
- Under Message for, pick Pending to write the message for registrations that are still waiting, such as for payment or approval.
- Click Save changes.
Confirmed and Pending are yours to write. Cancelled and Payment failed use the platform's messages. The rest of the page is drawn for the status you pick, and blocks those registrants don't see are faded.
Show a block only to some registrants#
- Click Shown for: … at the top of the block.
- Under Registration status, tick the statuses it should appear for, for example only Pending on the payment instructions.
- Under Tickets, choose Only selected tickets and tick them, if it's only for some tickets.
- Click Done, then Save changes.
Registrants see the block when both match.
Move, remove or add blocks#
Point at a block and use ↑ and ↓ to move it, or Remove to take it off the page. A removed block waits under Add to this page with its content. To add your own text, choose Custom content there. To put a block between two others, point at the gap and click + Add a block here.
Send people to your own website afterwards#
- In the Settings tab, open After registration.
- Turn on Send registrants to my own page.
- Type an address starting with
https://, a delay of 0 to 30 seconds, and the statuses it applies to. - Click Save changes.
People first see a short confirmation with their order number, then go to your page.
Write it with AI#
Open the AI tab, say what you want, such as "a warmer confirmed message that says what happens next", and click Send. Check page has the AI look at the page for every registration status and fix what's missing. To change one block, click Select, then the block. Nothing is live until you click Save changes.
Preview at the top shows the finished page from your unsaved changes, for any registration status. People who write HTML can use their own layout instead of the blocks, under Settings › Advanced. Most events don't need it.
If something looks wrong#
- My change isn't on the live page. Click Save changes. The editor shows what you're typing; visitors see what's saved.
- Part of my content disappeared. Scripts, iframes and unsafe links are removed for visitors' safety. The notice at the top lists what went.
- "The HTML has problems". A
{{ value }}is mistyped or doesn't exist. The message gives the line. - A thank-you block is greyed out. It doesn't apply to the status you're showing. Switch the status, or click Show it for … too.
- The redirect address is refused. Use an
https://page on your own website, not an EventNook address. - Design with AI says it isn't available. AI may be off for your organisation, or its allowance used up. You can still type on the page.
Who can do this#
Everyone with access to the event can look at these pages and preview them. Editors and event admins can save them.
Related guides
- Build your event's landing pageDesign the home page of your event site by typing on the page or describing it to AI, add sections such as the agenda and speakers, and publish it.
- Let people tell you they can't attendOpen the not-attending form, choose its questions, design its page and acknowledgement email, share its link and read the replies.
- Set up the site's menu, design and settingsChoose the colours, fonts and width every page starts from, set the menu bar, logo, footer and favicon, keep the site out of search, protect it with a code and add your own CSS.
- Change the wording people seeReword or translate the buttons, messages and labels of the event site, registration, emails and e-ticket, and set the date and time formats.
- Register for an eventChoose your tickets on the event's site, fill in your details and finish registering, on a phone or a computer.
Still stuck? In EventNook, ask HeyNook. It knows the page you're on and your event, and can take you straight to the right setting.