Build the registration form
Choose the questions attendees and buyers answer when they register, set each one up, ask some only for certain tickets, and publish the form.
Where to find it: Event admin › Event setup › Start here › Registration form
The registration form is what people fill in after they choose their tickets. The attendee form is answered once for each ticket holder. The buyer form is answered once per order, by the person paying. Both are built the same way, on a draft that you publish when it's ready.
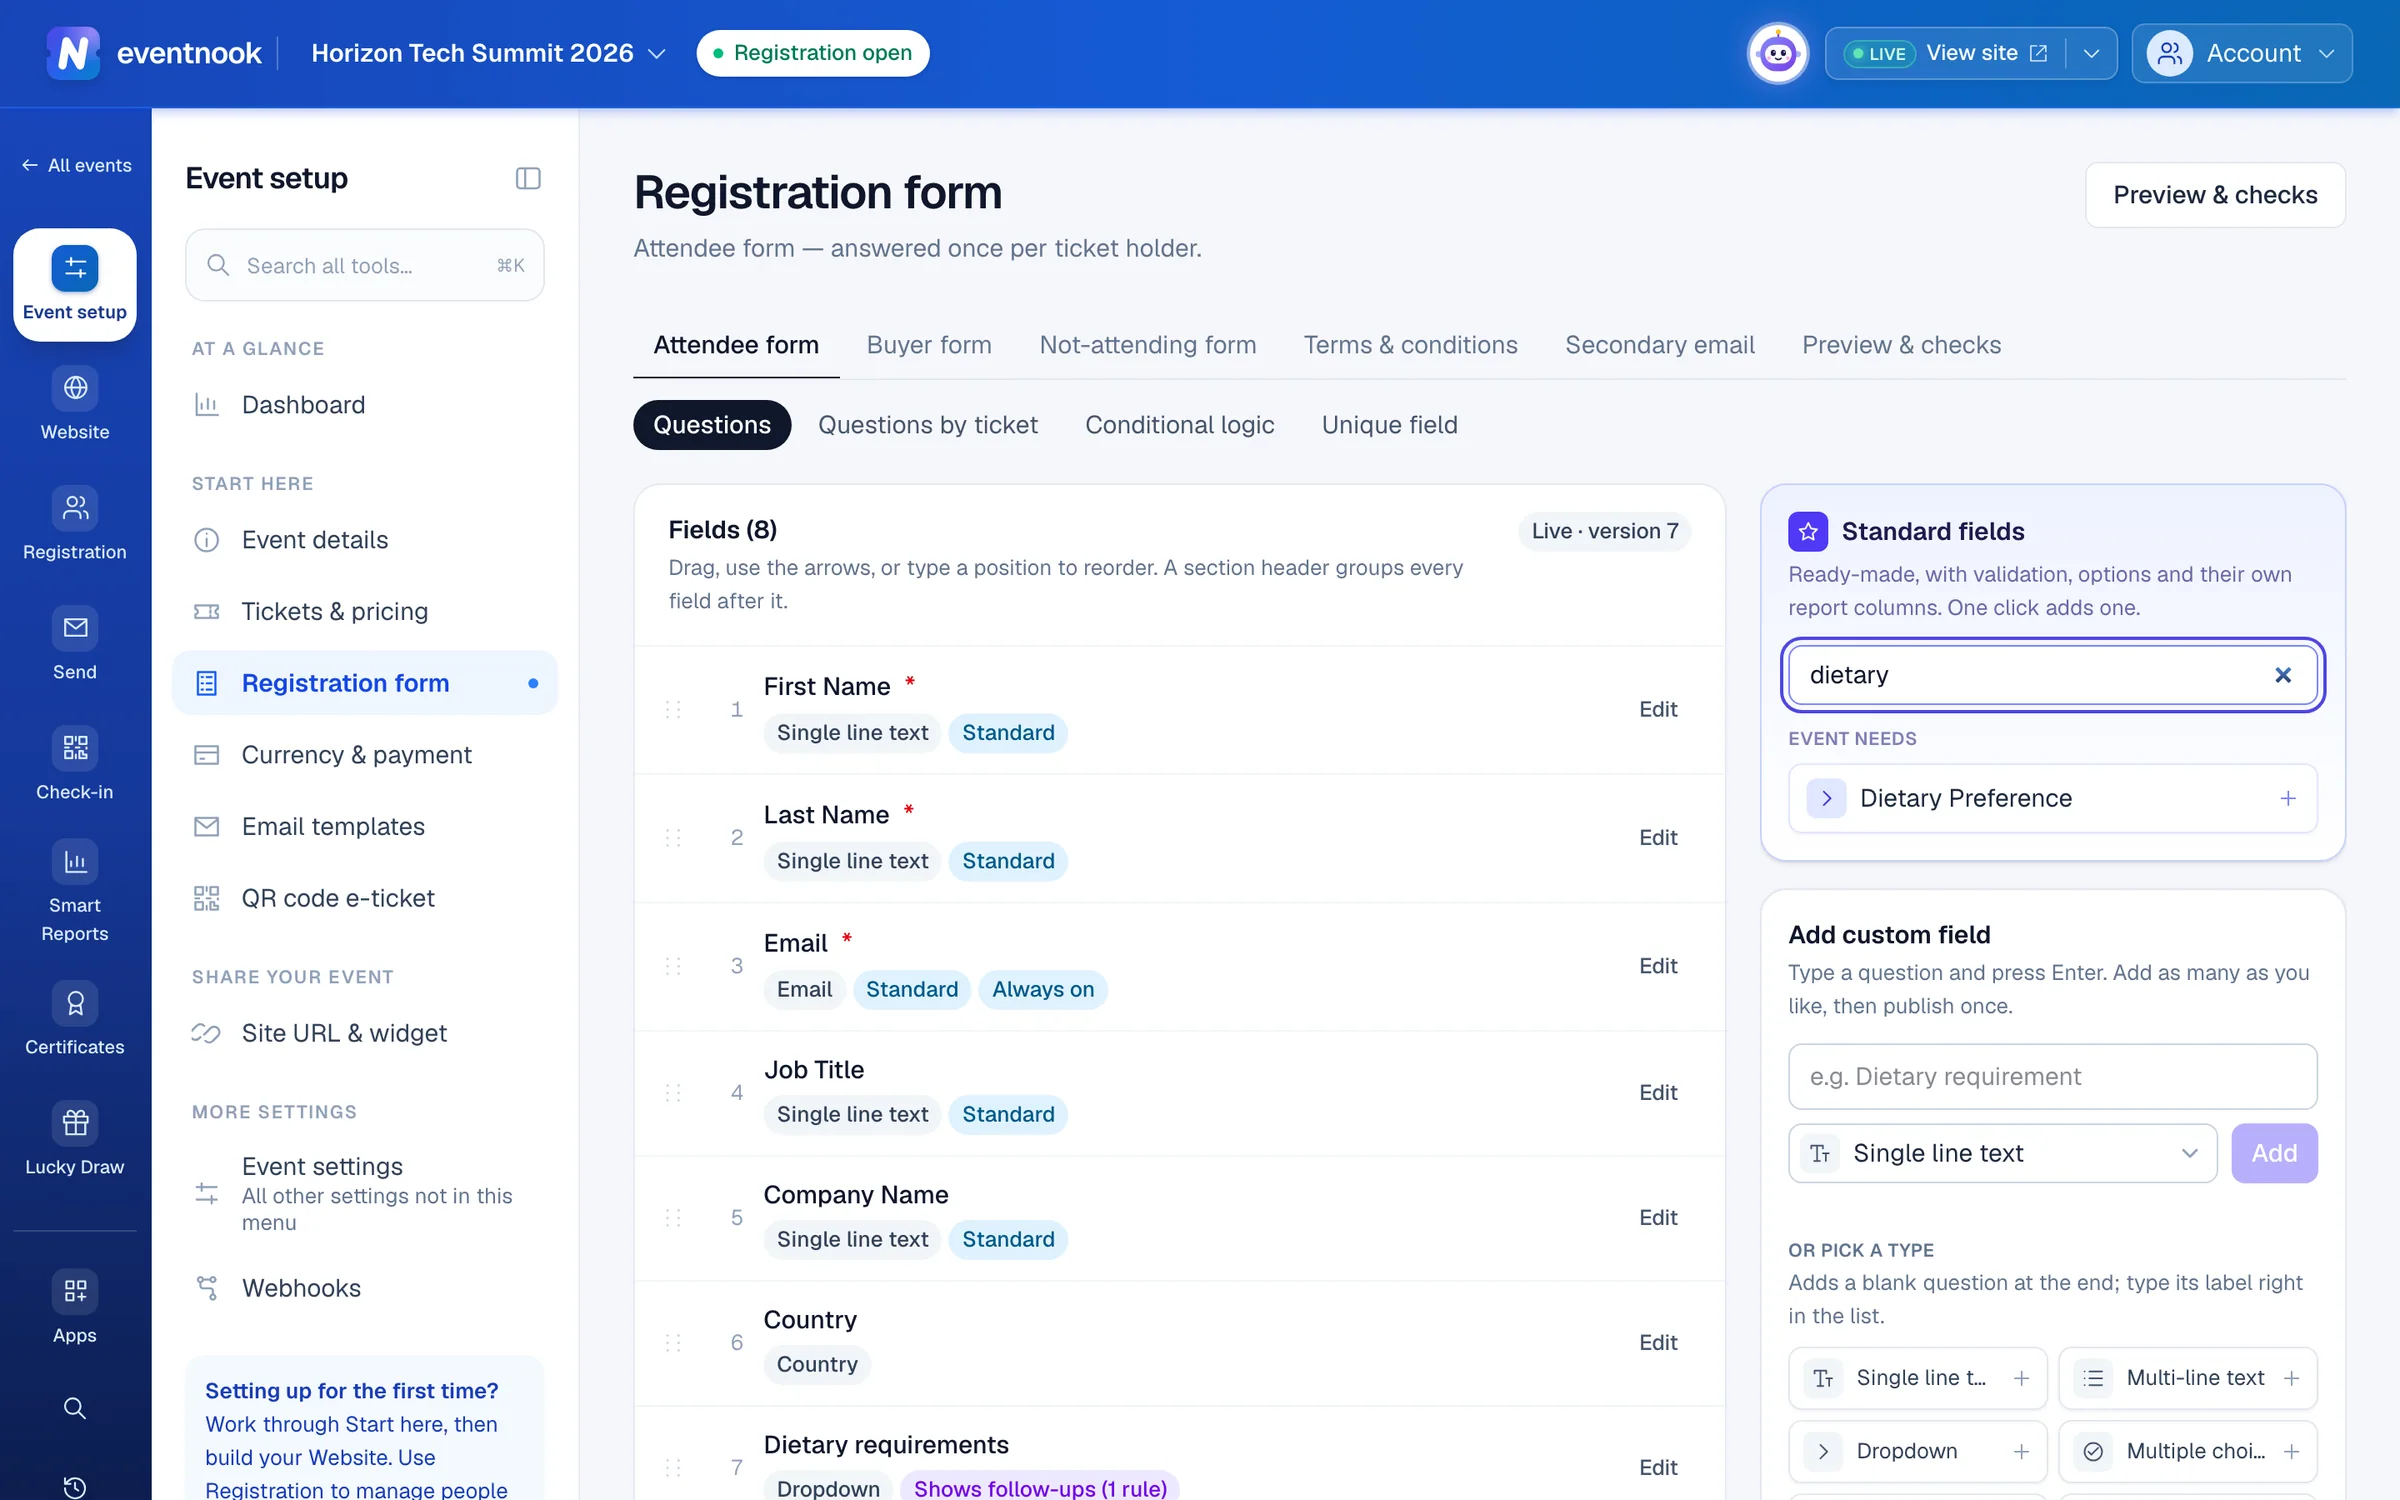
- 1Type a question and press Enter to add it
- 2Ready-made questions, one click each
- 3Ask a question only for some tickets
- 4See the form as registrants do
You work on a draft#
Nothing you change reaches registrants straight away. Adding, editing, removing and reordering questions all go into a draft. While you have changes, the list shows Draft · N unpublished changes and a bar runs along the bottom of the page.
- When you're done, click Review & publish in the bottom bar. Before the event is live, it says Review & save.
- Check the list of questions Added, Edited, Restored and Removed (answers kept).
- Click Publish now (or Save). Every change goes live together, so registrants never see a half-finished form.
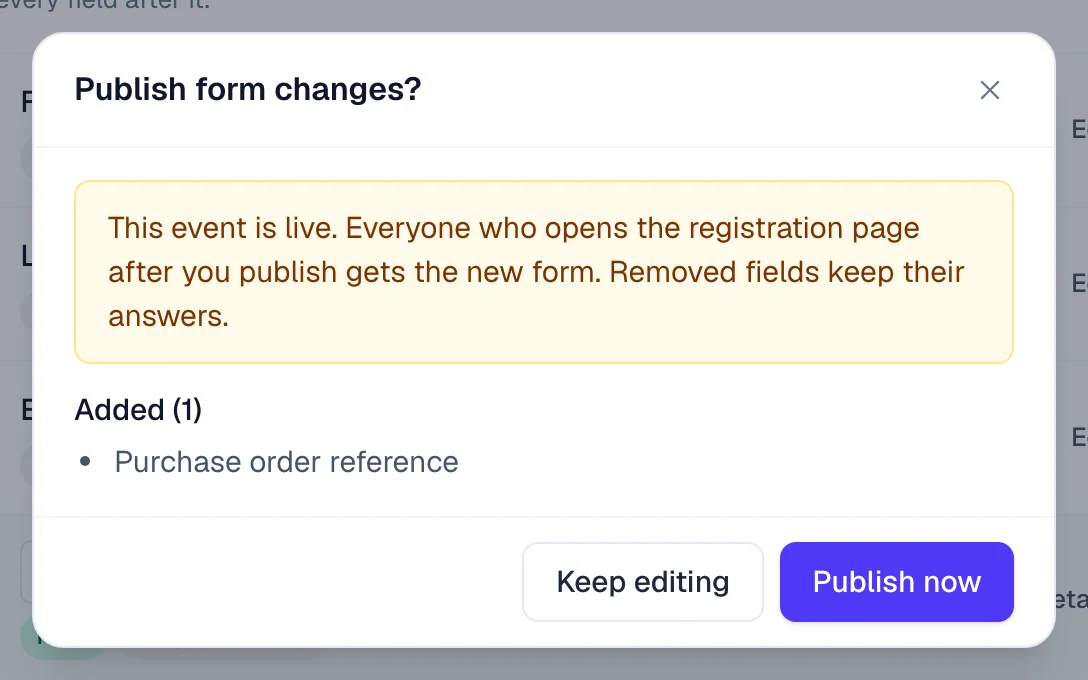
Your draft stays in this browser if you reload or switch tabs. Discard in the bottom bar throws it away.
Add questions#
Standard fields are ready-made questions with their own validation, options and report columns. Click one to add it. They are grouped as Name, Contact, Personal details, Work, Event needs, Emergency contact and Addresses; Add all adds a whole group. When many are left, a search box helps you find one, for example dietary. Fields under Organiser-only (such as category, table and seat) are filled in by your team, and registrants don't see them.
To add your own question:
- In Add custom field, type the question, for example
Dietary requirement. - Choose its type in the box beside it, such as Dropdown or Date.
- Press
Enter, or click Add. The question lands at the end of the list. - Type the next question straight away. Add as many as you like, then publish once.
- Click Details on a new question to add its options or make it required.
To start from a type instead, click it under Or pick a type. A blank question appears at the end of the list, ready for you to type its label in the row.
| Group | Question types |
|---|---|
| Common | Single line text, Multi-line text, Dropdown, Multiple choice, Checkboxes, Number, Date, Email, Phone |
| Special | Breakout session — radio, Breakout session — dropdown, File upload, Address block |
| More types | Website URL, Date & time, Date of birth, Country |
| Layout | Section header, Divider, Rich text block |
A type marked ★ may need a plan upgrade. If you can't add it, ask EventNook. Breakout sessions are only offered on the attendee form, because each attendee chooses their own session.
Edit a question#
- Click the question's label, or Edit on its row. The field editor opens beside the list.
- Make your changes. The cards are described below.
- Click Apply to draft, then publish when you're ready.
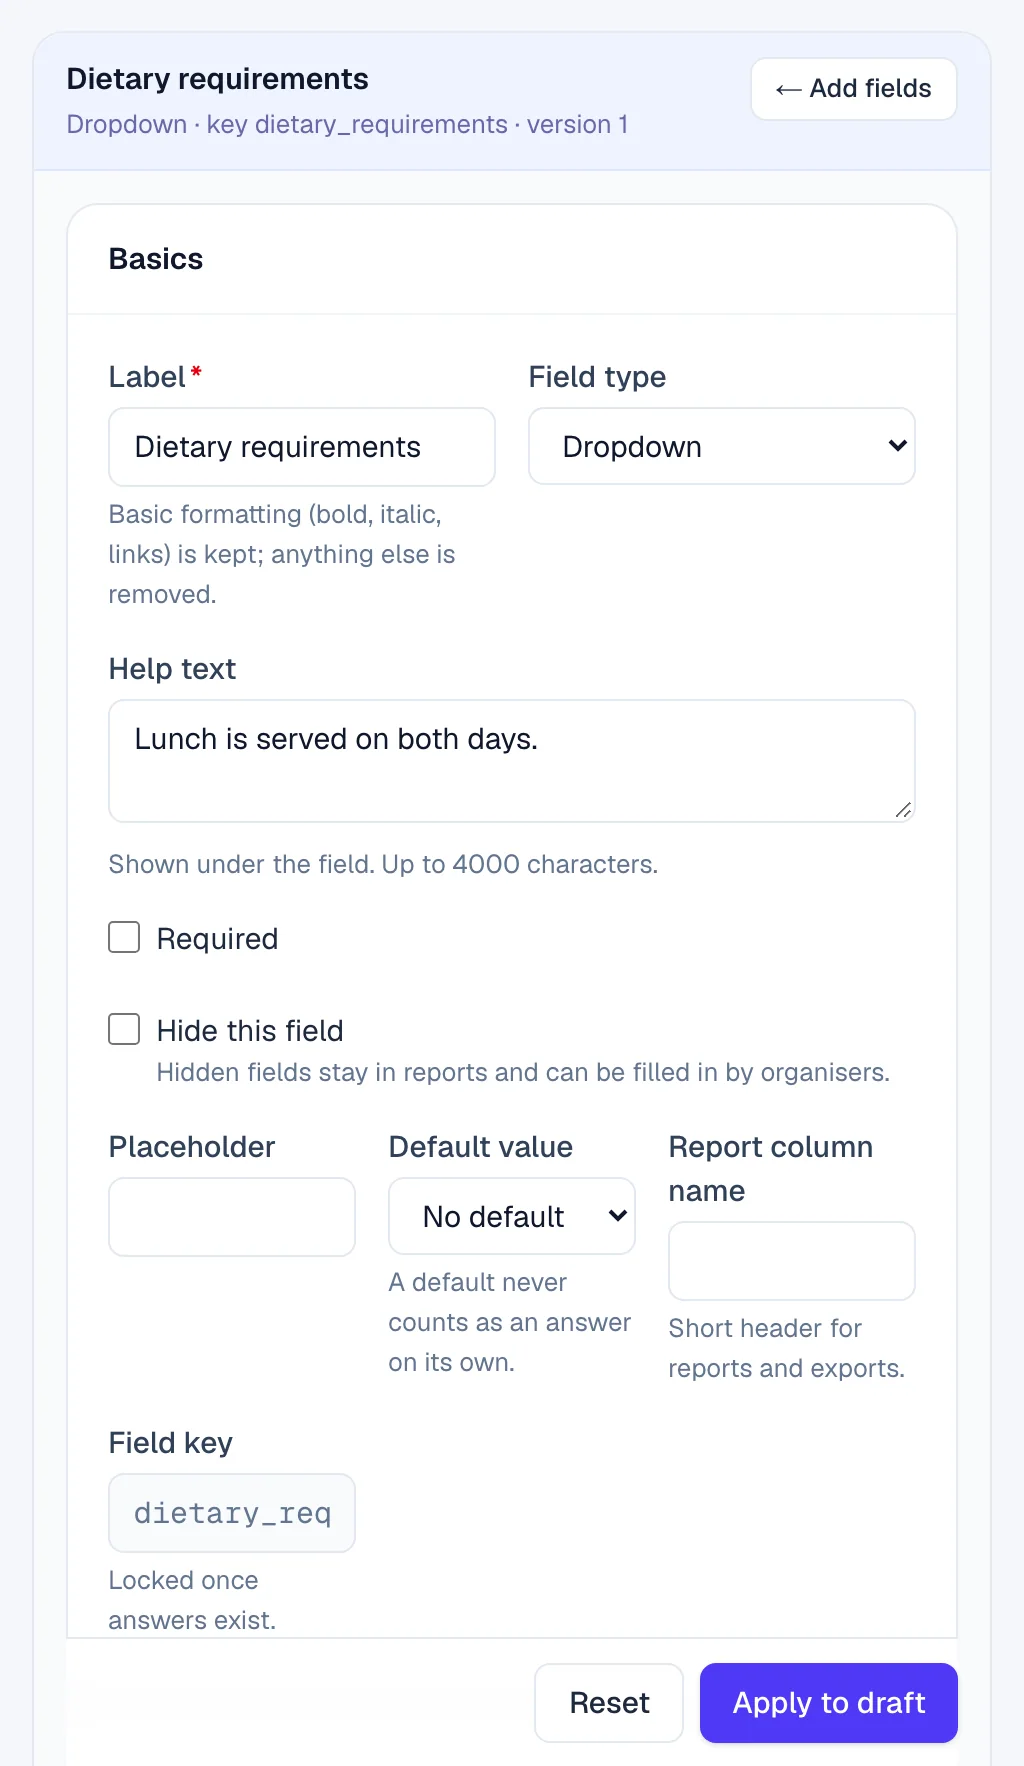
- 1Label, type, help text, required or hidden
- 2Put your changes in the draft
| Card | What you set |
|---|---|
| Basics | Label, Field type and Help text. Required and Hide this field. For text questions also Placeholder, Default value, Maximum length and Report column name. |
| Settings for the type | Choice questions: the options (Add option, or Add several… to paste one per line), hiding an option, and Add an “Other” choice with a text box. Email: Verify the address with a one-time code. File upload: the file types and sizes. |
| Validation | Rules the answer must meet. An empty answer always passes, so use Required to make a question compulsory. |
| Tickets | Which ticket types ask the question. Ask for every ticket is on to start with. |
| History | Every saved version, so earlier answers keep the wording they were given under. |
A hidden question is never asked, so it can't be required: its row shows Required but hidden — not enforced. Hidden questions stay in reports, and your team can still fill them in.
To change the type of a question that already has answers, the editor recommends removing it and adding a new one, which keeps both sets of answers. Or tick Convert and preserve existing answers as text.
Collect a profile photo#
Add Profile Photo from Personal details. In its settings, set Photo width (px), Photo height (px), the file types and Maximum file size. Registrants crop their picture to that size before it's uploaded. Tick Let registrants take the photo with their camera to offer the camera as well.
Offer breakout sessions#
Add Breakout session — radio or Breakout session — dropdown from Special, then click Details. Give every session a Session name and, if places are limited, a Capacity. Registrants pick one session, and a full session can no longer be chosen. A session without a name stops the form being published.
Reorder, group and remove questions#
- Move a question: drag its row by the handle, use the ↑ and ↓ buttons, or type a position in the # box and press
Enter. - Group questions: add a Section header from Layout, move it above the questions it should group and type its title in the row. It groups every question after it.
- Remove a question: point at its row and click Remove. It shows Will be removed · answers kept until you publish, and Undo brings it back.
After publishing, a removed question moves to Removed fields at the bottom of the page. Its answers are kept and still appear in reports. Restore brings it back with its answers when you next publish. Delete permanently is only possible for a question nobody has answered.
Email is marked Always on and can't be removed. A question used by conditional logic or chosen as the unique field can't be removed either until you change those first.
Ask a question only for some tickets#
- In the form's menu, click Questions by ticket.
- Click Edit on the question's row and untick the tickets that shouldn't ask it. With many tickets, type in Find a ticket, then click Only these N to keep only the matching ones.
- Click Save. The button shows how many rows you changed. This page saves on its own; it doesn't wait for Review & publish.
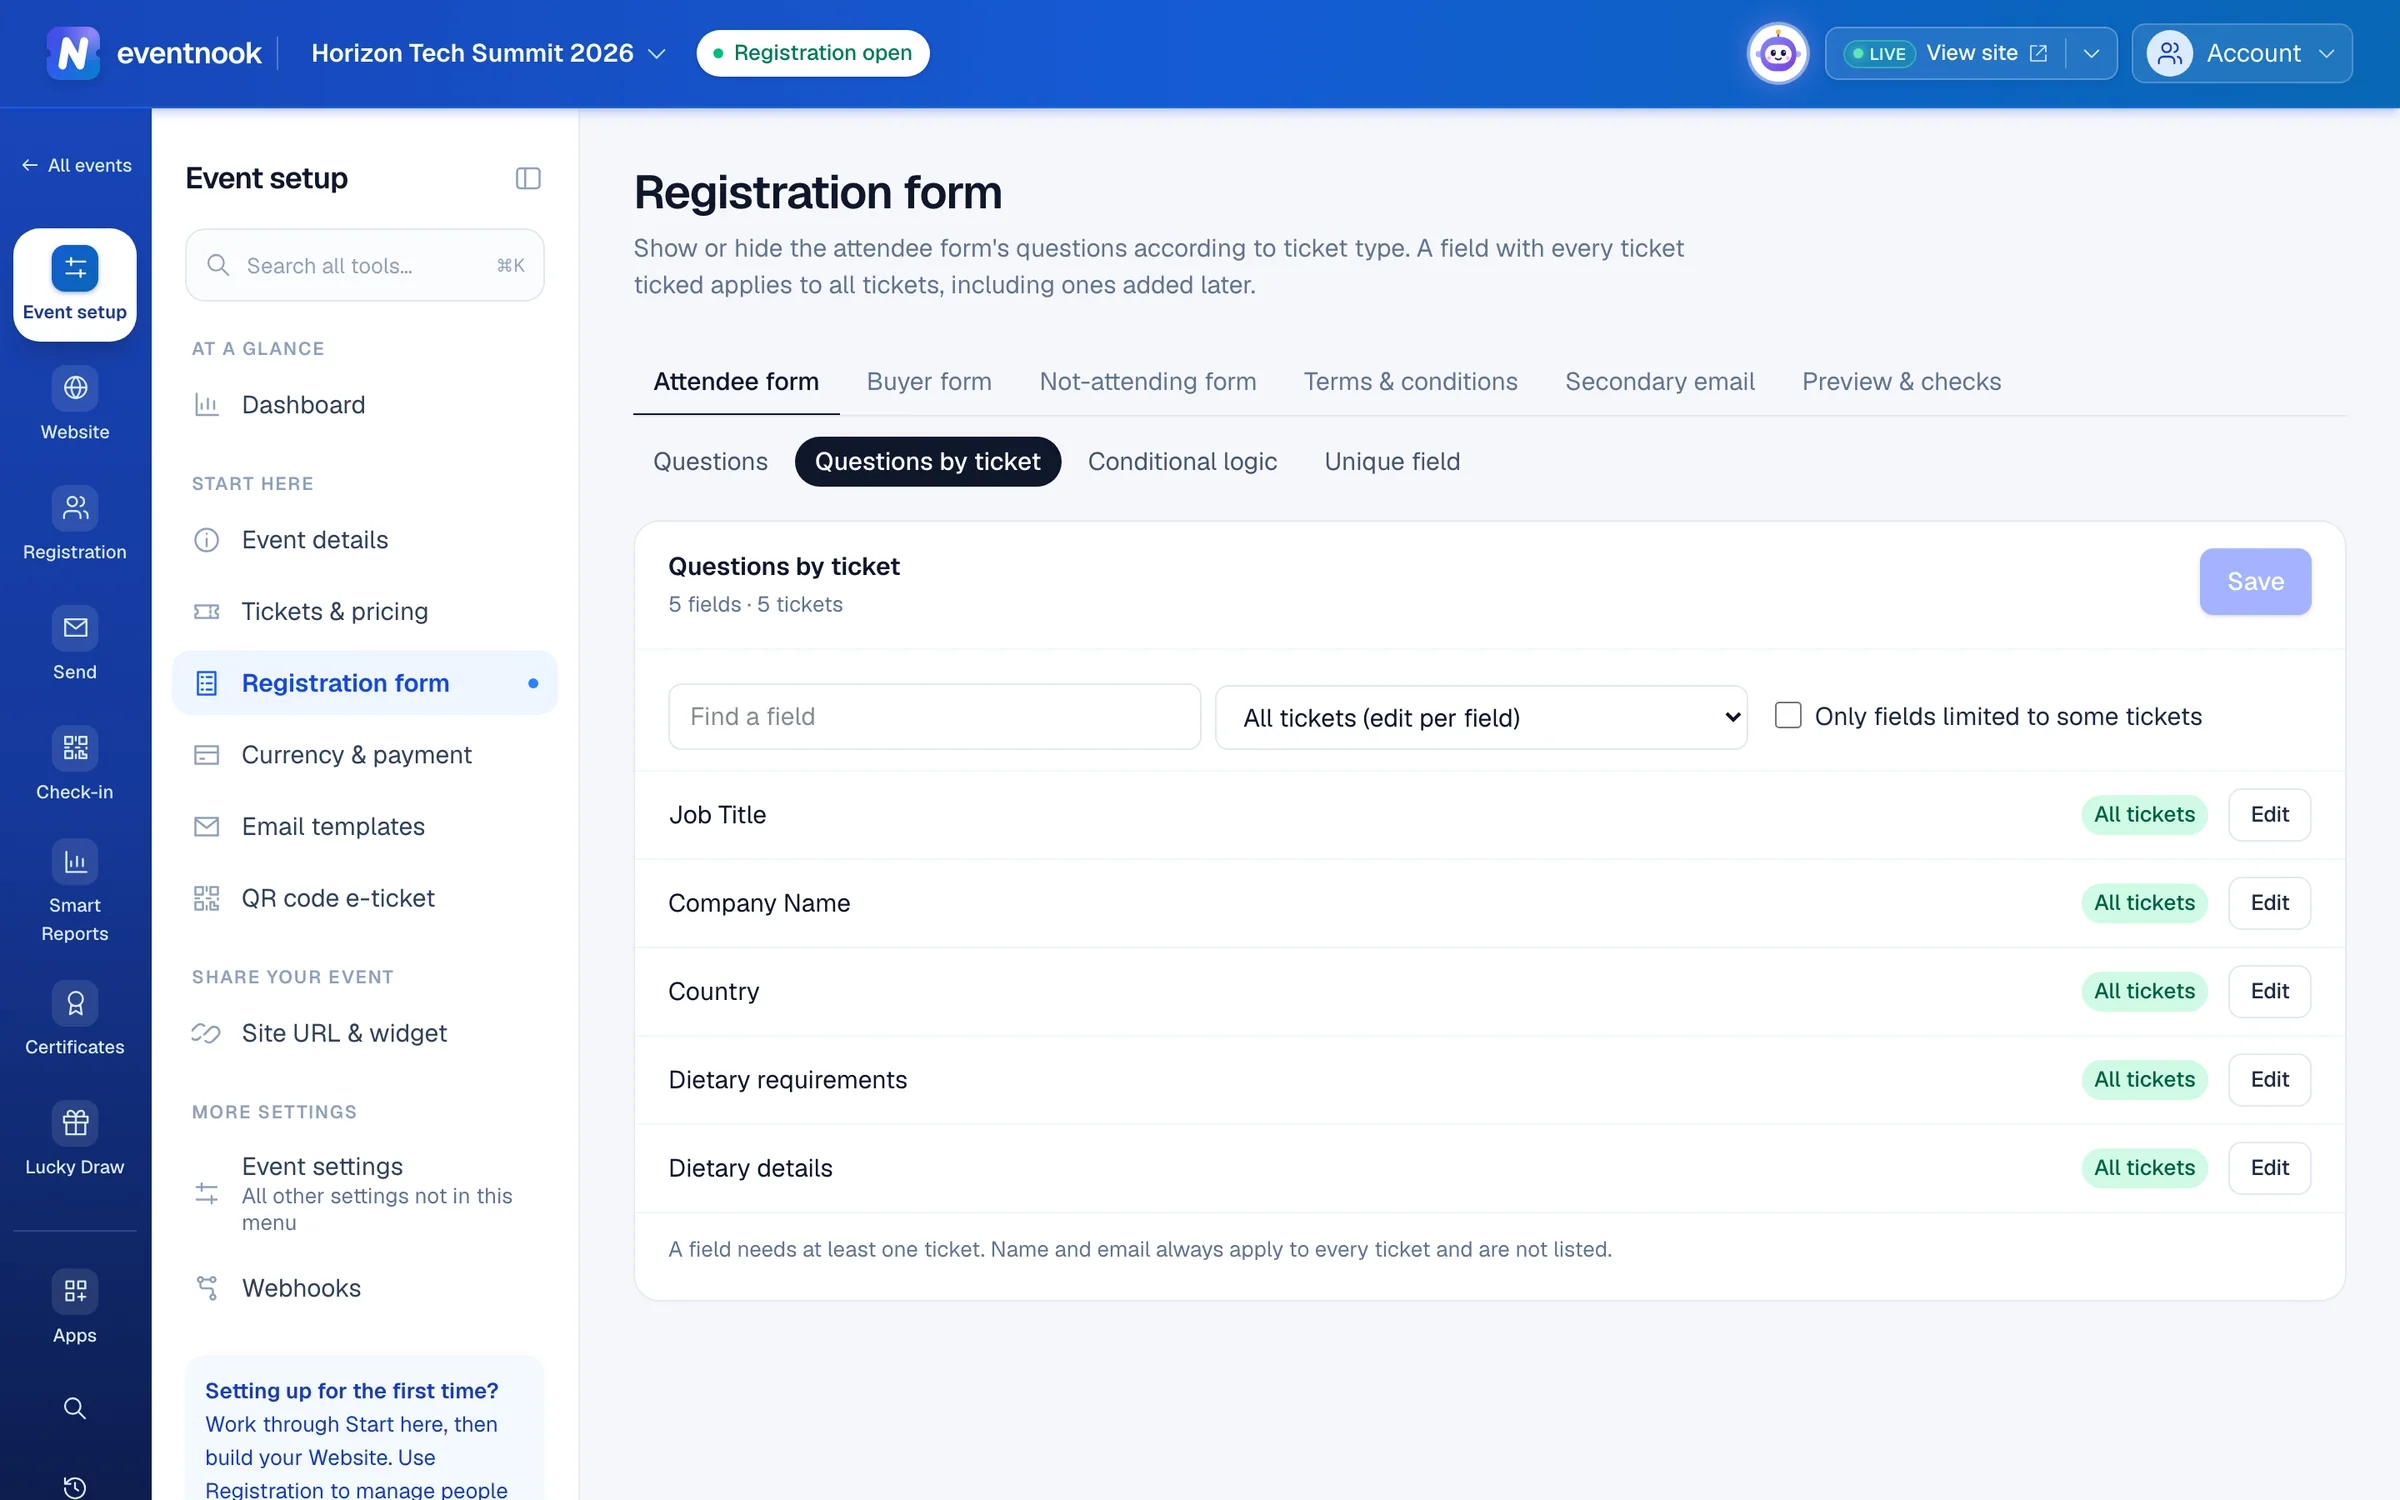
- 1Choose the tickets that ask this question
- 2See every question one ticket asks
To see everything one ticket asks, choose it in View ticket. Each row becomes a tick box for that ticket. A question ticked for every ticket shows All tickets and applies to tickets you add later too. Name and email are always asked for every ticket, so they aren't listed.
Registrants on a ticket that doesn't ask a question never see it, and it's never required for them.
The buyer form#
Open Buyer form at the top of the page. Use it for what you need once per order, such as a purchase order number. Its standard fields are the buyer's name, Email (always on), Company Name, Job Title, Mobile Phone, Contact Phone and Billing Address. Its menu also has Questions by ticket and Conditional logic, which work on the buyer's questions.
When someone registers several attendees, the registration page asks Who should we contact about this booking? If they pick one of the attendees, the buyer's name, email, phones, company and job title are taken from that attendee's answers and aren't asked again. Your own buyer questions are still asked. If they choose Someone else, the whole buyer form is asked.
The billing details asked at payment, such as the company the invoice is made out to, aren't buyer form questions. See Ask for billing details.
Preview and check the form#
- Click Preview & checks.
- Choose Attendee, Buyer or Not attending, and a Ticket to see what that ticket's registrants are asked.
- Answer choice questions to see follow-up questions appear. Nothing here is submitted.
Checks lists settings that will cause trouble at registration, such as a required question that is hidden, or a choice question with fewer than two options. No problems found. means all clear. Warnings never stop you saving or taking registrations.
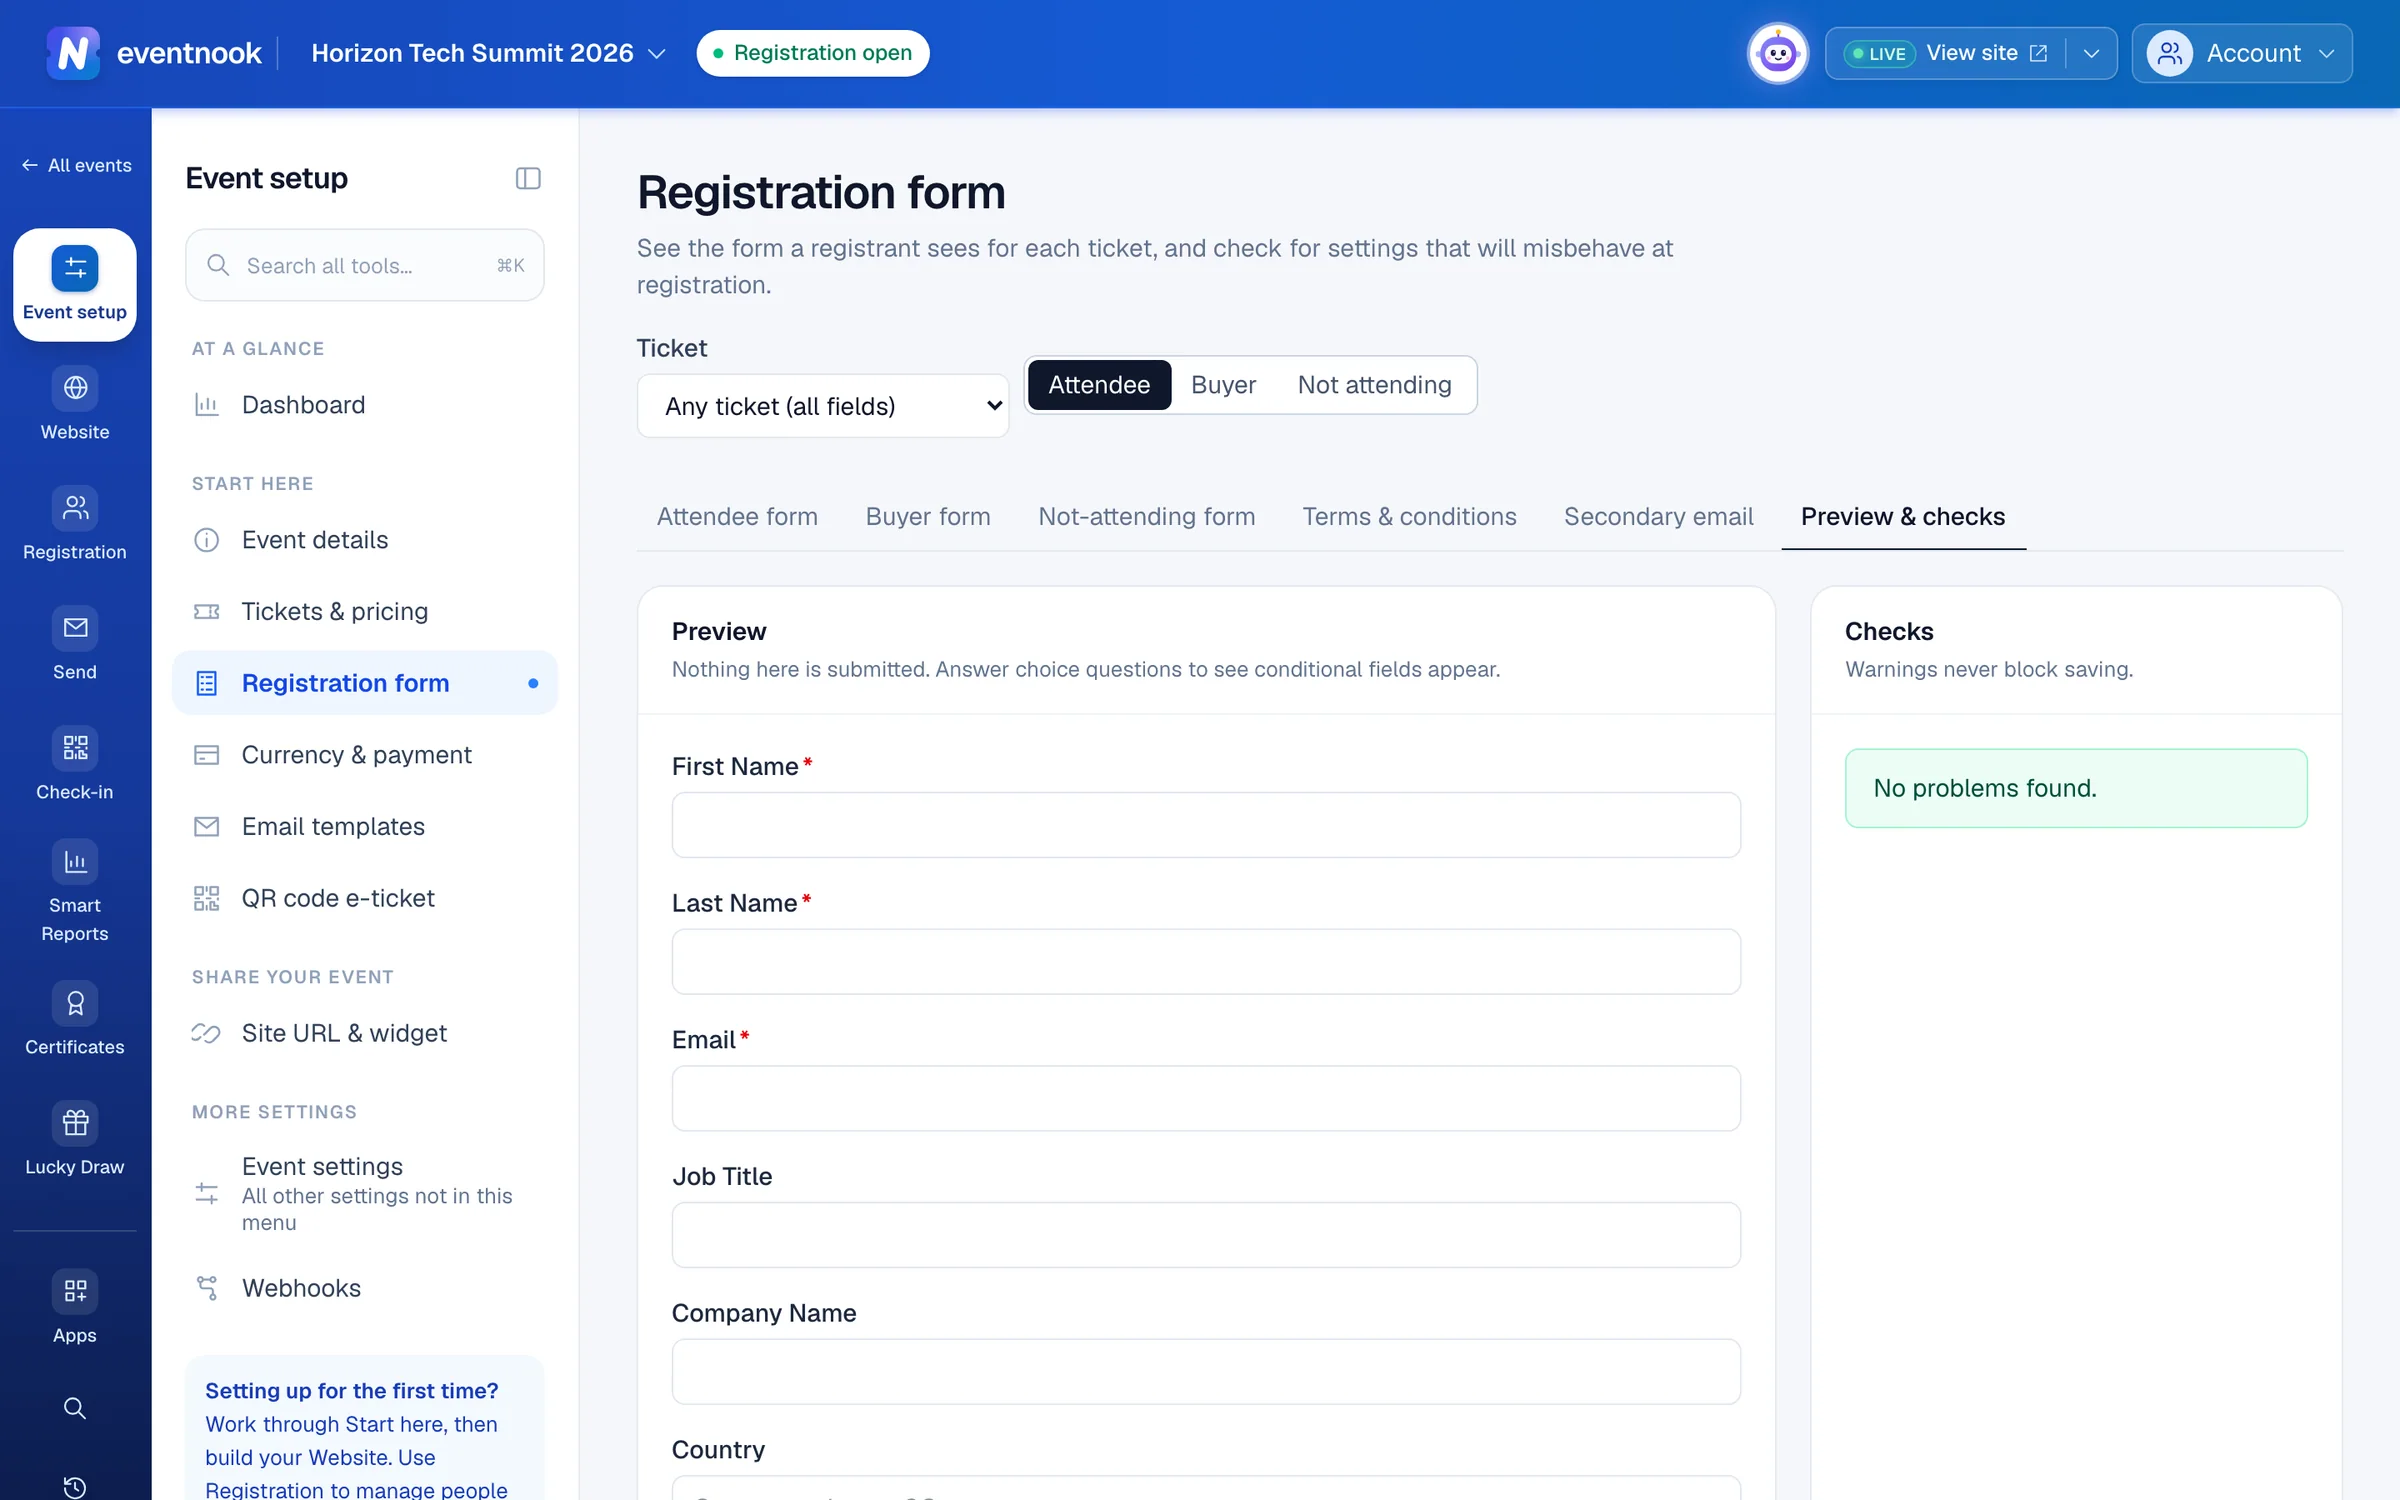
- 1Attendee, buyer or not-attending form
- 2Settings that will misbehave at registration
If something looks wrong#
- Review & publish is greyed out. A new question has no label, or a section header has no title. The bar names the item: type its label in the row.
- "Someone else changed this form". The form was published from another tab or by a colleague after you started. Click Load the latest form and make your changes again.
- "The live form changed since your unpublished changes were made, so they were discarded." The same thing happened while you were away from the page.
- A question can't be removed. It's used by conditional logic or it's the unique field. Change those first.
- A standard field shows "in use" and can't be added. One of your own questions already uses its key. Remove or rename that question, then add the standard one.
- A ticket's box is greyed out in Questions by ticket. It's the last ticket on that question, and a question needs at least one. Remove or hide the question instead.
- A banner on the buyer form says only the buyer's name and email are collected. Nothing is wrong. Add questions if you need more.
Who can do this#
Everyone with access to the event can view the forms. Editors and event admins can change and publish them.
Related guides
- Show questions only when they applyAsk a follow-up question only after a particular answer, such as dietary details when someone chooses Other, and see every condition on a map.
- Stop duplicates, add terms and ask for billing detailsRefuse duplicate registrations, make registrants accept your terms, copy order emails to a second address and choose the billing details buyers give when they pay.
- Let people tell you they can't attendOpen the not-attending form, choose its questions, design its page and acknowledgement email, share its link and read the replies.
- Create tickets and set pricesAdd the tickets people choose when they register, set their prices and limits, and stop selling one when you need to.
- Set when and how people registerOpen and close registration, cap the event, screen free registrations, set the checkout time limit, and decide what registrants and your staff may change afterwards.
Still stuck? In EventNook, ask HeyNook. It knows the page you're on and your event, and can take you straight to the right setting.