Set when and how people register
Open and close registration, cap the event, screen free registrations, set the checkout time limit, and decide what registrants and your staff may change afterwards.
Where to find it: Event admin › Event setup › More settings › Event settings
Event settings decides when people can register, how many can, what happens to free registrations and how long checkout may take. Its menu also leads to what registrants may change themselves, what your staff may change, and tracking.
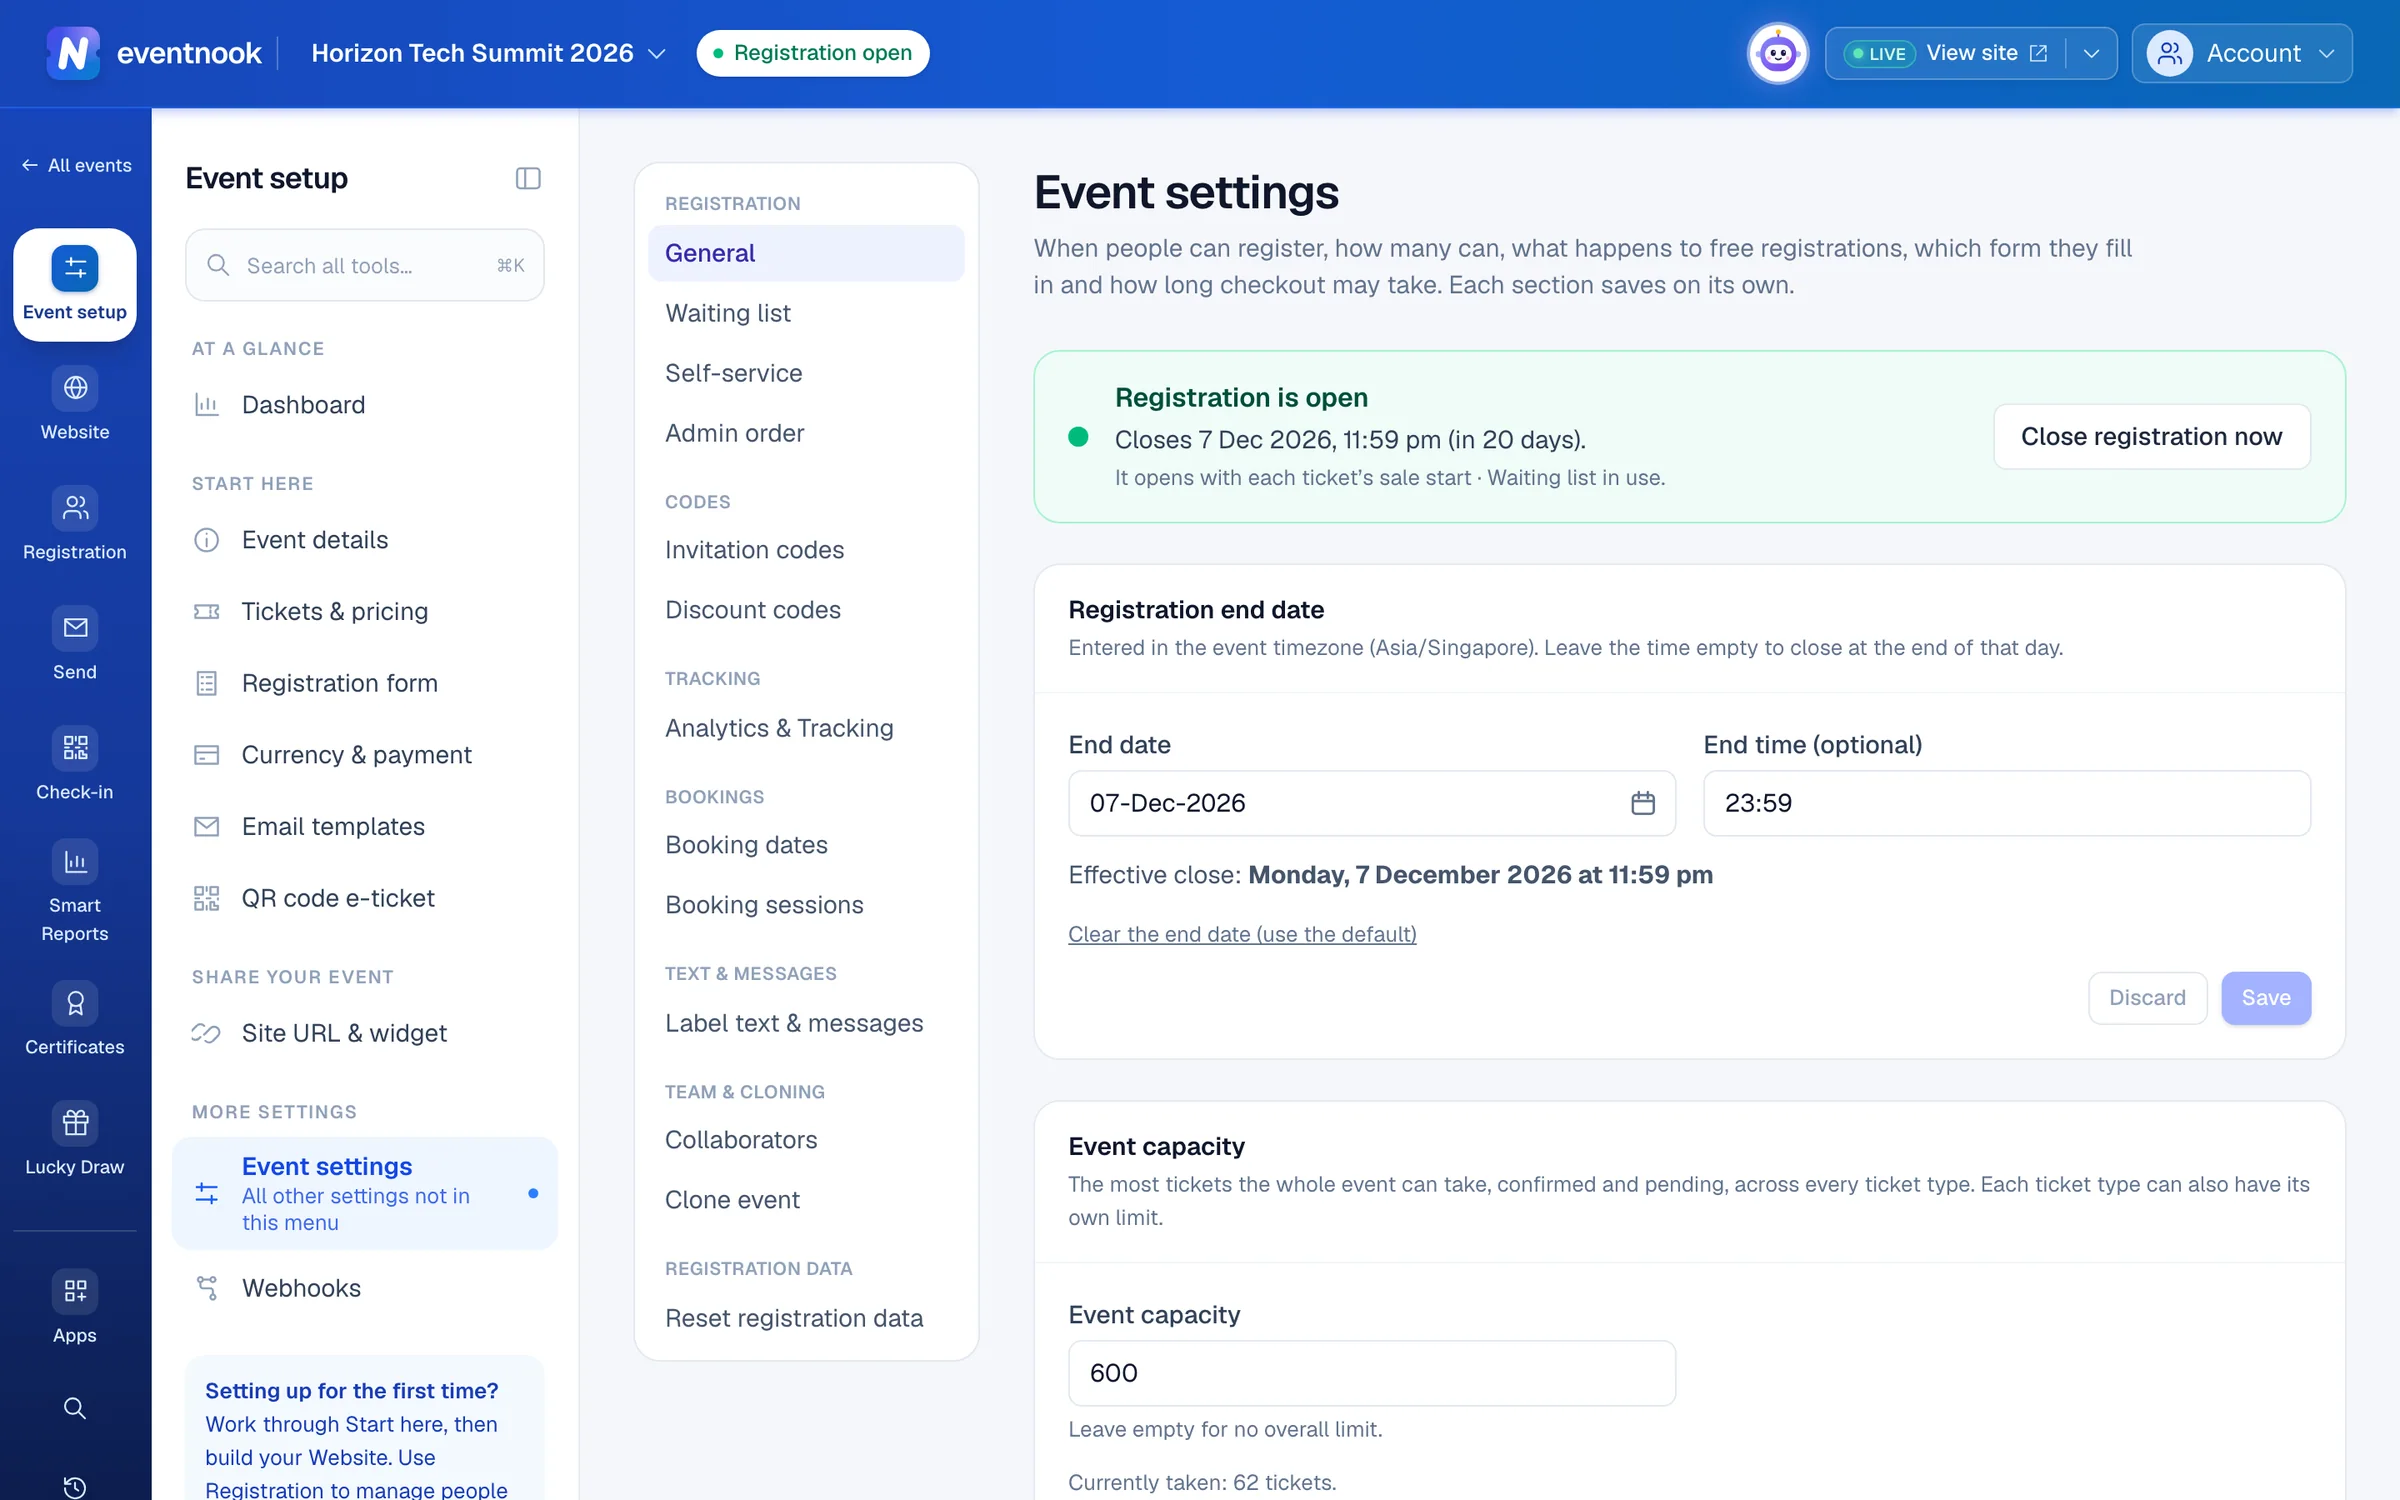
- 1Every registration setting, grouped
- 2Whether people can register right now, and why
- 3When registration closes
- 4The most tickets the whole event can take
Each section saves on its own: change it and click Save in that section. Dates and times are in the event's time zone.
Open or close registration#
The bar at the top says Registration is open, Registration is closed, Registration hasn't started or The event isn't live, and why. Registration opens with each ticket's sale start: there is no separate start date here.
- To stop registrations now, click Close registration now.
- To start again, click Open registration now. If the end date has passed, click Clear the end date and open, or save a later end date first.
To set when each ticket goes on sale, see Create tickets and set prices.
Set when registration closes#
- In Registration end date, choose the End date.
- Optional: set an End time (optional). Without one, registration closes at the end of that day.
- Click Save. Effective close shows when registration now closes.
With no end date, registration closes 24 hours after the event ends. Click Clear the end date (use the default) to go back to that.
Limit the whole event#
- In Event capacity, type the most tickets the event can take, confirmed and pending, across every ticket type.
- Click Save.
Leave it empty for no overall limit. Currently taken shows how many tickets count against it. Each ticket can also have its own limit.
Other registration sections#
| Section | What it does |
|---|---|
| Manual approval | Turn on Require approval for free registrations to screen them. They stay Pending and get the acknowledgement email; approving one sends the confirmation. Paid orders follow their payment. Approve them in Order approvals. |
| Registration form data collection | Buyer and every attendee (the attendee form once per ticket, plus the buyer's details) or Buyer only (the buyer's form alone; attendees can't then be cancelled one by one). Orders already made keep the data they were collected under. |
| Checkout time limit | Time limit to complete checkout (minutes): 5 to 1440, default 60. Show the countdown timer on the form and payment steps. A change applies to new carts; carts in progress keep their deadline. |
| Tickets held in carts | Count tickets in other people's unexpired carts as unavailable. Either way the event can't be oversold; this changes only what other buyers see as available. |
Let registrants manage their own order#
Registrants open their order page after confirming their email with a one-time code. Viewing the order is always allowed; Self-service decides what else they may do. Everything is off until you turn it on.
- In the Event settings menu, click Self-service.
- Under What registrants can do, turn on the actions you allow.
- Under Fields on Change details, tick Shown for each answer registrants may see, and Editable for each one they may change.
- Optional: under Deadlines, set a Cancellation deadline and an Edit deadline (also applies to switching tickets).
- Click Save self-service settings.
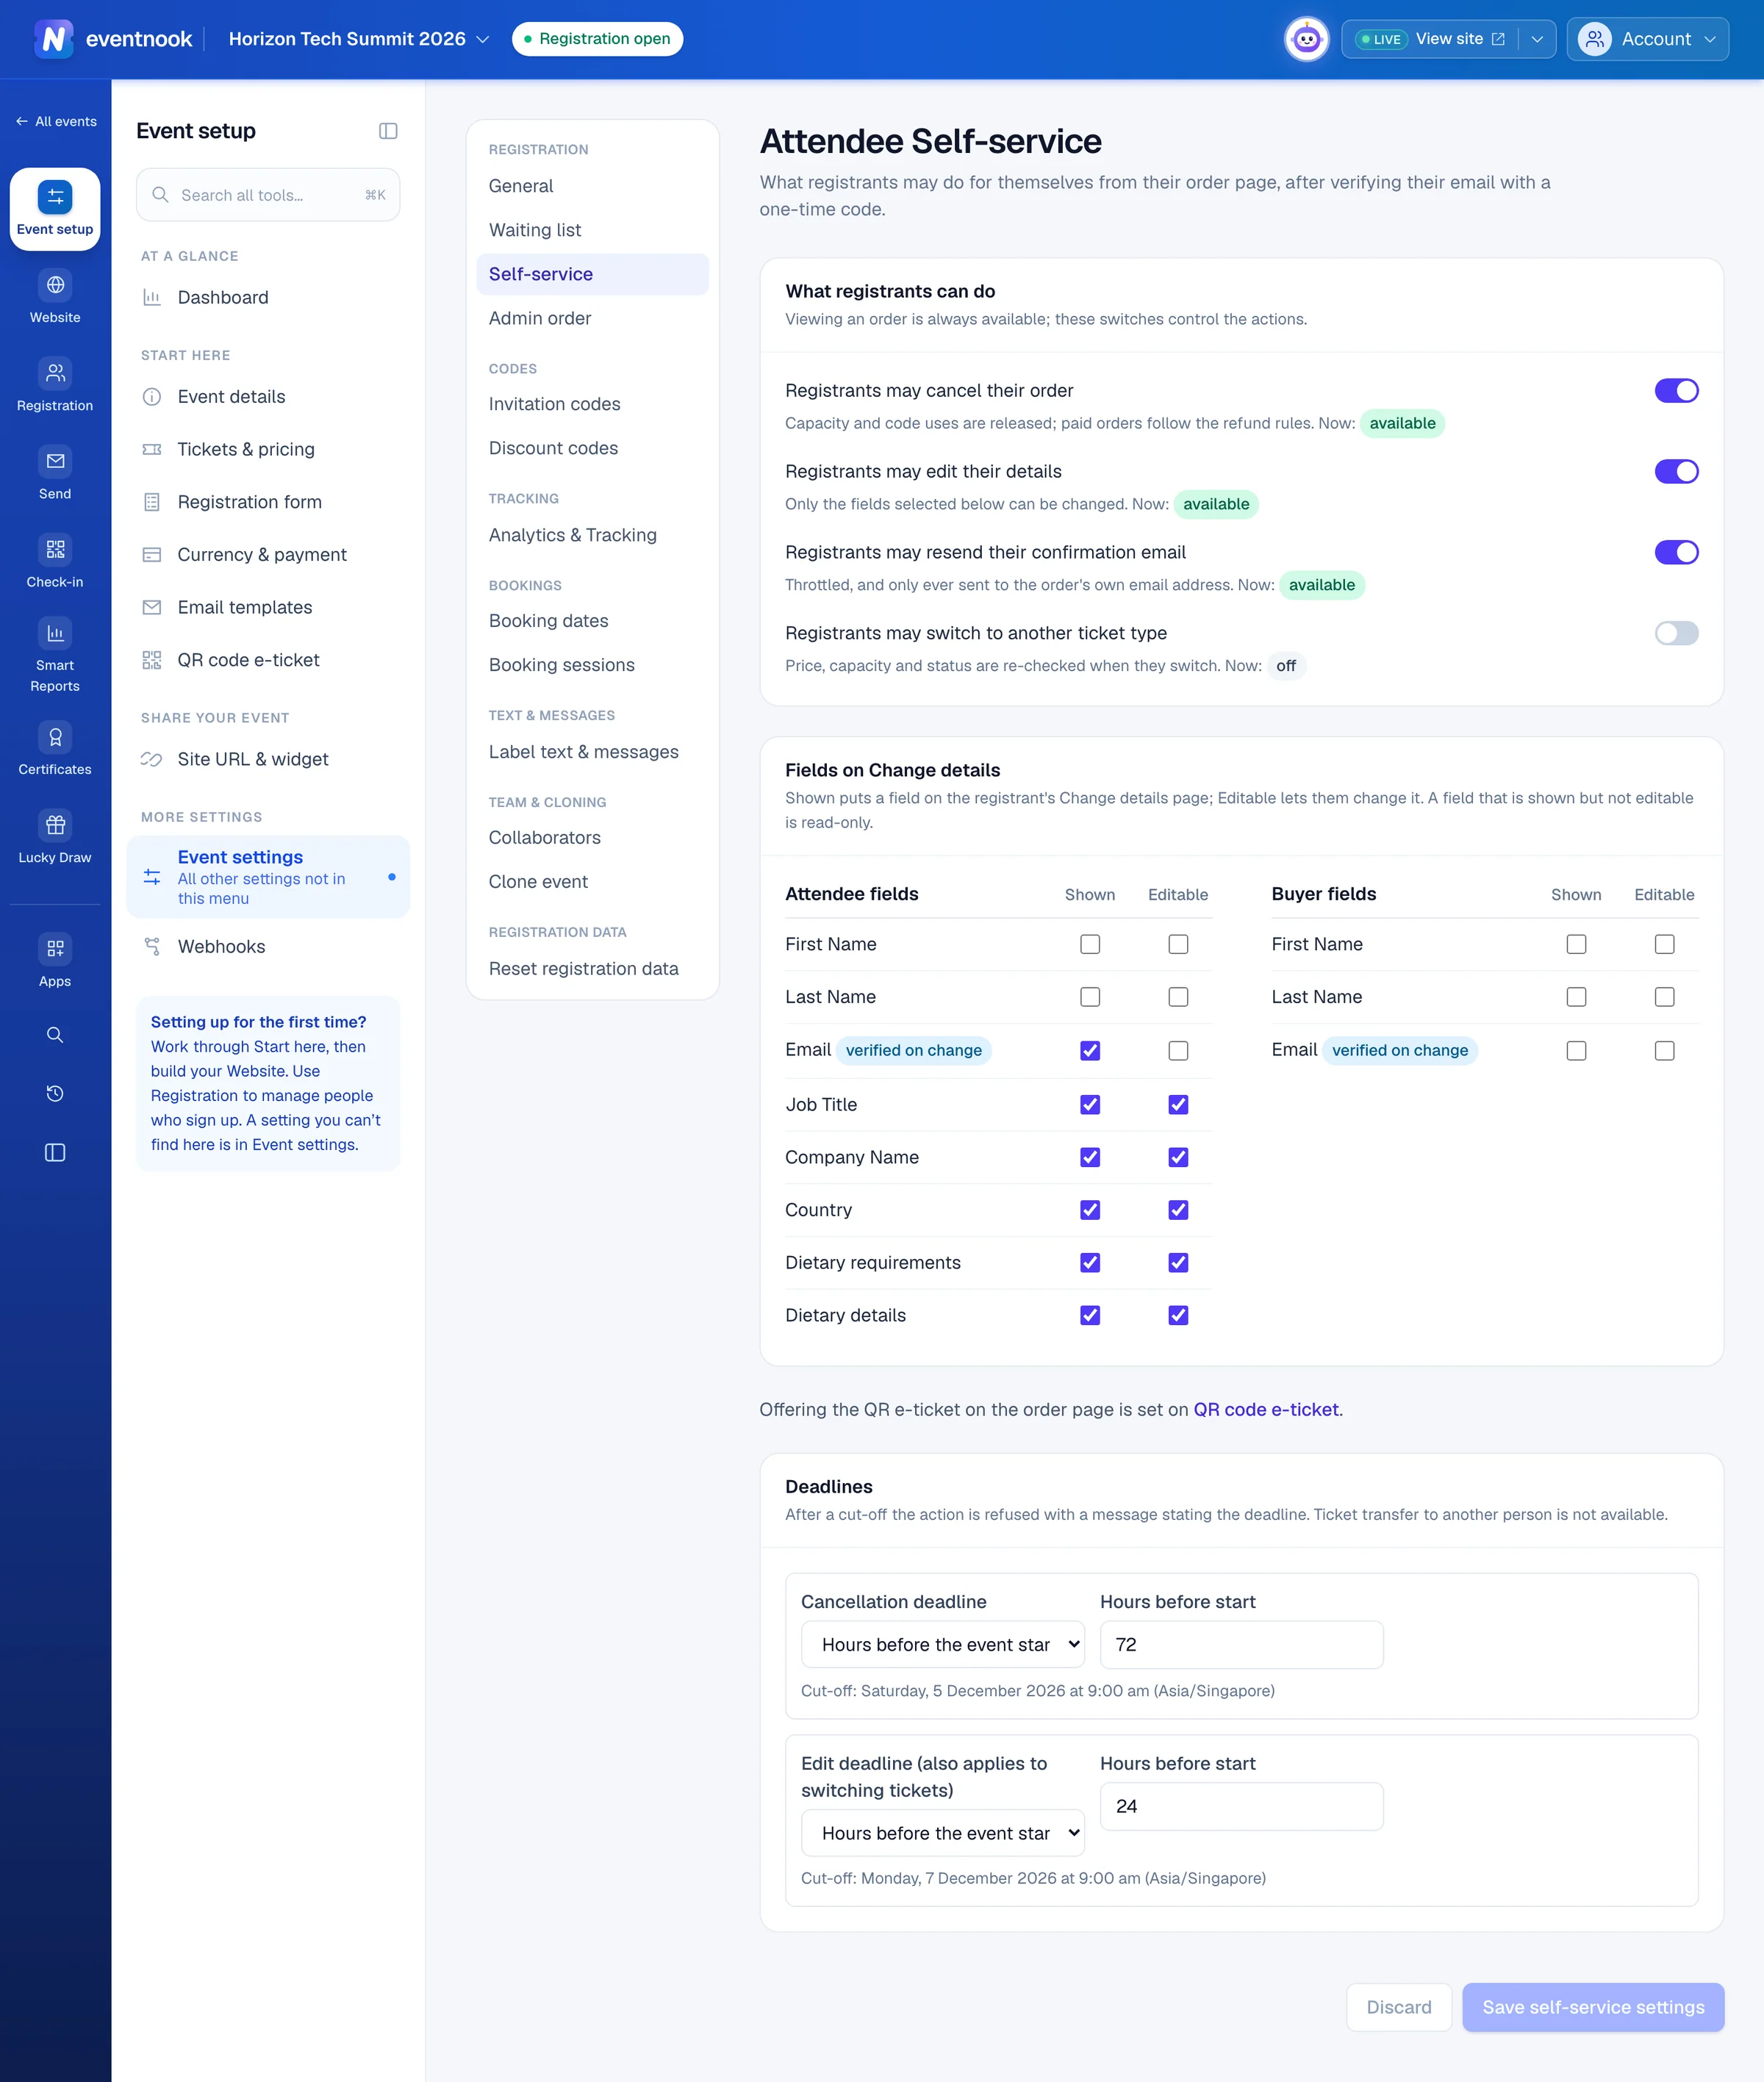
- 1What registrants may do on their order page
- 2Which answers they see, and which they can change
- 3Cut-offs for cancelling and editing
- 4Saves the whole page
| Switch | What registrants can do |
|---|---|
| Registrants may cancel their order | Cancel. Places and code uses are released; paid orders follow the refund rules. |
| Registrants may edit their details | Change the fields ticked Editable. |
| Registrants may resend their confirmation email | Send it again, only ever to the order's own email address. |
| Registrants may switch to another ticket type | Switch ticket. Price, capacity and status are checked again. |
Each switch shows Now: with whether the action works right now, or why not (off, deadline passed, no editable fields). A deadline is No deadline, Hours before the event starts or A fixed date and time. Registrants can't transfer a ticket to another person.
Whether the order page offers the QR e-ticket is set on QR code e-ticket. What registrants see is in Manage your registration.
Limit what your staff can change#
Admin order holds safety switches for this event's orders and attendees. They apply to everyone working on the event, owners included, on top of each person's role. They only take permissions away.
- In the Event settings menu, click Admin order.
- Under Allowed actions, turn off what nobody should do: Editing orders, Deleting orders, Cancelling individual attendees, Editing attendees or Changing an attendee's ticket type.
- Click Save.
Everything is on by default except Deleting orders. Orders with a payment can never be deleted. Effective permissions shows, for each action, whether you can do it now and why not. Use defaults puts every switch back.
Measure registrations with analytics#
Analytics & Tracking loads your analytics on the event site, the ticket widget and registration form, and the confirmation page. These pages show personal and payment details, so only approved tracking loads, and you can't paste raw HTML or JavaScript.
- In the Event settings menu, click Analytics & Tracking.
- Under Analytics integrations, click Add integration and choose the Provider: Google Analytics 4, Google Tag Manager, Meta Pixel or LinkedIn Insight Tag.
- Type its ID, such as the Measurement ID. The example under the box shows the format.
- Choose where it Runs on: All pages, or Only these pages.
- Optional: tick Send a conversion (order value and currency) when someone registers, and set Loading to Wait for cookie consent.
- Click Save integrations.
- Under Where tracking loads, check that each page you need is switched on.
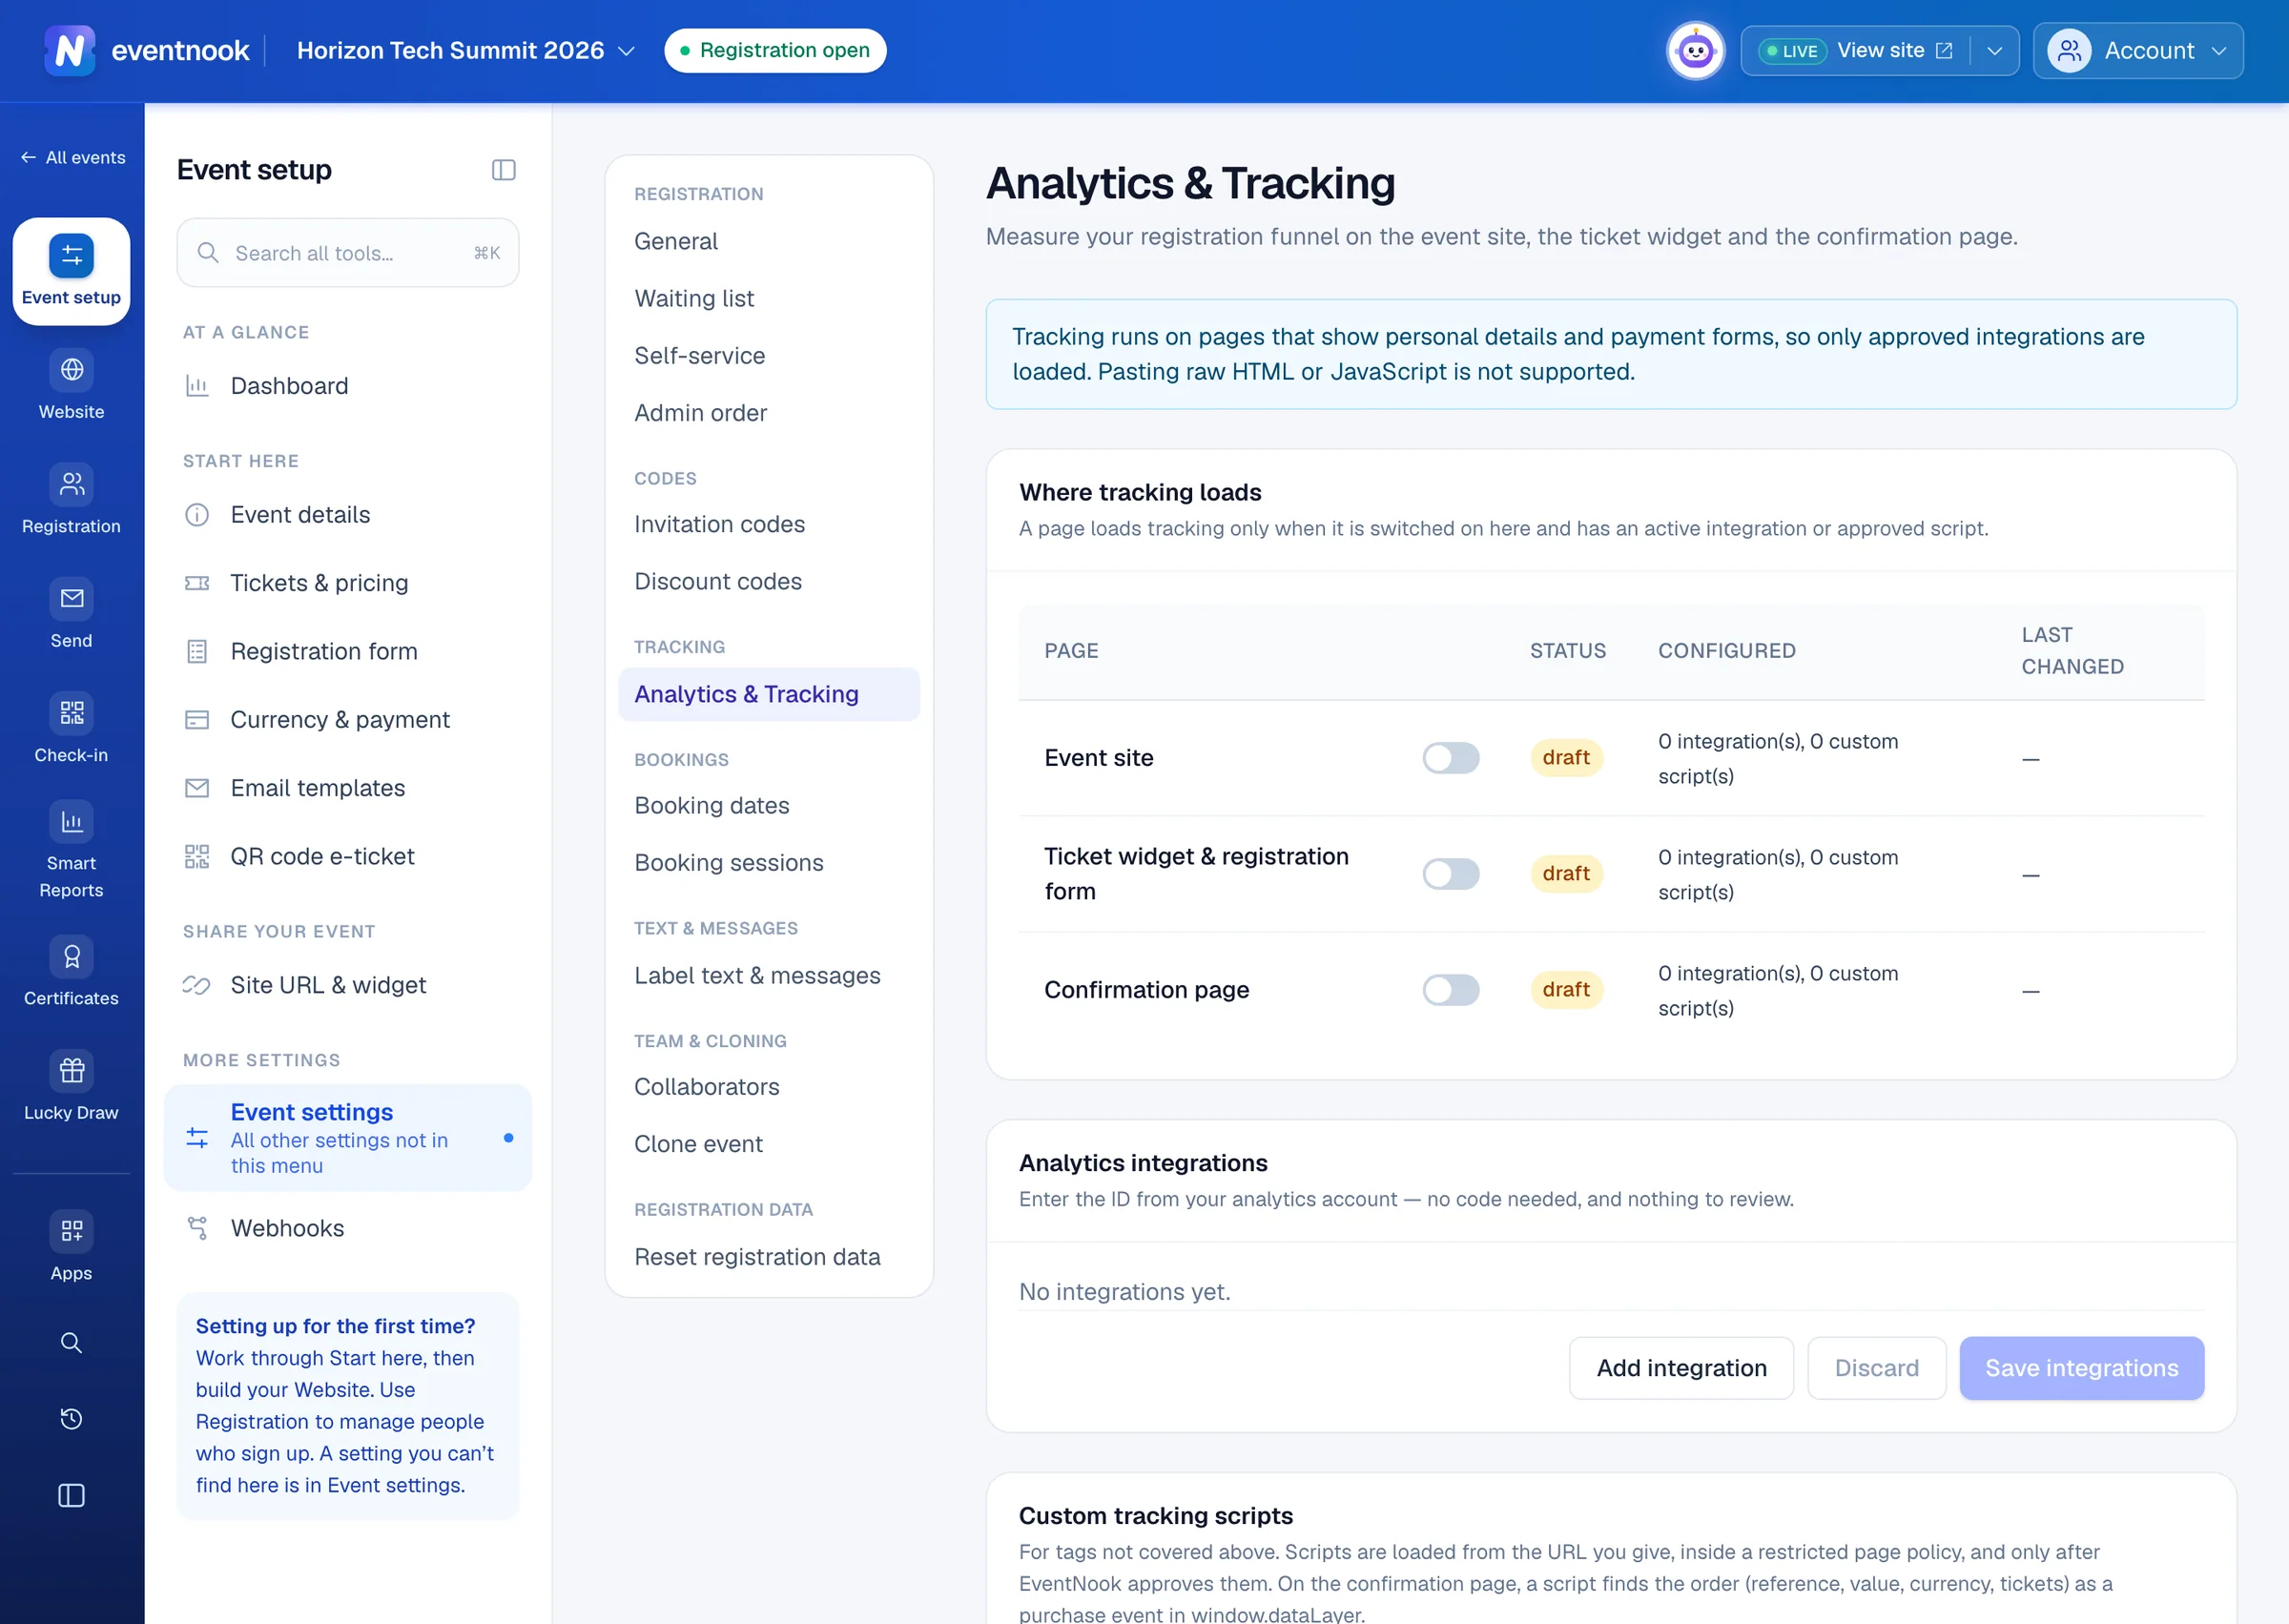
- 1Switch tracking on for each page
- 2Google Analytics, Tag Manager, Meta or LinkedIn by their ID
- 3Any other tag, after EventNook approves it
A page loads tracking only when it is switched on and has an active integration or approved script. For a tag not in the list, add its Script URL (https) under Custom tracking scripts, choose its Placement, and click Submit for review. It runs once EventNook approves it.
More in the Event settings menu#
The menu on the left also holds:
- Waiting list: see Run a waiting list.
- Invitation codes and, on a paid event, Discount codes: see Invitation codes and Discount codes. Which tickets require an invitation code is set on Invitation codes, in its Settings tab.
- Booking dates and Booking sessions: see Take bookings by date and timeslot.
- Label text & messages: see Change the wording people see.
- Collaborators and Clone event: see Collaborators and Clone an event.
- Reset registration data: see Archive an event or reset its data.
You see only the pages your role may open. The registration widget is on Site URL & widget; see Share your event's links.
If something looks wrong#
- Registration closed on its own. Its end date passed. Click Clear the end date and open, or save a later end date.
- Registration is open but nobody can buy. Check that the event is live and that at least one ticket is on sale and not hidden.
- "Someone else changed this setting." Click Reload in that section and make your change again.
- Editing is on, but registrants can't change anything. No field is ticked Editable under Fields on Change details.
- Now: says deadline passed. Move the deadline later, or choose No deadline.
- Cancelling an attendee is unavailable. The event collects the buyer's details only, so attendees are cancelled with their order.
- A tracking ID is rejected. It doesn't match the provider's format. Compare it with the example under the box.
- A custom script isn't running. It is waiting for approval, or its page is switched off under Where tracking loads.
Who can do this#
Everyone with access to the event can view these settings. The Event Editor role or above can save the registration sections, the event capacity and self-service. Opening and closing registration, Admin order and Analytics & Tracking need the Event Admin role, or Owner or Admin of the organisation.
Related guides
- Create tickets and set pricesAdd the tickets people choose when they register, set their prices and limits, and stop selling one when you need to.
- Run a waiting listOffer a waiting list on tickets that sell out, choose what it asks for, and invite people to register when places free up.
- Take bookings by date and timeslotTurn an event into a booking event, choose which days can be booked, and add the timeslots visitors pick, each with its own capacity.
- Invite guests with invitation codesMake tickets invitation-only, give each guest a code or a personal link, import a guest list and see who has registered.
- Change the wording people seeReword or translate the buttons, messages and labels of the event site, registration, emails and e-ticket, and set the date and time formats.
- Manage your registrationSign in to My Order with a code sent to your email, see your registration and tickets, change your details and cancel if the organiser allows it.
Still stuck? In EventNook, ask HeyNook. It knows the page you're on and your event, and can take you straight to the right setting.