Import attendees from a spreadsheet
Add many attendees at once from a CSV or Excel file or pasted rows, check every row before anything is created, and choose whether they are emailed.
Where to find it: Event admin › Registration › Add or update attendees › Import attendees
Import attendees adds many people at once from a spreadsheet. Each upload is a batch of up to 300 rows for one ticket. You check every row before anything is created, and nobody is emailed unless you choose to.
Every imported attendee gets a confirmed, complimentary registration. Group tickets and donations can't be imported.
Start a batch#
- Open Registration › Add or update attendees › Import attendees.
- Type a Batch name, such as the name of the list.
- Choose the Ticket. Below it, the page says how many places are left.
Add your list:
- Upload CSV or Excel: drop the file on the box, or click it to choose one. A .csv saved as UTF-8, or an .xlsx workbook (its first sheet).
- Paste rows: copy the cells from your spreadsheet, including the header row, and paste them in Rows.
- Click Read the list.
The first row of your list names the columns. For a file with the right columns, click Download the template for this ticket.
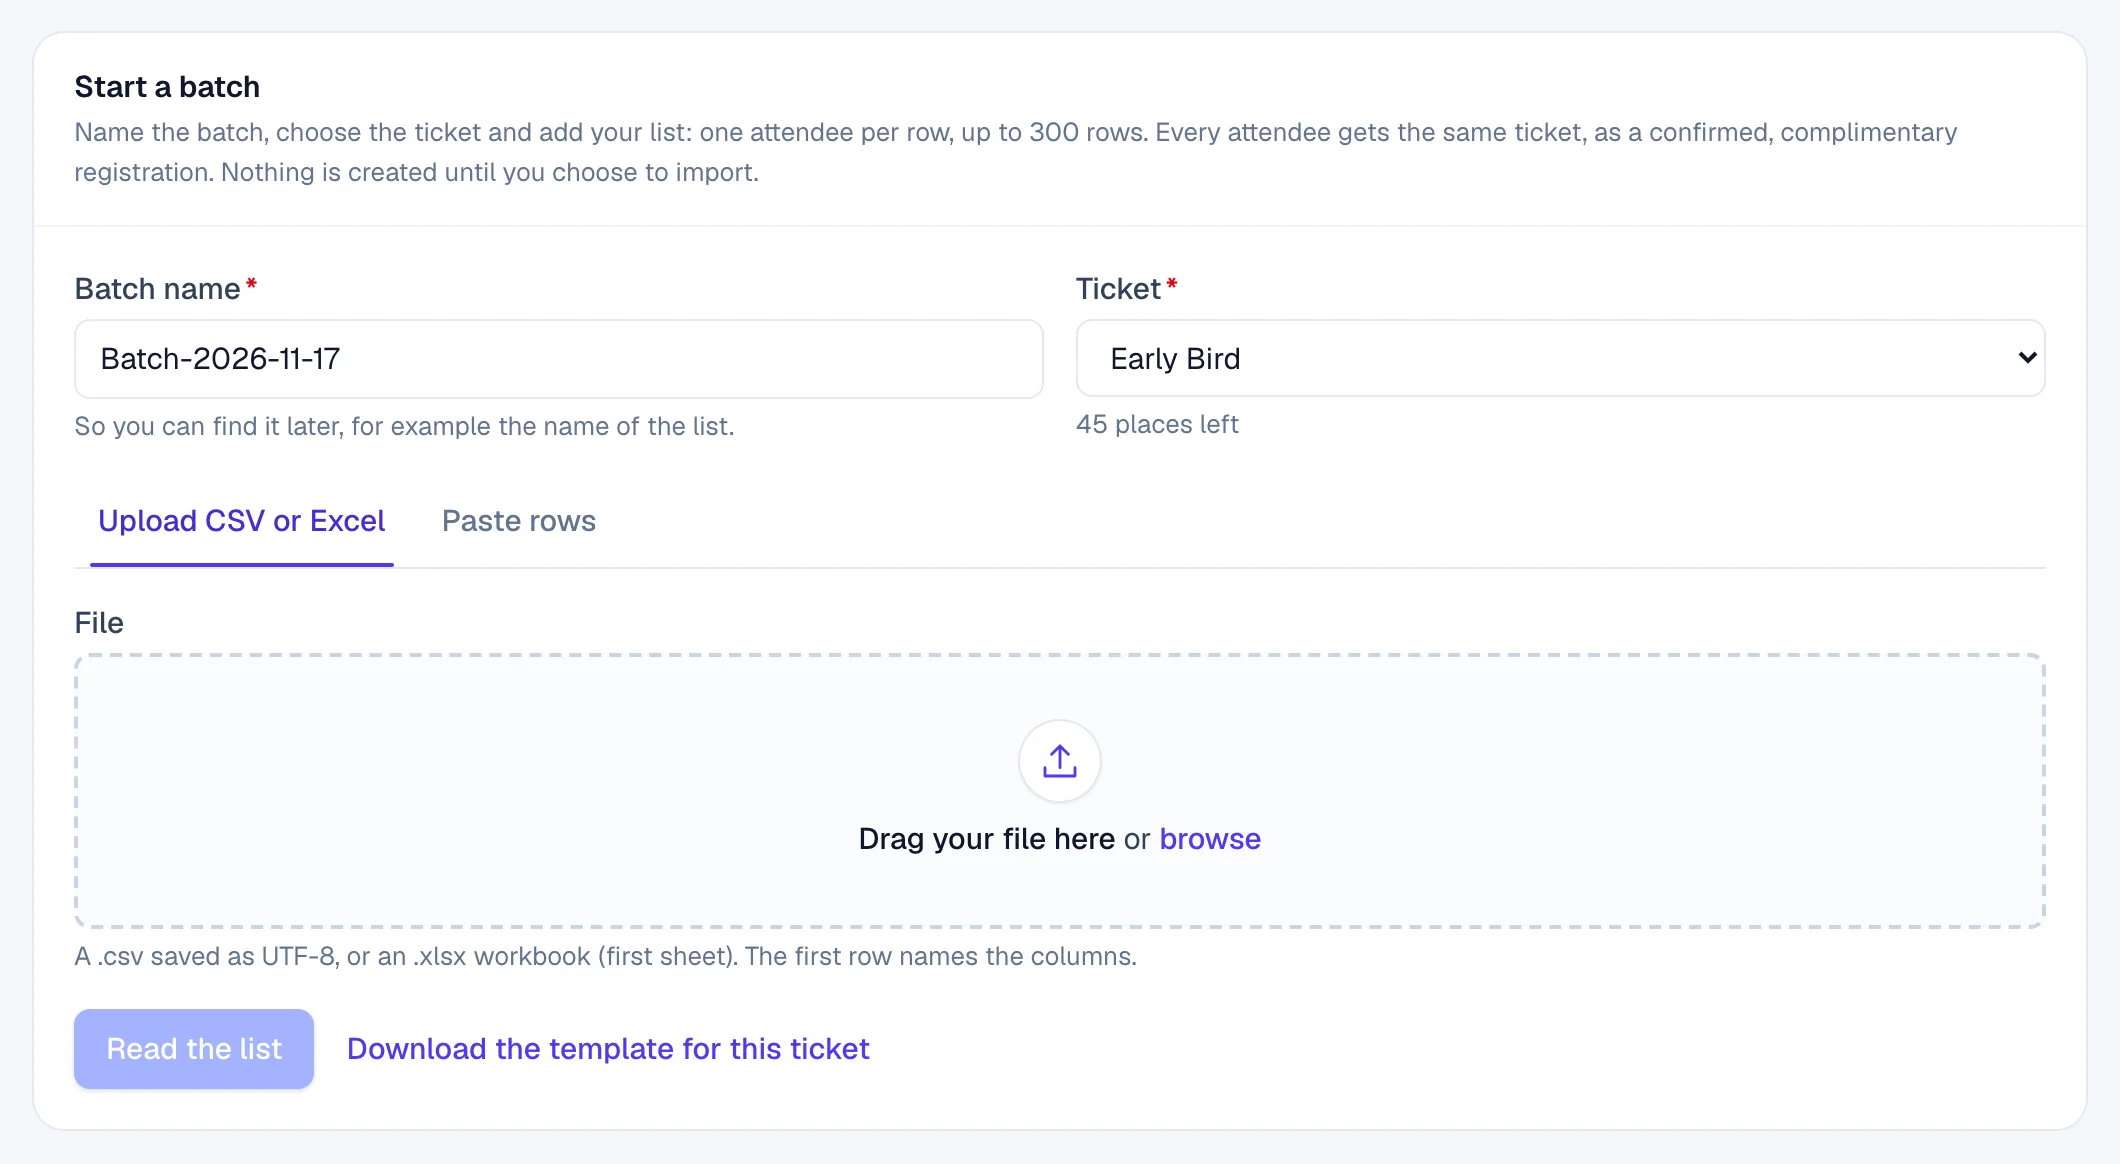
- 1The ticket every attendee in this batch gets
- 2Paste cells copied from a spreadsheet instead of a file
- 3A file with the right columns for this ticket
- 4Read the list; nothing is created yet
Match your columns#
The batch opens on 1. Match your columns, with each column of your file, its first values, and the field it Imports into.
- Under QR codes for check-in, choose EventNook issues the QR codes, or My attendees already have QR codes if another system already sent them.
- Check each column's field. Change one that's wrong, or set it to Do not import. Fields marked * are required by the form.
- Optional: tick Import rows that are missing a required answer if your list lacks an answer the form requires, such as a job title. Name and email are always required.
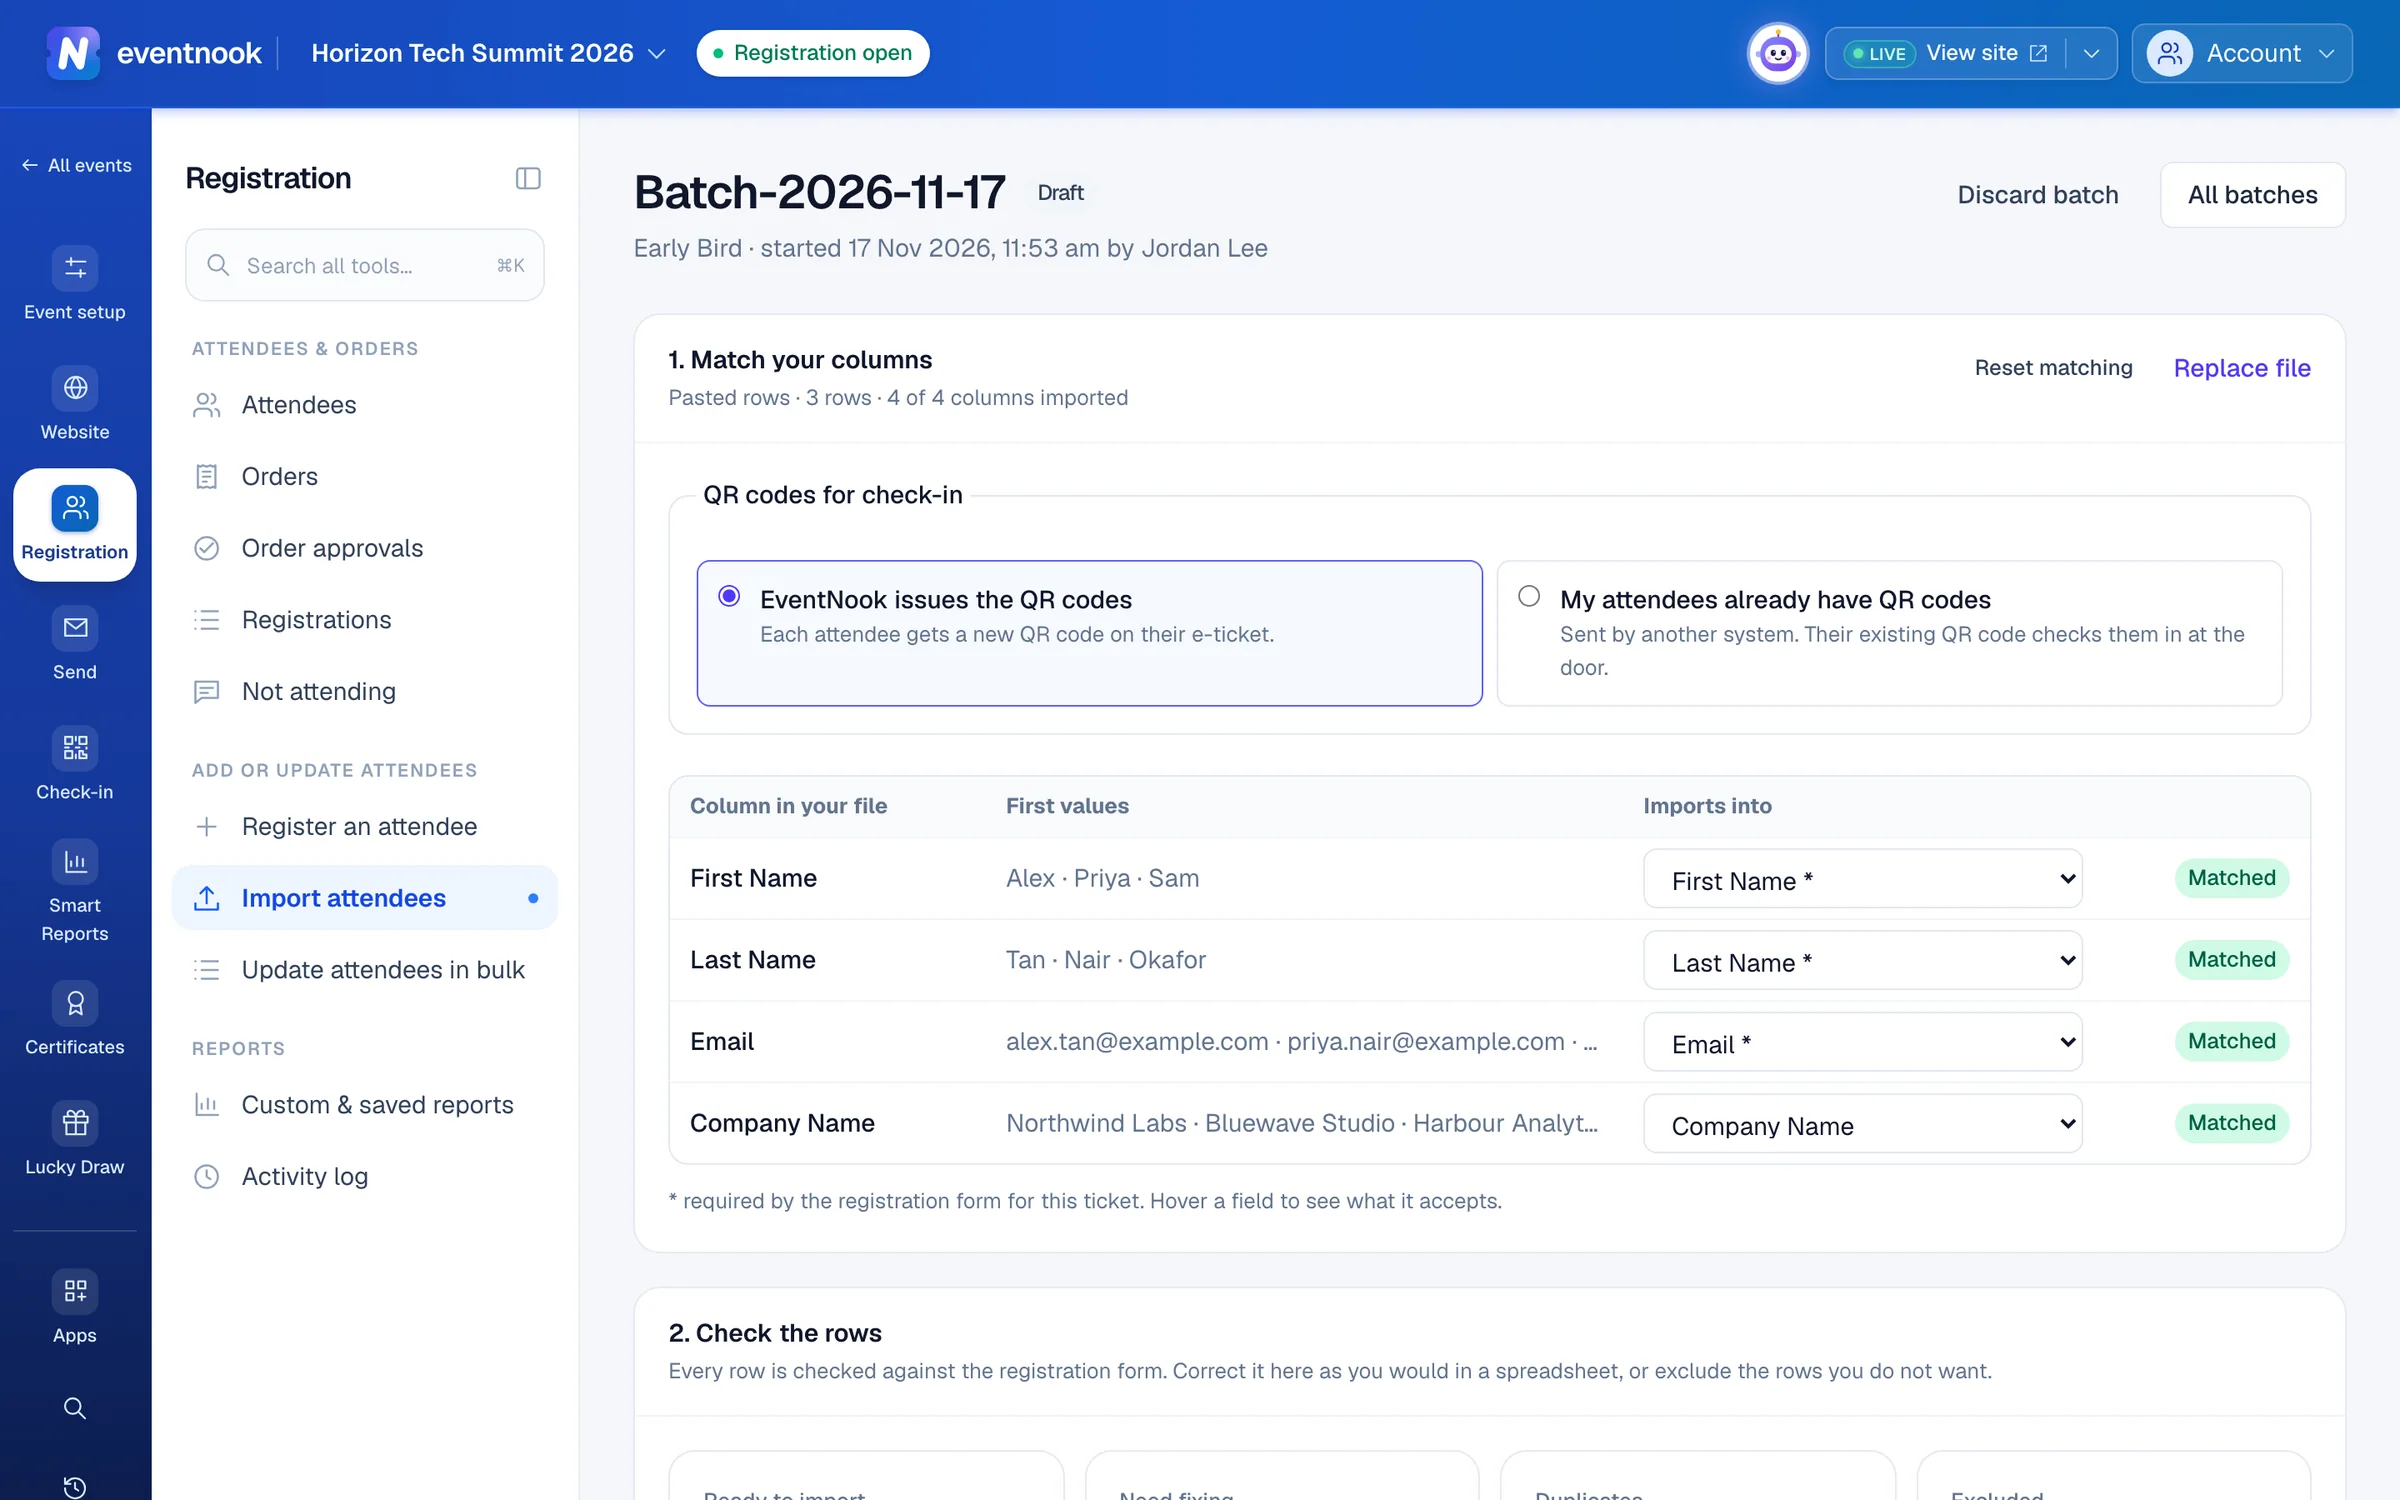
- 1Who issues the QR codes people scan at the door
- 2The form field each column of your list goes into
Click Reset matching to start the matching again.
Attendees who already have QR codes#
Choose My attendees already have QR codes, include each attendee's ticket ID as a column, and match it to External QR ticket ID. Scanning their existing code checks them in. They also get an EventNook code, so the e-ticket you email checks them in too. Each ID must be unique in the event.
Check the rows#
2. Check the rows checks every row against your registration form and counts what is Ready to import, what Need fixing, the Duplicates and what you Excluded.
- Click Need fixing to see the rows with a problem. Click a cell and type to correct it, as in a spreadsheet. Each change is saved and checked at once.
- Click Exclude on a row you don't want. Select several rows and click Exclude with their count to leave them all out.
- The line above the table says what the selected row needs.
Copy and paste work with Excel and Google Sheets. Ctrl or ⌘ + D fills down, Delete clears and Ctrl or ⌘ + Z undoes. Download these rows with reasons gives you the rows that need fixing as a file.
Import#
- Under 3. Import, decide what happens to duplicates of an existing registration or of an earlier row. Skip the duplicates (recommended) is the default. Only an event admin can choose Import them anyway, with a reason.
- Tick Email the confirmation to each attendee when the import finishes if they should hear from you. Leave it off to import quietly.
- Click Import with the number of attendees, check what the dialog says, and click Start the import.
The import runs in the background. You can leave the page; the batch stays under Batches.
After the import#
The batch shows Rows in the file, Registrations created, Failed and Skipped.
- Download with reasons gives you the rows that weren't imported, to correct and upload as a new batch.
- If you imported quietly, click Email the attendees not yet emailed when you're ready. Nobody is emailed twice for the same batch.
- Review and edit these attendees opens them in Update attendees in bulk.
If something looks wrong#
- Letters look garbled. Save the file as CSV UTF-8, or upload the .xlsx file.
- "Not enough places". The ticket, the event or a session is nearly full. Exclude some rows, or raise the capacity and come back to the batch.
- The batch shows Stopped. Click Resume from row with the row number. Rows already created aren't created again.
- You started the wrong list. While it imports, click Stop the import. What was already created is kept. A batch not yet imported can be dropped with Discard batch.
- A ticket isn't offered. The page lists the tickets that can't be imported, each with the reason.
Who can do this#
Event Admin and Event Editor roles can import attendees. Only an event admin can import duplicates.
Related guides
- Update attendees in bulkCorrect registration answers for many attendees in one sheet, the way you would in a spreadsheet, and save them together.
- Register someone yourselfRegister a person through the event's real registration form on their behalf, or prepare a personal link with their details for them to complete.
- Find attendees and change their detailsSearch and filter the attendee list, open anyone's details beside it, correct or cancel one attendee, find duplicates, count attendees in a pivot and export the list.
- Build the registration formChoose the questions attendees and buyers answer when they register, set each one up, ask some only for certain tickets, and publish the form.
- Change the emails your event sendsWrite the confirmation and other emails your event sends by itself, turn them on or off, choose who gets copies and check whether an email arrived.
Still stuck? In EventNook, ask HeyNook. It knows the page you're on and your event, and can take you straight to the right setting.