Find attendees and change their details
Search and filter the attendee list, open anyone's details beside it, correct or cancel one attendee, find duplicates, count attendees in a pivot and export the list.
Where to find it: Event admin › Registration › Attendees & orders › Attendees
Attendees lists every ticket holder, one row per ticket. Use it to find someone, check their details, fix a mistake or take a list into a spreadsheet.
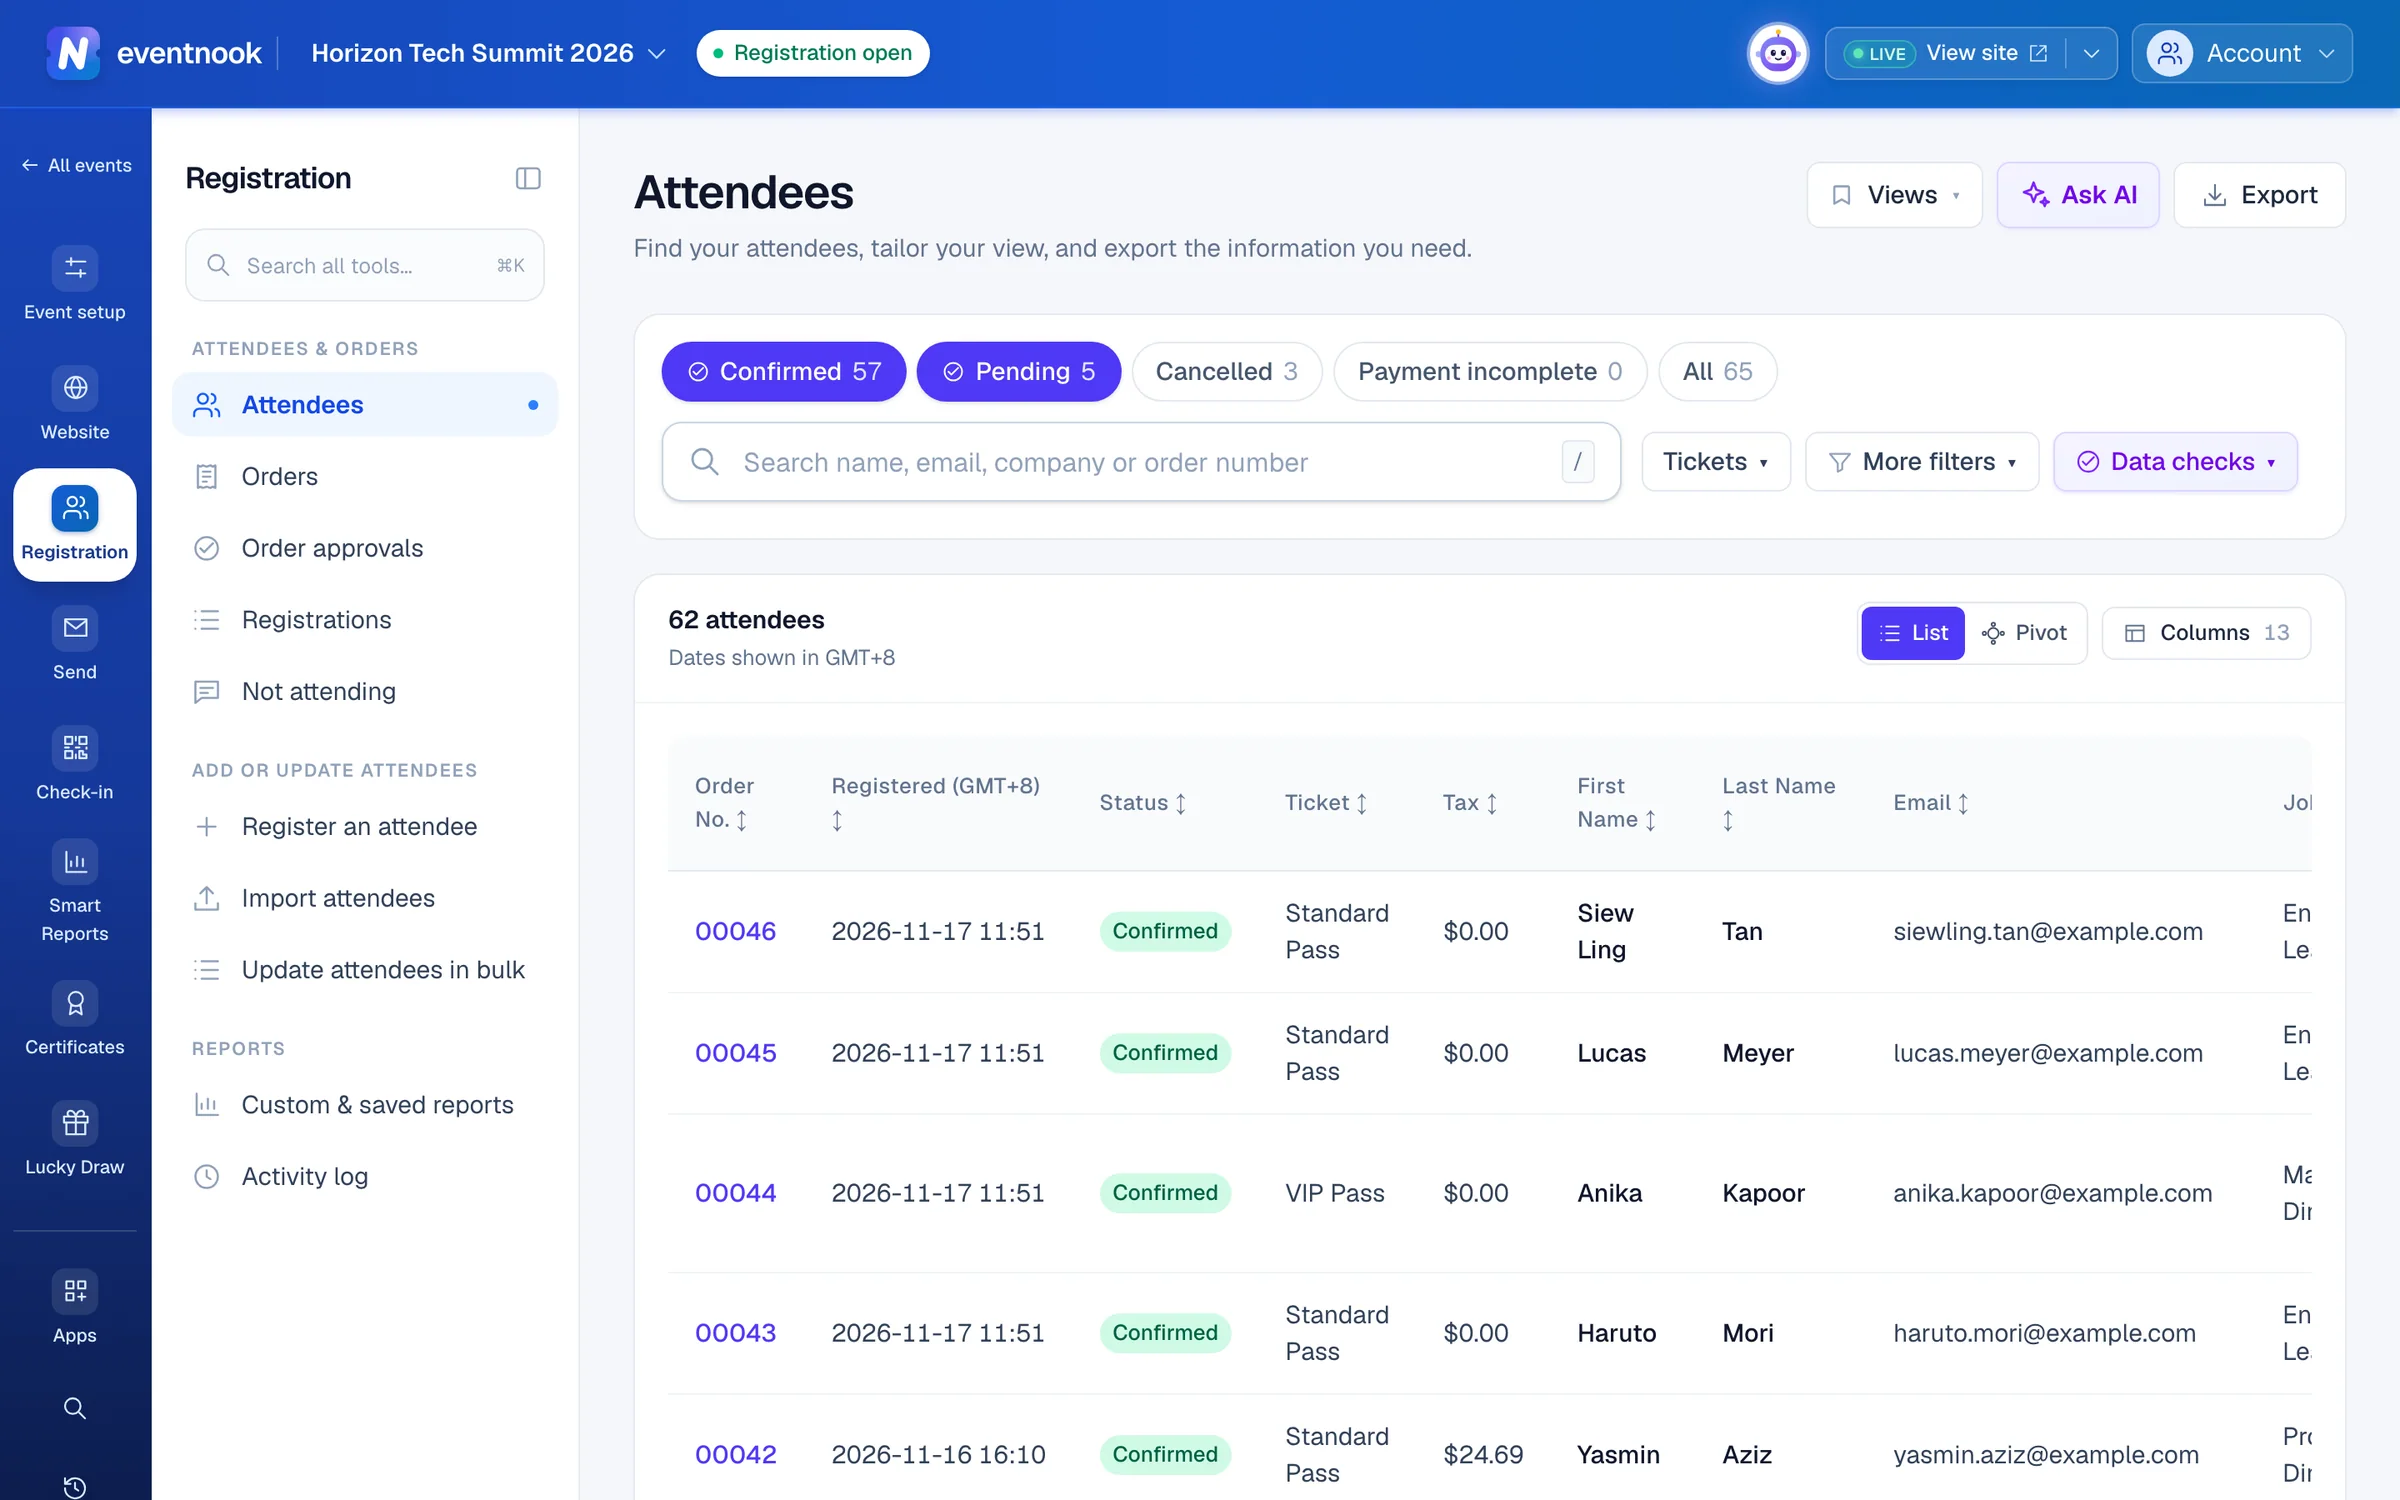
- 1Turn statuses on and off, each with how many it holds
- 2Find someone by name, email, company or order number
- 3Match attendees on any answer on the form
- 4Find people registered twice and details to clean up
- 5Export the list as it is shown
The Ask AI button in the header opens the Attendees agent beside the list, which finds people you describe in plain words. See Ask AI beside the attendee list.
Find an attendee#
- Open Registration › Attendees & orders › Attendees.
- Type part of a name, email, company or order number in the search box. The list narrows a moment after you stop typing.
- Click the row, or the attendee's name, to open their details beside the list.
Press / to jump to the search box, and Enter to open the only match straight away.
Filter the list#
- Status buttons: Confirmed and Pending are on when the list opens. Turn on Cancelled or Payment incomplete too, or click All. Each shows how many attendees it holds under your other filters.
- Tickets: show only the people holding some tickets.
- More filters: click Add condition, then choose a field, an operator and a value, such as Company Name is empty. Join conditions with And (all must match) or Or (either may match). Use is one of to match several exact values at once.
Everything applies as you change it; there is no Apply button. Clear filters takes them all off. The filters are part of the page's address, so a copied link opens the same list.
Find duplicates and details to clean up#
Open Data checks beside the search box. Each check shows how many confirmed and pending attendees it finds.
| Check | What it finds |
|---|---|
| Registered twice: same email | The same email on tickets in more than one order. |
| Registered twice: same name | The same first and last name in more than one order. |
| Same email, different names | One email used for several people, often an assistant registering colleagues. |
| Same company, different spellings | One company written several ways, such as EventNook, Event Nook and EventNook Pte Ltd. |
| Invalid mobile number | Numbers that can't be real: letters, the wrong length, an unknown country code or filler like 00000000. |
Choosing a check narrows the list like any filter, and a line under the filters says what to do with what it found. Click Clear the check to go back.
If your access includes your organisation's other events, Data checks also has Registered in other events: attendees whose email is on a confirmed or pending ticket in another of your events, past or upcoming.
See one attendee#
Click a row and the attendee's details open to the right of the list. The list stays where it is.
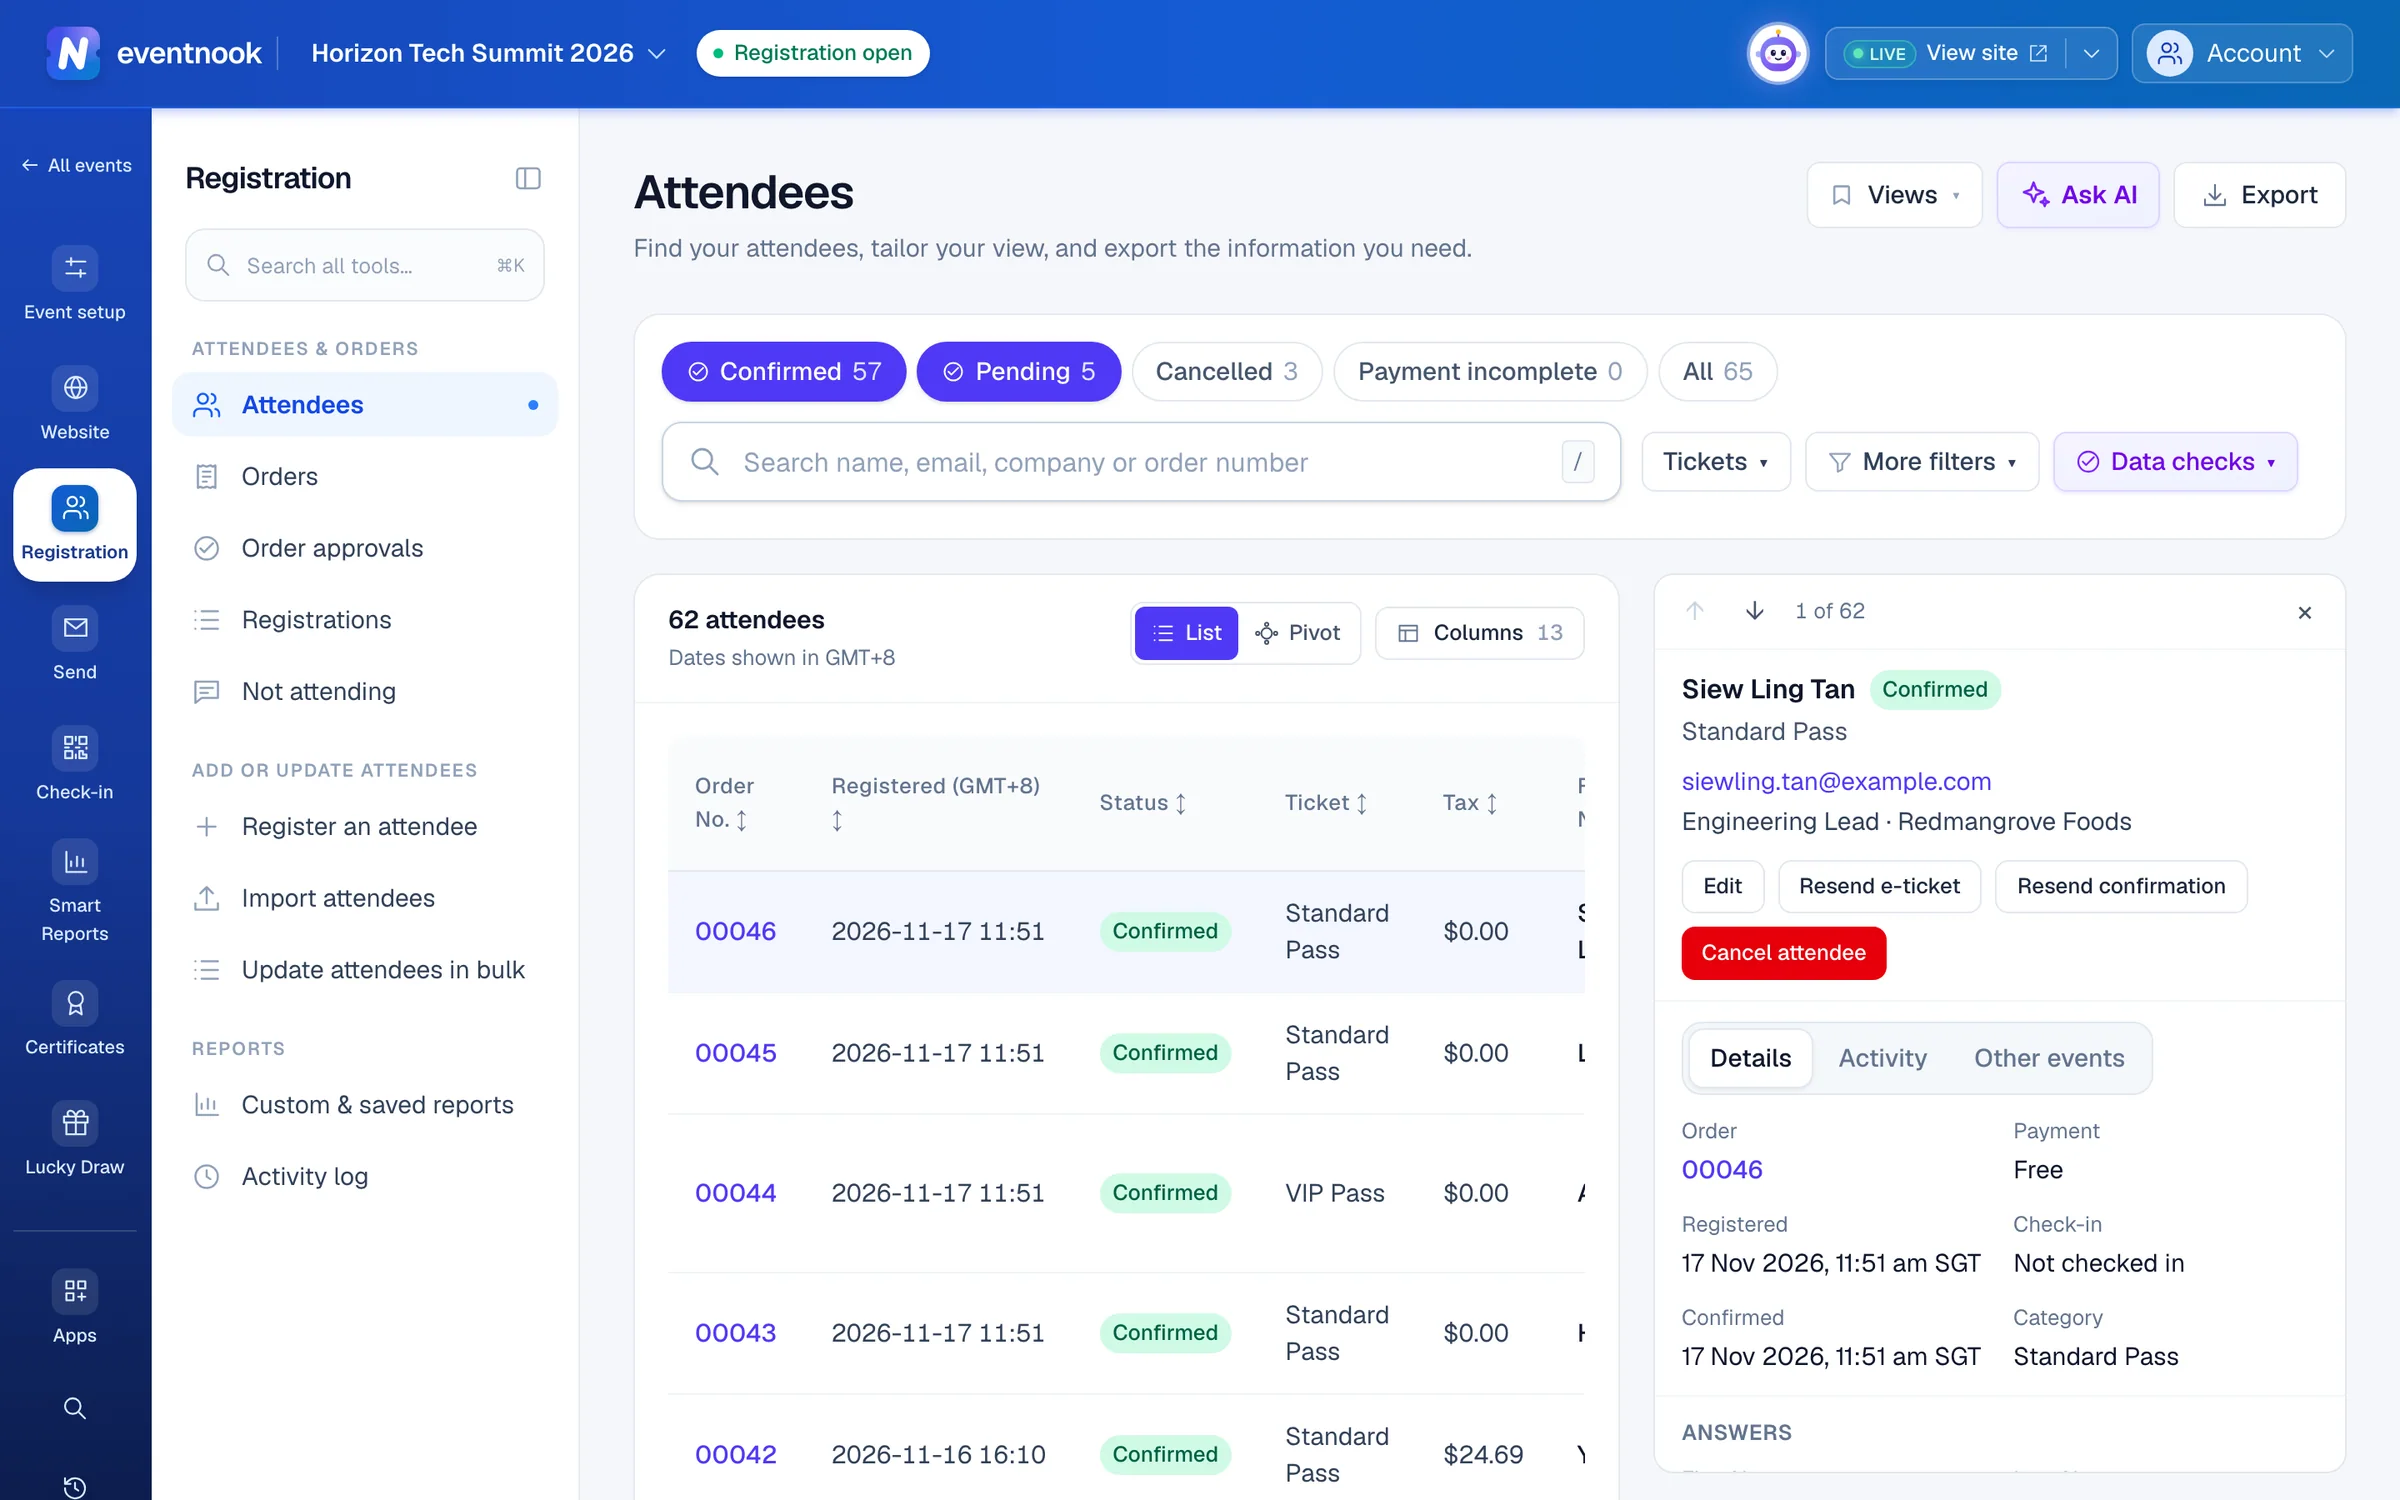
- 1Correct this attendee's answers, category, seat or tags
- 2Send the e-ticket to the attendee again
- 3Messages sent to them and changes to their record
- 4Go through the list without closing the details
- The top shows how to reach them, their ticket and status. Possible duplicate means another registration has the same details.
- Details shows the order (click it to open the order), payment, when they registered and checked in, category, table, seat and tags, then every answer and the Ticket code, with Open e-ticket.
- Activity lists the messages sent to them with their delivery status, and the changes made to their record.
- Other events shows the organisation's other events this email registered for, when your access includes it.
Use the ↑ and ↓ buttons at the top to go through the attendees on the page. Press Esc or click × to close.
Edit or cancel one attendee#
In the attendee's details:
- Edit: change their answers, Category, table, seat, Tags or Internal note, then click Save attendee.
- Resend e-ticket: sends the e-ticket to the attendee. Resend confirmation sends the confirmation to the order's contact. Both ask you to check the address first.
- Cancel attendee: choose a Reason, decide whether to email the cancellation, and click Cancel attendee. Their ticket code stops working and their place is released. If the order was paid, choose what happens to their share of the money; a refund needs your password.
- Reinstate: on a cancelled attendee, choose a reason and click Reinstate attendee.
If they were the order's last active attendee, cancelling them cancels the whole order. To change someone's ticket, open their order.
Choose columns#
The list opens on every field of your attendee form. Click Columns at the top right of the table, untick what you don't need, set the order with ↑ and ↓, and click Apply. This browser remembers the choice for this event. Reset to default brings every field back.
To keep a layout under a name, use the Views menu in the header, as on the orders list.
Count attendees in a pivot#
Click Pivot at the top right of the table to count the same people by one field down the side and another across the top.
- Choose Rows, such as Ticket, and Columns, such as Check-in.
- Choose what Values the cells hold, such as attendees or check-ins.
- Optional: tick Count blanks to count people with no value in a field.
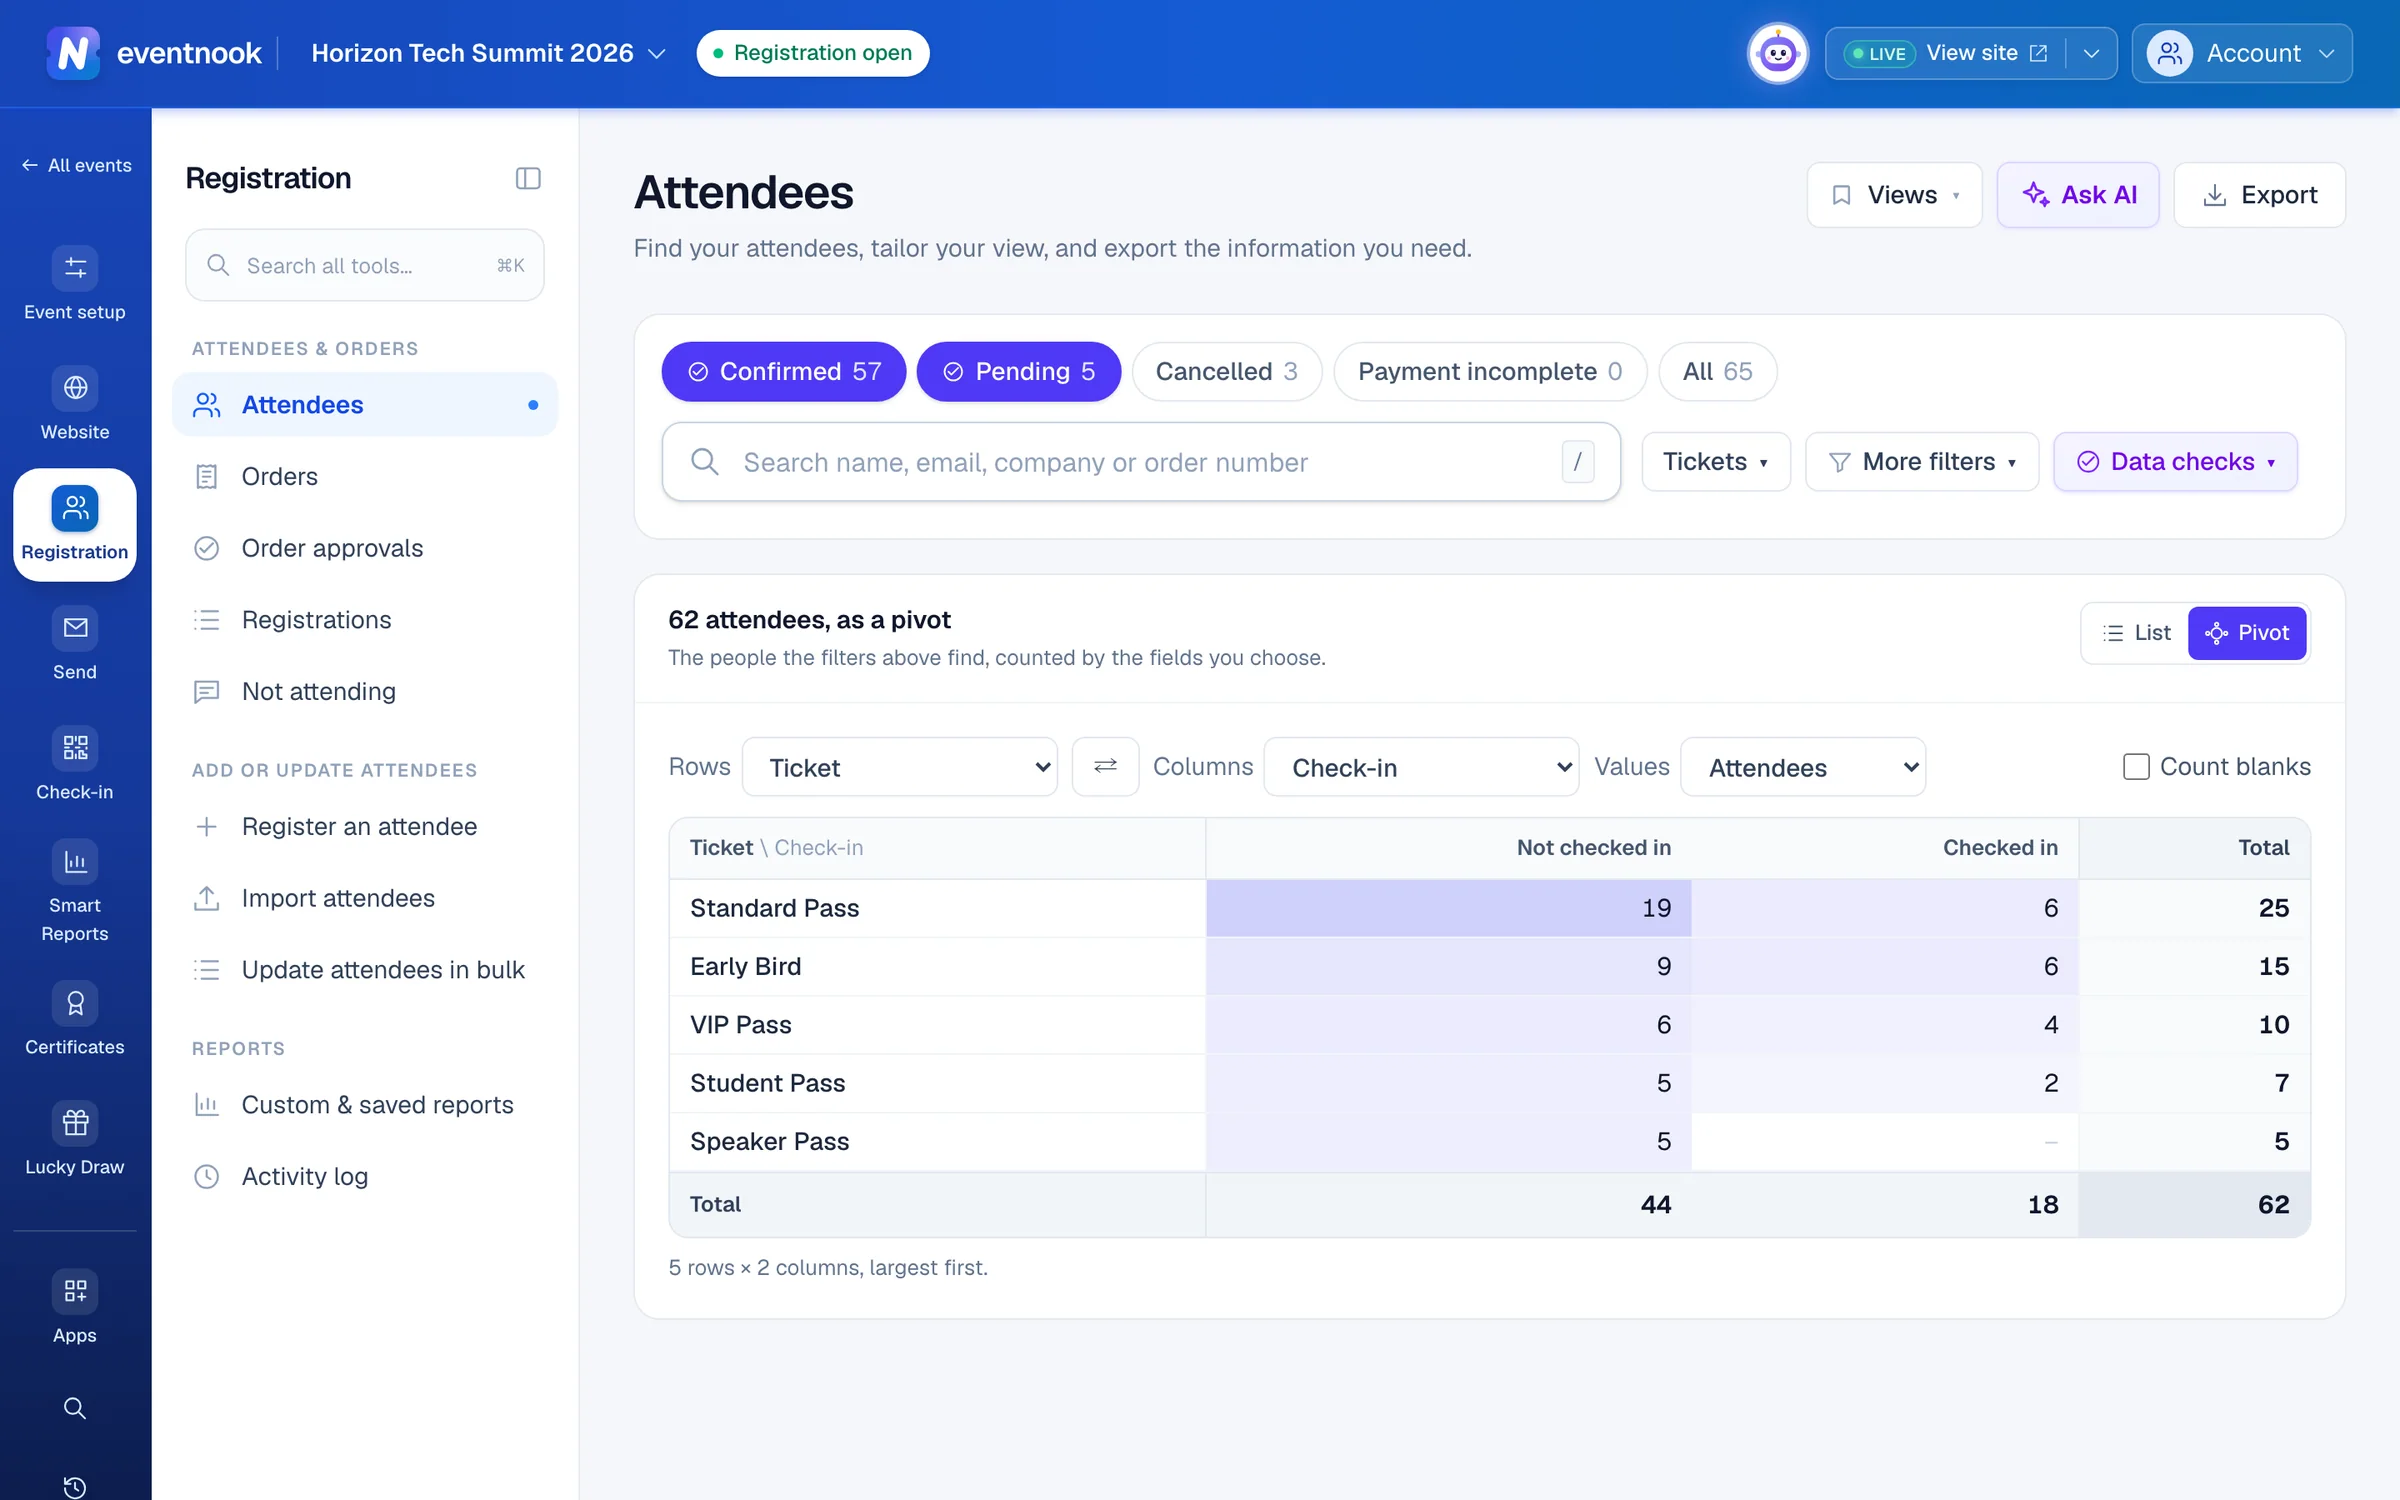
- 1The field counted down the side
- 2The field counted across the top
- 3Attendees, check-ins or revenue in each cell
Every row and column has its total, and a darker cell holds more. The filters above still apply. ⇄ swaps rows and columns, and List brings the people back.
Export attendees#
- Click Export. It opens on the list as shown, across every page.
- Optional: under Who to export, change the statuses, tickets or check-in for this export only. Under Columns, keep As in the list, or pick Every column or Choose columns.
- Choose how personal data is written, and tick the acknowledgement if it asks for one.
- Click Request export, then Download when it's ready.
The list on the page doesn't change while you adjust the export.
If something looks wrong#
- Someone is missing. Cancelled attendees are hidden at first. Turn on Cancelled, or click All.
- Names and emails look partly hidden. Your role can't see personal data in full. Exports are masked the same way.
- Edit or Cancel attendee is greyed out. Hover over it for the reason. For example, on an event that collects details from the buyer only, edit the order instead.
- "Someone else changed this attendee". Close the edit, open the attendee again and make your change.
- A resend is refused. Each attendee can be sent 3 emails an hour and 10 a day.
- An uploaded file won't open. Opening attendees' files needs full access to personal data.
- There's no Registered in other events check or Other events tab. Your access doesn't include your organisation's other events. An organisation owner or admin can turn on See registrations in other events for you in Collaborators.
Who can do this#
Everyone with access to the event's attendees can see the list. Event Admin and Event Editor roles can edit, cancel and reinstate attendees and resend their emails. Refunds need an event admin. Exporting needs a role that can export.
Related guides
- Ask AI beside the attendee listOpen the Attendees agent beside the attendee list, ask for the people you need in plain words, and review and run the actions it prepares.
- Update attendees in bulkCorrect registration answers for many attendees in one sheet, the way you would in a spreadsheet, and save them together.
- Change, cancel or refund an orderOpen one order to see who bought, what they paid and who is attending, then edit it, resend its email, record a payment, cancel it or refund it.
- Find and export ordersFind any order by number, name or email, narrow the list by status and payment, keep the layouts you use as views, and export exactly what you see.
- Summaries, saved views and exportsCount attendees by up to three fields, manage the saved views of your reports, run your organisation's custom reports and see every export of the event.
Still stuck? In EventNook, ask HeyNook. It knows the page you're on and your event, and can take you straight to the right setting.