Set up invoices, receipts and tax
Put your billing details on invoices, receipts and credit notes, choose how they are numbered and how they look, and charge tax on the tickets you choose.
Where to find it: Event admin › Event setup › Start here › Currency & payment › Receipt & invoice
EventNook issues an invoice for an order with an amount to pay, a receipt when an order is paid, and a credit note for a refund. Receipt & invoice sets what those documents say and how they are numbered; Design & templates sets how they look; Tax settings sets the tax on tickets.
These are tabs at the top of Currency & payment, on a paid event only.
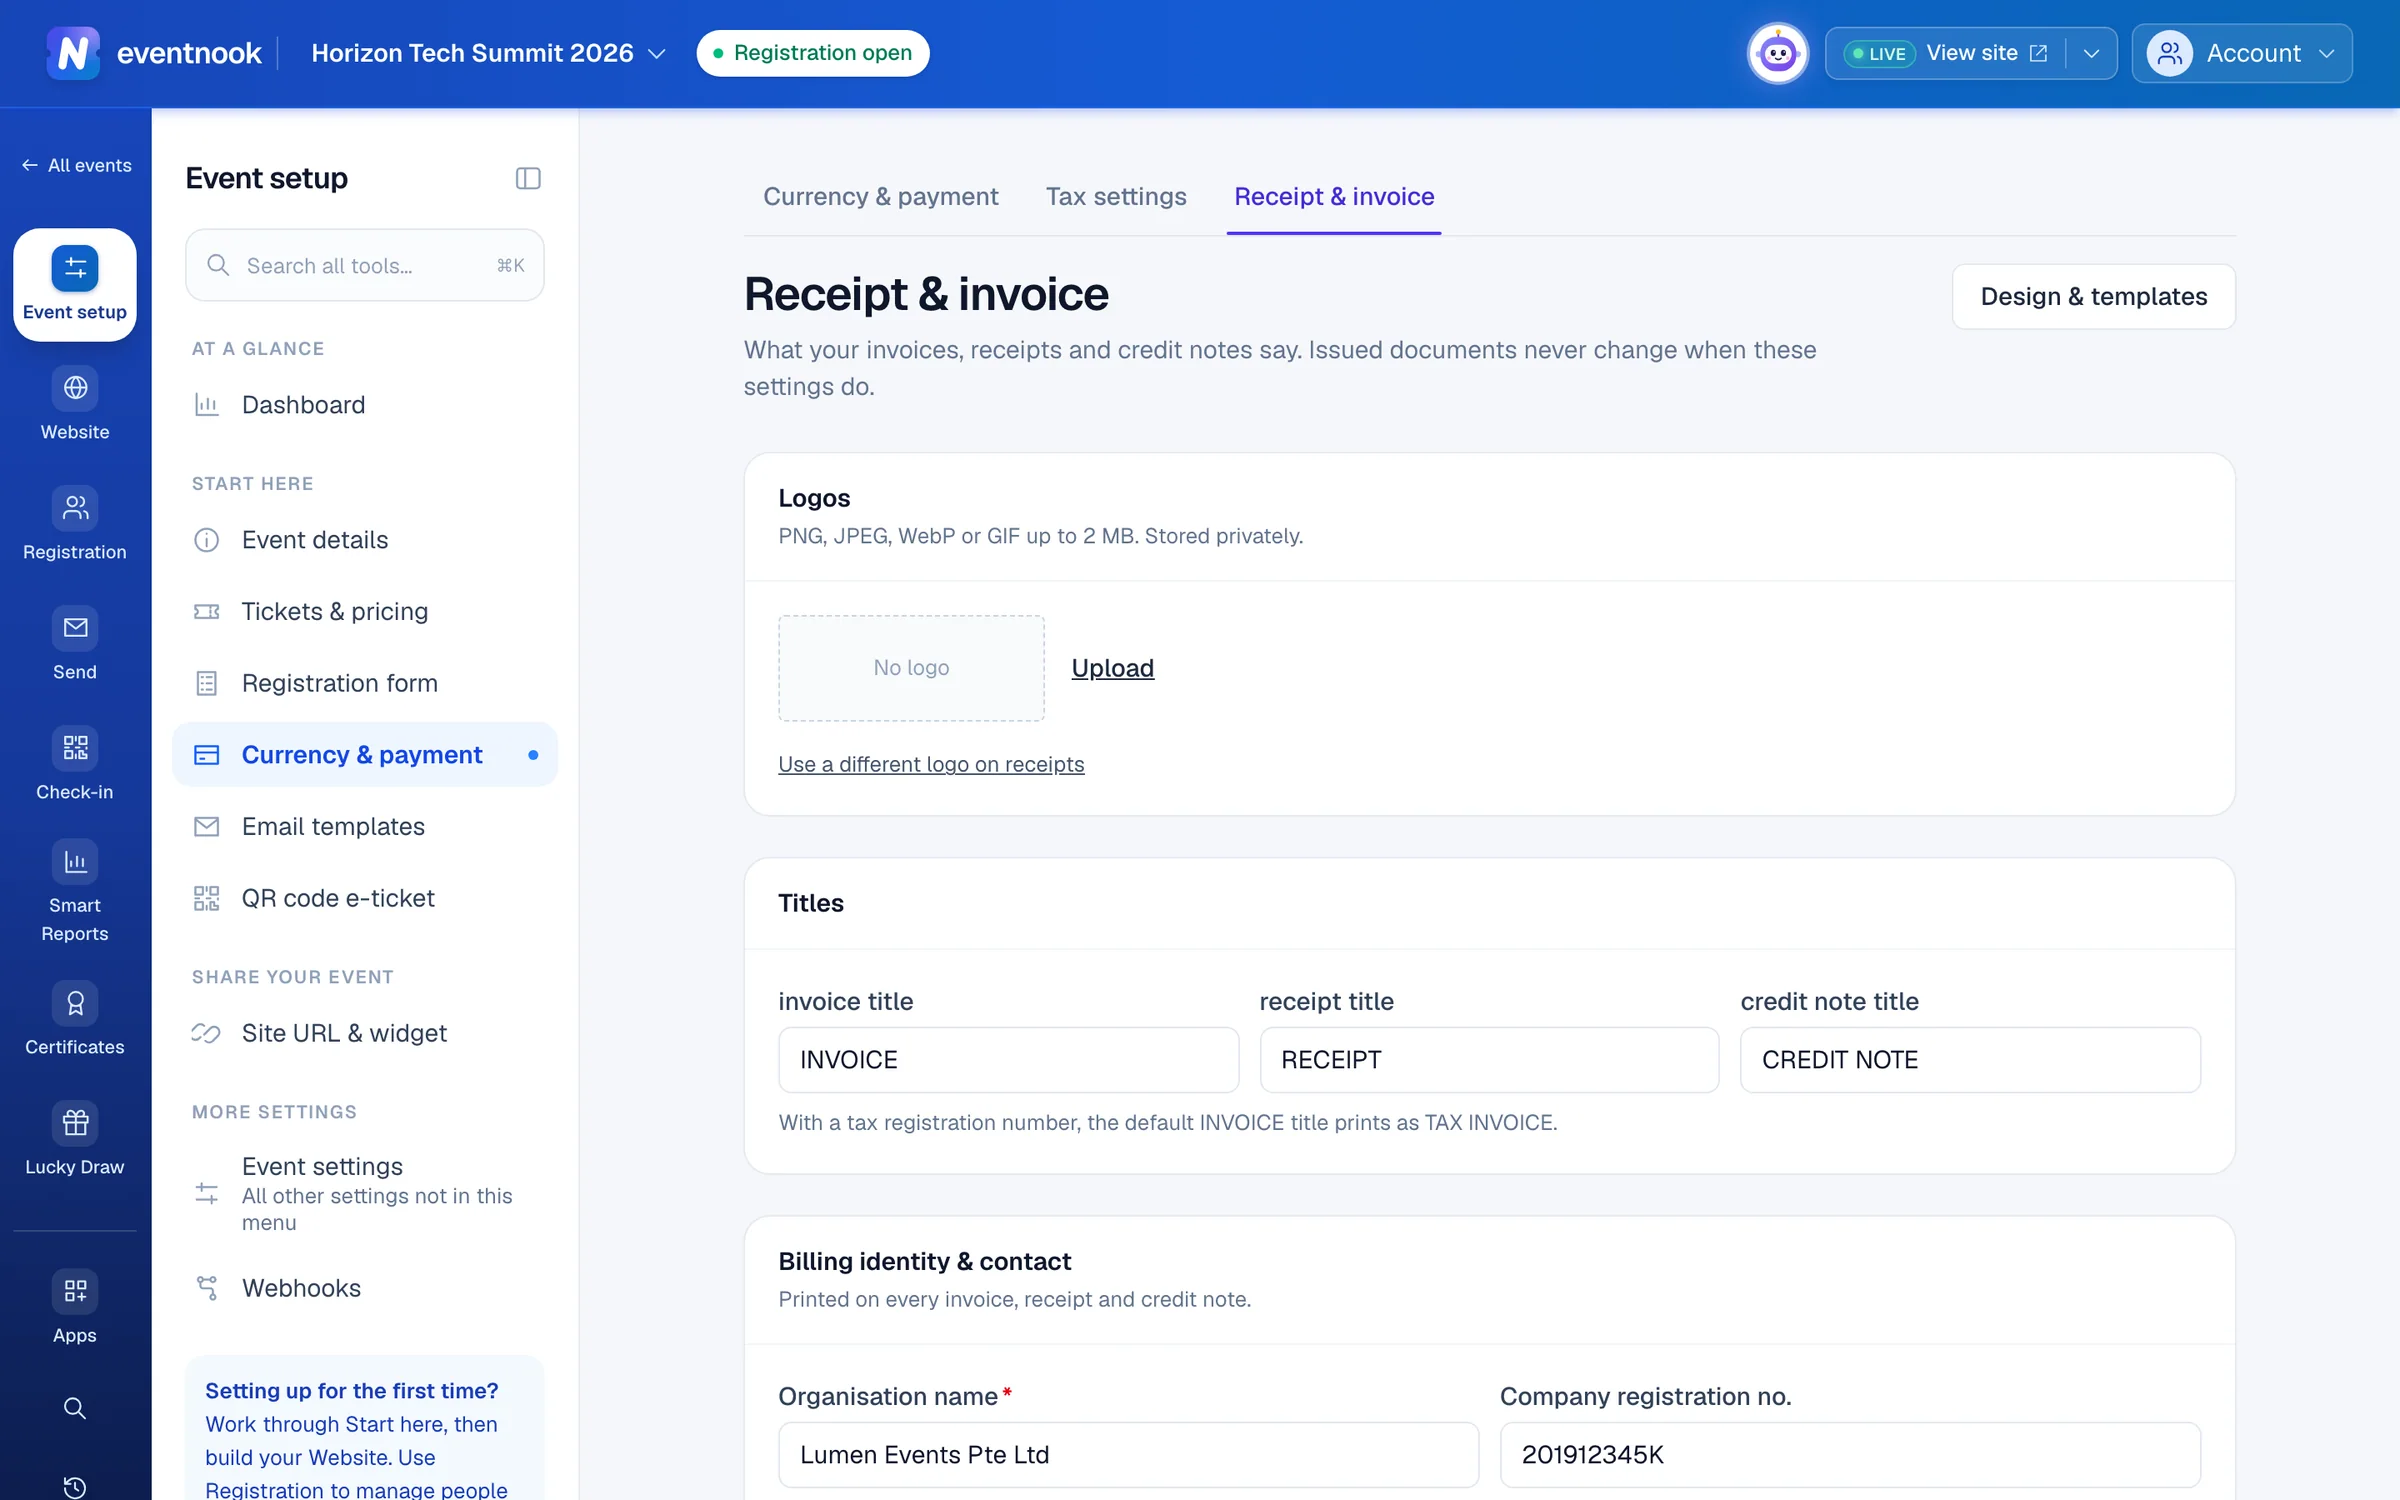
- 1The logo printed on invoices and receipts
- 2Your organisation's details, on every document
- 3Layout, colour and what each document shows
- 4The tax charged on tickets
Put your details on invoices and receipts#
- Open Currency & payment and click the Receipt & invoice tab.
- Under Logos, click Upload. Use a PNG, JPEG, WebP or GIF up to 2 MB. To use another logo on receipts, click Use a different logo on receipts.
- Under Billing identity & contact, type the Organisation name and the rest of your details: Company registration no., address, Phone, Email and Website.
- Optional: under Titles, change the title printed on each document.
- Click Save settings.
The Organisation name is required before you offer Pay by Invoice. With a tax registration number, the default INVOICE title prints as TAX INVOICE. Leave Tax registration no. (blank = from tax settings) empty to use the number from Tax settings.
What buyers type about themselves, such as their company, address, tax number or PO number, prints under their name. Which of those details you ask for is part of the registration form; see Form options.
Add a due date and terms#
Under Terms:
| Setting | What it does |
|---|---|
| Payment due | No due date, Due on receipt, Net 7 days to Net 90 days, or Other… for any number of days from 1 to 365. Each invoice prints its due date, counted from the invoice date. |
| Show payment terms and Payment terms | Free text printed with the due date, such as how to pay or a late fee. |
| Show terms & conditions and Terms & conditions | Your terms, printed on the documents. Basic formatting is kept. |
Choose how documents are numbered and issued#
Under Numbering & issuing, set the prefix of each document, how many Digits its number has, and the Number book:
- This event: the event numbers its documents on its own.
- Shared across the organisation: one sequence across every event that shares it.
Numbers are given out when a document is issued, and are never reused or reset. Number books shows the last number issued and the next one for each document.
The three ticks decide which documents are issued:
- Issue invoices for orders with an amount to pay
- Issue receipts when an order is paid
- Also issue zero-value receipts for free orders
Preview a document#
- Under Preview, choose the Document: Invoice, Receipt or Credit note.
- Leave Order id (optional) empty for sample data, or enter an order's id to see its real document.
- Click Preview. The document appears as buyers receive it, marked PREVIEW.
Change how documents look#
- On Receipt & invoice, click Design & templates.
- Under Standard template, choose Classic, Modern or Compact.
- Under Colour & typeface, set the Accent colour and the Typeface.
- Under What the document shows, switch off the parts you don't want, such as Discount column or Event line.
- Optional: type a Footer note, such as a thank-you line.
- Check the Live preview and click Save changes. Discard throws away everything since the last save.
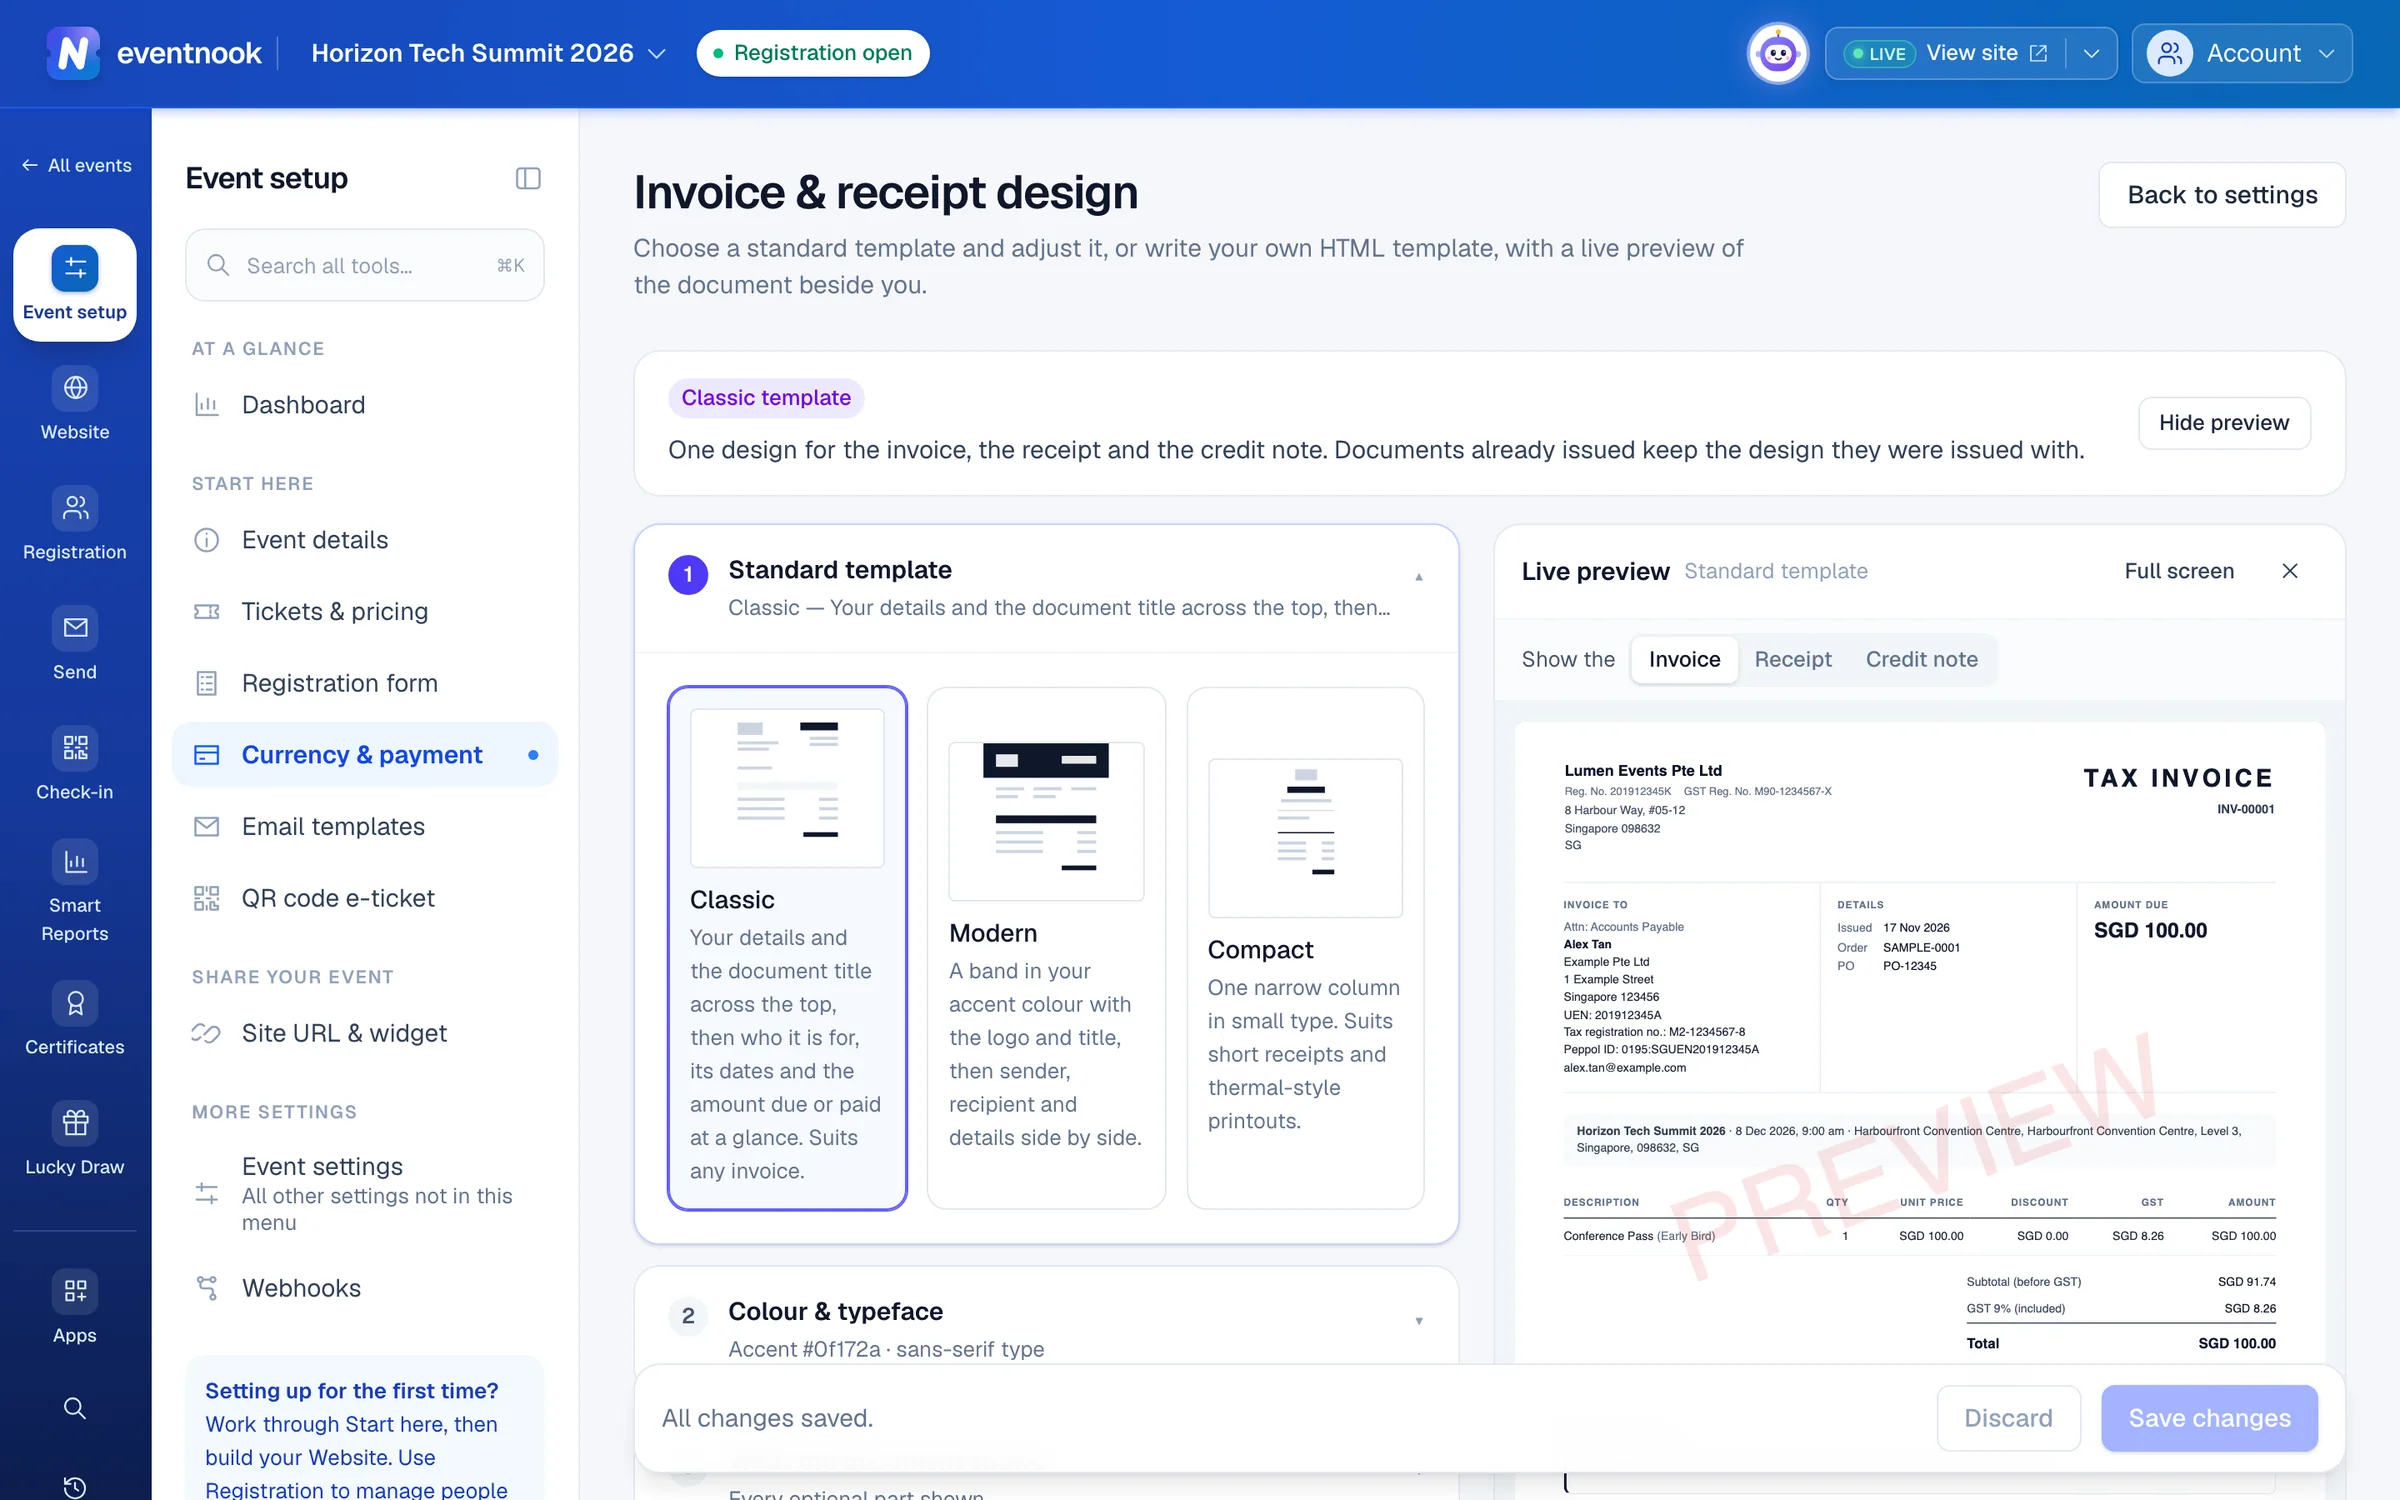
- 1Classic, Modern or Compact
- 2The document with your unsaved changes
- 3Saves the whole design
One design is used for the invoice, the receipt and the credit note. Numbers, the buyer, the lines and every amount are always printed: they are what makes the document valid.
Use your own layout#
Custom template (advanced) replaces the standard layout of the invoice or the receipt with your own HTML. It can print values and show or hide parts, but money and tax are always calculated by EventNook.
- Open Custom template (advanced) and choose the Invoice or Receipt tab.
- Click Start from the Classic template (or the template you chose) and edit it.
- Click Check for errors and fix anything it lists.
- Turn on Use my custom invoice template (or receipt) and click Save changes.
Template syntax reference and Available variables (sample values) below the editor list what a template can use. To go back, turn the switch off, or click Remove custom template, and save.
Charge tax#
- Click the Tax settings tab.
- Turn on Collect tax on this event.
- Choose the Tax type, such as GST or VAT, or Other… to type your own Tax label.
- Type the Rate (%). 0 is allowed, for zero-rated tickets.
- Type your Tax registration number. It is required when the rate is above 0.
- Choose Ticket prices: Include tax (buyers pay the price shown) or Exclude tax (tax is added at checkout).
- Click Save tax settings.
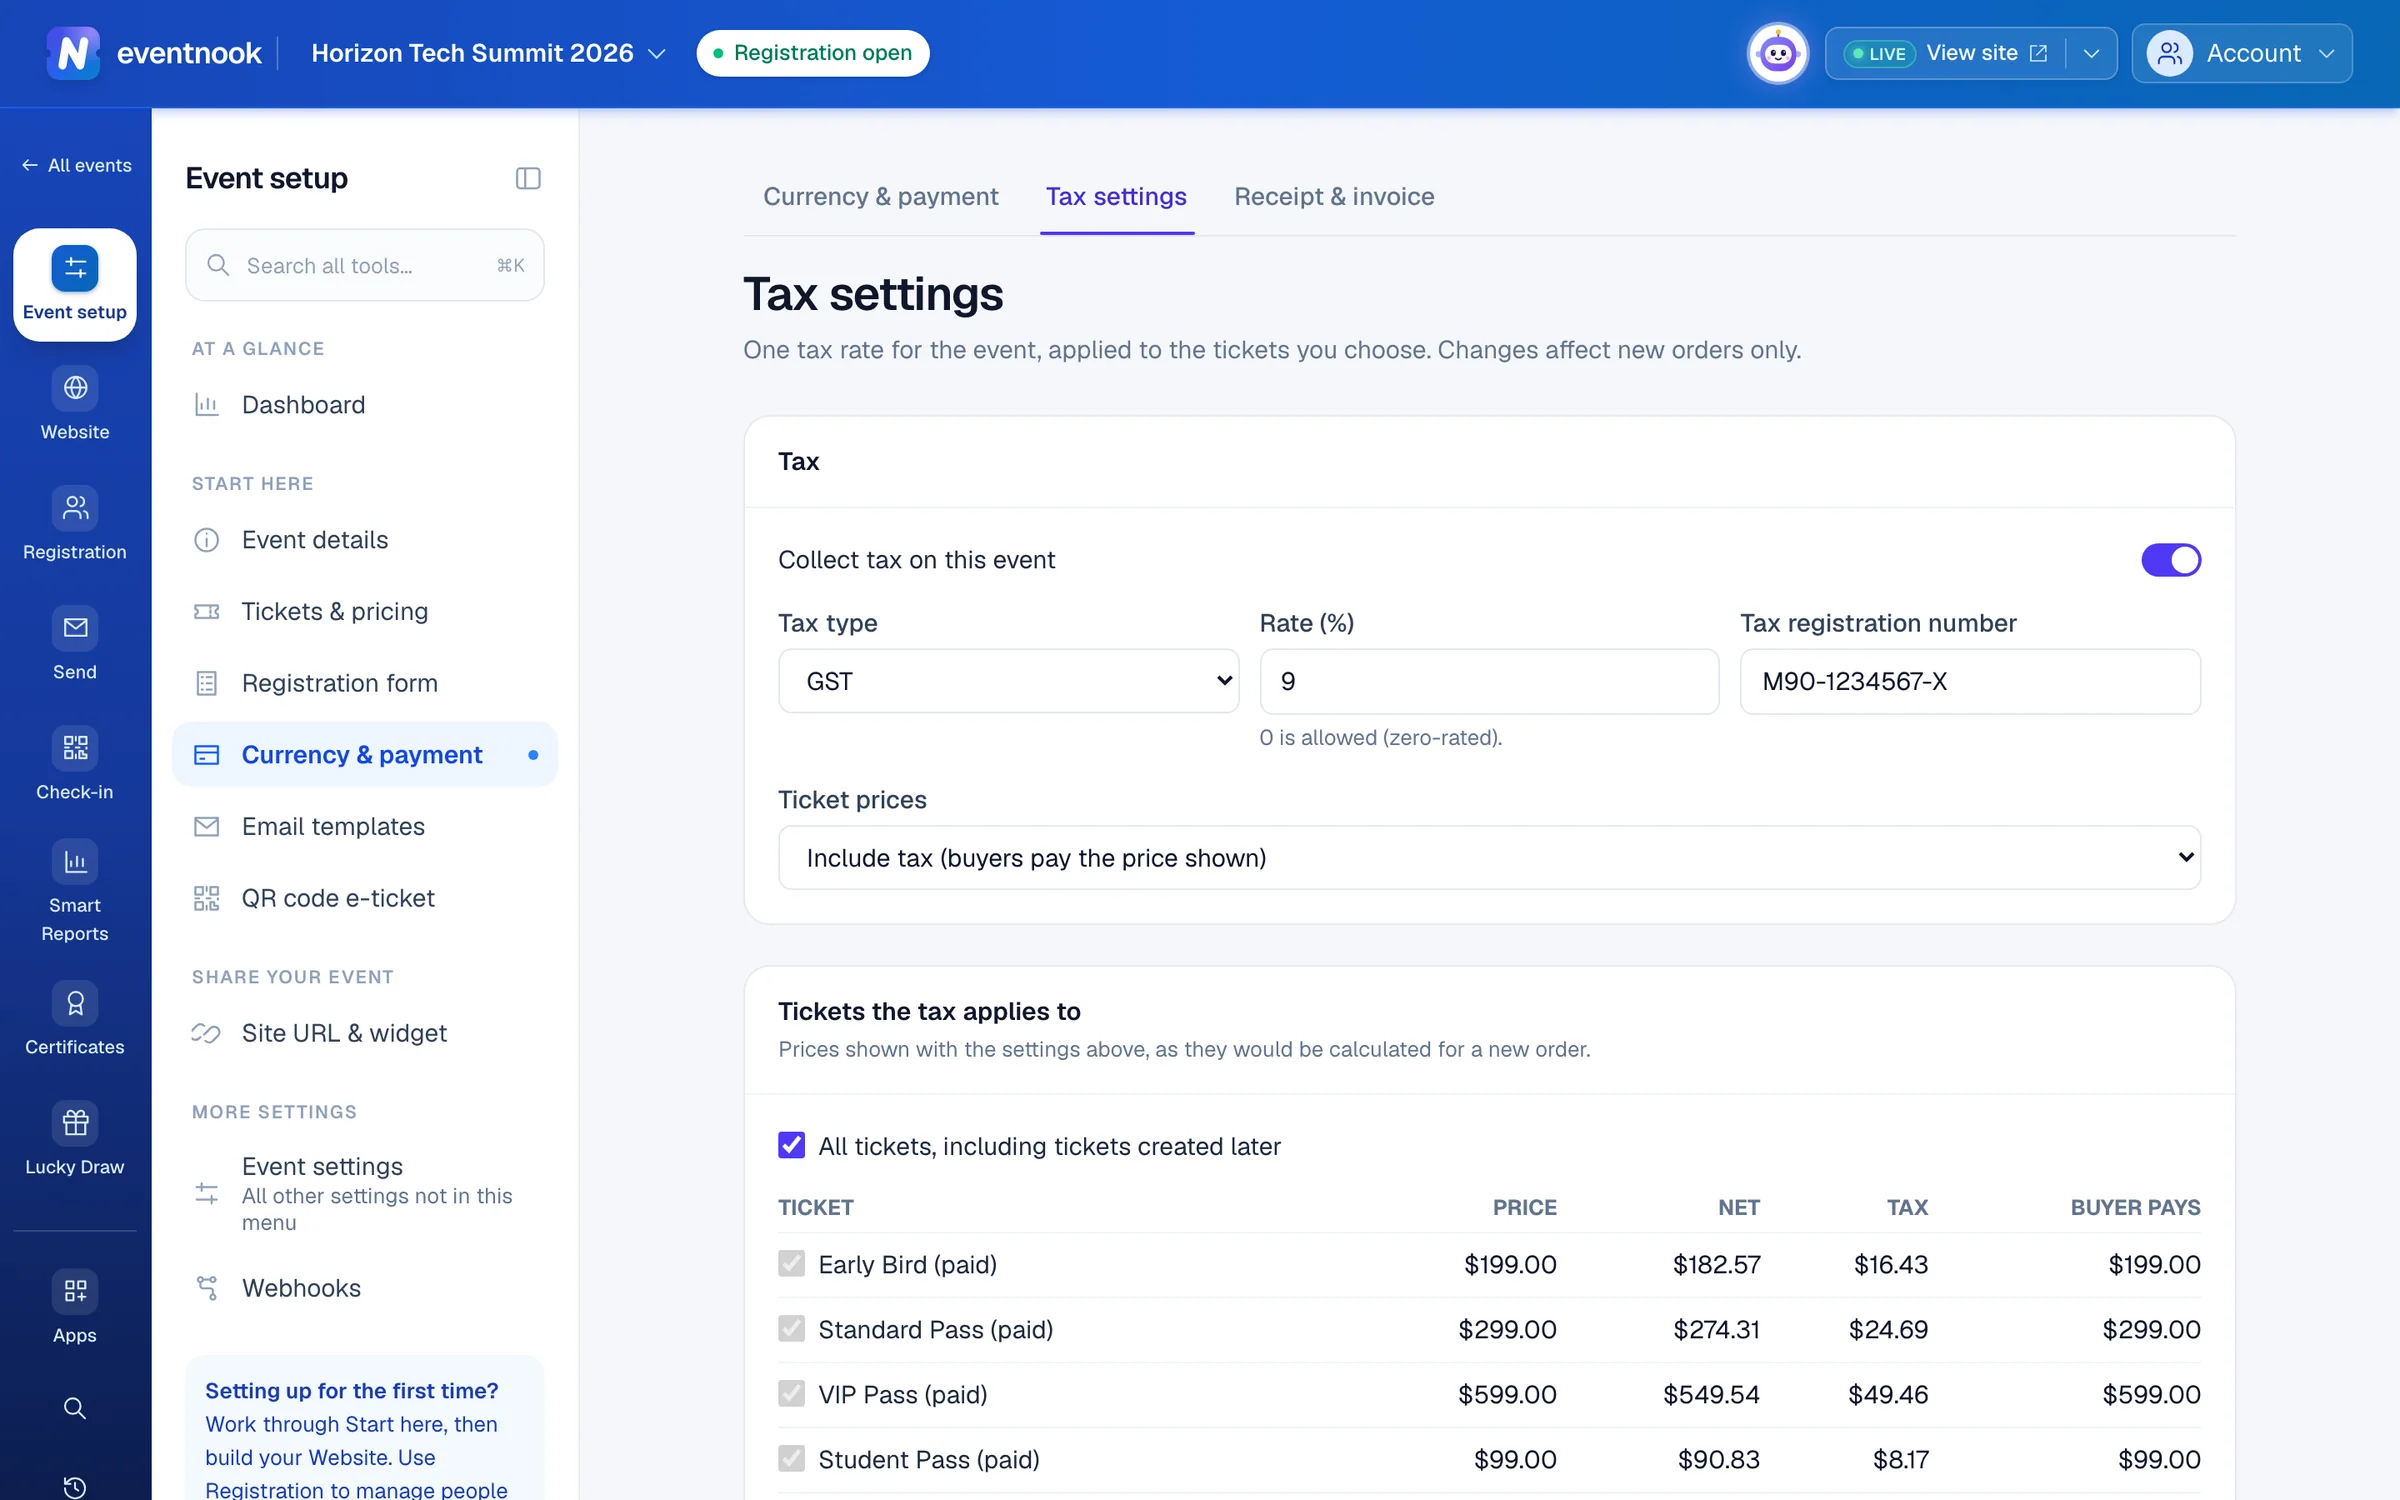
- 1Turn tax on or off; the values are kept
- 2Whether prices include tax or tax is added at checkout
- 3Or untick it and choose the tickets
To charge tax on some tickets only, untick All tickets, including tickets created later and tick the tickets the tax applies to. Then choose what Tickets the tax does not apply to are: Out of scope, Zero-rated or Exempt. That category is recorded on those invoice lines; it doesn't change any price. Ask your accountant if you're unsure.
The table shows each ticket's Net, Tax and Buyer pays with the saved settings. Save to see your changes in it.
If orders already exist when you change the rate, switch tax on or off, or change inclusive to exclusive, a dialog says Existing orders keep their tax. Click Save anyway: only new orders use the new values.
Switching tax off keeps the type, rate and number for when you switch it back on.
If something looks wrong#
- "Not configured yet" on Receipt & invoice. Type at least the Organisation name and click Save settings.
- The logo is refused. Use a PNG, JPEG, WebP or GIF of 2 MB or less.
- Preview with an order fails. The order must belong to this event, and you need access to orders. Leave the box empty for sample data.
- The custom template switch is greyed out. The template is empty. Click Start from the Classic template first.
- "Enter the tax registration number". Tax is on with a rate above 0. Type the number, or set the rate to 0.
- "Select at least one ticket the tax applies to". You unticked All tickets, including tickets created later without ticking any ticket.
- The settings changed since you opened this page. Someone else saved. Reload the latest version and make your change again.
Who can do this#
Anyone with payment access can see these pages and preview documents. An Event Admin, or the organisation's Owner or Admin, can change them.
Related guides
- Set the currency and how buyers payChoose the event's currency, turn on card, PayPal, bank transfer and other payment methods, and confirm, refund and export payments.
- Print invoices and receipts in bulkMake one printable document with a page for every order's invoice or receipt, then print it or save it as a PDF.
- Change, cancel or refund an orderOpen one order to see who bought, what they paid and who is attending, then edit it, resend its email, record a payment, cancel it or refund it.
- Stop duplicates, add terms and ask for billing detailsRefuse duplicate registrations, make registrants accept your terms, copy order emails to a second address and choose the billing details buyers give when they pay.
Still stuck? In EventNook, ask HeyNook. It knows the page you're on and your event, and can take you straight to the right setting.