Let people tell you they can't attend
Open the not-attending form, choose its questions, design its page and acknowledgement email, share its link and read the replies.
Where to find it: Event admin › Event setup › Start here › Registration form
The not-attending form is a page where people who can't come let you know, with a reason and your own questions. Use it for invitation-only events, where you want to hear from everyone you invited. A reply is never a registration: it holds no place, sends no registration email and never shows among your attendees or orders.
Open the form and share its link#
New events start with the form closed.
- Open Registration form and click Not-attending form. In its menu, click Settings, page & email.
- Turn on Take replies and click Save.
- Click Copy link and paste the link in your invitation email, on your event site or wherever people might look.
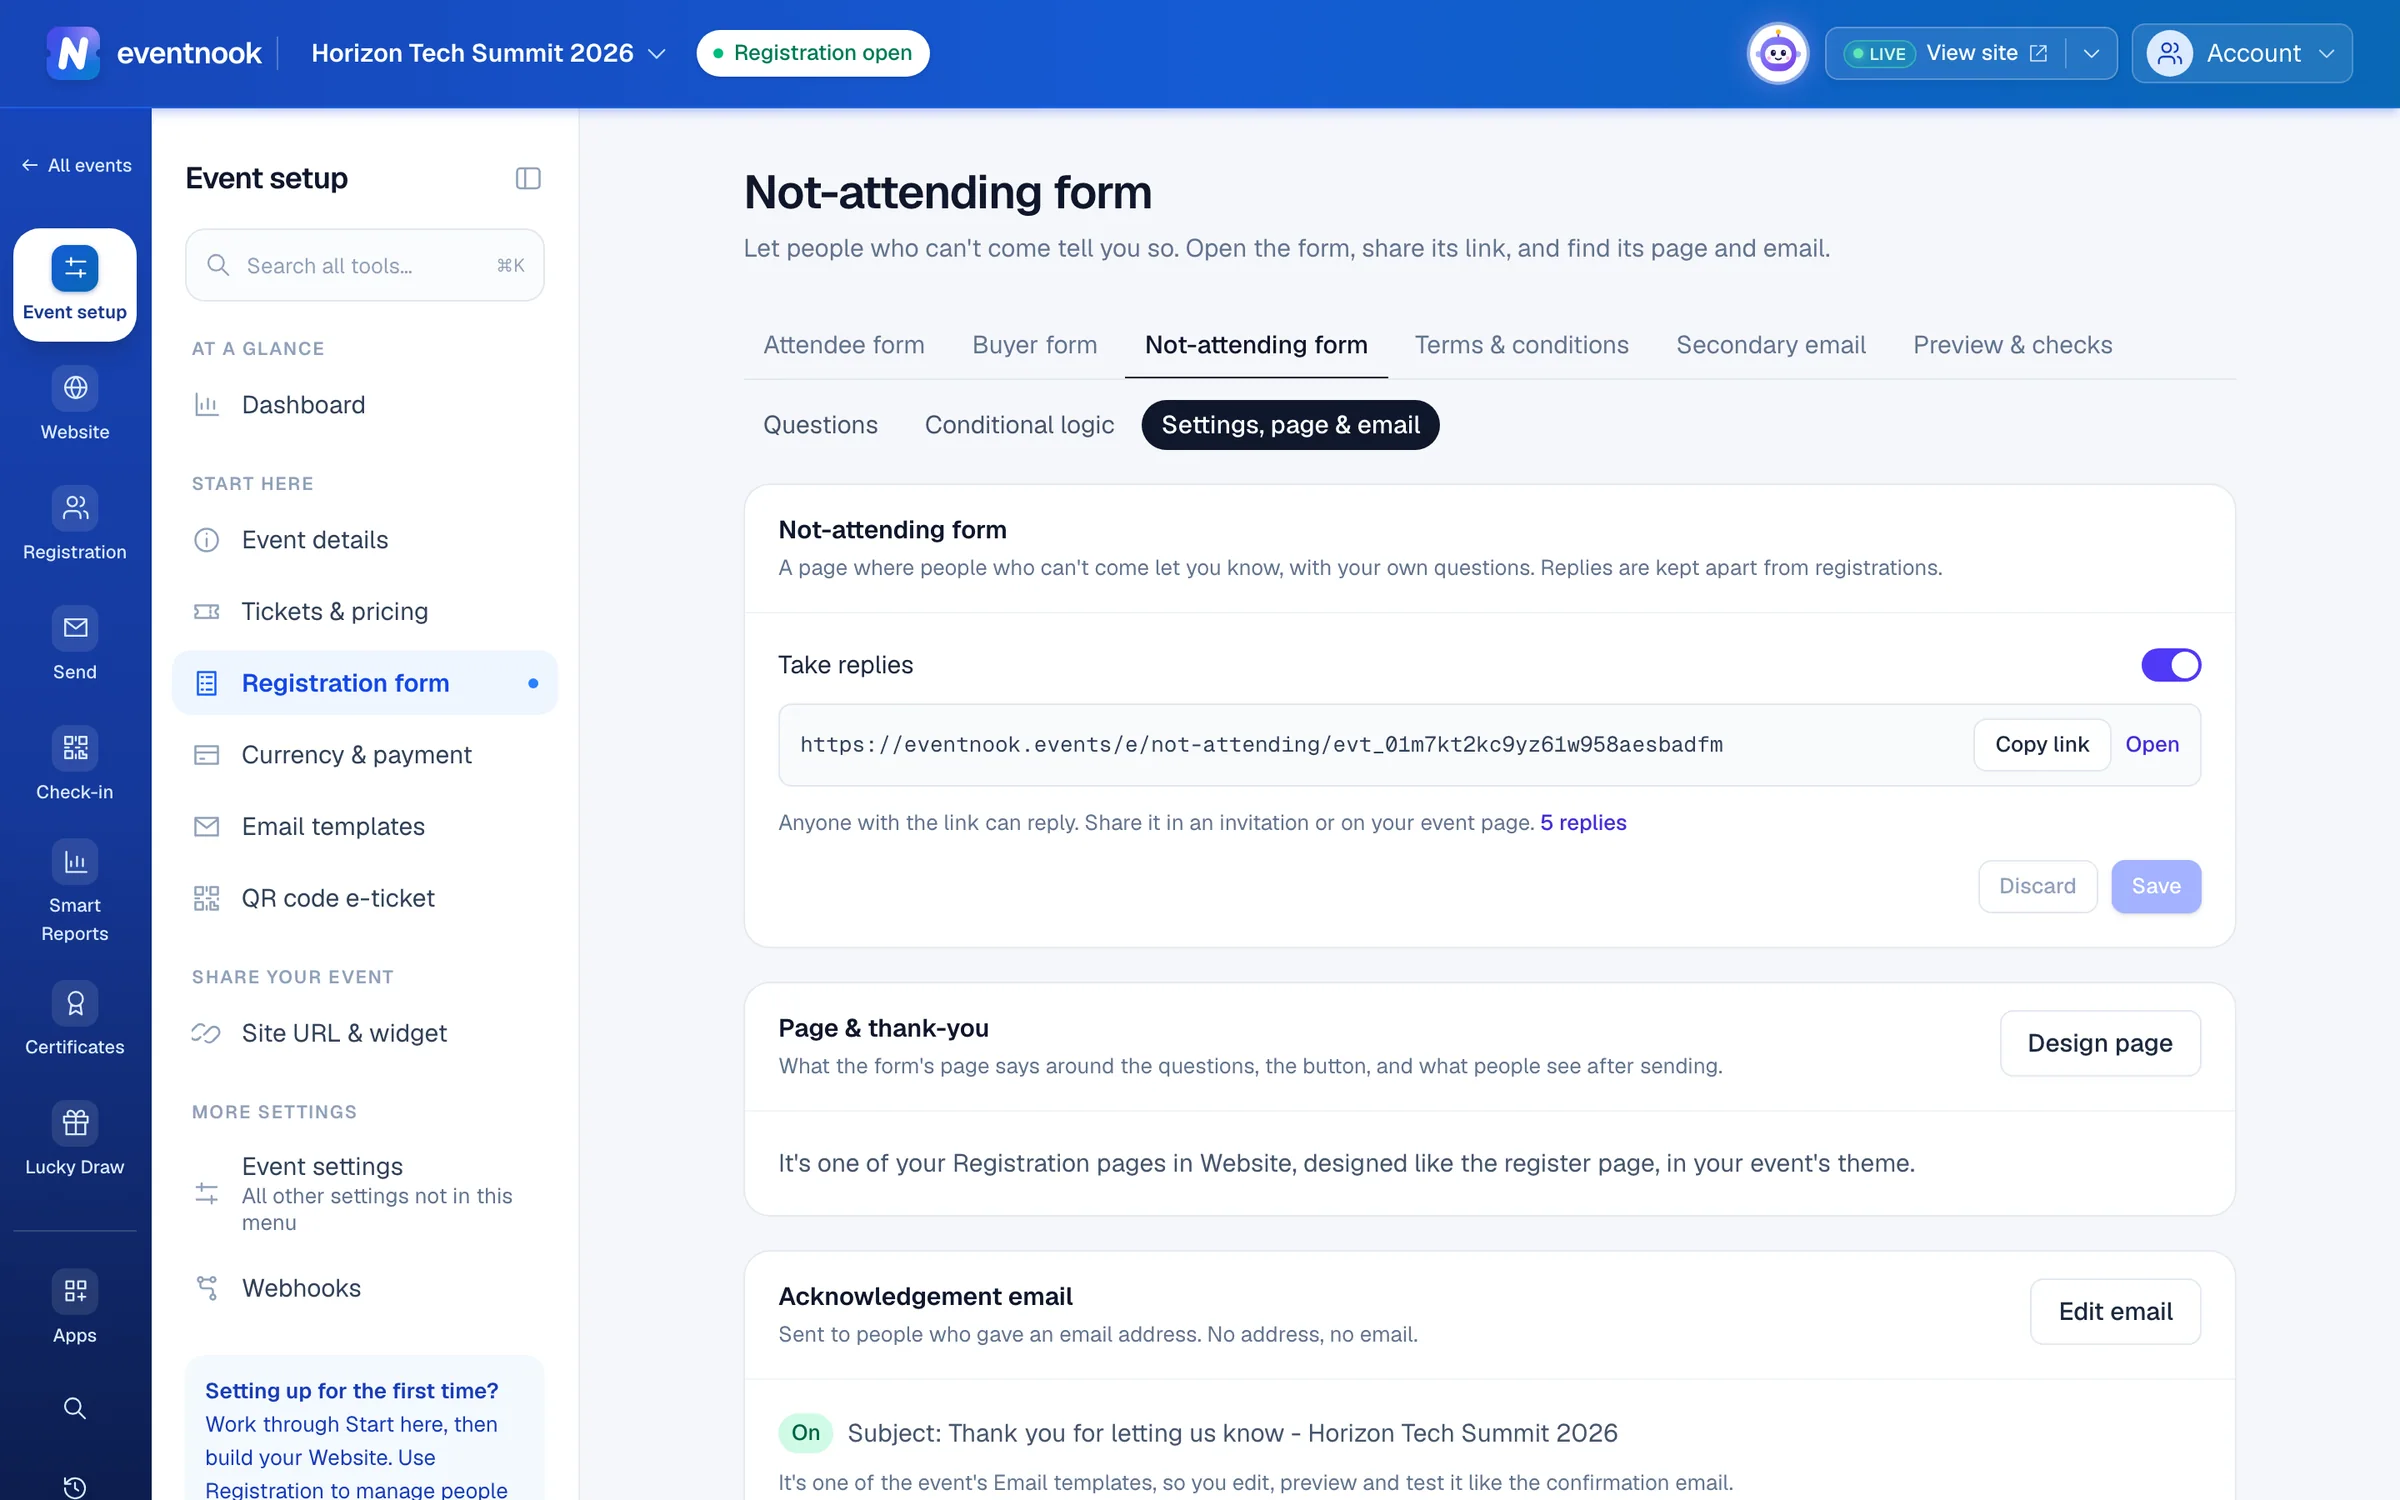
- 1Open or close the form
- 2The link to share in invitations
- 3Design the form's page and thank-you
- 4Write the acknowledgement email
While the form is closed, its page says it isn't taking replies. The link is made from the event's id, so renaming the event never breaks it. The same switch and link are at the top of the form's page in Website Builder, where turning it on or off saves at once.
Choose the questions#
The form is built in the same builder as the registration form, on a draft you publish. See Build the registration form for how the builder works.
A new form asks for Full Name (required), Email, Mobile Phone, Reason for not attending (a dropdown, required) and Message.
- Change the reasons: click Edit on Reason for not attending, change its options, click Apply to draft and publish.
- Ask something else: type it in Add custom field, pick its type, press
Enter, then publish. - Require an email: Email is optional on this form. Without one, nobody can be sent the acknowledgement. Edit Email, tick Required and publish.
File uploads and breakout sessions aren't offered here, and questions can't be limited to tickets, because a reply has none. Conditional logic in the form's menu works as it does on the registration form: see Show questions only when they apply.
Design the page and thank-you#
The form has a page of its own, drawn in your event's theme like the register page.
- On Settings, page & email, click Design page. Or open Website Builder › Not-attending page.
In Content, choose a part of the page under Your page, or click it on the page:
- Top bar: A link back, The event site's menu, or No bar.
- Above the form: your own words. It starts with the event's name, date and place.
- The form: the Button wording. The questions come from the form builder.
- After the form: anything else, such as how to reach you.
- After sending: the thank-you shown in place of the form once someone has sent it.
- Type on the page, pick a ready-made design, or describe what you want in the AI tab.
- Click Save changes. The page is live at once.
Use Show above the page to switch between The form and After sending. The page is designed the same way as the register page: see Design the register and thank-you pages for ready-made designs, AI and your own HTML.
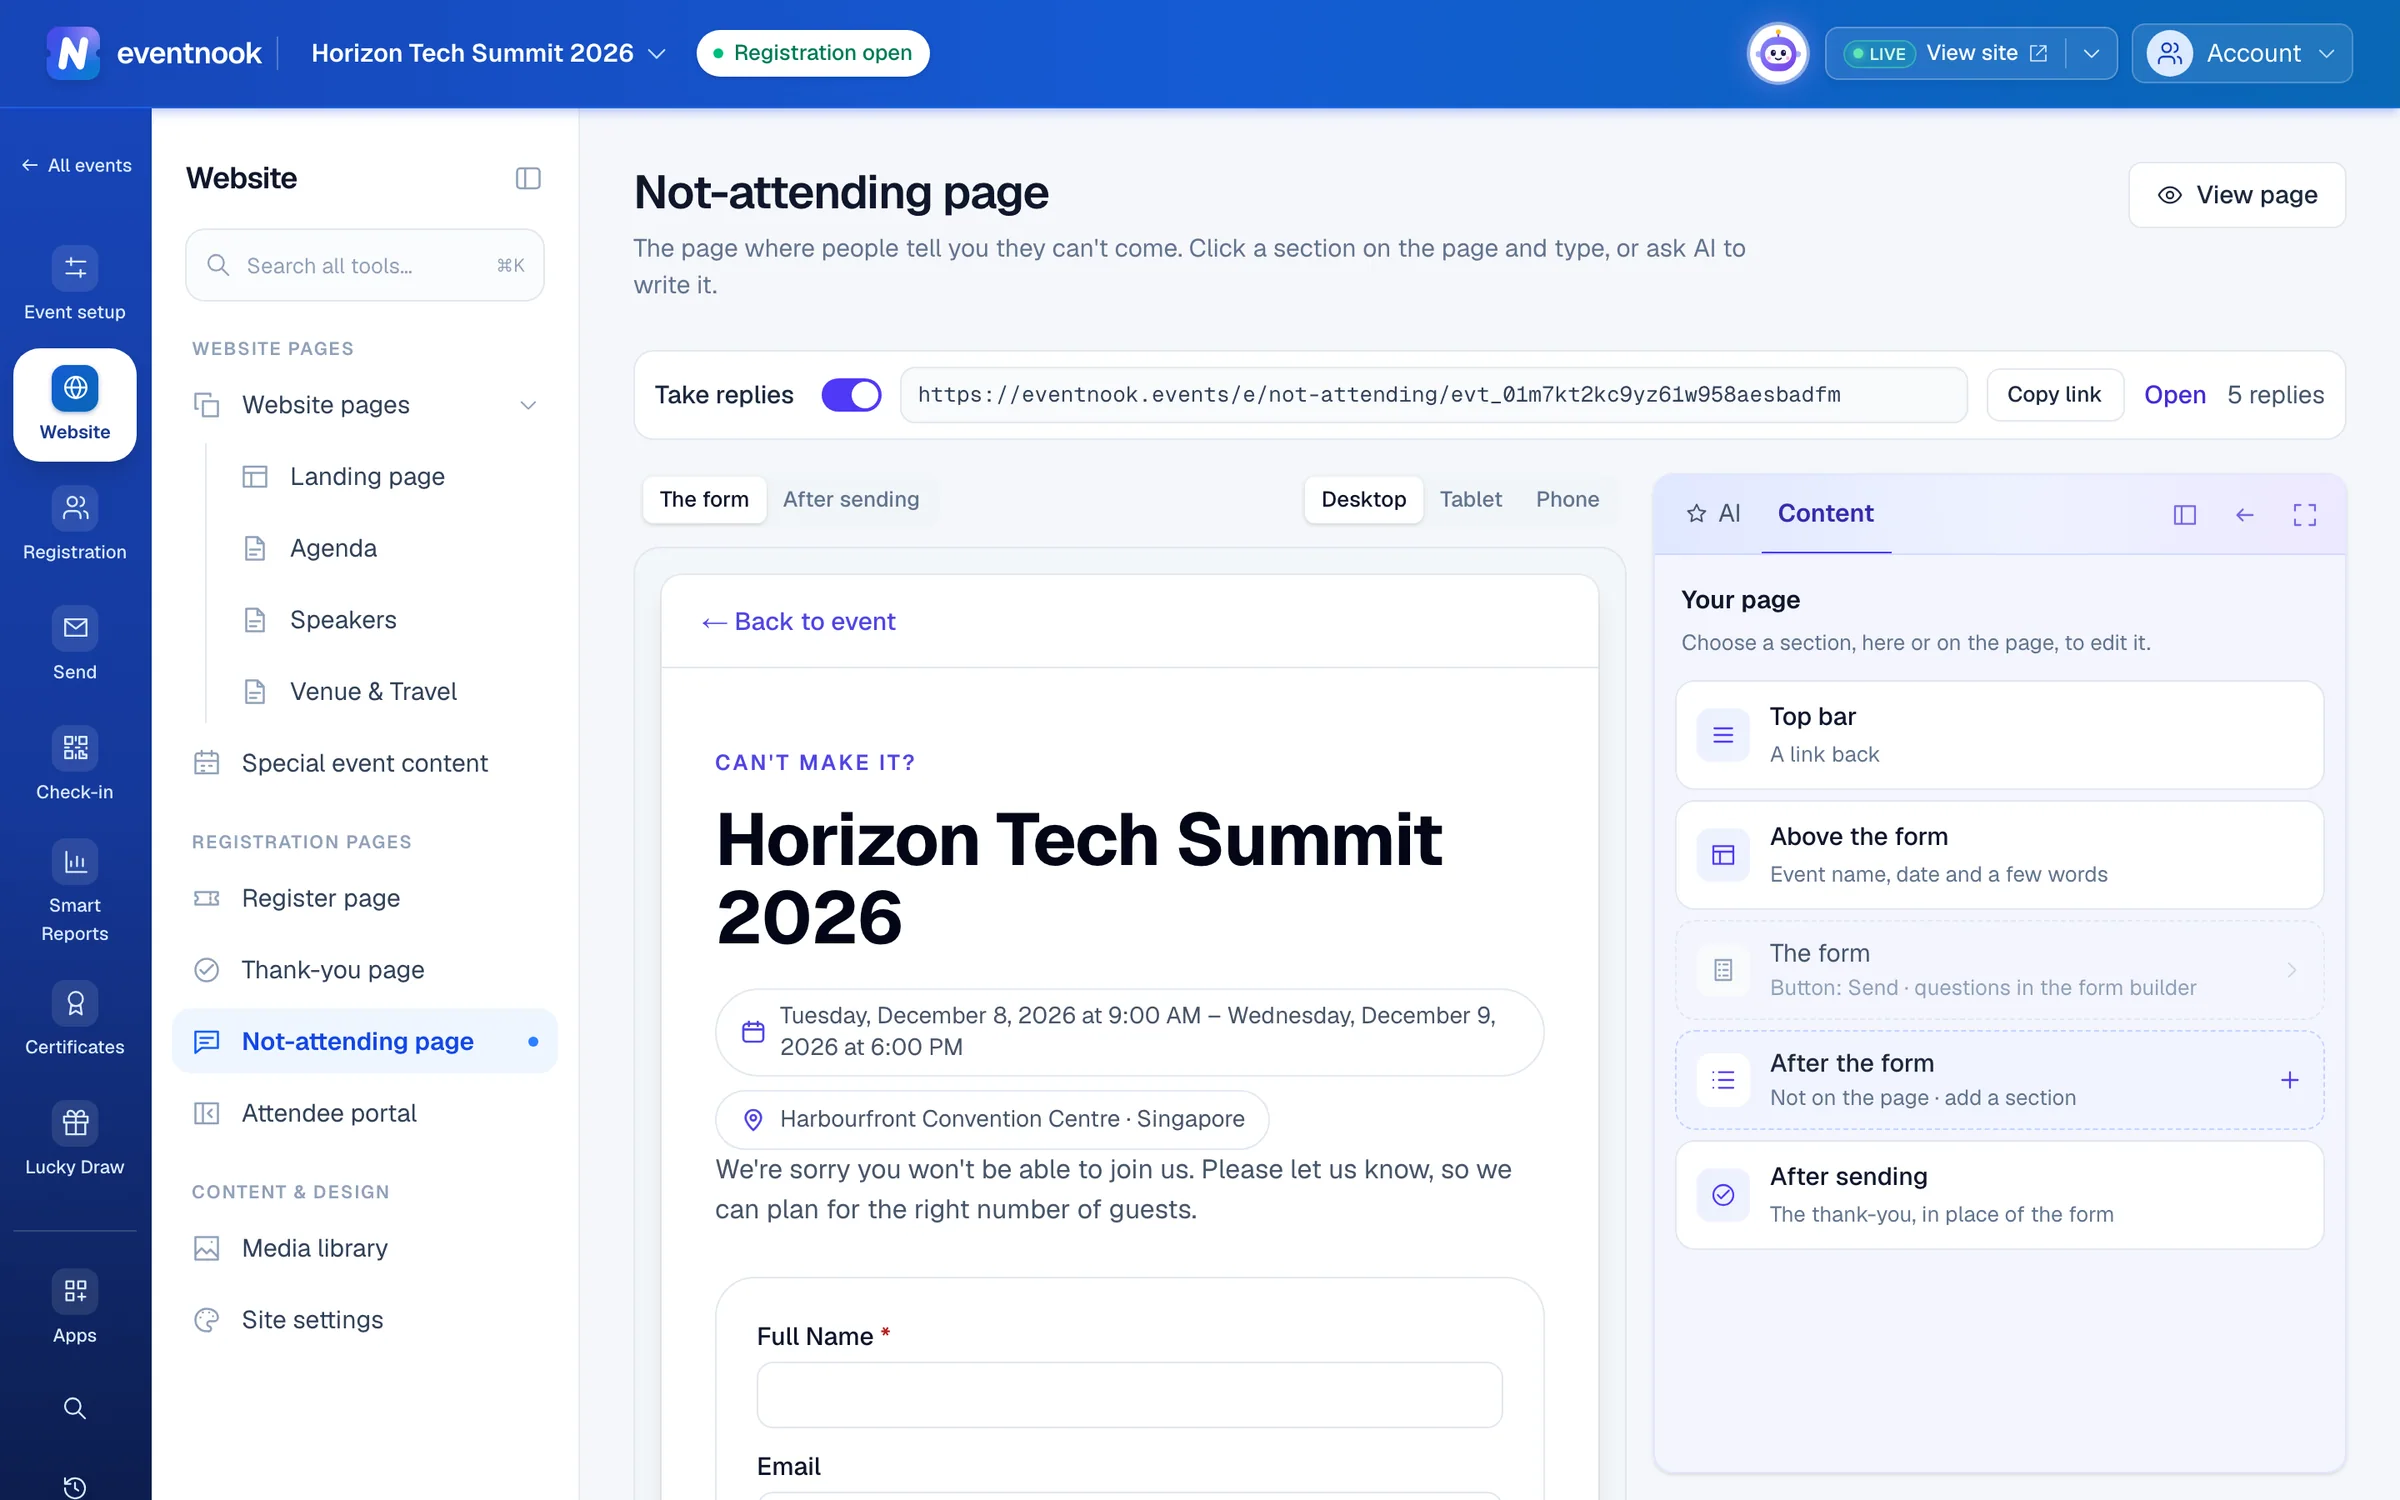
- 1The parts of the page, around the form
- 2Open the live page
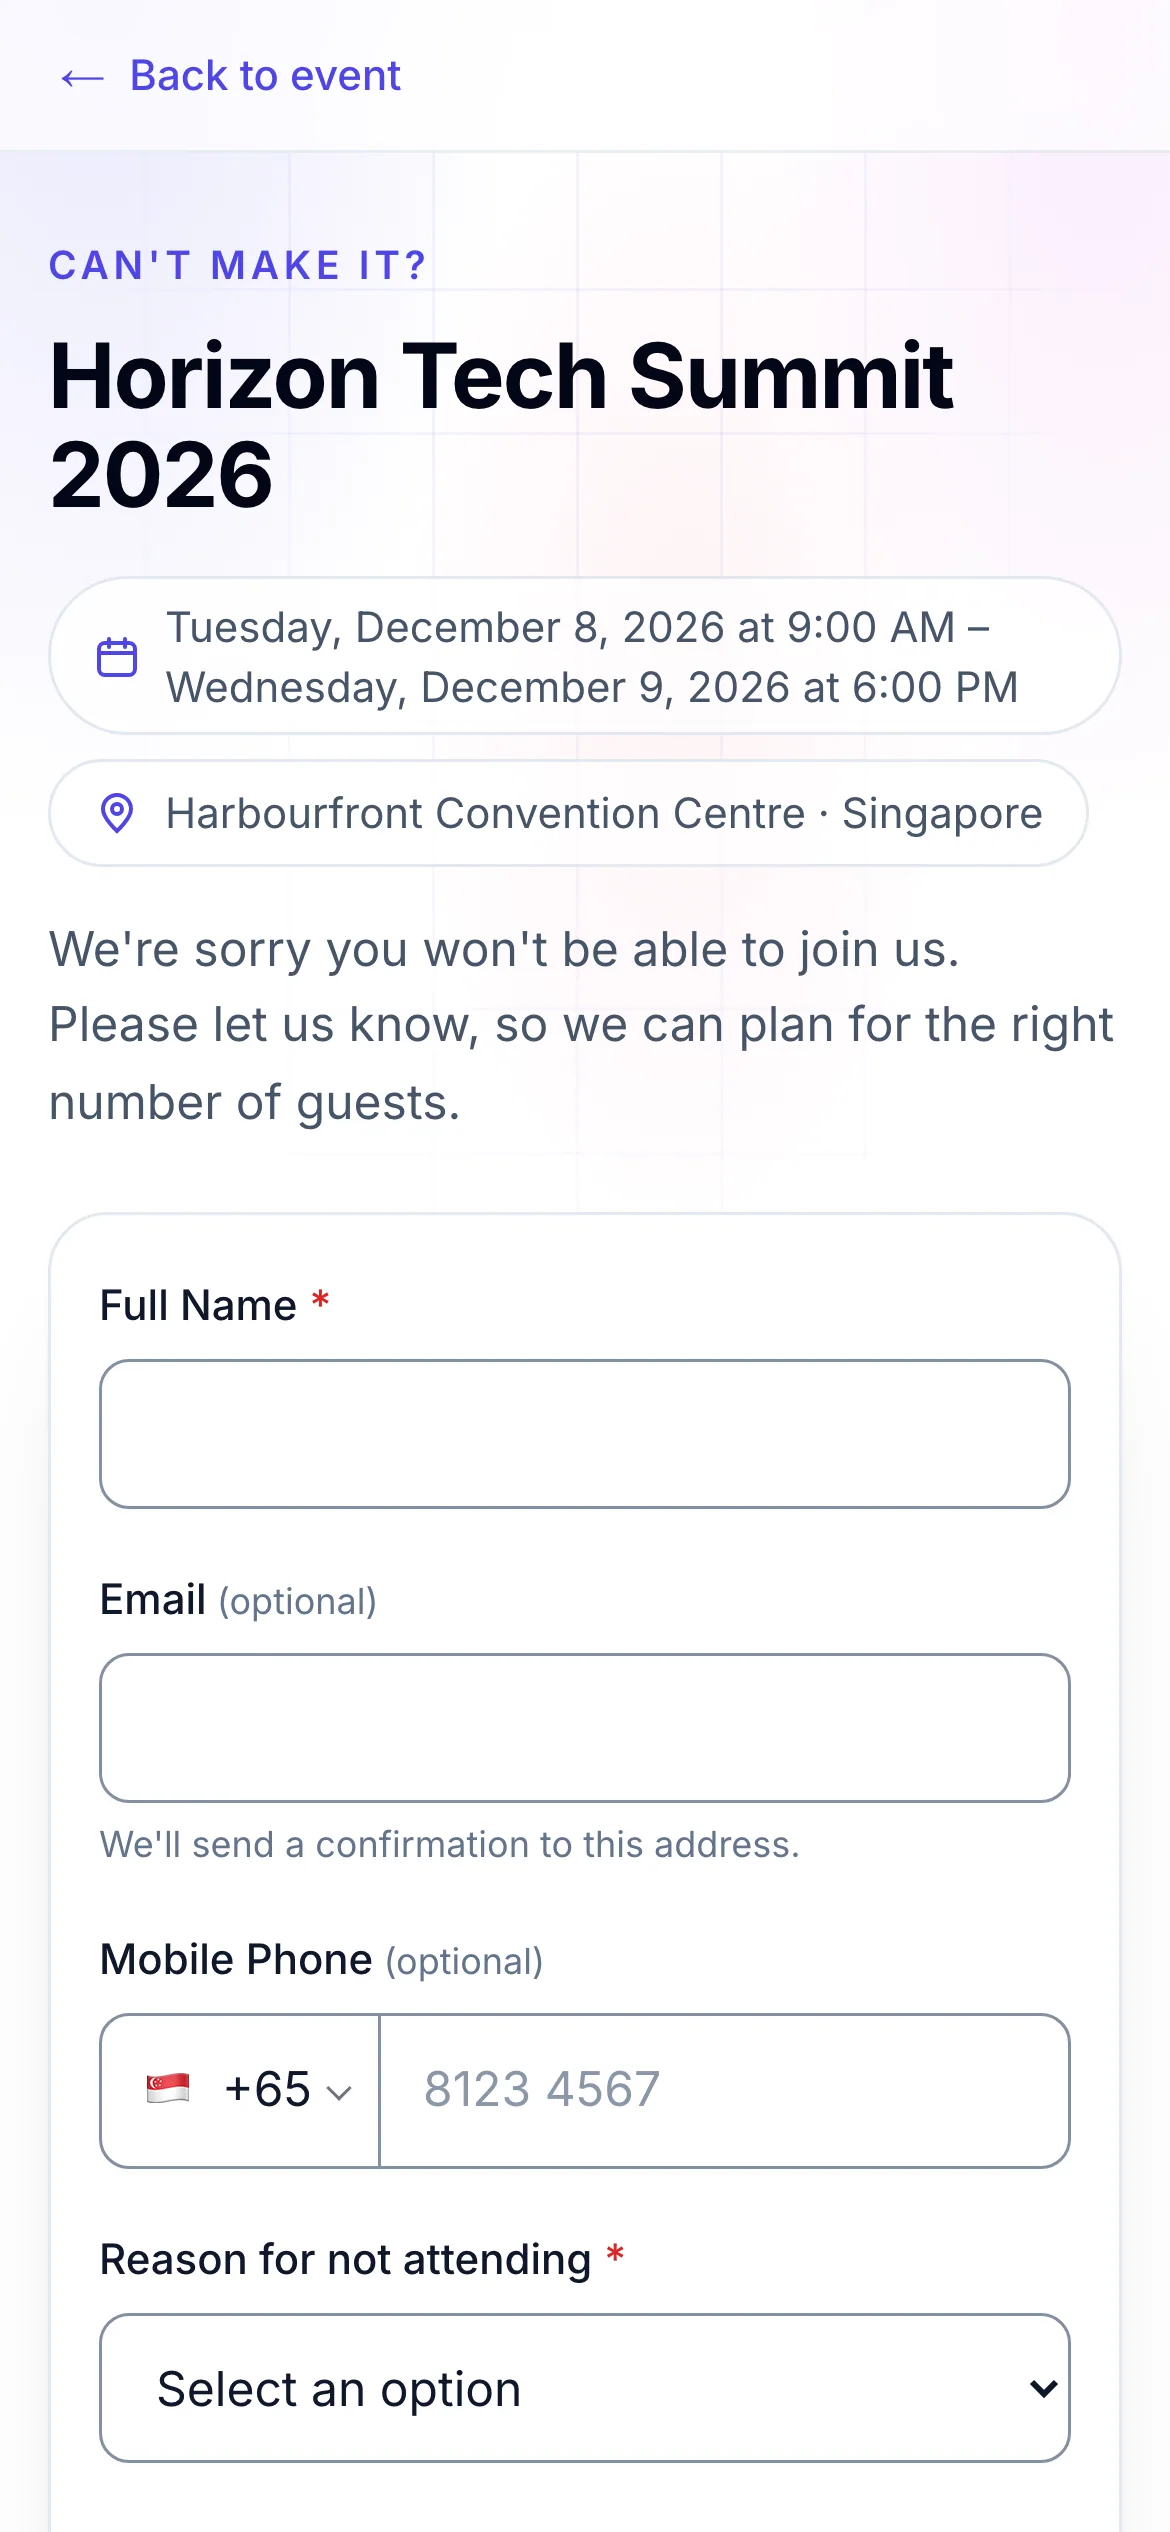
Write the acknowledgement email#
People who give an email address are sent the Not-attending acknowledgement, with a copy of their reply. It's one of the event's email templates.
- On Settings, page & email, click Edit email.
- Change what it says, preview it and send yourself a test, as you would the confirmation email. See Change the emails your event sends.
Its merge fields are the person's reply (their first name, reason, message and answers to your own questions) and the event's details. The card on Settings, page & email shows whether it's On or Off, and its subject.
Read the replies#
Open Report › Not attending. Replies are listed newest first.
- Reason chips at the top show All, then each reason with how many gave it. Click one to list only those.
- Search finds a name, email, mobile or company.
- Click a row to see every answer the person gave. A reply without an email says No email: no acknowledgement sent.
- Export CSV downloads the replies you're looking at, with a column per question.
- To remove replies, tick them and click Remove, then confirm. This can't be undone.
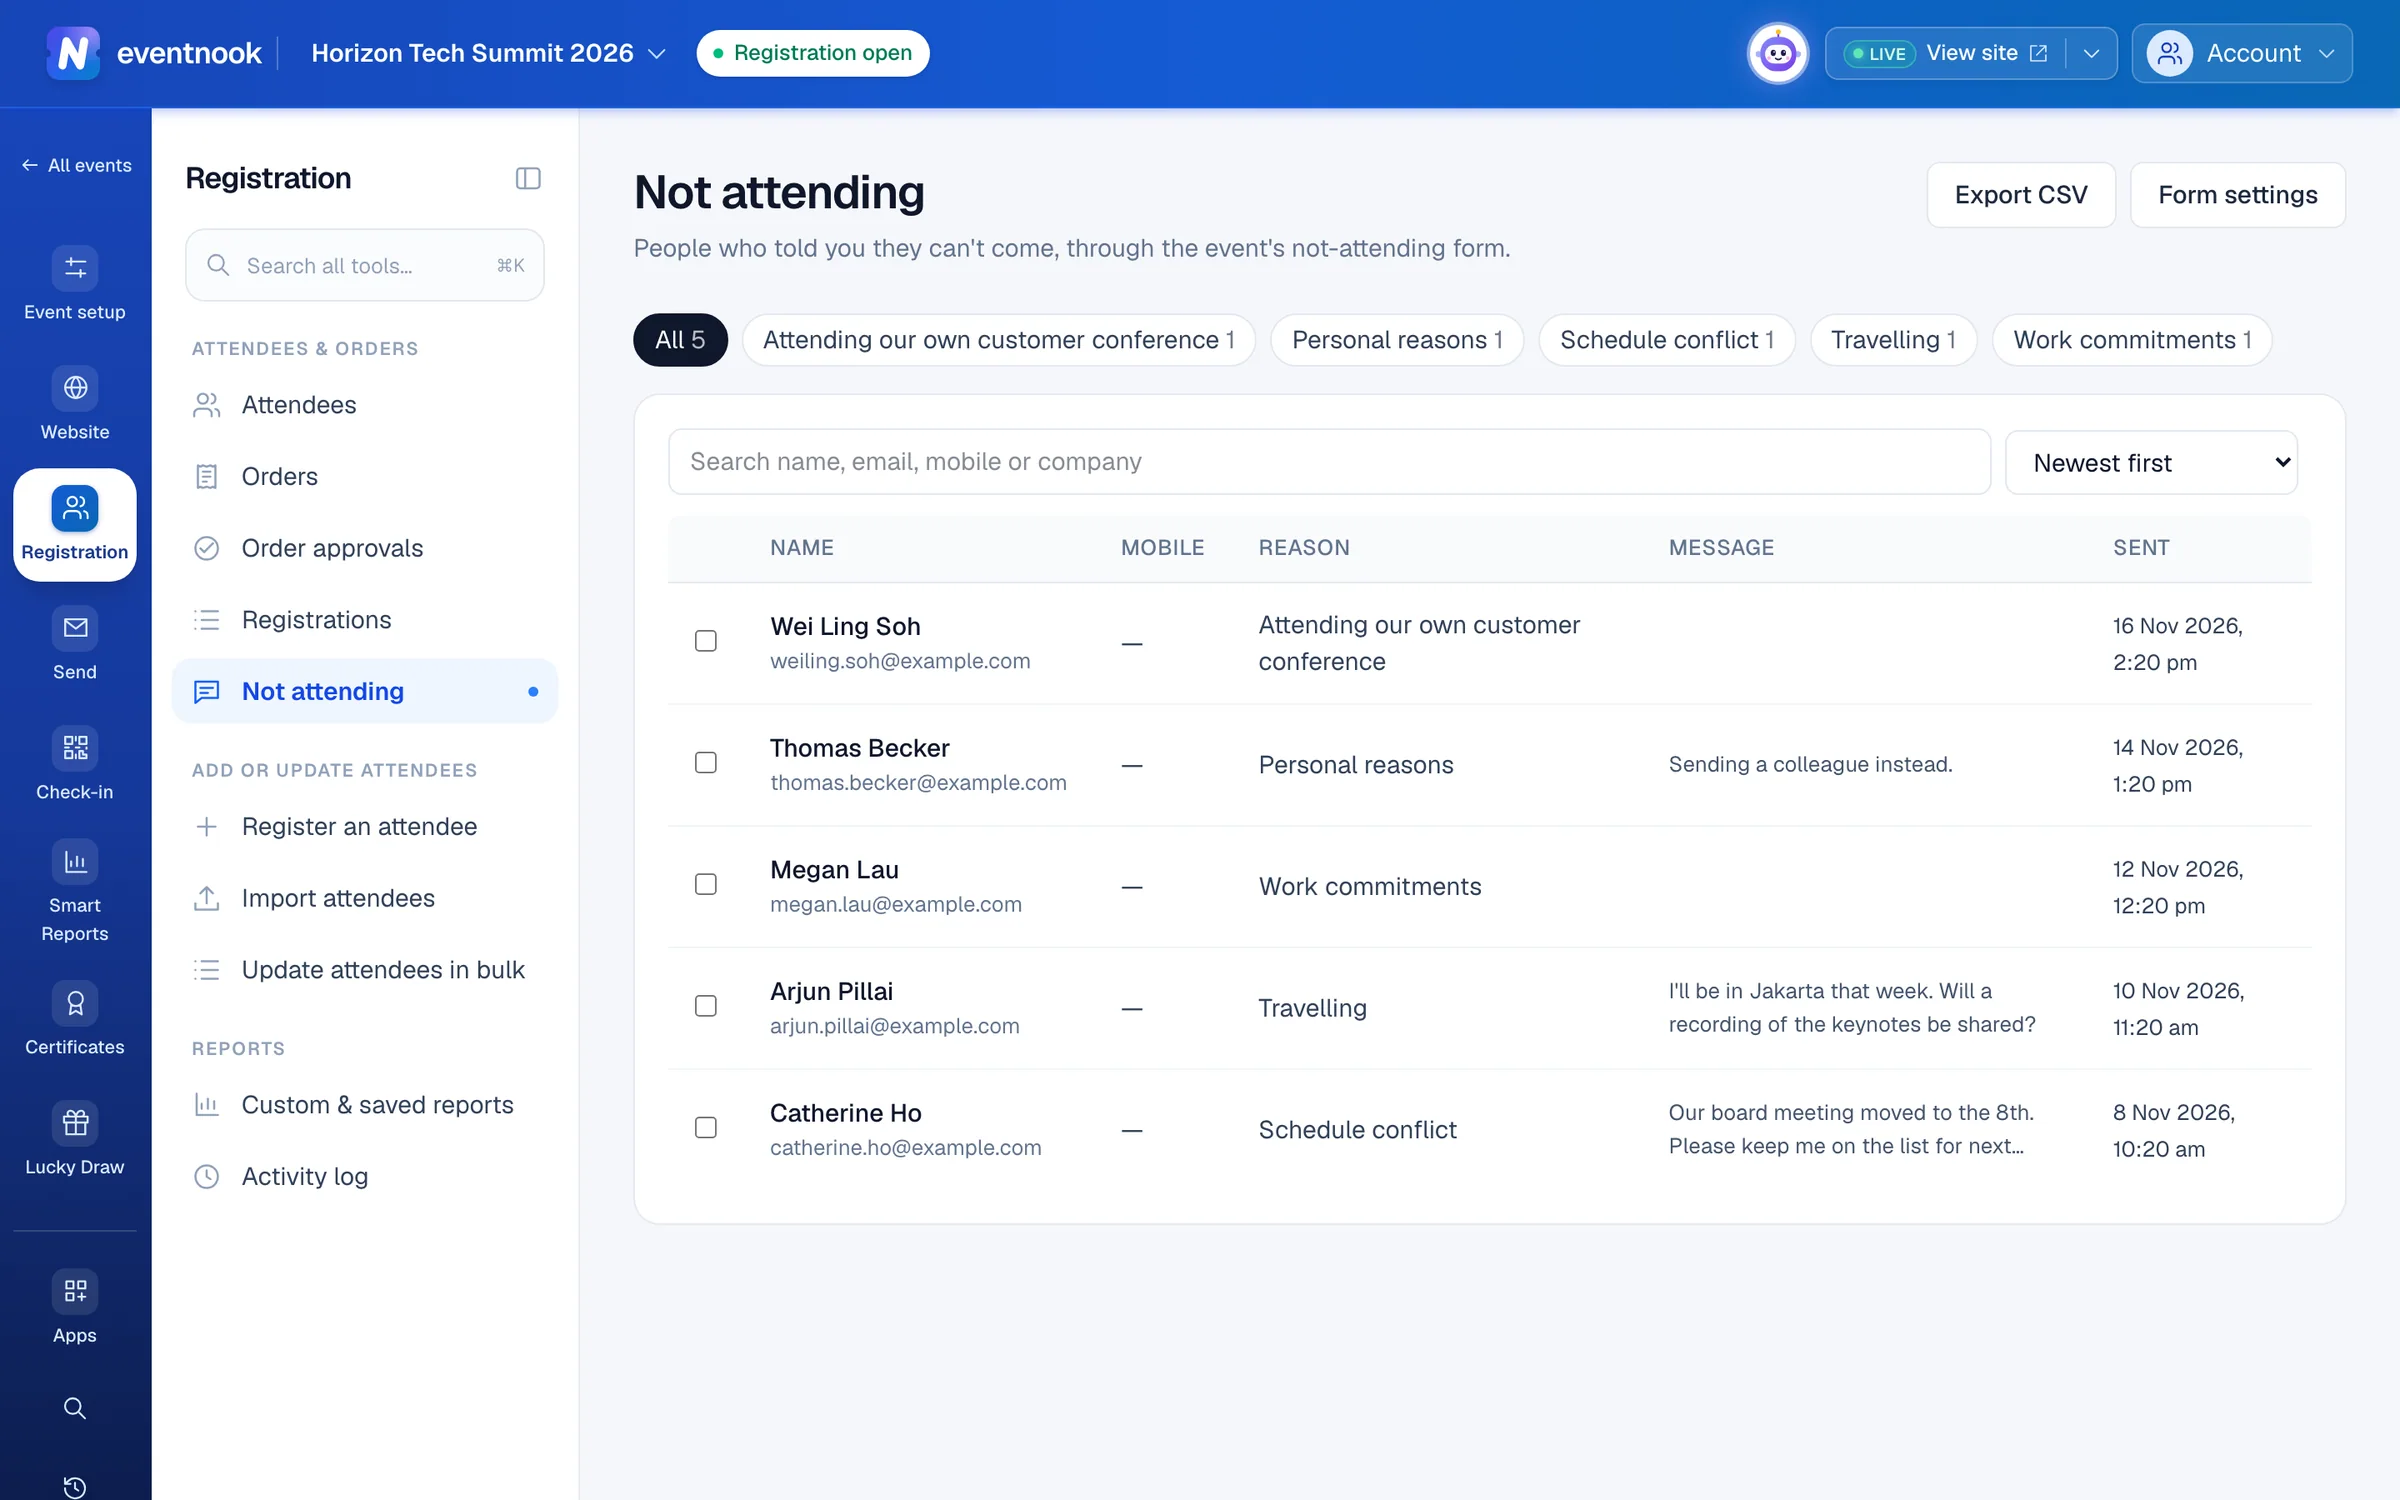
- 1How many gave each reason
- 2Download the replies
If something looks wrong#
- People say the form is closed. Turn on Take replies on Settings, page & email or at the top of the form's page.
- Publishing the questions says the form needs a name. Keep Full Name, or First Name and Last Name, required and visible.
- Someone replied but got no email. They left Email empty, the acknowledgement is off in Email templates, or their address bounced before.
- "Someone else changed this setting". Click Reload and make the change again.
- A reply is missing from the list. Click All and clear the search.
Who can do this#
Editors and event admins can open the form, change its questions, page and email. Everyone who can see attendees can read the replies. Removing replies needs permission to delete attendees, which event admins have. Export CSV needs permission to export personal data.
Related guides
- Build the registration formChoose the questions attendees and buyers answer when they register, set each one up, ask some only for certain tickets, and publish the form.
- Design the register and thank-you pagesWrite what stands around your tickets on the register page, and what people see right after they register, by typing on the page, picking a ready-made design or asking AI.
- Change the emails your event sendsWrite the confirmation and other emails your event sends by itself, turn them on or off, choose who gets copies and check whether an email arrived.
- Tell the organiser you can't attendUse the organiser's "Can't make it?" form to say you won't be coming, and why, in a minute.
Still stuck? In EventNook, ask HeyNook. It knows the page you're on and your event, and can take you straight to the right setting.