Share your event's links and embed the registration widget
Change the event's web address, copy its links and QR codes, put the registration widget on your own website, and make private, pre-filled and custom-domain links.
Where to find it: Event admin › Event setup › Share your event › Site URL & widget
Site URL & widget holds every way people reach your event: its web address, the links and QR codes to share, the registration widget for your own website, private links for a group, and your own domain.
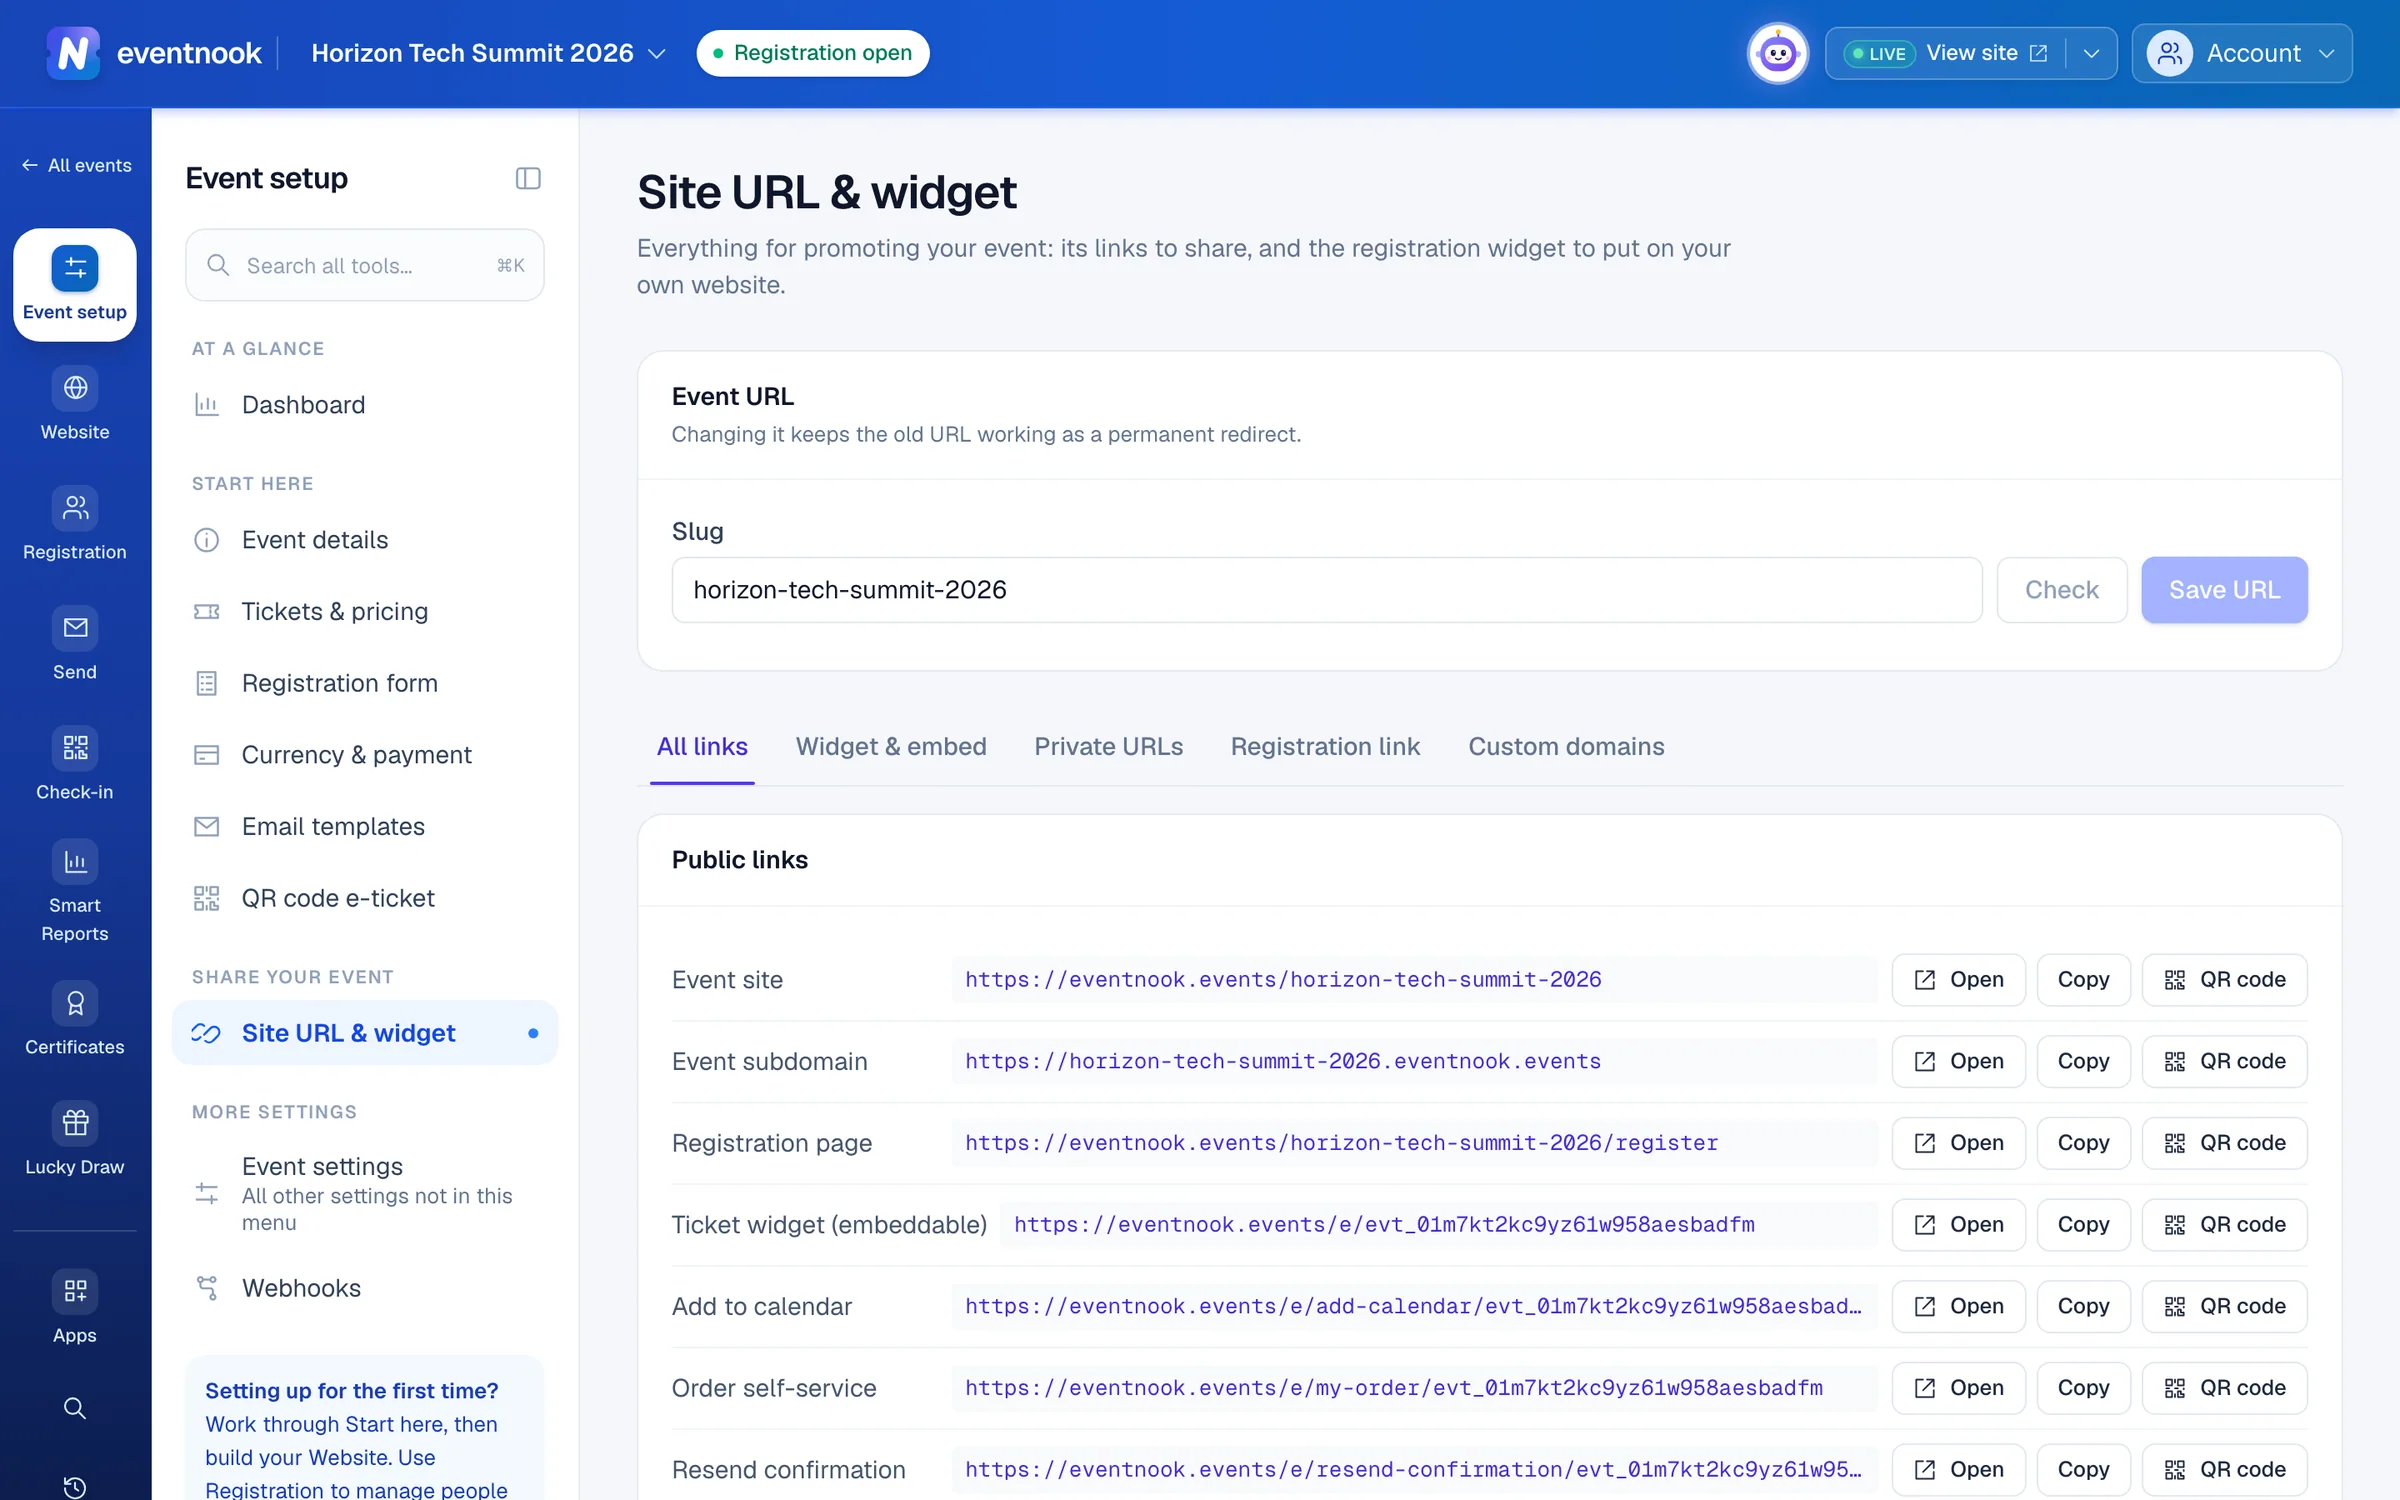
- 1The part of the address that names your event
- 2See whether a new address is free before you save it
- 3Links, the widget, private URLs, pre-filled links and your own domains
- 4A QR code for any link, to download for print or a slide
Change the event address#
The Slug is the part of the event site's address that names your event. Changing it keeps the old address working as a permanent redirect, so printed links and QR codes still open the event.
- Open Site URL & widget and type the new Slug.
- Click Check. It says Available., or why the address can't be used.
- Click Save URL.
A slug uses 8 to 100 characters: lowercase letters, digits and hyphens. Underscores and spaces are not allowed. Some words are used by the site's own pages, so Check says This word is reserved. An event that already has a shorter slug keeps it; the rule applies when you change it.
Share a link or a QR code#
All links lists the event's public links: the Event site and its Event subdomain, the Registration page, Add to calendar, Order self-service, Resend confirmation, Ticket widget (embeddable), and each of your own domains once it is verified.
- Click a link, or Open, to open it in a new tab.
- Click Copy to copy it.
- Click QR code to show it large. Click Download SVG for print (it stays sharp at any size) or Download PNG for a screen or slide.
Visitors can open the links once the event is live. For more on promoting the event, see Share your event.
Put the registration widget on your website#
The widget is the ticket list and registration form, framed inside a page of your own website. Its look is set once for the event; then you make a saved widget for each website it goes on.
Choose how the widget looks#
- Open the Widget & embed tab. Look & behaviour opens, with a live preview beside it.
- Under Selection mode, choose how buyers pick tickets.
- Under Display options and Code boxes, turn on what buyers should see.
- Click Save changes in the bar at the bottom. The bar counts unsaved changes on both sections.
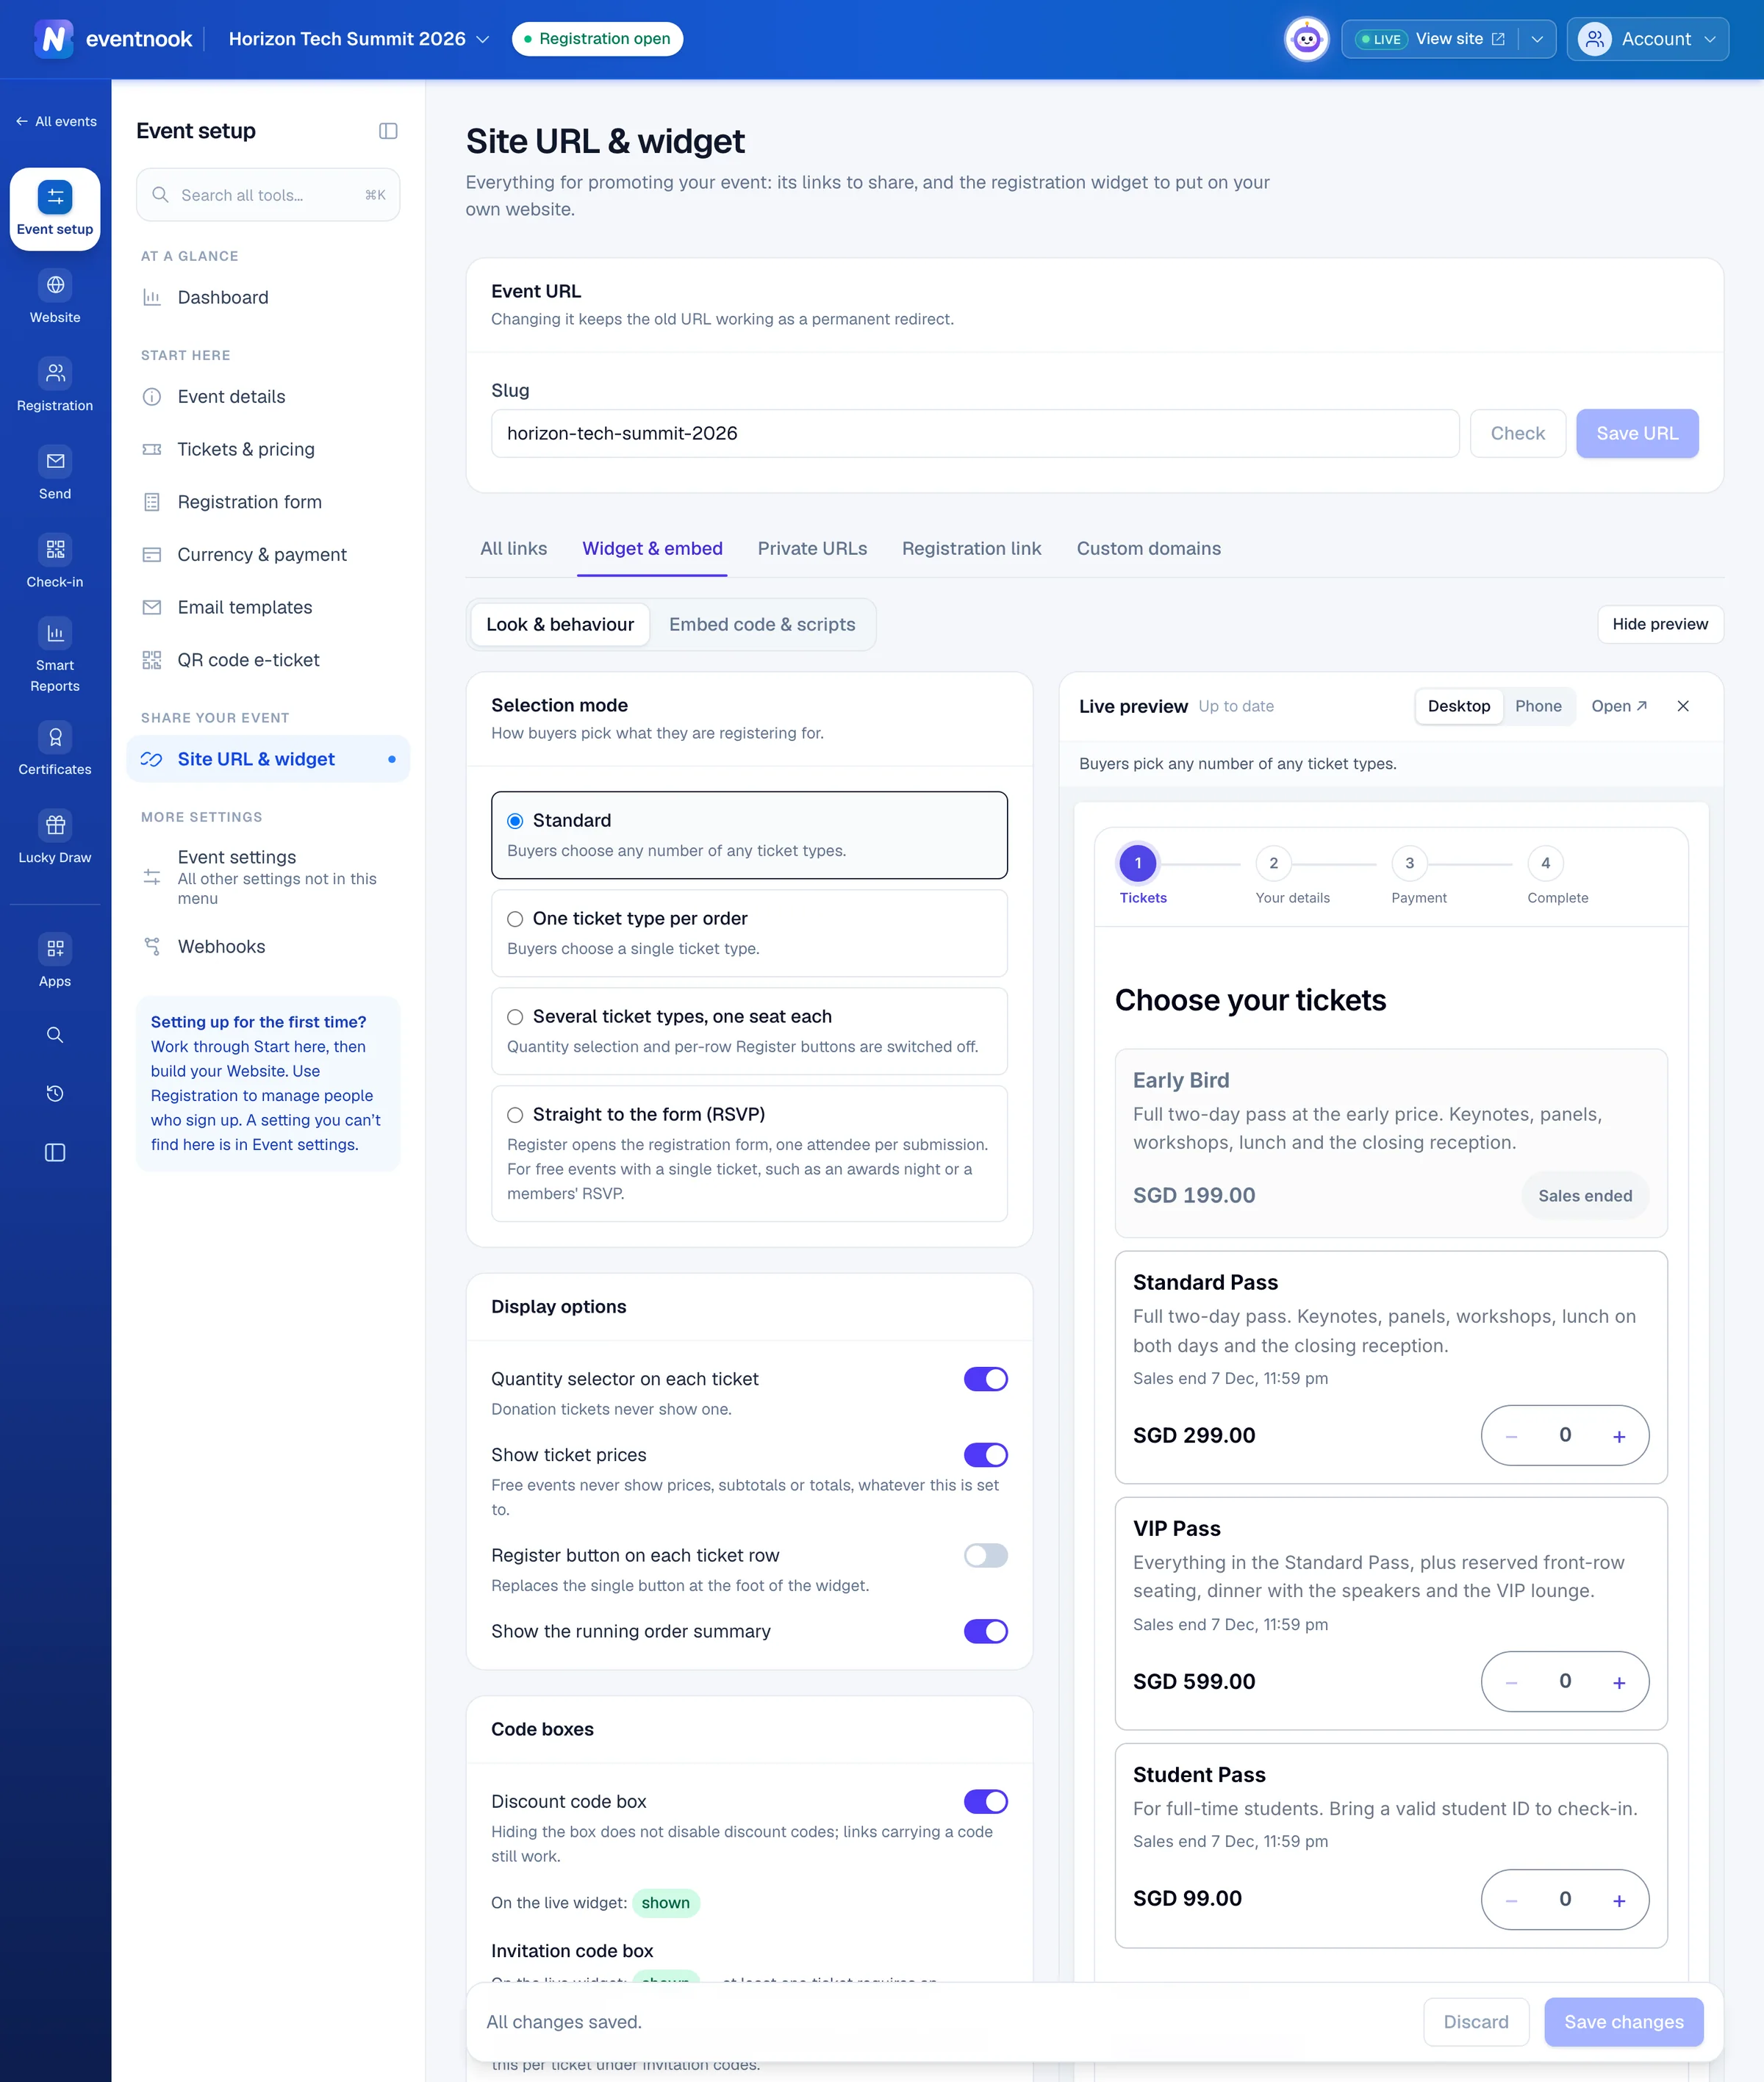
- 1How buyers pick tickets in the widget
- 2Prices, quantities, buttons and the order summary
- 3Your unsaved changes, as buyers will see them
- 4The code to paste on your website
| Selection mode | What buyers do |
|---|---|
| Standard | Choose any number of any ticket types. The default. |
| One ticket type per order | Choose a single ticket type. |
| Several ticket types, one seat each | Tick ticket types, one place each. The quantity selector and row buttons are off. |
| Straight to the form (RSVP) | Register opens the registration form, one attendee per submission. For a free event with a single ticket. |
| Option | What it does |
|---|---|
| Quantity selector on each ticket | A number picker on each ticket. Donation tickets never show one. |
| Show ticket prices | Shows prices. A free event never shows prices or totals. |
| Register button on each ticket row | Replaces the single button at the foot of the widget. |
| Show the running order summary | The order summary beside the form. |
| Discount code box | Hiding the box doesn't switch discount codes off: links carrying a code still work. The box is also hidden while the event has no active discount codes or registration isn't open. |
The Invitation code box has no switch. It shows while any ticket requires an invitation code; see Invitation codes.
Get the code for a website#
- On Widget & embed, click Embed code & scripts.
- Under Embed on other websites, click New widget.
- Type a Name after the website it goes on, such as
Our websiteorSponsor site. - Under Tickets, keep All tickets on sale, or choose Only some and tick them.
- Optional: change the Selection mode, the display switches, Width and Height. Anything left on As the event follows Look & behaviour.
- Click Create widget. Its code opens below it.
- Click Copy code and paste it into your website's page.
Make one widget per website. Changing a widget later changes it everywhere its code is pasted, with no new code. An event can have up to 50 widgets.
| Setting | What it does |
|---|---|
| Width | Pixels (800) or a percentage (100%). |
| Height (pixels) | 100 to 10,000. |
| Resize the frame to fit the widget | The frame grows and shrinks with the widget, starting at the height you set. If your website builder removes scripts from pasted code, click Code without a script instead: the frame keeps the height you set. |
Then, under Websites allowed to embed the widget, type your website's domain, one per line (example.com or *.example.com), and click Save changes. Leave it empty to allow only the event's own site and custom domain.
Below the widgets, Public links has the event's links with Copy and QR code, and Registration form link per ticket: a link that opens straight on one ticket's form, with no ticket step. A ticket's page has the code to embed its form.
Add a tracking script to the widget#
Widget tracking scripts loads a conversion tag on the ticket-selection step. Enter a Header script URL or Footer script URL (https only; raw HTML or JavaScript is not accepted). A new URL is sent for review and doesn't run until EventNook approves it. For analytics across the event site, use Analytics & Tracking instead; see Registration settings.
Give a group its own link#
A private URL opens registration showing only the tickets you choose, one or several. Use it for VIP guests, speakers or a partner.
- Open the Private URLs tab and click New private URL.
- Type a Name for yourself, such as
VIP guests. The URL code fills in from it; change it if you like. - Tick the tickets the link shows. Under Hidden tickets, tick a hidden ticket to show it through this URL and nowhere public.
- Click Create private URL, then copy the link or its QR code from the list.
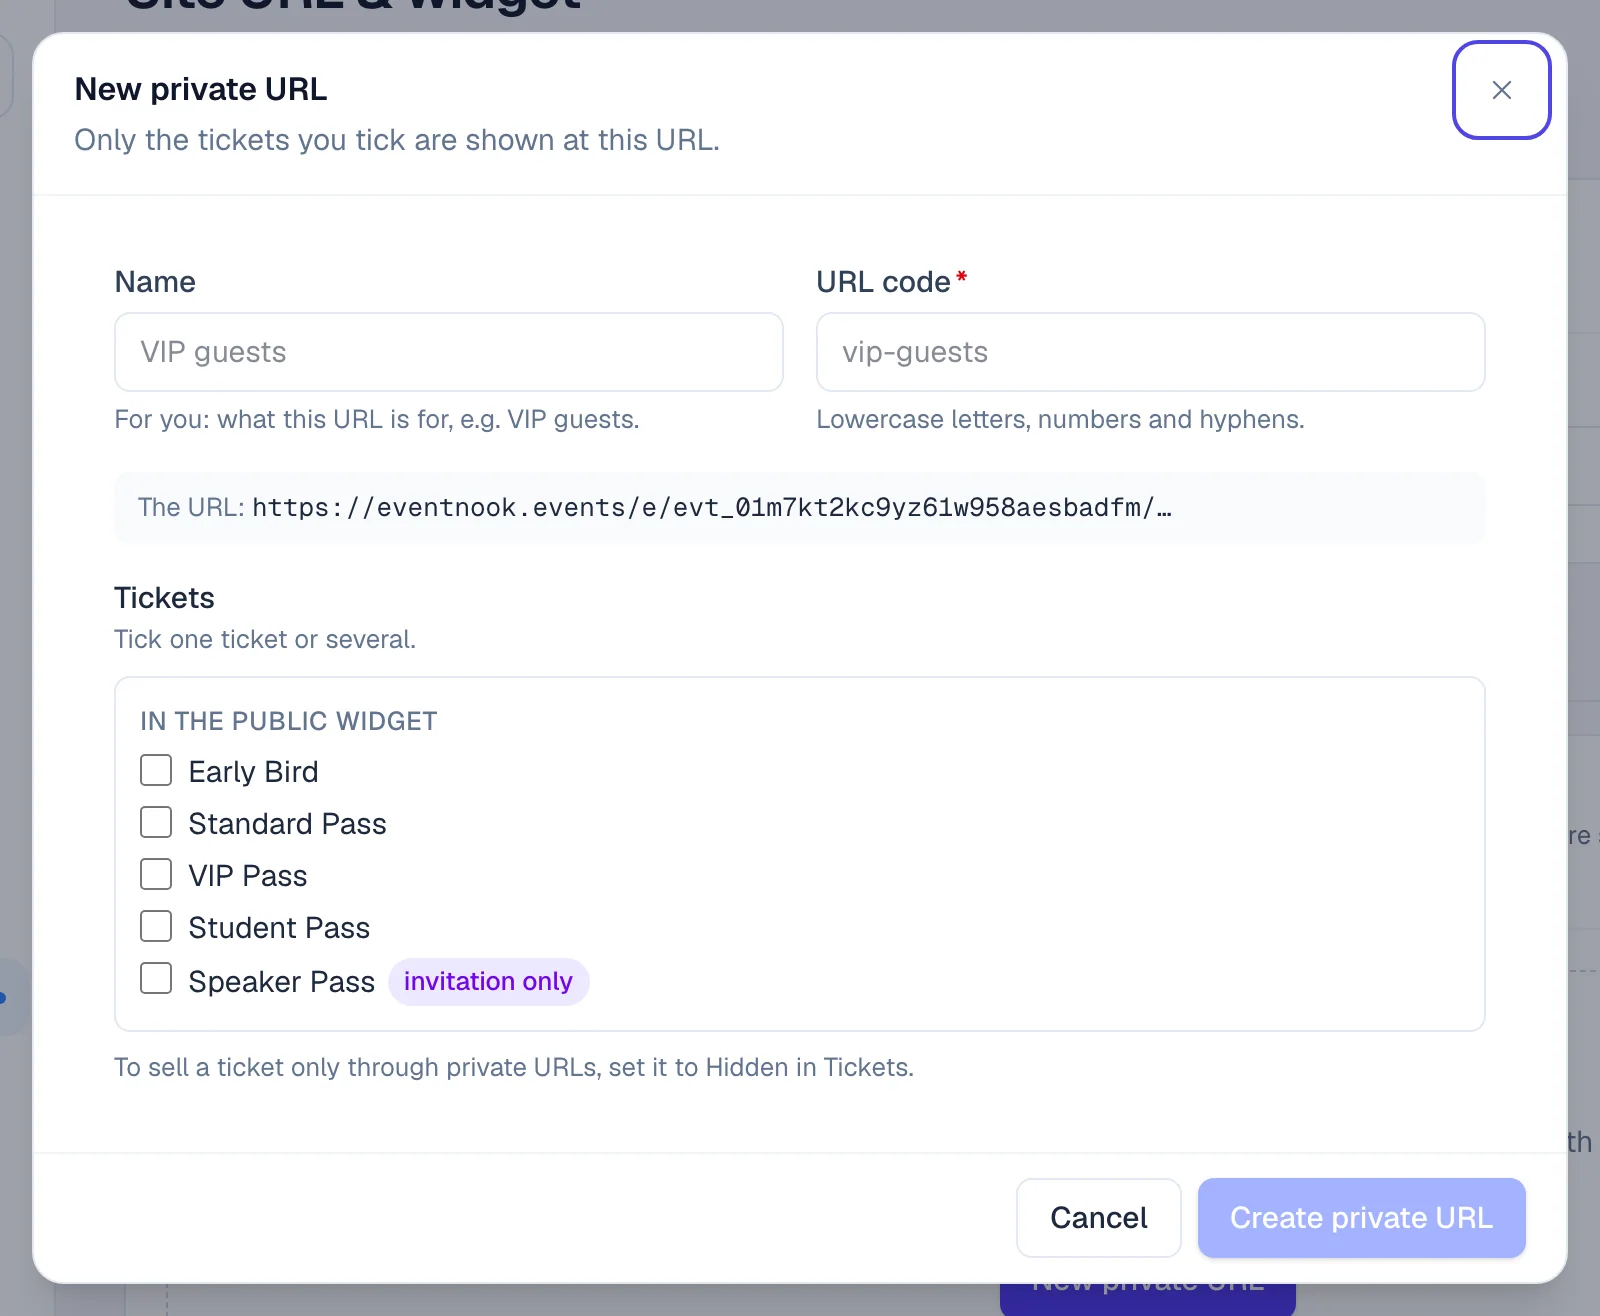
- 1For you, such as VIP guests
- 2The tickets this URL shows
To sell a ticket only through private URLs, set it to hidden in Tickets & pricing, then add it to the private URLs that should show it.
Changing a link's URL code or deleting the link stops the old address working at once for anyone who has it.
Make a link with a discount code#
- Open the Registration link tab.
- Type the Discount code.
- Optional: choose a ticket under Pre-select ticket, and type a Source tag such as
newsletterto see where buyers came from. - Click Generate link and copy it.
Generating a link uses no code. The code is checked now and again at checkout, so the link never gets round the code's rules.
Use your own domain#
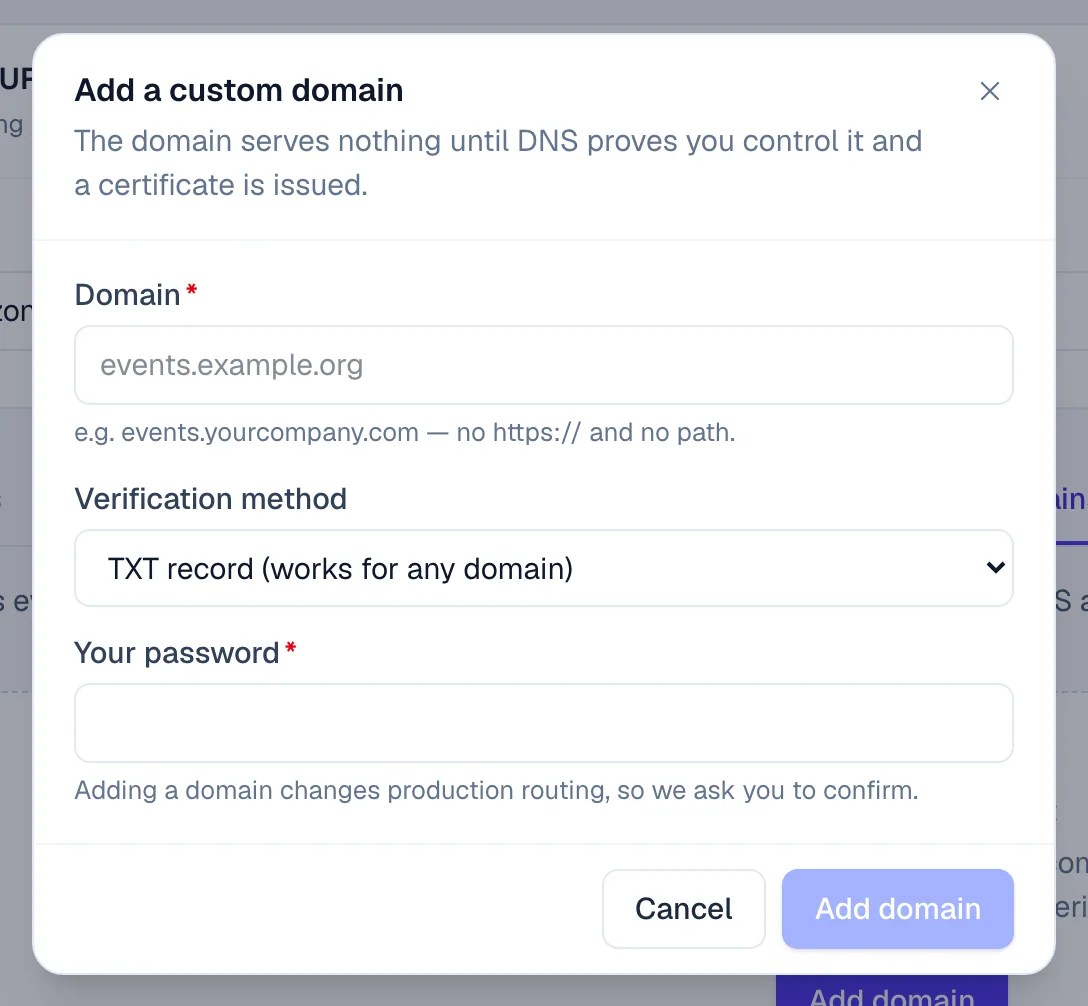
You can serve the event site from your own address, such as events.yourcompany.com. The domain serves nothing until your DNS proves you control it and a certificate has been issued; certificates are issued automatically.
- Open the Custom domains tab and click Add domain.
- Type the Domain, without
https://and without a path. - Choose the Verification method: TXT record (works for any domain) or CNAME record (subdomains).
- Type Your password and click Add domain. The DNS records to create open.
- Create those records at your DNS provider, then click Verify now on the domain's row.
- When the status is active, click Make primary if links should use this domain.
Each domain's row shows its Status, Certificate and Last check. Redirects has Other hosts → primary and Apex → www. DNS records shows what to create and what your DNS answers now (Observed); Diagnose runs each check and says how to fix one that fails.
- Disable stops the domain serving but keeps its verification, so Enable brings it back.
- Remove keeps the domain redirecting to your primary host for 30 days, so existing links and QR codes keep working. Then the name is released.
Both ask you to type the domain name and your password.
Custom domains depend on your plan. If Add domain says the feature isn't included in your plan, contact EventNook.
If something looks wrong#
- Check says the address is already taken or reserved. Choose another slug, for example with the year added.
- Check says it isn't a valid event URL. It's shorter than 8 characters, or has an underscore, a space or another character that isn't allowed.
- The pasted widget doesn't show on your website. Add your website's domain under Websites allowed to embed the widget and click Save changes.
- A ticket doesn't appear in a saved widget. Widgets never show hidden tickets; only a private URL does. A ticket hidden or archived after you chose it leaves the widget.
- A private URL shows no tickets. Its tickets were archived or deleted. Edit it and choose others.
- Generate link refuses the discount code. The code is unknown, inactive, outside its dates or used up. Fix it in Discount codes.
- A domain stays on pending verification. Open DNS records and compare Observed with what you set. DNS changes can take a while to appear.
- A domain is verified but not serving. The certificate isn't issued yet. Check the records, then click Retry certificate.
- A domain shows verification lost. The verification record disappeared from your DNS. The domain keeps serving for 72 hours; put the record back before then.
Who can do this#
Everyone with access to the event can copy links, QR codes and widget code, and generate registration links. Changing the address needs the Event Editor role or above, and so do private URLs and the widget's look and saved widgets. Tracking scripts and custom domains need the Event Admin role, or Owner or Admin of the organisation; adding, disabling and removing a domain also ask for your password.
Related guides
- Share your eventChoose the right link for each place you promote your event, print its QR code, put registration on your website and point registrants to their own pages.
- Create tickets and set pricesAdd the tickets people choose when they register, set their prices and limits, and stop selling one when you need to.
- Offer discount codesCreate codes that lower ticket prices, limit how often and when they work, and see how much discount each one gave.
- Invite guests with invitation codesMake tickets invitation-only, give each guest a code or a personal link, import a guest list and see who has registered.
Still stuck? In EventNook, ask HeyNook. It knows the page you're on and your event, and can take you straight to the right setting.