Change the emails your event sends
Write the confirmation and other emails your event sends by itself, turn them on or off, choose who gets copies and check whether an email arrived.
Where to find it: Event admin › Event setup › Start here › Email templates
Your event sends some emails by itself: the order confirmation with the tickets, an acknowledgement while an order waits for payment or approval, cancellations, rejections and verification codes. Each one is ready to use. Change what it says when you want your own words, design or attachments.
Open Setting › Essential Setup › Email templates.
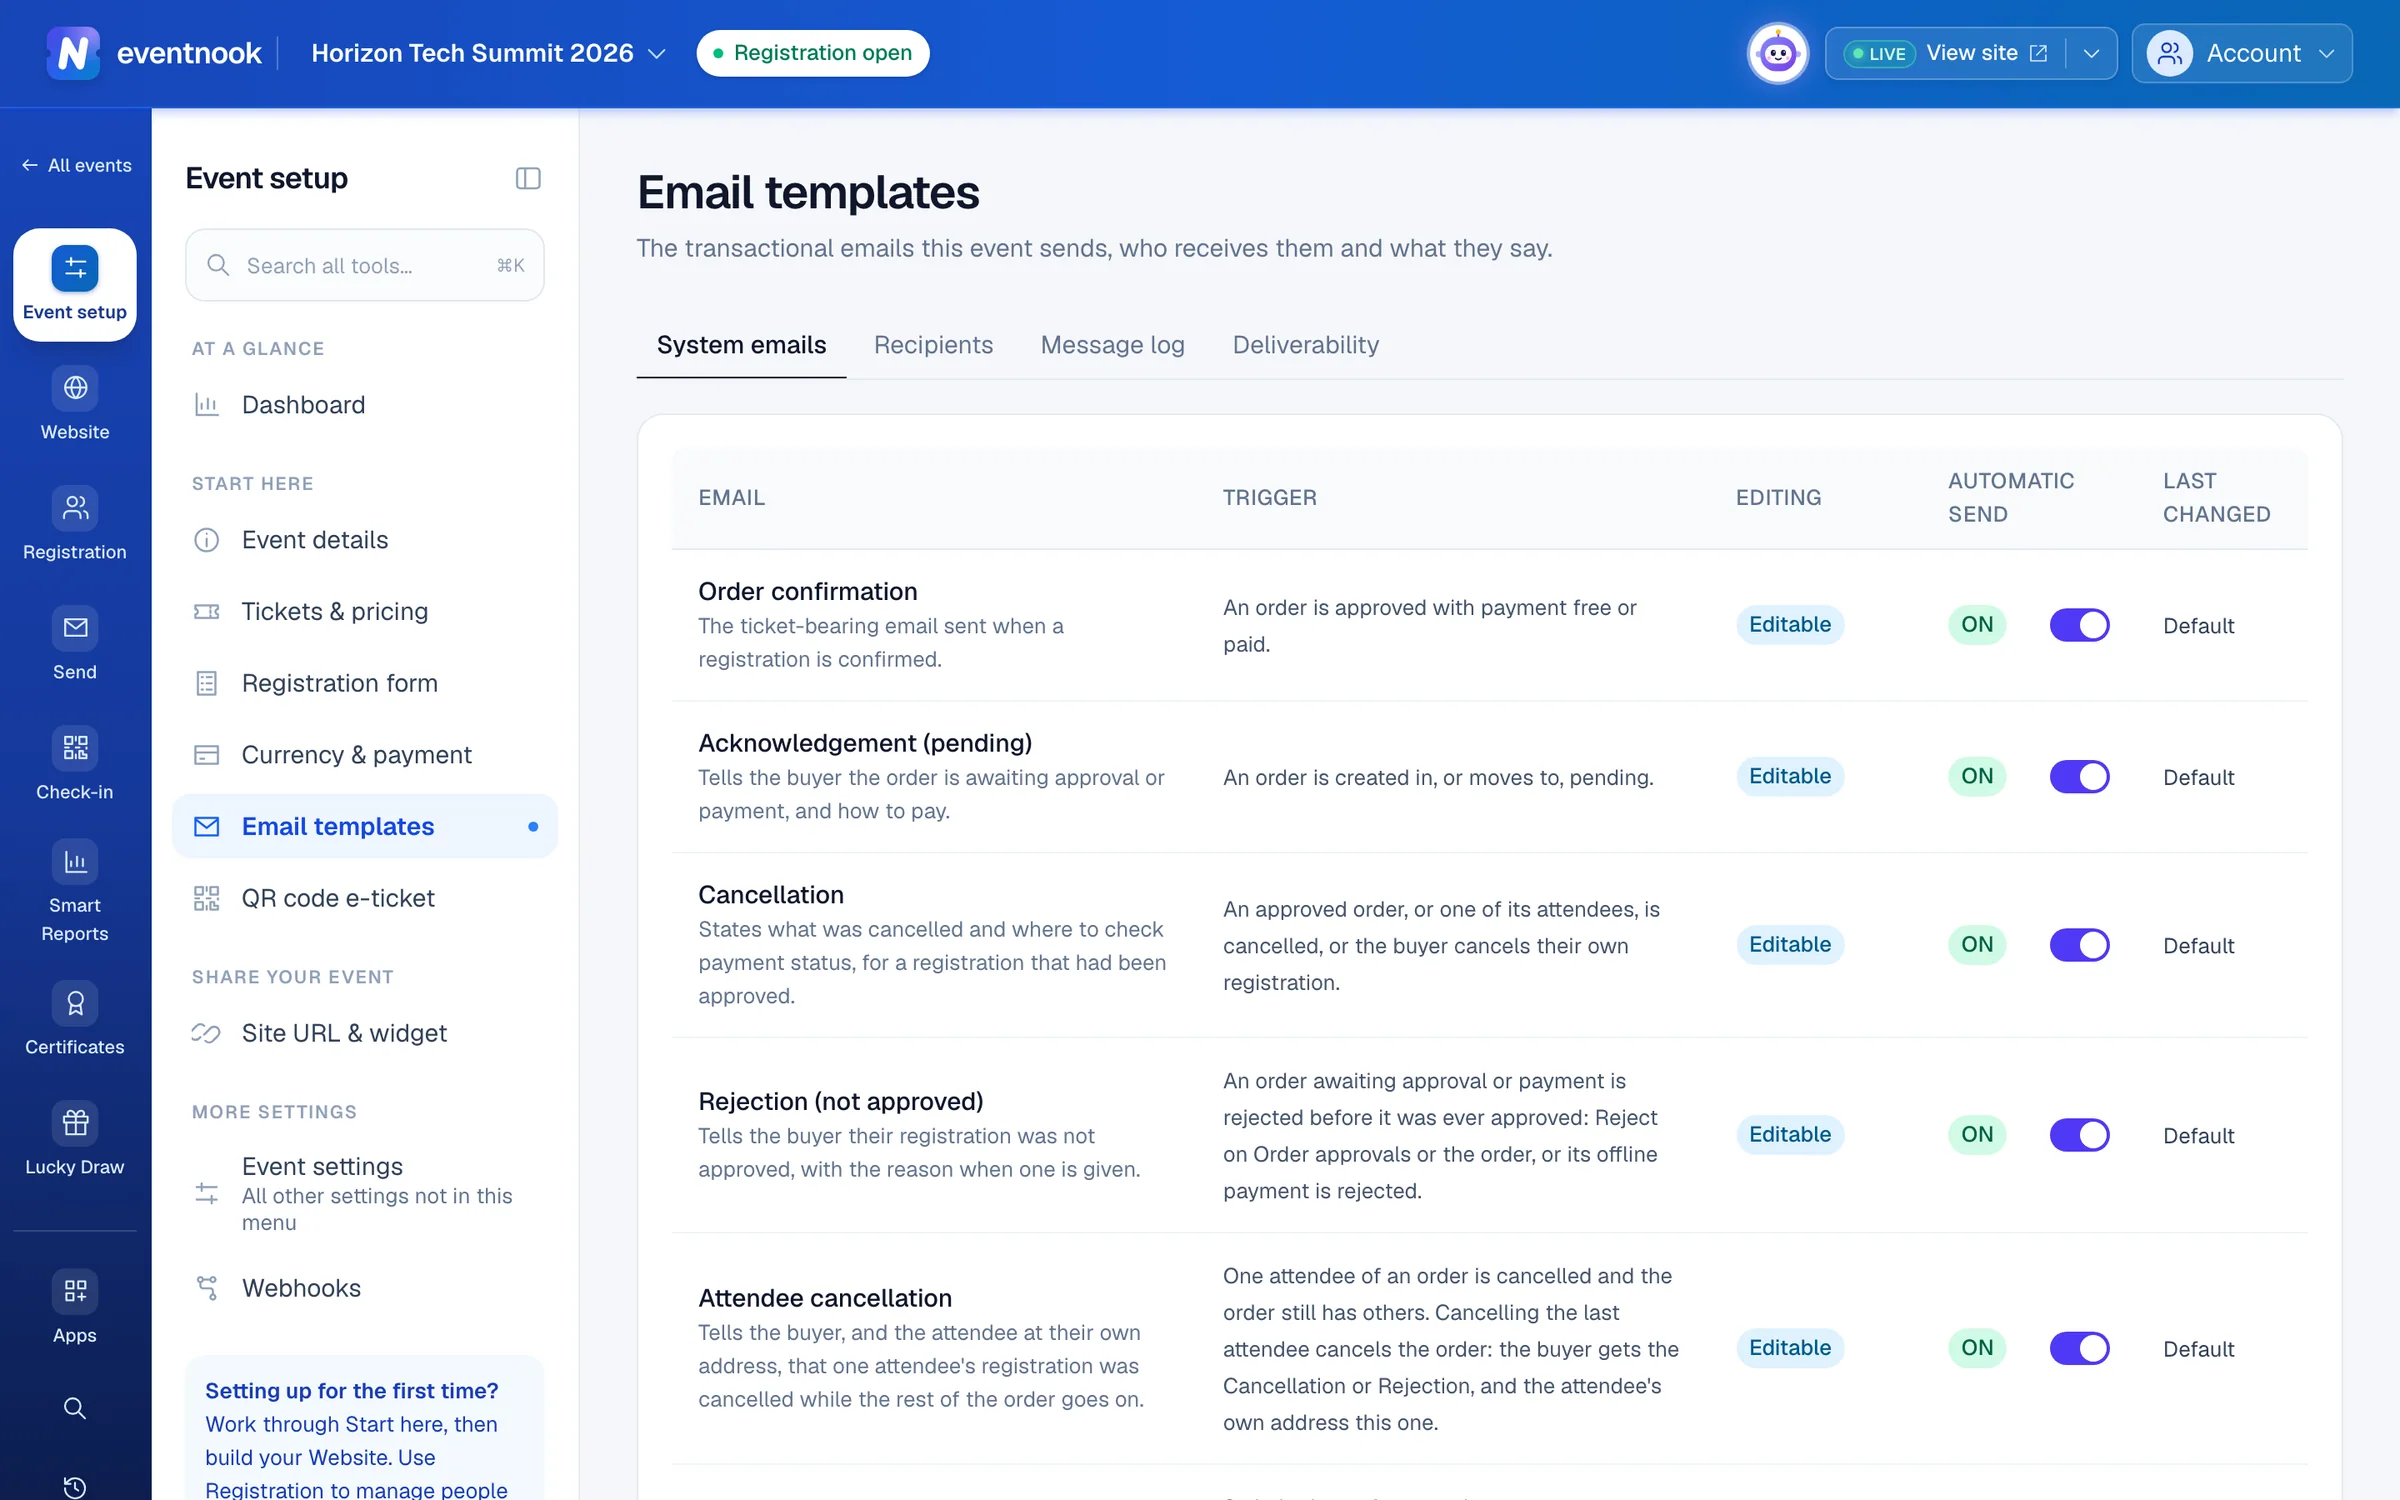
- 1Open an email to change what it says
- 2Turn an email's automatic sending on or off
- 3Who else gets copies
- 4What was sent, and whether it arrived
| When it's sent | |
|---|---|
| Order confirmation | An order is approved, free or paid. It carries the tickets. |
| Acknowledgement (pending) | An order is waiting for approval or payment. It says how to pay. |
| Cancellation | An approved order, or one of its attendees, is cancelled. |
| Rejection (not approved) | An order waiting for approval or payment is rejected. |
| Attendee cancellation | One attendee of an order is cancelled and the rest of the order goes on. |
| Registration updated | A registration is changed. Off until you turn it on. |
| Organiser notice: cancellation and Organiser notice: registration changed | Tell your team about cancellations and changes. Off until you turn them on. |
| Per-attendee ticket | Each attendee's own ticket, when each attendee gets their own ticket email. |
| Welcome on check-in | An attendee is checked in. Off until you turn it on. See The welcome email. |
| Not-attending acknowledgement | Someone sends the not-attending form with an email address. |
| Manage-order verification code and Email verification code | Someone asks for a code to manage their order or verify their email. You can change only the wording around the code. |
Turn an email on or off#
Use the switch under Automatic send. It takes effect straight away, and you can still resend an email by hand from an order. Verification codes are Always on.
Change what an email says#
- Click the email's name, for example Order confirmation. The email opens in the middle of the page, with a side panel beside it.
- Type the Subject and your message straight on the email. Use Variable or Insert variable to add details such as the buyer's first name or the order number.
- Click Send test to send the draft to yourself with sample details.
- Click Save changes. Until then, your edits are a draft; Discard throws them away.
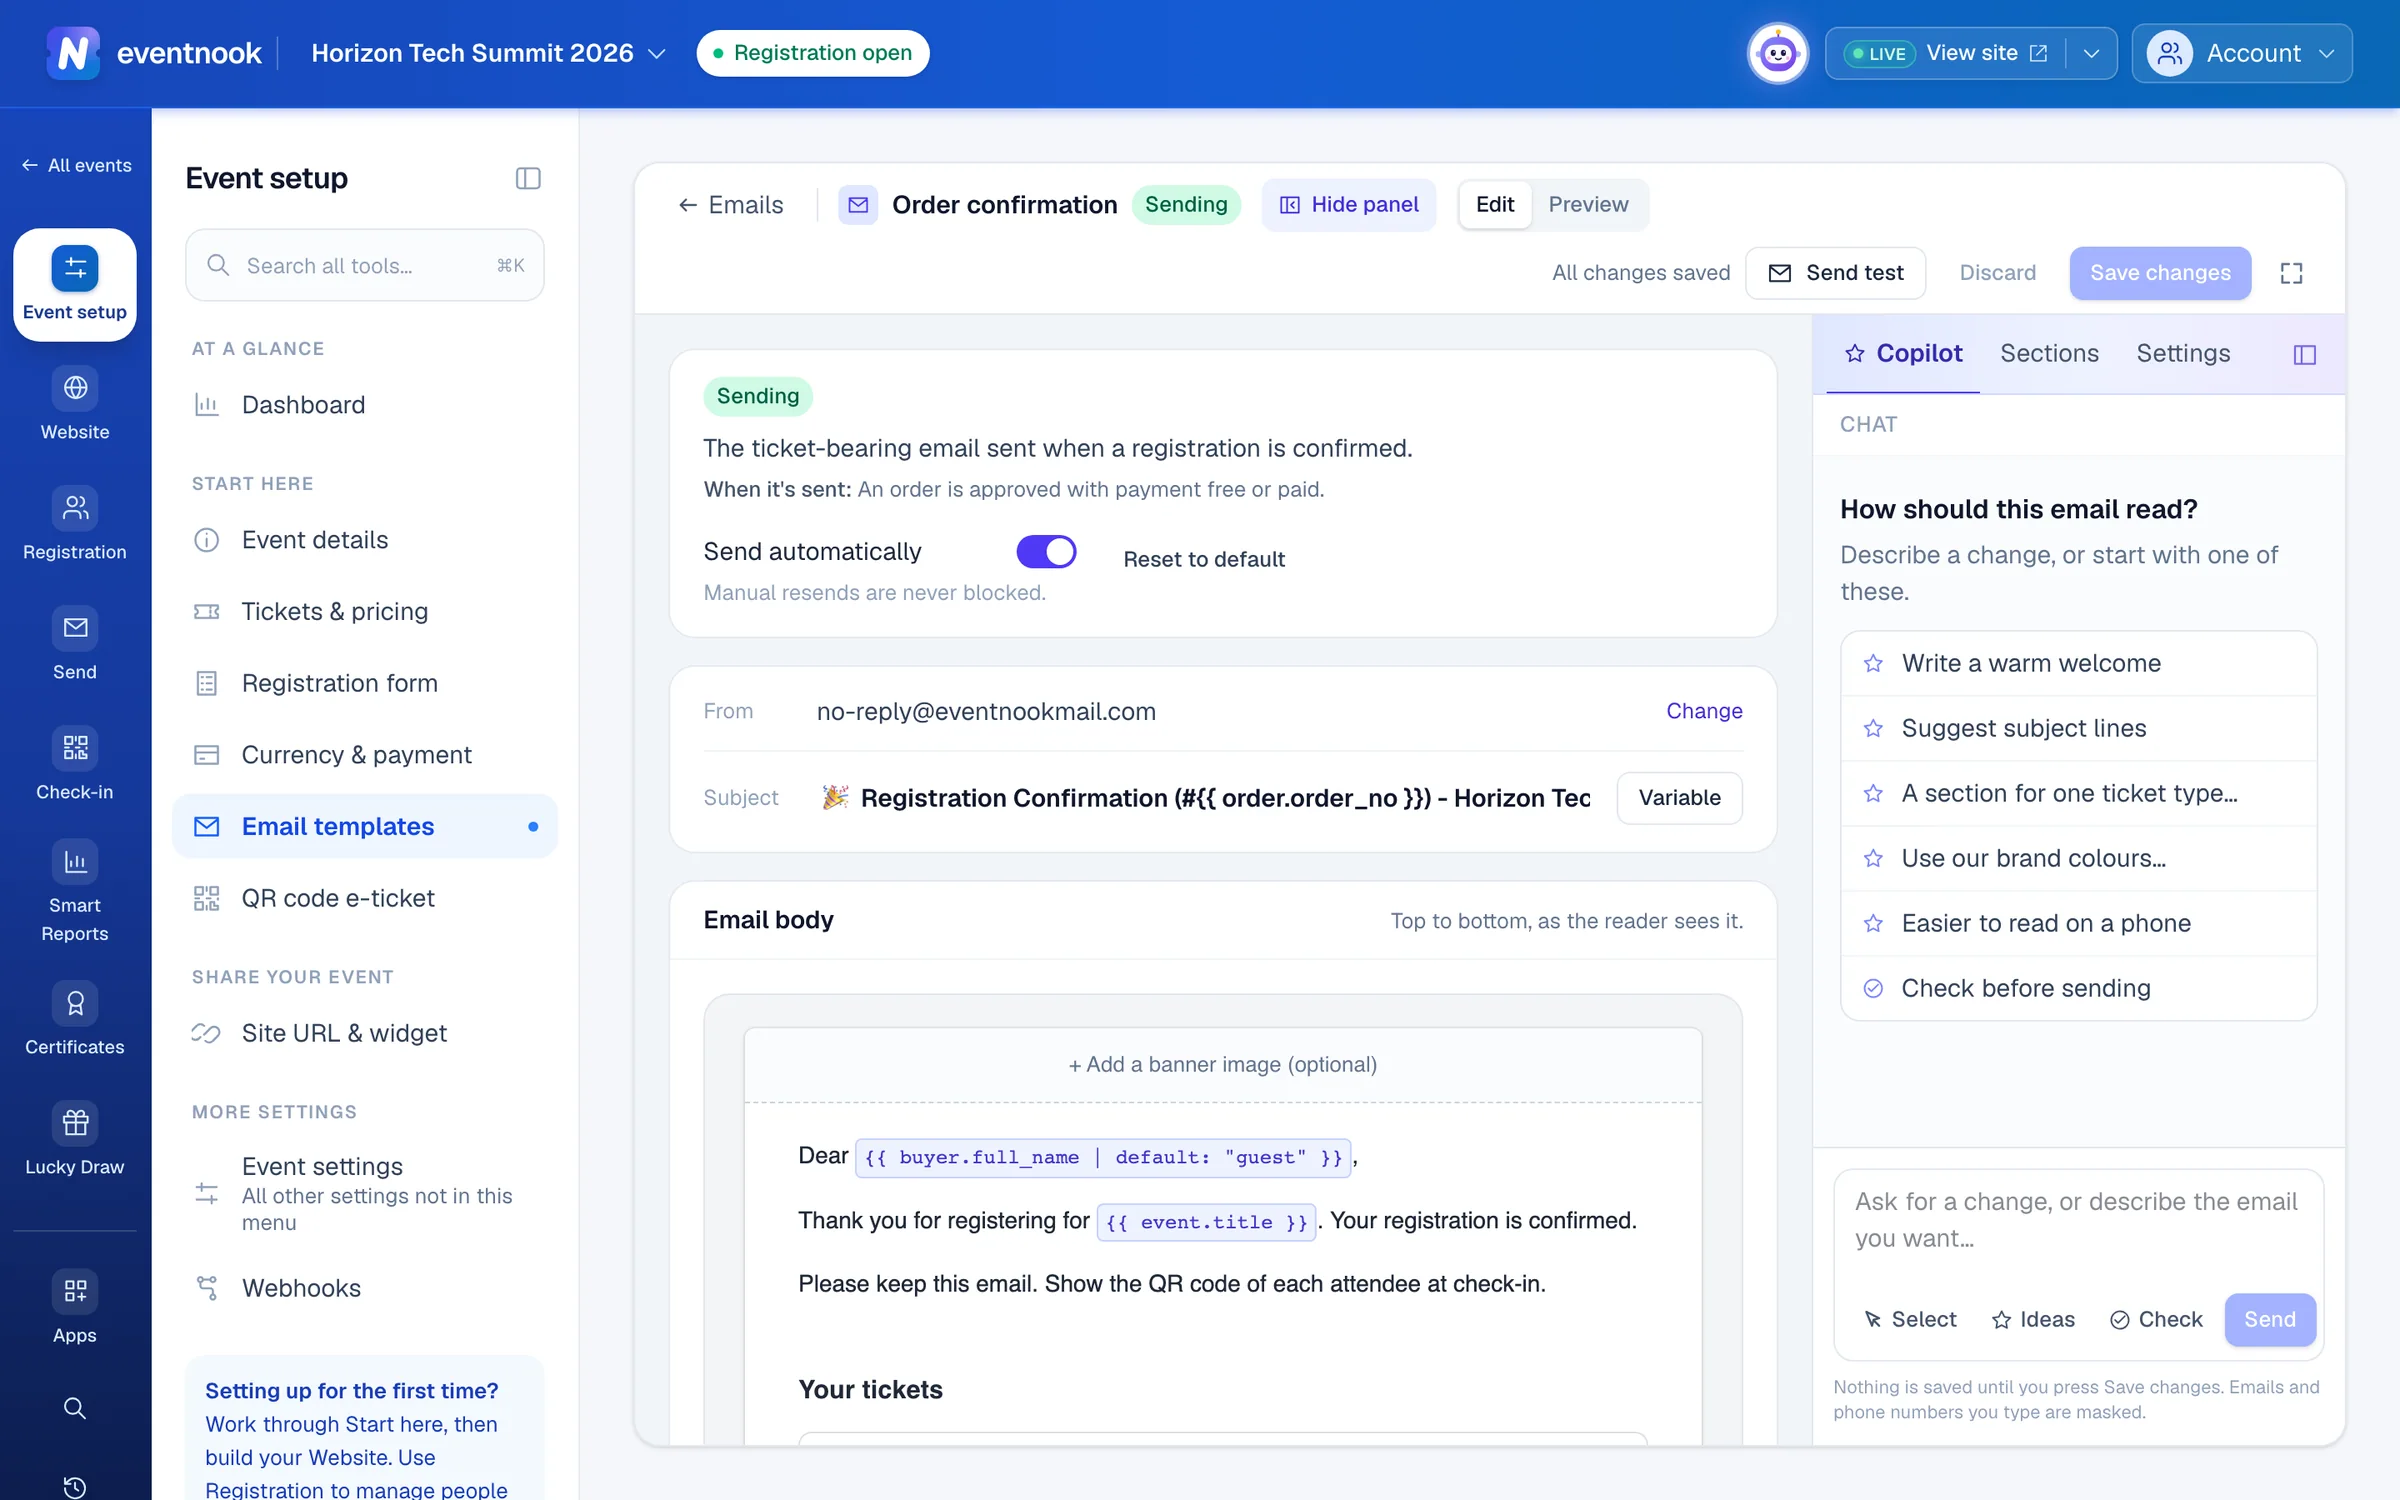
- 1The blocks in the email, to move, remove or add
- 2Sender, look, links, attachments
- 3Send this draft to yourself
The side panel has three tabs:
| Tab | What it's for |
|---|---|
| Copilot | Tell the AI what you want, such as "make the welcome warmer and mention there's free parking", and it writes and designs the email with you. Check looks for problems, such as a subject that's too long. |
| Sections | The blocks in the email, top to bottom. Move (↑ ↓) or remove (×) a block, or add one from Add a section. |
| Settings | Who it's from, Look & feel, Merge links, Attachments and Advanced. |
The status card at the top says whether the email is Sending or Not sending, with Send automatically to turn it on or off and Reset to default to start again. Full screen gives the email the whole window.
Add or remove sections#
Ready-made sections, such as QR code e-ticket, About the event or Document links, fill in each order's details when the email is sent. Custom content is your own text, headings, images and buttons, written in place.
- To add a section at a particular place, point at the gap between two sections and click + Add section here.
- A removed section waits under Add to this email, so you can add it back.
Show a section only for some tickets#
- Point at the section and click its ticket chip, which says All tickets.
- Choose Only selected tickets and tick the tickets.
- Click Save changes. The section shows Only for: ….
It appears when anyone in the order holds one of those tickets. In each attendee's own ticket email, it goes by that attendee's ticket.
Attach files or a calendar invite#
In Settings › Attachments, click Upload files, or tick Calendar invite (.ics). You can attach up to 10 files, 10 MB in total. Files are scanned for viruses before they're sent.
Test with a real order#
Click Preview, choose A real order and pick one, then Send me a test email. Tests only go to your own address, the organiser or BCC addresses, or your verified domains.
Choose who gets copies#
- On Email templates, open the Recipients tab.
- Turn on what you need, then click Save.
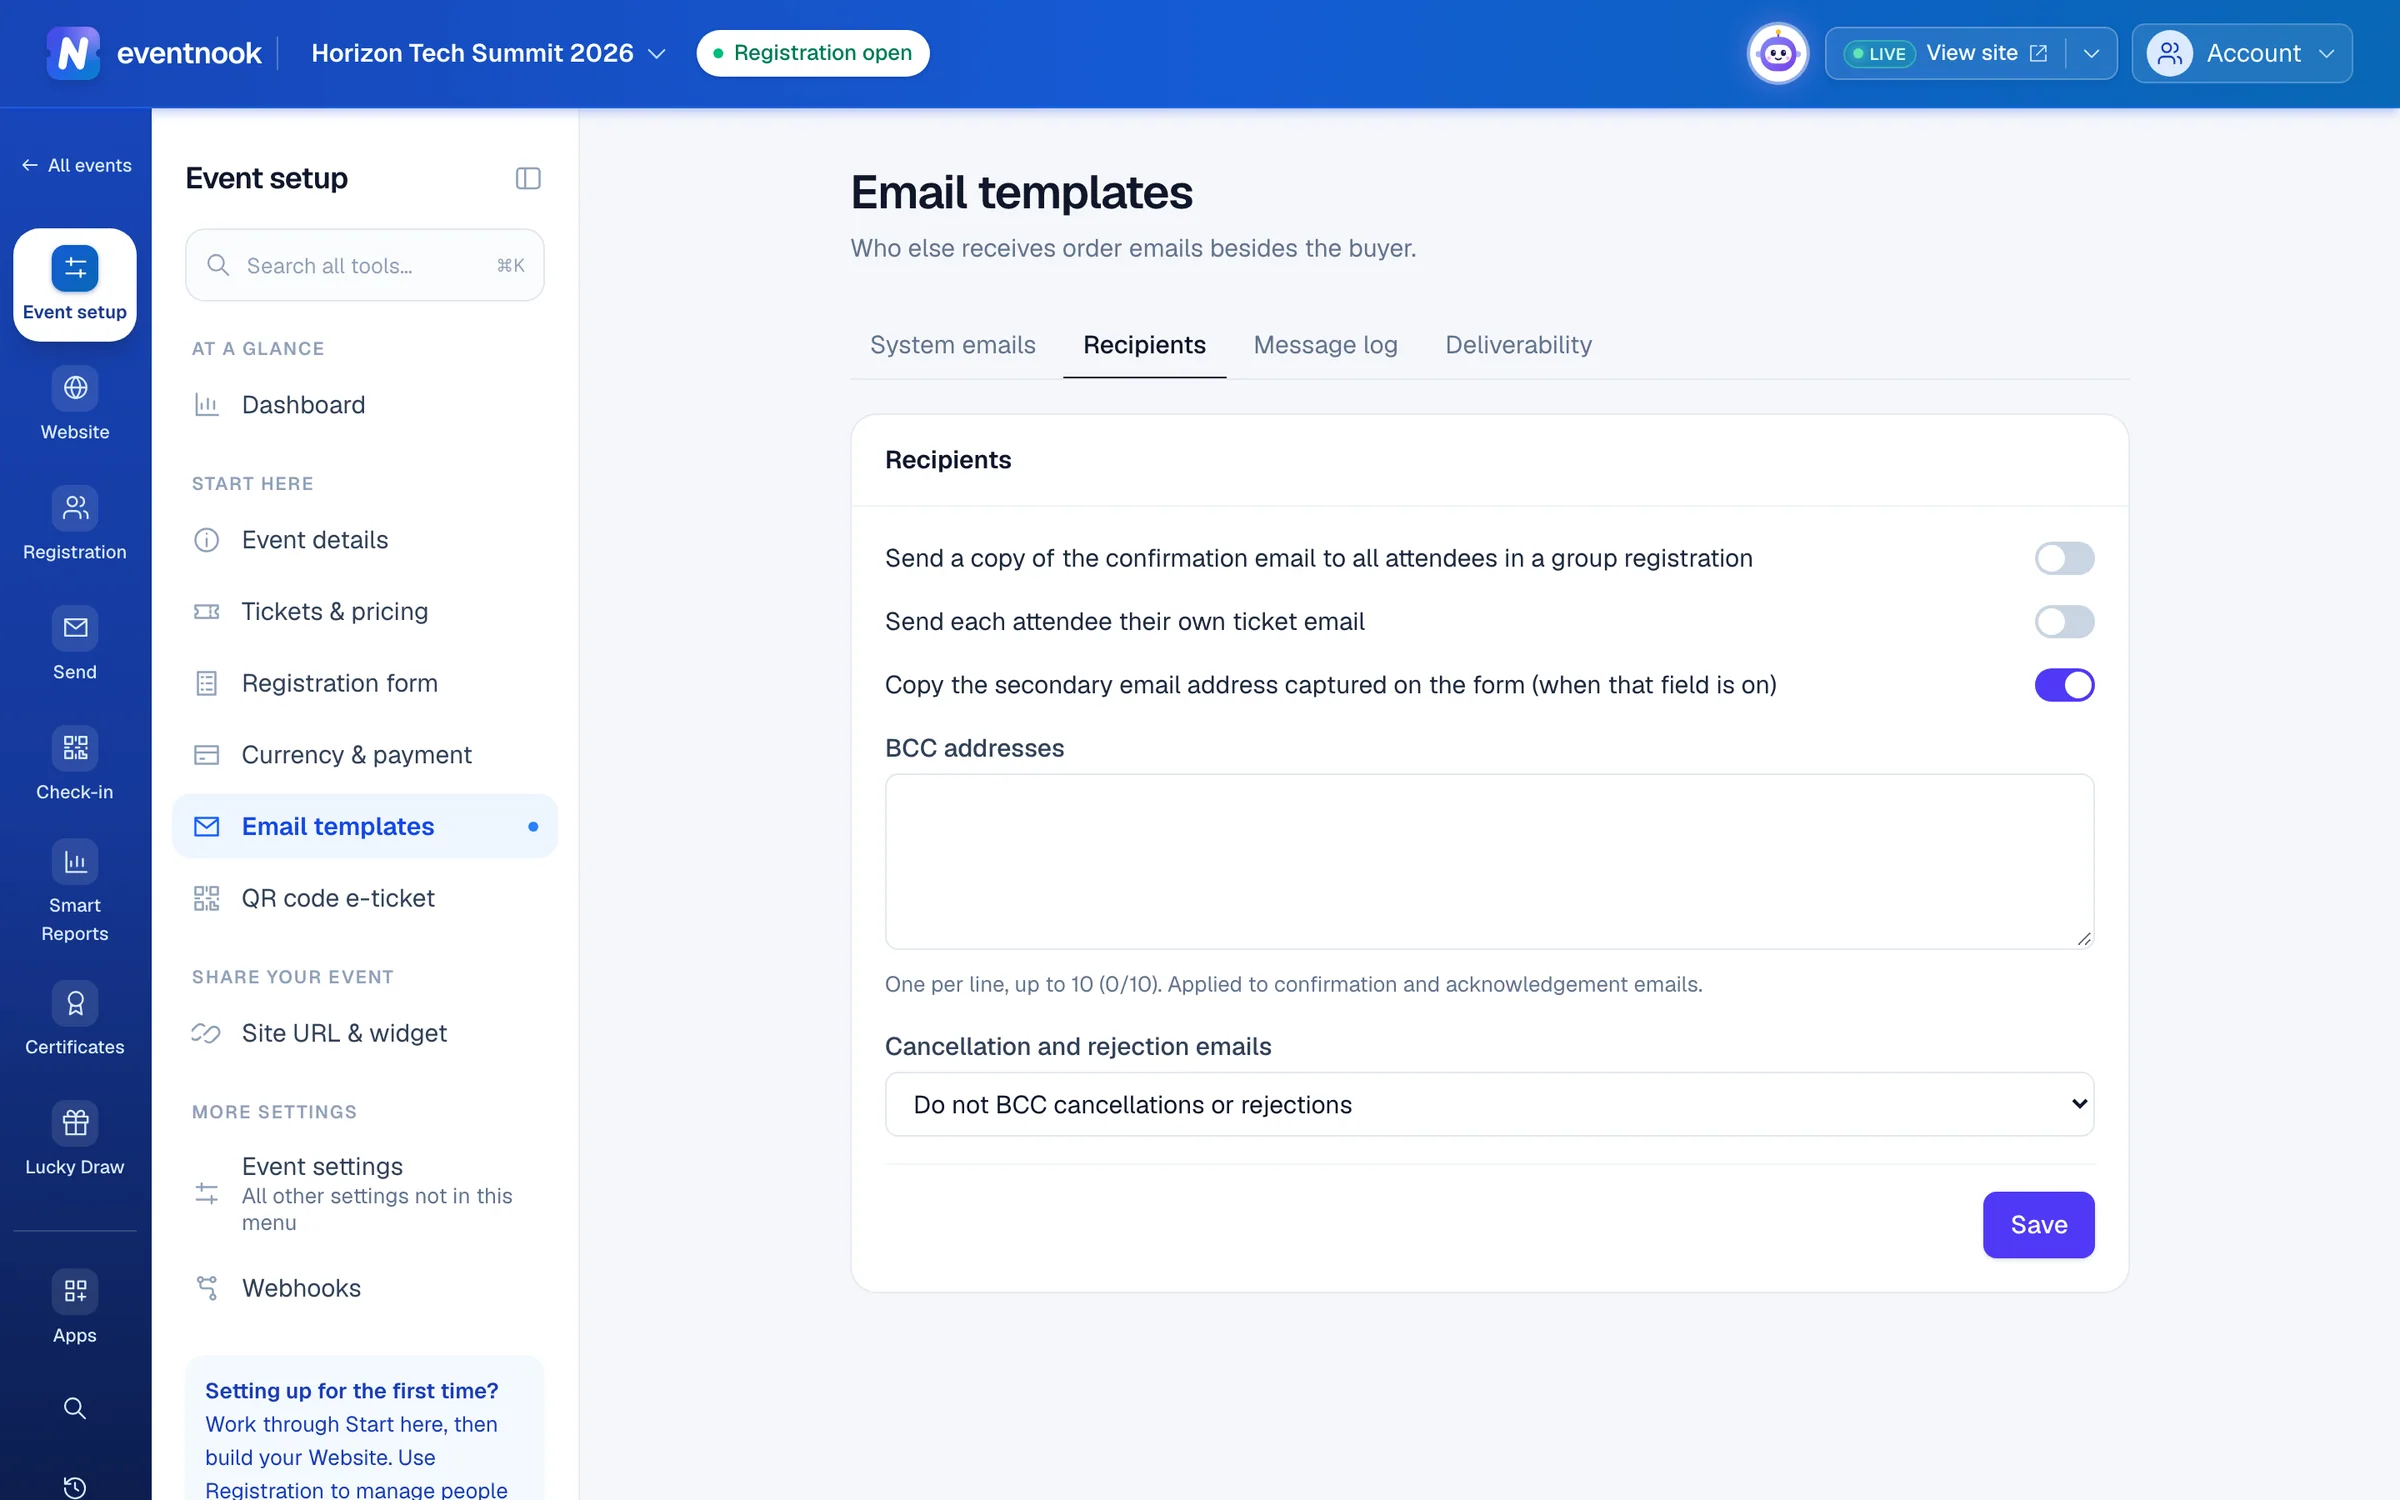
| Setting | What it does |
|---|---|
| Send a copy of the confirmation email to all attendees in a group registration | Each attendee in a group order is copied on the buyer's confirmation. |
| Send each attendee their own ticket email | Each attendee with their own address gets an email with only their ticket, and isn't copied on the buyer's confirmation, so nobody gets two. |
| Copy the secondary email address captured on the form (when that field is on) | Copies the extra address people give on the form. To ask for one, see Copy order emails to a second address. |
| BCC addresses | Up to 10, one per line. They get the confirmation and acknowledgement emails. |
| Cancellation and rejection emails | Whether your BCC addresses also get cancellations and rejections. |
Check whether an email arrived#
Open the Message log tab. It lists every email the event sent by itself, with its subject, recipients and status. The text of the email isn't kept.
- Type the order number in Order no., or an address in Recipient.
- Click Apply.
- Read the Status: delivered or opened means it reached the person's inbox provider, so ask them to check their spam folder.
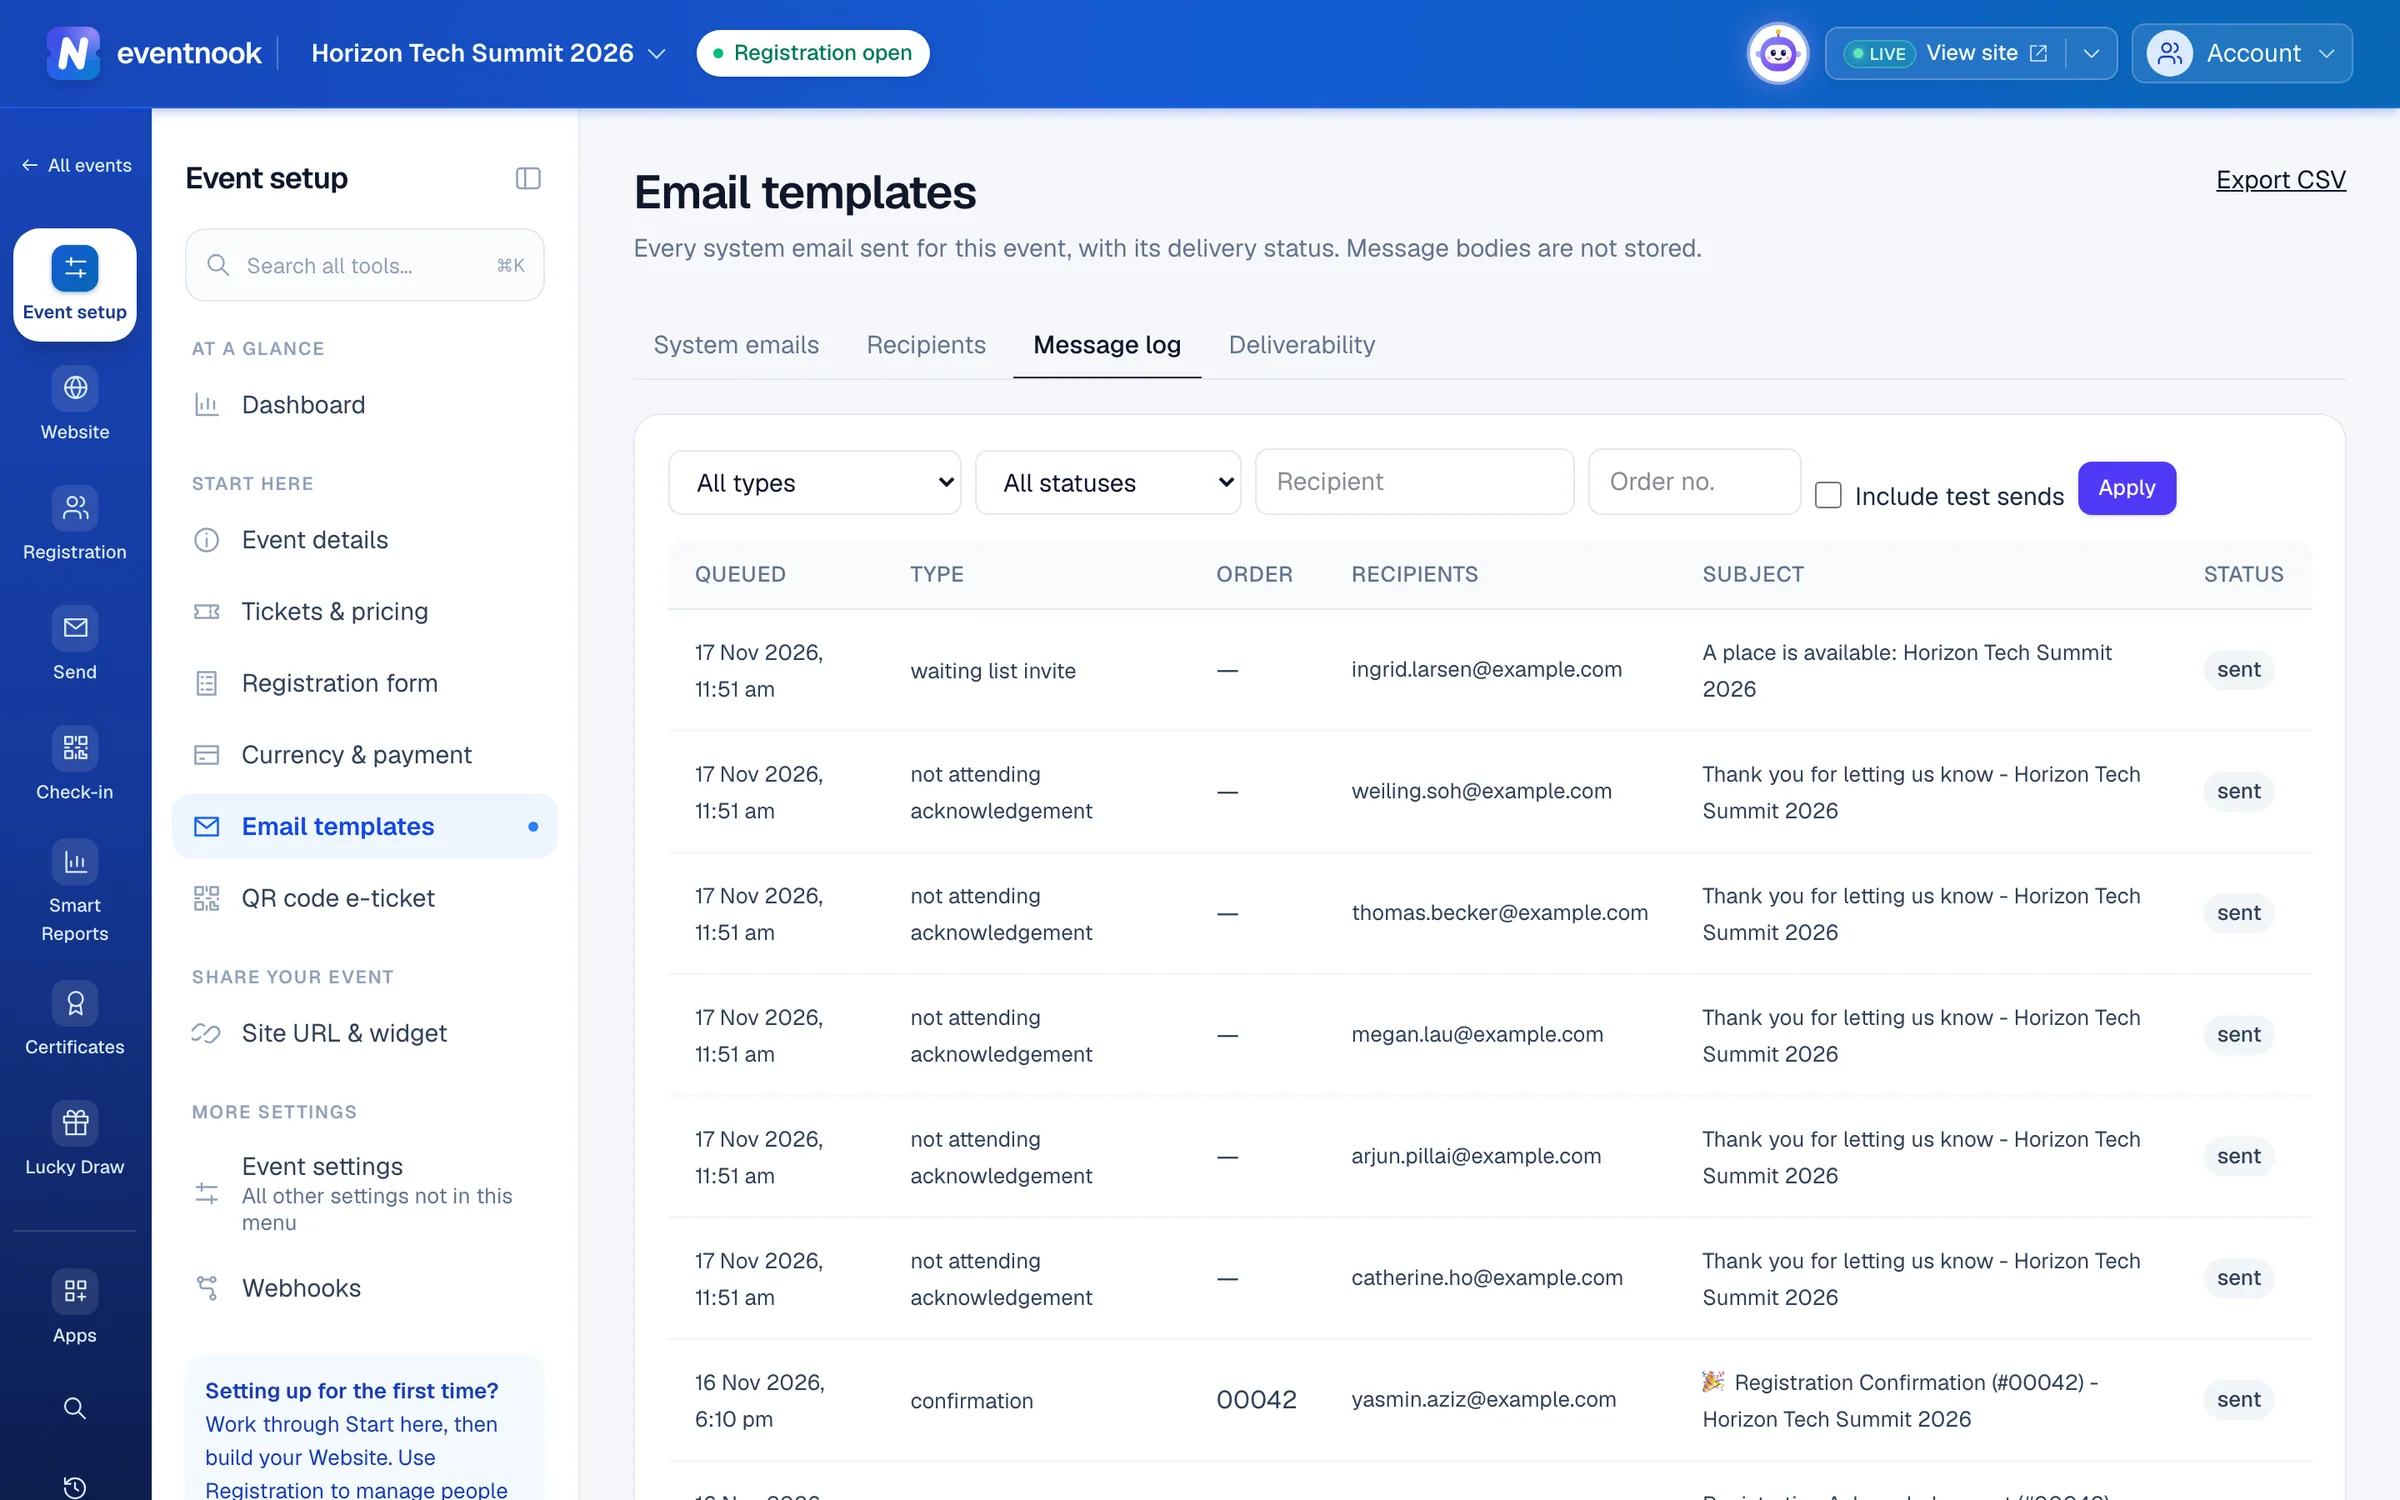
Tick Include test sends to see your tests. Export CSV downloads the log.
If something looks wrong#
- Suppressed. The address bounced or reported your email as spam before, so it wasn't sent. See Email deliverability.
- Bounced or failed. The address is probably wrong. Correct it on the order, then resend.
- A Template health card appears on the list. Some sends couldn't use your template, so the ready-made version was sent instead. Open the email it names, check the preview, fix it and save.
- "Choose at least one ticket." A section is set to Only selected tickets with nothing ticked.
- "Someone else saved this email while you were editing." Reload the latest version, then make your changes again.
- The Copilot isn't there, or says it isn't available. AI isn't in your plan, or it's turned off for your organisation. You can still edit the email by hand.
- An attachment says pending scan or quarantined. It isn't sent until the scan passes. Delete a quarantined file and upload a clean copy.
- Addresses in the message log are partly hidden. Only event admins and above see full addresses.
Who can do this#
Everyone with access to the event's settings can see the emails and preview them. Editors and event admins can change, test, save and turn them on or off.
Related guides
- Email your attendees or buyersWrite one email to your attendees or the people who placed orders, choose exactly who gets it, and send it now or at a time you choose.
- Make sure your emails arriveChoose who your event's emails come from, check your organisation's bounce and spam rates and sending domains, and find out why someone isn't getting your emails.
- Design the QR code e-ticketTurn on e-tickets with QR codes, choose what the pass shows and where attendees get it, and check it in the live preview before you save.
- Stop duplicates, add terms and ask for billing detailsRefuse duplicate registrations, make registrants accept your terms, copy order emails to a second address and choose the billing details buyers give when they pay.
- Send a welcome email on check-inSwitch on the email each guest gets as they are checked in, write and design it with or without AI, and send yourself a test.
Still stuck? In EventNook, ask HeyNook. It knows the page you're on and your event, and can take you straight to the right setting.