Find and export orders
Find any order by number, name or email, narrow the list by status and payment, keep the layouts you use as views, and export exactly what you see.
Where to find it: Event admin › Registration › Attendees & orders › Orders
Orders lists every order for the event, one row per order, with the buyer, what they paid and where the order stands. Open it when you need to find an order, check payments or take the list into a spreadsheet.
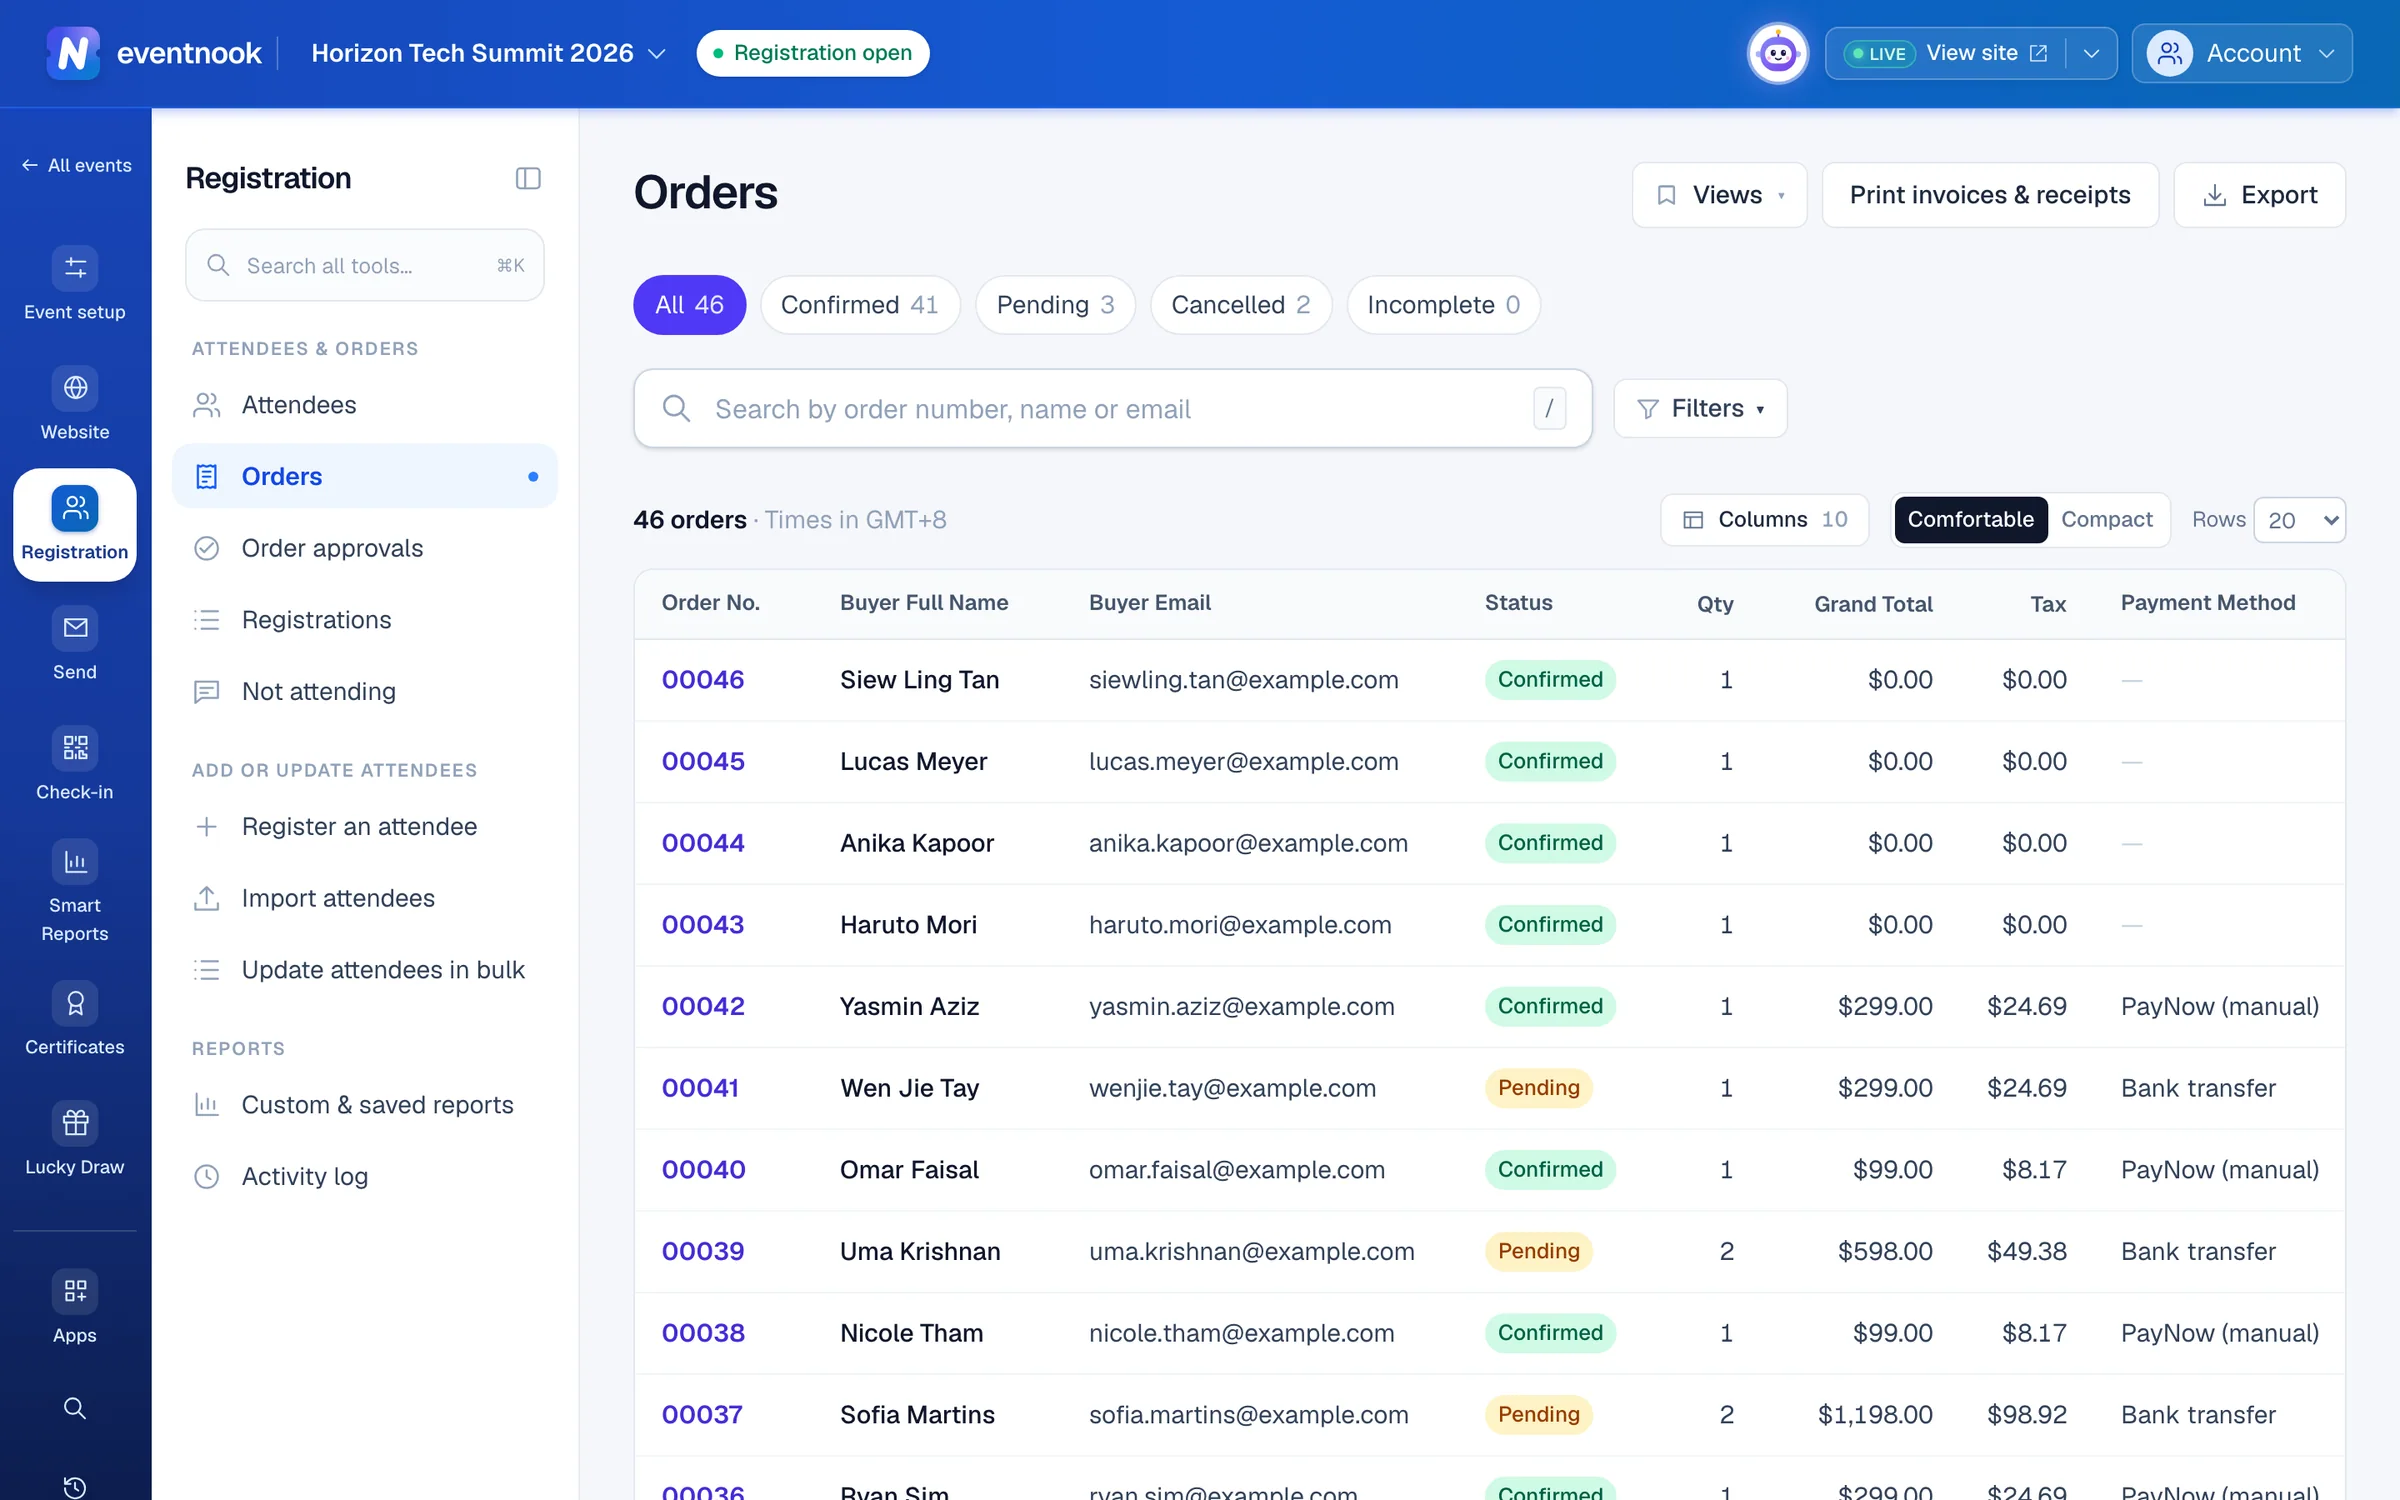
- 1Show one status at a time, each with its count
- 2Find an order by its number, a name or an email
- 3Narrow by order type, invoice, dates, payment or any answer
- 4Switch to a saved layout, or save this one
- 5Export the list as it is filtered
Find an order#
- Open Registration › Attendees & orders › Orders.
- Type the order number, a name or an email in Search by order number, name or email. It finds the order through the buyer or any attendee on it, even a buyer who isn't attending.
- Click the row, or its Order No., to open the order.
The list says how many orders match. Press / to jump to the search box from anywhere on the page, Esc to clear it, and Enter to open the order straight away when only one matches.
Show orders by status#
The tabs at the top filter the list at once. The list opens on All.
| Tab | What it holds |
|---|---|
| All | Every order. |
| Confirmed | Approved orders. |
| Pending | Orders waiting for your approval or for a payment you record yourself, such as a bank transfer. |
| Cancelled | Orders that were cancelled or rejected. |
| Incomplete | Checkouts that didn't finish: payment still processing, failed or cancelled. |
Narrow the list#
- Click Filters beside the search box.
Choose what to match:
Filter What it does Order type Free and paid (default), Paid or Free. Invoice Any, Has an invoice or No invoice. Ordered from and Ordered to A date range, in the event's time zone. Payment method One or more methods. A method no order uses is shown faded. Payment status Such as paid, pending or refunded. Include test orders On a live event, adds orders placed while the event was in test mode. - Optional: add a condition on any order or attendee answer, such as a company or a job title. A condition on an attendee answer keeps the whole order when any of its attendees matches.
- Click Apply filters. The Filters button shows how many filters are on.
Clear filters beside the button takes every filter and the search off. Reset in the panel goes back to All with no filters.
Choose columns and sort#
- Click Columns at the top right of the table to choose the columns and their order, then Apply. Reset to default brings back the standard set.
- Click a column heading to sort by it. Click again to reverse the order.
- Switch between comfortable and compact rows beside Columns. This browser remembers your choice.
- Choose how many rows show on a page: 20, 50, 100 or 200.
The filters, columns, sort and page are part of the page's address, so you can copy the link and send it to a colleague who has access.
Keep a layout as a view#
A view keeps the columns and their order, the filters, the sort and the page size under a name.
- Set the list up the way you want it.
- Click Views, then Save what is on screen as a new view….
- Type a name. Optional: tick Share with everyone who can see this report, or Open this view by default.
- Click Save. The button now shows the view's name.
To go back to the standard list, open the menu and choose Report default. For the view in use, the same menu has Update with what is on screen, Open this view by default, sharing and Delete this view. All your views are also listed in Custom & saved reports.
Export orders#
- Filter the list to the orders you want.
- Click Export. The dialog shows how many orders and columns the export holds.
- Choose the format: XLSX, CSV or JSON.
- Under Columns, keep As in the list, or pick Every column or Choose columns.
- Choose how personal data is written, and tick the acknowledgement if it asks for one.
- Click Request export. When it's ready, click Download. You can also tick Email me a link when the export is ready and close the dialog.
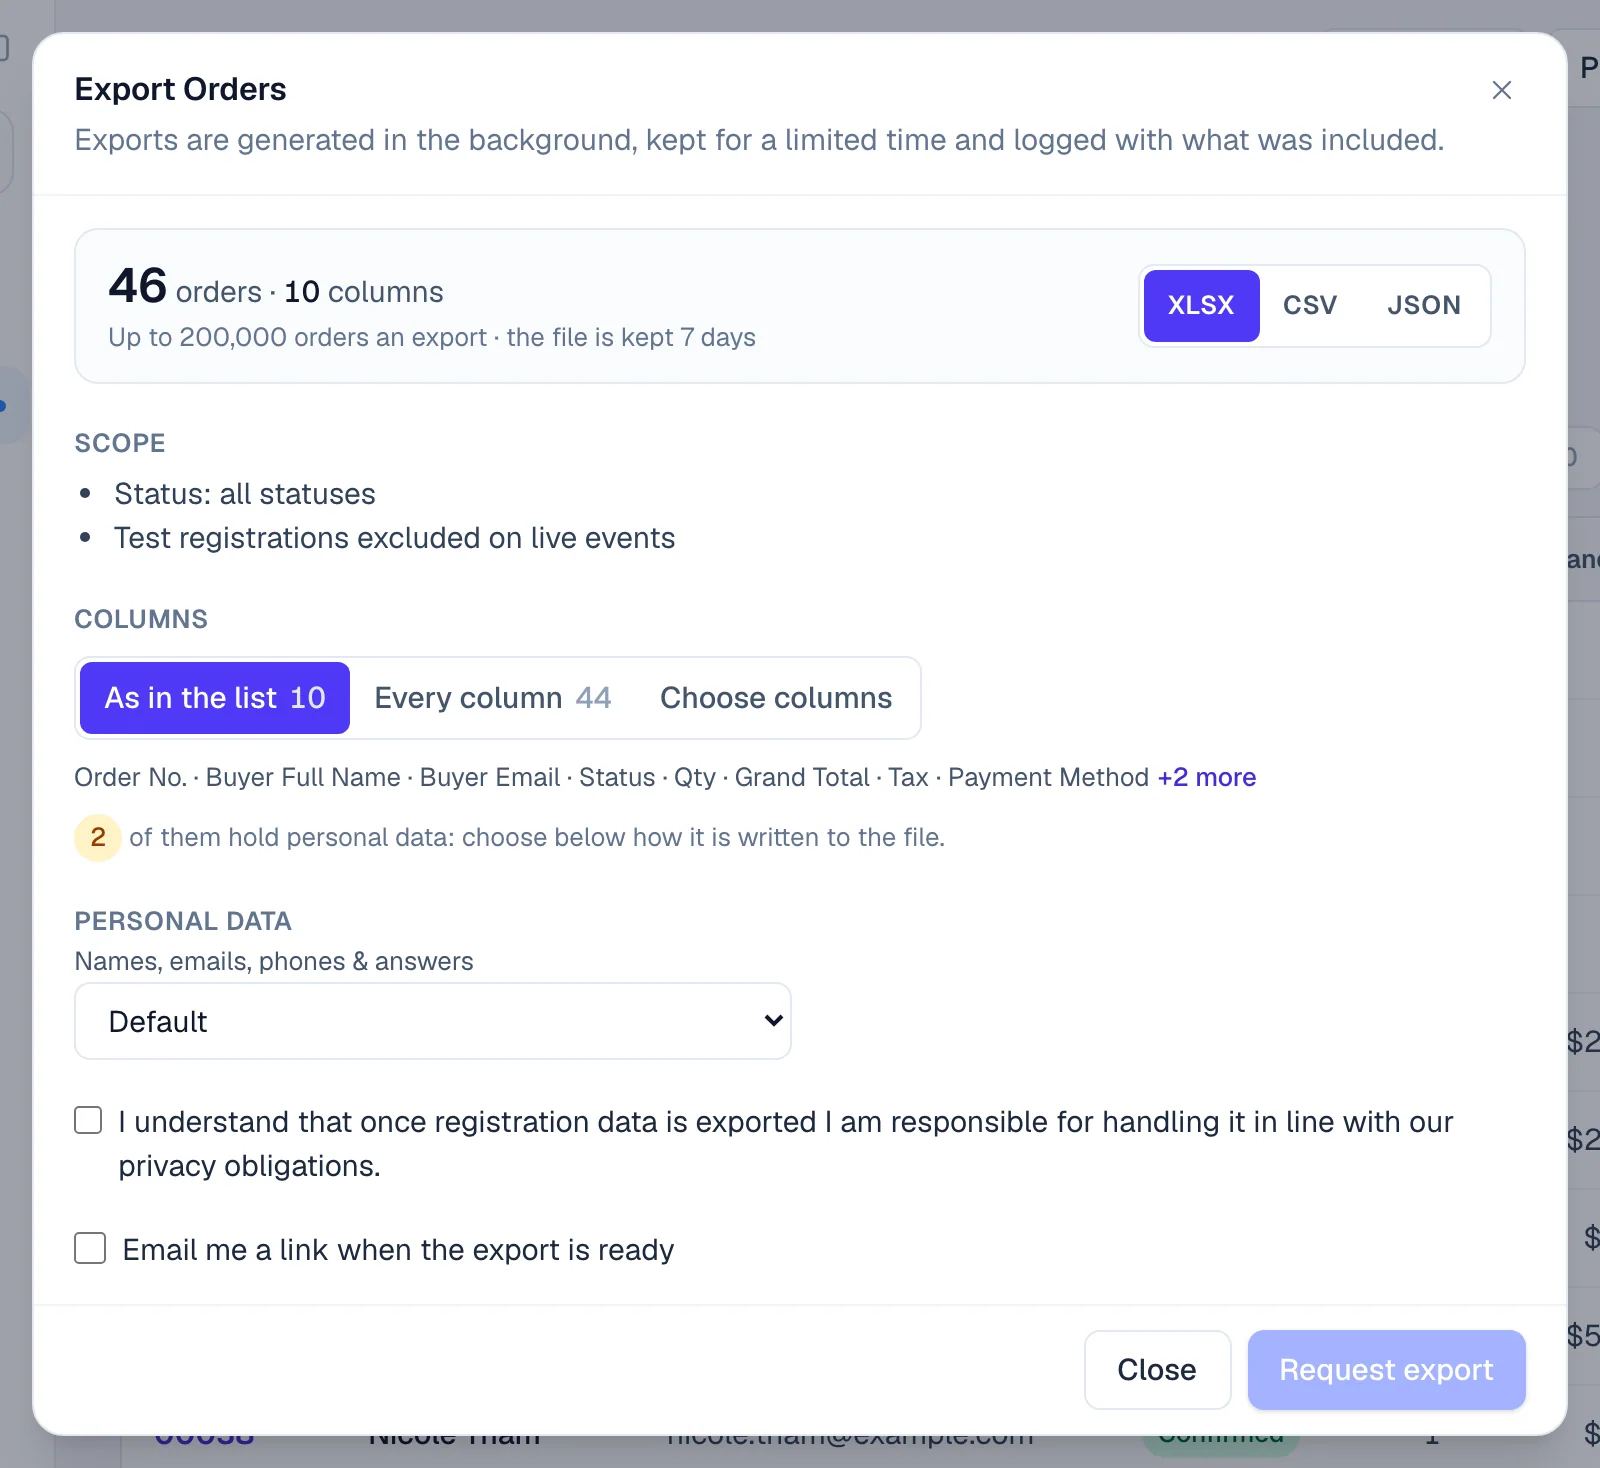
Exports are made in the background and kept for a limited time. Every export of the event is listed under Exports in Custom & saved reports.
Print invoices or receipts#
Click Print invoices & receipts in the page header to make one document with a page per order. See Print invoices and receipts in bulk.
The Orders page#
The event dashboard's Manage orders link opens a short page called Orders with three shortcuts: Open queue for the approval queue, View orders for this list, and Bulk print for invoices and receipts.
If something looks wrong#
- An order you expect is missing. Check the tab: Confirmed leaves out pending, cancelled and incomplete orders. Click All, then search again.
- Names and emails look partly hidden. Your role can't see personal data in full. The list says "Personal information is masked according to your access permissions." Exports are masked the same way.
- Test orders don't show. On a live event, orders placed in test mode are left out. Open Filters and tick Include test orders.
- There is no Export button. Your role can't export. Ask an event admin.
- Request export stays greyed out. The export is larger than your plan allows, or the acknowledgement isn't ticked. Narrow the filters or split the export.
Who can do this#
Everyone with access to the event's orders can see this list. Exporting needs a role that can export, such as Event Admin, Event Editor or Event Analyst. An Event Analyst's exports never hold personal data in full.
Related guides
- Change, cancel or refund an orderOpen one order to see who bought, what they paid and who is attending, then edit it, resend its email, record a payment, cancel it or refund it.
- Approve or reject pending ordersWork through the orders waiting for a decision and the payments that failed, approving or rejecting each one in place, from the keyboard or many at once.
- Find attendees and change their detailsSearch and filter the attendee list, open anyone's details beside it, correct or cancel one attendee, find duplicates, count attendees in a pivot and export the list.
- Print invoices and receipts in bulkMake one printable document with a page for every order's invoice or receipt, then print it or save it as a PDF.
- Review registrations order by orderSee each order with the people registered under it, work through the pending ones and approve several at once.
Still stuck? In EventNook, ask HeyNook. It knows the page you're on and your event, and can take you straight to the right setting.