Set the currency and how buyers pay
Choose the event's currency, turn on card, PayPal, bank transfer and other payment methods, and confirm, refund and export payments.
Where to find it: Event admin › Event setup › Start here › Currency & payment
Currency & payment decides what currency the event sells in and how buyers can pay. A method is offered at checkout only when it is on, fully set up and supports the event's currency.
This page is on a paid event only. A free event takes no payment; to start charging, convert it in Event details.
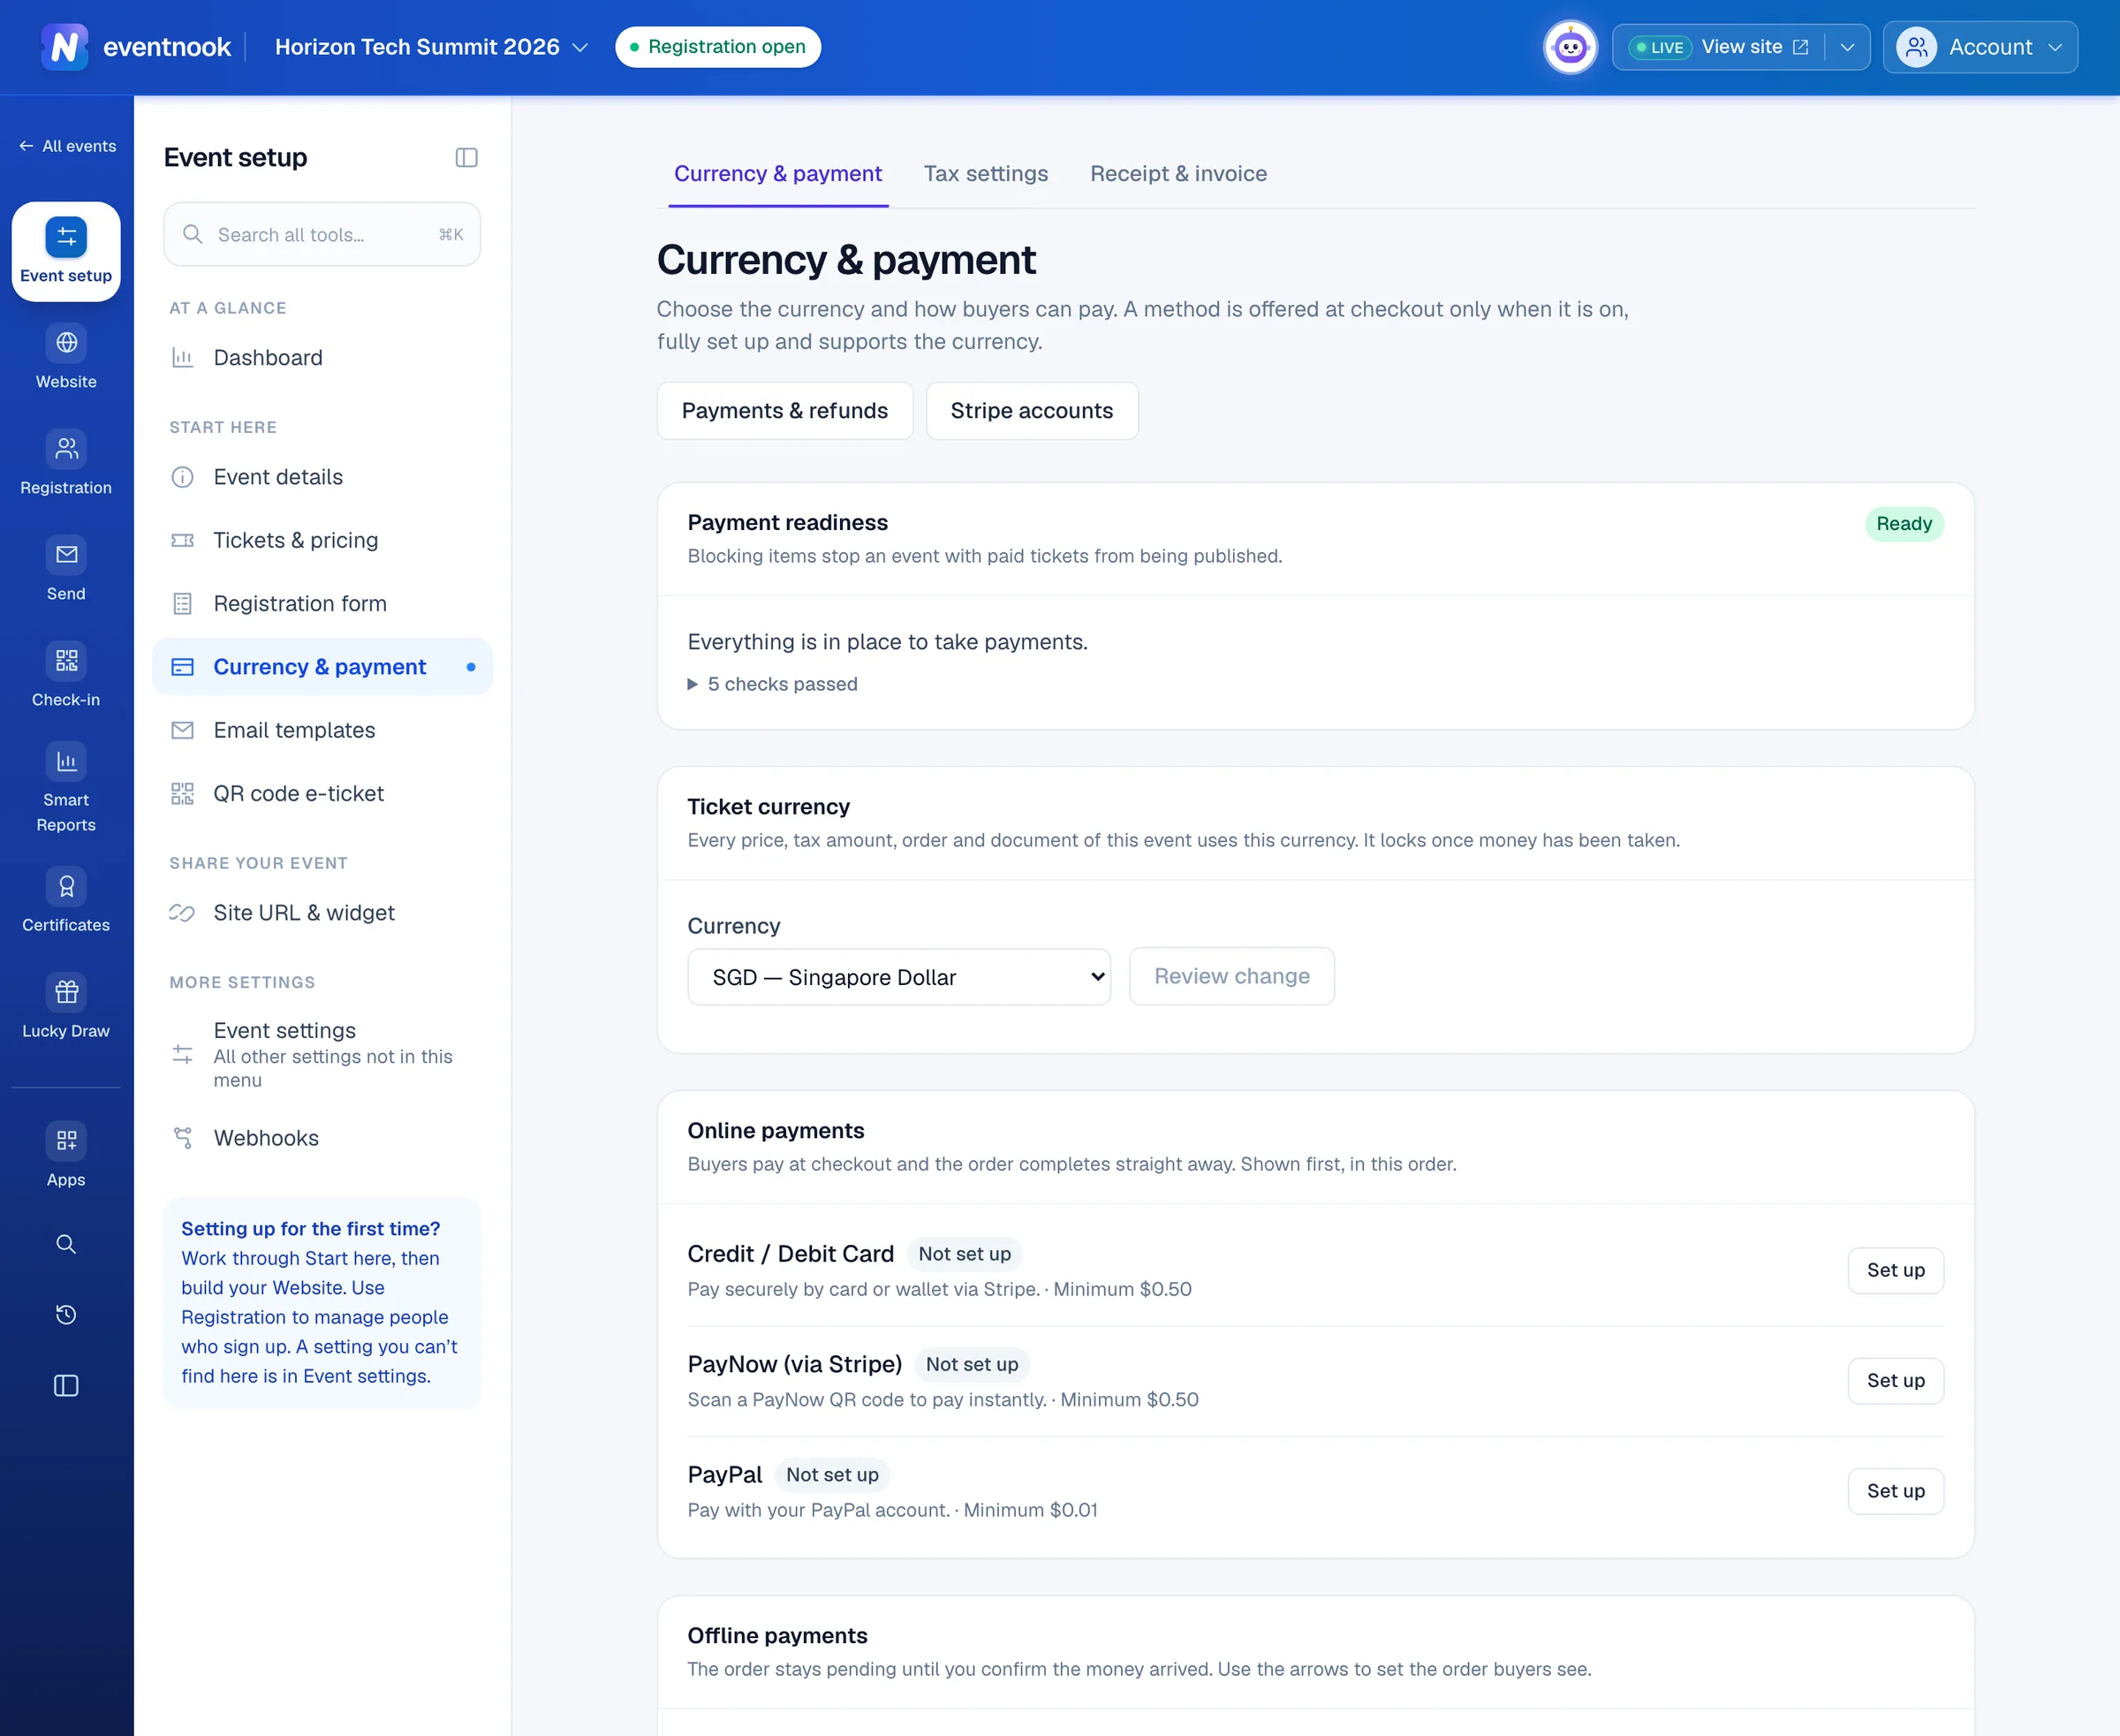
- 1One currency for every price, order and document
- 2Card, PayNow and PayPal, paid at checkout
- 3Methods you confirm yourself once the money arrives
- 4Every charge and refund of the event
Before you start#
- To take card payments or PayPal, your organisation needs a connected Stripe or PayPal account. An organisation Owner or Admin connects it; see Collect payments.
- Bank transfer, cheque and the other offline methods need no account. You confirm each payment yourself.
Choose the currency#
- Open Currency & payment.
- Under Ticket currency, choose the Currency and click Review change.
- Check the list in the dialog: methods that will be switched off, and each ticket's price in the new currency. Click Change currency.
Turn on a payment method#
The page lists Online payments first (buyers pay at checkout and the order completes straight away), then Offline payments you have set up, then More offline methods not set up yet.
- Click Set up on the method, or Edit on one already set up.
- If the panel lists what the method still needs, click each item to jump to its field and fill it in.
- Under What buyers see, check the Title and Short description and write the Payment instructions.
- Turn on Offer to buyers and click Save and turn on. The row now shows Offered to buyers.
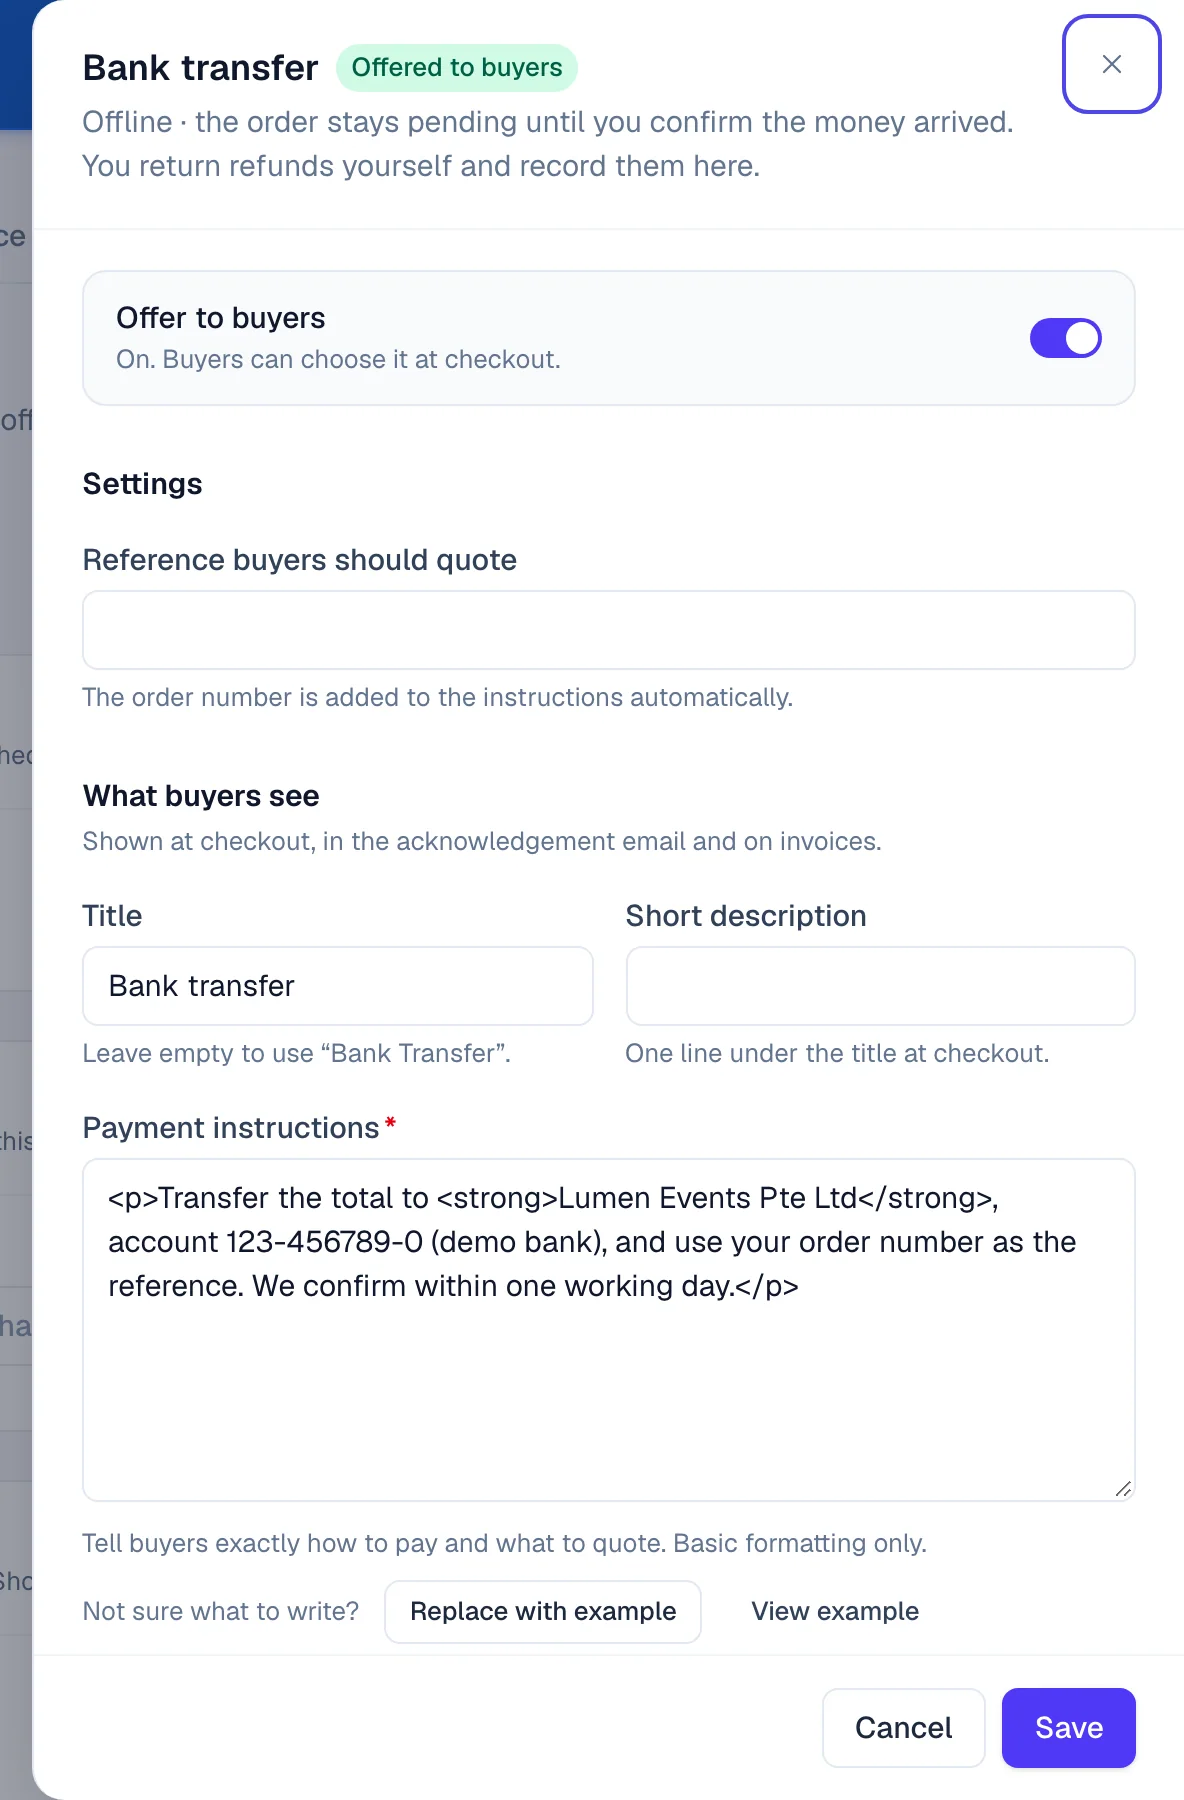
- 1Turns the method on or off when you save
- 2Shown at checkout, in the email and on the invoice
| Method | How it works |
|---|---|
| Credit / Debit Card | Online, through your connected Stripe account. Choose the Connected Stripe account. Optional: tick Additional Stripe methods such as GrabPay. Apple Pay, Google Pay and Link follow your Stripe account's settings. |
| PayNow (via Stripe) | Online, through Stripe. Singapore dollars only. |
| PayPal | Online. Buyers pay at PayPal, into the Connected PayPal account you choose. |
| Pay by Invoice | Offline. Buyers register now and pay against the invoice. Set Payment terms (days), and choose whether to ask for a PO number or who the invoice is for. Needs the organisation name in Receipt & invoice. |
| Bank Transfer, Cheque | Offline. Tell buyers where to send the money and what reference to quote. |
| On-site Payment | Offline. Buyers pay at the registration counter. |
| PayNow (Singapore), PayNow QR | Offline, Singapore dollars only. PayNow QR shows buyers a QR code for your UEN or mobile number. After saving, open it again and scan the Sample QR with your banking app to check the name and account. |
| SkillsFuture Credit | Offline, Singapore dollars only. Set the Maximum claim amount and the SkillsFuture terms. |
| Other | Offline, under the Name buyers see you choose. |
To set the order buyers see offline methods in, use the ↑ and ↓ buttons on their rows. Online methods are always shown first.
To stop offering a method, turn off its switch on the list. Buyers no longer see it at checkout.
Check the event can take payments#
Payment readiness at the top lists what still needs doing. Items marked ✕ stop an event with paid tickets from being published; items marked ! are warnings. When nothing is left, it says Everything is in place to take payments.
Confirm a bank transfer or cheque#
An order paid by an offline method stays pending until you confirm the money arrived.
- Click Payments & refunds at the top of Currency & payment.
- Find the payment in the Ledger and click Confirm.
- Check the Amount received. It starts at the balance due; a smaller amount records a part payment.
- Optional: add the Reference and Date received, then click Confirm payment.
To cancel an order that was never paid, click Reject instead and type the Reason shown to the buyer. The order is cancelled, its tickets are released and the buyer is told why.
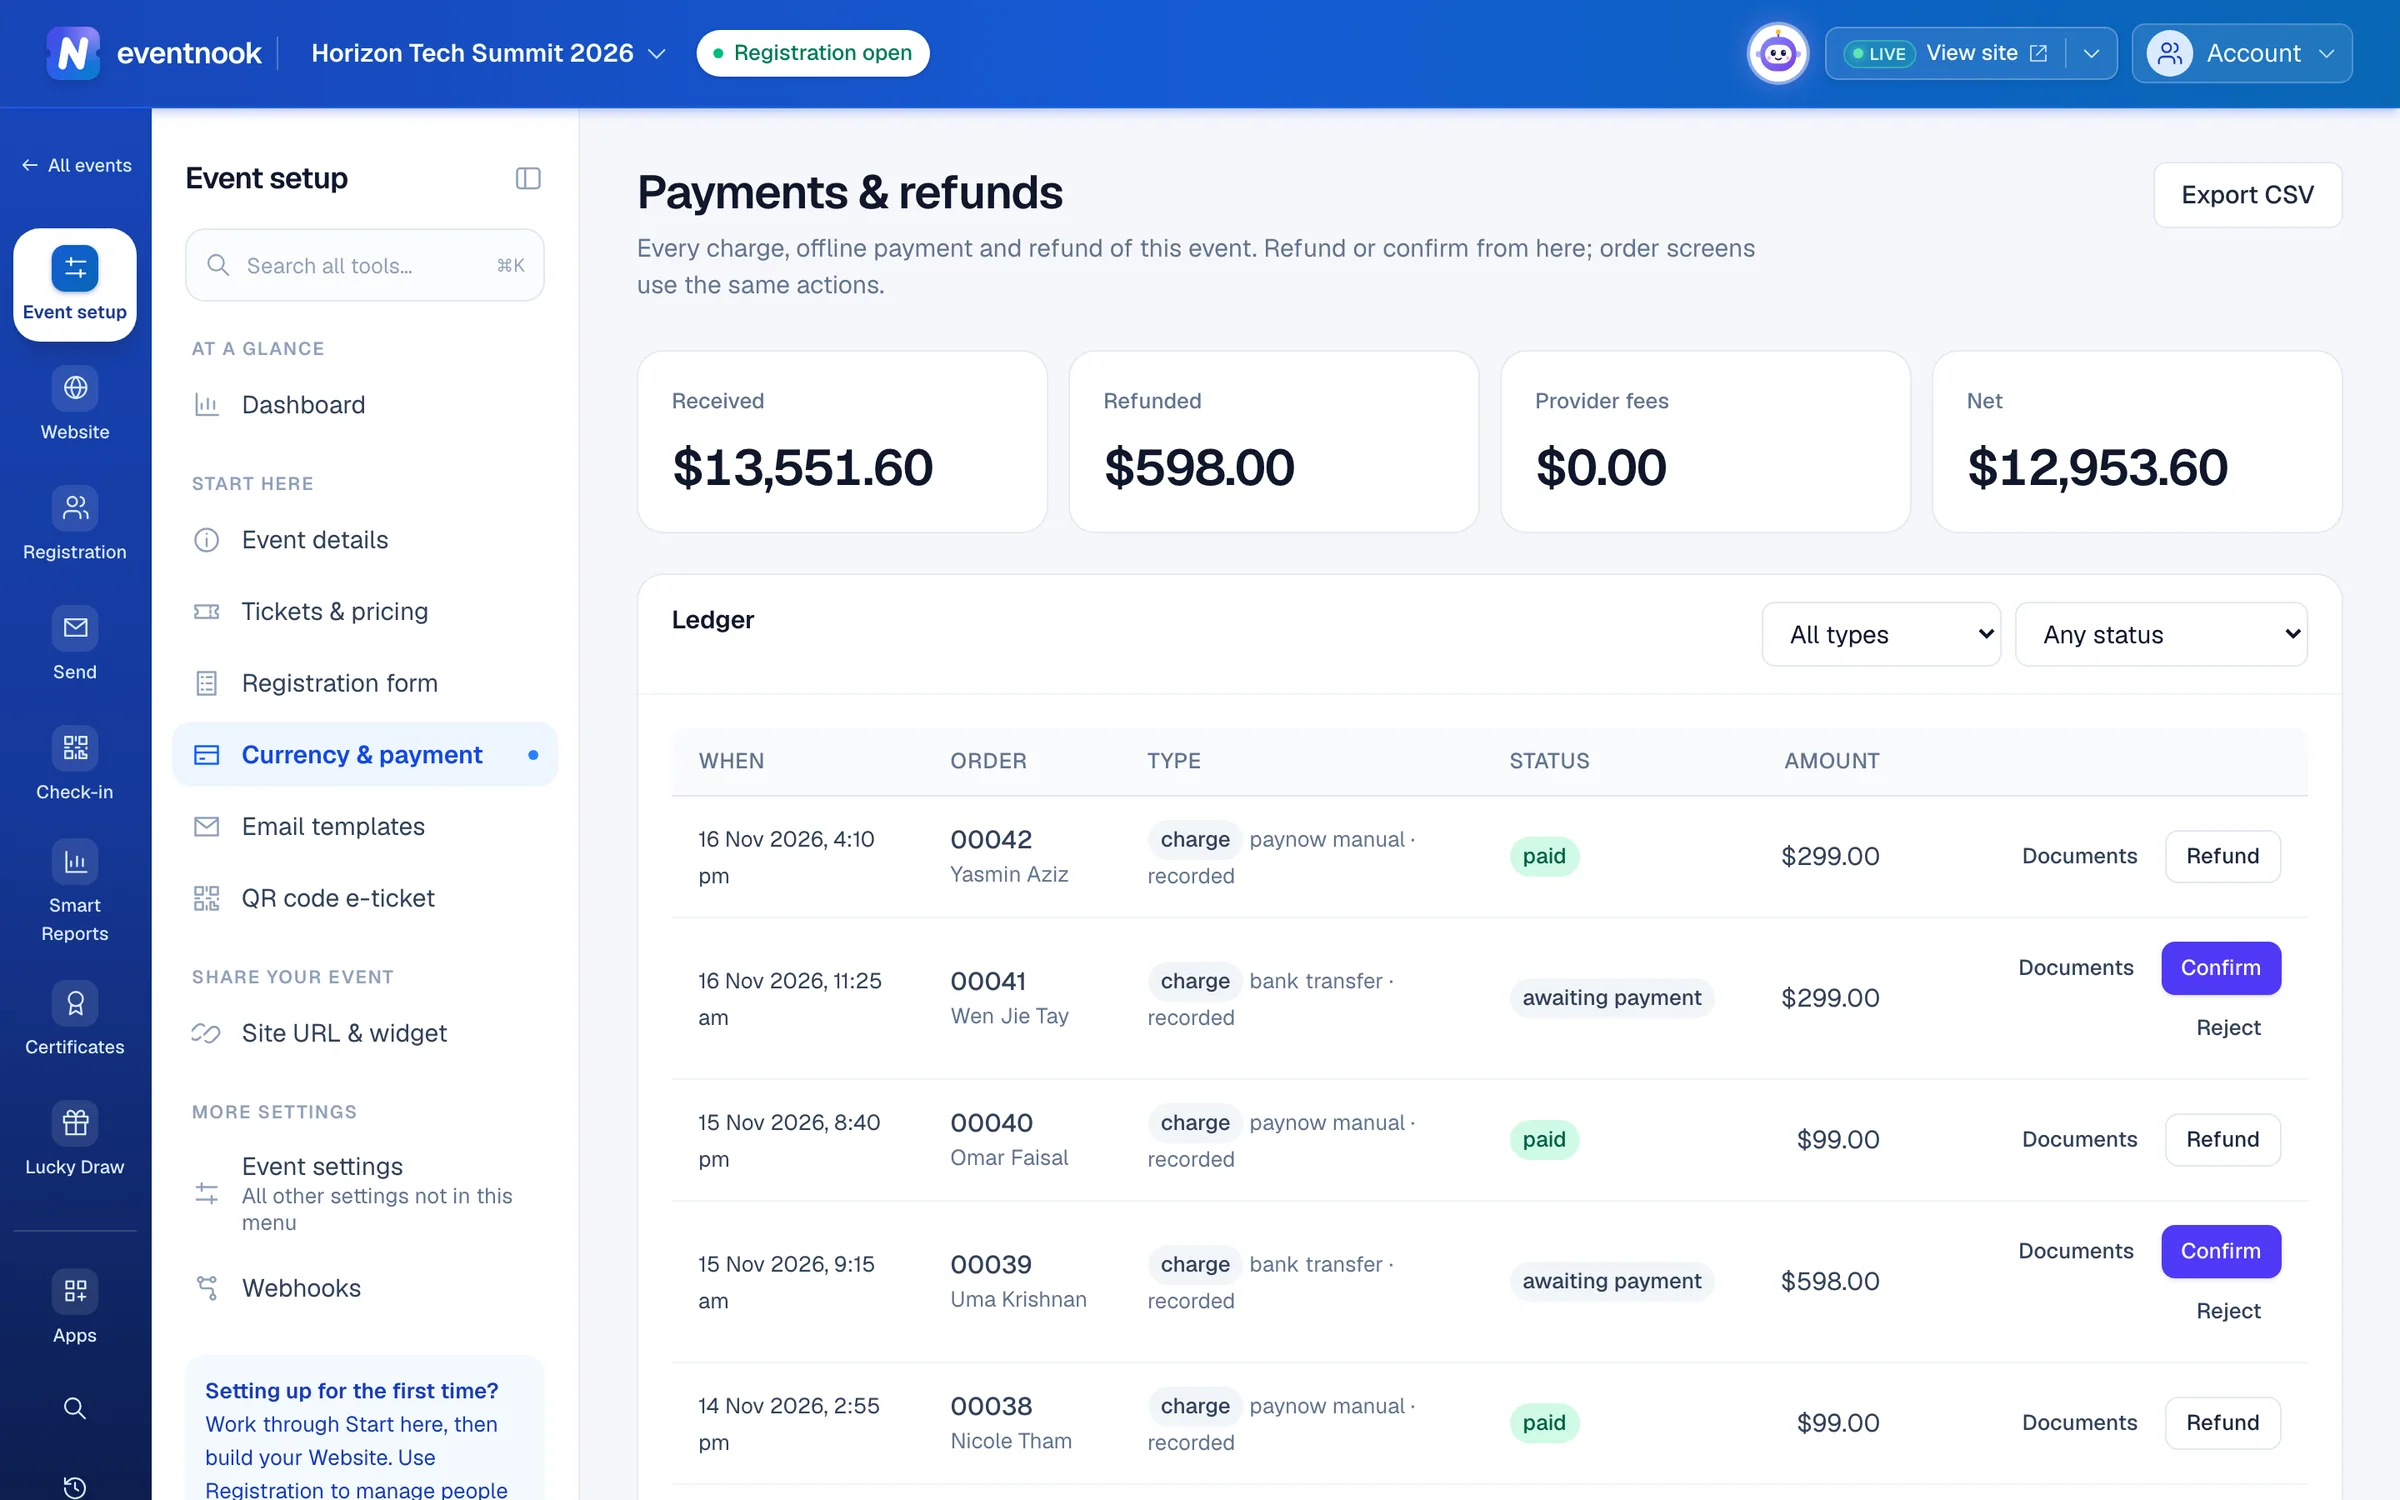
- 1Mark an offline payment as received
- 2Record a refund on a paid order
- 3Download every payment for your accounts
Refund an order#
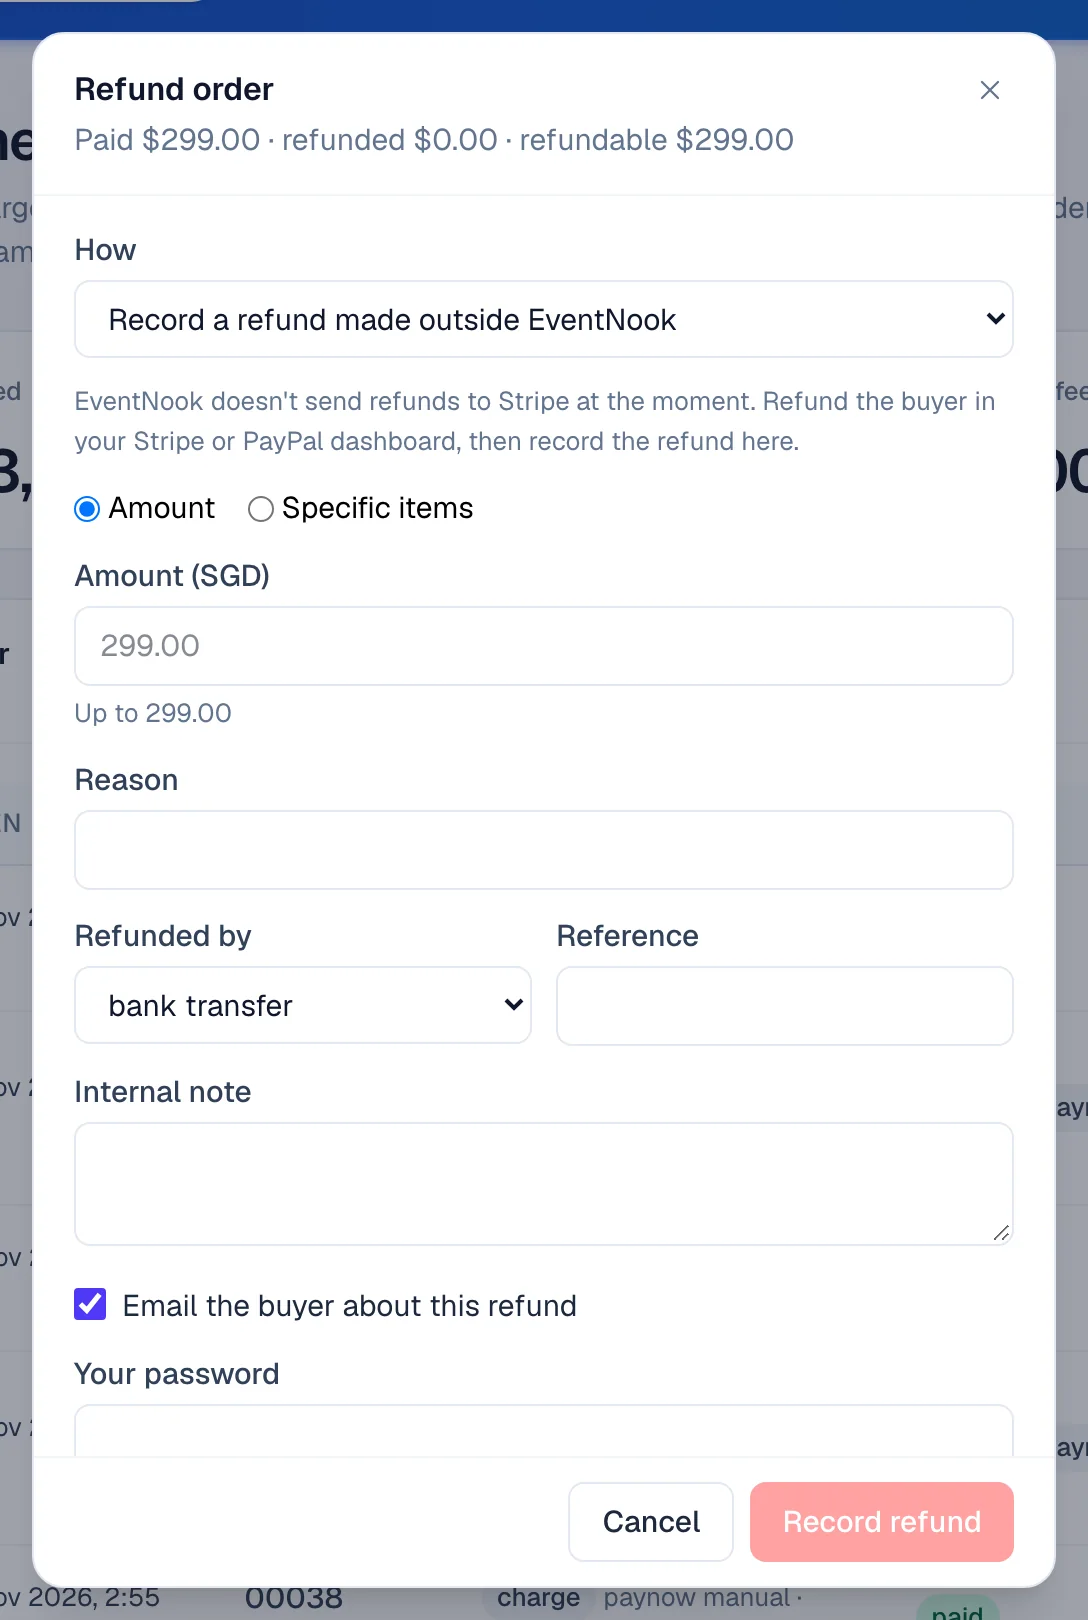
- On Payments & refunds, click Refund on the order's payment.
- Under How, choose how the refund is made. If it offers only Record a refund made outside EventNook, return the money first in your Stripe or PayPal dashboard or from your bank, then record it here.
- Choose Amount and type it, or Specific items and tick them.
- Type the Reason. For a recorded refund, choose Refunded by and add the Reference.
- Leave Email the buyer about this refund ticked to tell them.
- Type Your password and click Record refund.
You can also refund and confirm payments from the order itself; see Order details.
See and export every payment#
Payments & refunds shows Received, Refunded, Provider fees and Net at the top, then every charge and refund in the Ledger. Filter it by type and status. Click Documents on a row to see the order's invoice and receipt, and Export CSV to download the whole list.
Reconciliation lists anything EventNook and the payment provider may disagree about, such as a payment that has stayed pending. When it says Nothing needs attention, there is nothing to do.
If something looks wrong#
- Turning a method on opens its settings instead. Something it needs is missing. Complete the items listed at the top of the panel and click Save and turn on.
- A method shows Currency not supported. It doesn't work with the event's currency. Use another method.
- Card payments show Stripe account cannot charge. The Stripe account needs attention. An organisation Owner or Admin can finish it in Collect payments.
- "The currency is locked". Orders have already taken money, so the currency can't change.
- There is no Refund button on a payment. Only a successful charge on a paid or partly refunded order can be refunded, and refunding needs the right role (below).
- Reject is refused. Money was already received for the order. Refund it instead.
Who can do this#
Anyone with payment access can see these pages. An Event Editor can change a method's title and short description only. An Event Admin, or the organisation's Owner or Admin, can turn methods on and off, change their settings and payment instructions, change the currency, confirm or reject offline payments and refund orders. Choosing the Stripe or PayPal account needs the organisation's Owner or Admin.
Related guides
- Connect a payment accountConnect your organisation's Stripe or PayPal account so buyers' payments go straight to you, choose the default for new events, and see what you pay EventNook.
- Set up invoices, receipts and taxPut your billing details on invoices, receipts and credit notes, choose how they are numbered and how they look, and charge tax on the tickets you choose.
- Change your event's detailsEdit the event's name, dates, registration window, venue, organiser details and images, and switch it between a free and a paid event.
- Change, cancel or refund an orderOpen one order to see who bought, what they paid and who is attending, then edit it, resend its email, record a payment, cancel it or refund it.
Still stuck? In EventNook, ask HeyNook. It knows the page you're on and your event, and can take you straight to the right setting.